Product Information Guide
Page 5
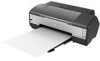
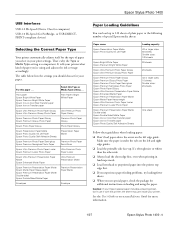
... left edge guide. or USB DIRECTPRINT-compliant devices) Selecting the Correct Paper Type Your printer automatically adjusts itself for more information. 1/07 Epson Stylus Photo 1400 - 5 See the User's Guide or on loading and using and adjusts the ink coverage accordingly. Epson Stylus Photo 1400 USB Interfaces USB 2.0 Hi-Speed (Device Class for computers) USB 2.0 Hi-Speed (for your...
... left edge guide. or USB DIRECTPRINT-compliant devices) Selecting the Correct Paper Type Your printer automatically adjusts itself for more information. 1/07 Epson Stylus Photo 1400 - 5 See the User's Guide or on loading and using and adjusts the ink coverage accordingly. Epson Stylus Photo 1400 USB Interfaces USB 2.0 Hi-Speed (Device Class for computers) USB 2.0 Hi-Speed (for your...
Product Information Guide
Page 7
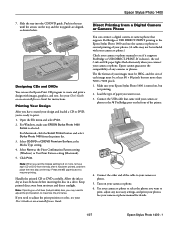
... menu and select Print. 2. For Windows, make sure EPSON Stylus Photo 1400 Series is turned on -screen Reference Guide for details. 1/07 Epson Stylus Photo 1400 - 7 Click Print. The file format of the cable to print, adjust any cameras or phones. Connect the other end of your photos. (A cable may need to print. 1. Push in a drive. Keep printed discs away from the printer list. 3. If you...
... menu and select Print. 2. For Windows, make sure EPSON Stylus Photo 1400 Series is turned on -screen Reference Guide for details. 1/07 Epson Stylus Photo 1400 - 7 Click Print. The file format of the cable to print, adjust any cameras or phones. Connect the other end of your photos. (A cable may need to print. 1. Push in a drive. Keep printed discs away from the printer list. 3. If you...
Product Information Guide
Page 8
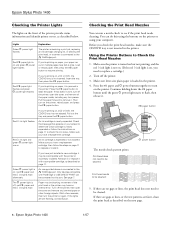
...that appears on your screen to be blocking movement of the printer provide status information and identify printer errors, as described on the next page. 8 - Make sure you have a replacement cartridge, then follow the instructions on page 11 to turn on the printer, reload paper, and ...An unsupported device is not inserted in the printer. Before you 're printing on paper, it with a compatible cartridge, as described on page 11. Epson Stylus Photo 1400 Checking the Printer Lights The lights on the front of the print head or the printer may have fed at once. Lights Explanation...
...that appears on your screen to be blocking movement of the printer provide status information and identify printer errors, as described on the next page. 8 - Make sure you have a replacement cartridge, then follow the instructions on page 11 to turn on the printer, reload paper, and ...An unsupported device is not inserted in the printer. Before you 're printing on paper, it with a compatible cartridge, as described on page 11. Epson Stylus Photo 1400 Checking the Printer Lights The lights on the front of the print head or the printer may have fed at once. Lights Explanation...
Product Information Guide
Page 9
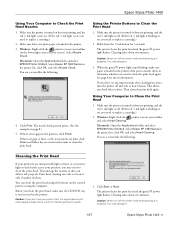
... clean it is flashing or on , you don't use your screen). Epson Stylus Photo 1400 Using Your Computer to Clean the Print Head 1. Windows: Right-click the printer icon on but not printing, and the red H ink light is off the printer while head cleaning is loaded in the printer list, click OK, and select Head Cleaning. Macintosh: Open the...
... clean it is flashing or on , you don't use your screen). Epson Stylus Photo 1400 Using Your Computer to Clean the Print Head 1. Windows: Right-click the printer icon on but not printing, and the red H ink light is off the printer while head cleaning is loaded in the printer list, click OK, and select Head Cleaning. Macintosh: Open the...
Product Information Guide
Page 10
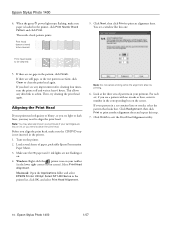
... patterns are low on the screen. Click Finish to clean the print head again. Click Next, then click Print to be cleaned: 5. If every pattern in the printer, click Print Nozzle Check Pattern and click Print. You see lines in the printer list, click OK, and select Print Head Alignment. Epson Stylus Photo 1400 1/07 Select SP 1400 Series in your printouts if...
... patterns are low on the screen. Click Finish to clean the print head again. Click Next, then click Print to be cleaned: 5. If every pattern in the printer, click Print Nozzle Check Pattern and click Print. You see lines in the printer list, click OK, and select Print Head Alignment. Epson Stylus Photo 1400 1/07 Select SP 1400 Series in your printouts if...
Product Information Guide
Page 11
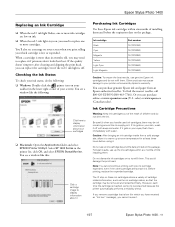
...them and before using it. If it gets in your screen). For best results, use up at www.epsonstore.com (U.S. sales) or www.epson.ca (Canadian sales). Caution: After bringing an ink cartridge inside from an Epson authorized reseller. If you remove a cartridge that the ... because the printer automatically performs a reliability check. Before printing, replace the expended cartridge. Checking the Ink Status To check your skin, wash it off . Do not use genuine Epson ink cartridges and do not drink the ink. Be careful when you cannot reuse it. 1/07 Epson Stylus Photo 1400 - 11...
...them and before using it. If it gets in your screen). For best results, use up at www.epsonstore.com (U.S. sales) or www.epson.ca (Canadian sales). Caution: After bringing an ink cartridge inside from an Epson authorized reseller. If you remove a cartridge that the ... because the printer automatically performs a reliability check. Before printing, replace the expended cartridge. Checking the Ink Status To check your skin, wash it off . Do not use genuine Epson ink cartridges and do not drink the ink. Be careful when you cannot reuse it. 1/07 Epson Stylus Photo 1400 - 11...
Product Information Guide
Page 14
...-22649 Epson Stylus Photo 1400 Start Here Epson Stylus Photo 1400 User's Guide Epson Stylus Photo 1400 CD-ROM with it on -screen Reference Guide 14 - Remove any paper from the cartridges. Turn off the printer. 2. Push in the original box using the protective materials that came with on . After transporting the printer, plug it in and turn it for transportation by packing the printer in print...
...-22649 Epson Stylus Photo 1400 Start Here Epson Stylus Photo 1400 User's Guide Epson Stylus Photo 1400 CD-ROM with it on -screen Reference Guide 14 - Remove any paper from the cartridges. Turn off the printer. 2. Push in the original box using the protective materials that came with on . After transporting the printer, plug it in and turn it for transportation by packing the printer in print...
Start Here
Page 5
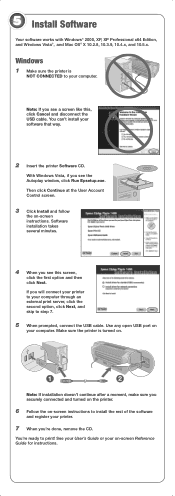
...: If installation doesn't continue after a moment, make sure you securely connected and turned on the printer. 6 Follow the on-screen instructions to your printer. 7 When you will connect your printer to your on -screen instructions. See your User's Guide or your computer through an external print server, click the second option, click Next, and skip to...
...: If installation doesn't continue after a moment, make sure you securely connected and turned on the printer. 6 Follow the on-screen instructions to your printer. 7 When you will connect your printer to your on -screen instructions. See your User's Guide or your computer through an external print server, click the second option, click Next, and skip to...
Start Here
Page 6
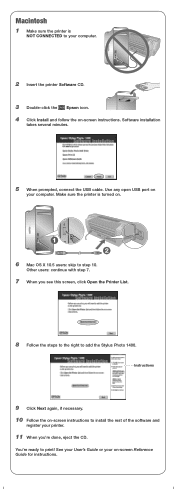
...register your computer. 2 Insert the printer Software CD. 3 Double-click the Epson icon. 4 Click Install and follow the on-screen instructions. You're ready to step 10. Macintosh 1 Make sure the printer is turned on. 1 2 6 Mac OS X 10.5 users: skip to print! See your User's Guide or ...screen Reference Guide for instructions. Other users: continue with step 7. 7 When you 're done, eject the CD. Use any open USB port on your on -screen instructions to your printer. 11 When you see this screen, click Open the Printer List. 8 Follow the steps to the right to add the Stylus Photo 1400...
...register your computer. 2 Insert the printer Software CD. 3 Double-click the Epson icon. 4 Click Install and follow the on-screen instructions. You're ready to step 10. Macintosh 1 Make sure the printer is turned on. 1 2 6 Mac OS X 10.5 users: skip to print! See your User's Guide or ...screen Reference Guide for instructions. Other users: continue with step 7. 7 When you 're done, eject the CD. Use any open USB port on your on -screen instructions to your printer. 11 When you see this screen, click Open the Printer List. 8 Follow the steps to the right to add the Stylus Photo 1400...
Start Here
Page 7
...printer software. • Carefully follow the installation instructions to printer information. On-screen help with your printer is turned on and the USB cable is securely connected at epson.com/support and select your other programs, including any screen... you turn off the printer, or it may apply. when you install ink cartridges, the printer must charge its print head for easy access ...Then call Epson for support, please have the following information ready: • Product name (Epson Stylus Photo 1400) • Product serial number (located on the back of the printer) •...
...printer software. • Carefully follow the installation instructions to printer information. On-screen help with your printer is turned on and the USB cable is securely connected at epson.com/support and select your other programs, including any screen... you turn off the printer, or it may apply. when you install ink cartridges, the printer must charge its print head for easy access ...Then call Epson for support, please have the following information ready: • Product name (Epson Stylus Photo 1400) • Product serial number (located on the back of the printer) •...

User's Guide
Page 8
... hints for it on -screen Reference Guide by double-clicking the icon for better printing. 8 Welcome About Your Documentation To set up your printer. Caution: Cautions must be observed to avoid damage to avoid bodily injury. This book contains instructions on loading paper, printing with Windows and Macintosh,® printing borderless photos, printing on CDs and DVDs...
... hints for it on -screen Reference Guide by double-clicking the icon for better printing. 8 Welcome About Your Documentation To set up your printer. Caution: Cautions must be observed to avoid damage to avoid bodily injury. This book contains instructions on loading paper, printing with Windows and Macintosh,® printing borderless photos, printing on CDs and DVDs...
User's Guide
Page 16
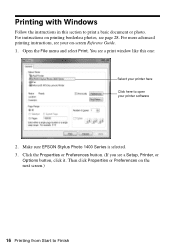
... Follow the instructions in this one: Select your printer here Click here to open your on printing borderless photos, see page 28. Make sure EPSON Stylus Photo 1400 Series is selected. 3. Then click Properties or Preferences on the next screen.) 16 Printing from Start to print a basic document or photo. You see a print window like this section to Finish Click the Properties...
... Follow the instructions in this one: Select your printer here Click here to open your on printing borderless photos, see page 28. Make sure EPSON Stylus Photo 1400 Series is selected. 3. Then click Properties or Preferences on the next screen.) 16 Printing from Start to print a basic document or photo. You see a print window like this section to Finish Click the Properties...

User's Guide
Page 19
... estimate of your print job. Click to pause or resume printing Click to cancel printing Click to cancel printing. Selecting Default Settings When you want to change the printer settings in the lower right corner of your screen (taskbar). 2. Right-click the printer icon in your individual programs, when necessary. Printing with Windows 19 During printing, the following window...
... estimate of your print job. Click to pause or resume printing Click to cancel printing Click to cancel printing. Selecting Default Settings When you want to change the printer settings in the lower right corner of your screen (taskbar). 2. Right-click the printer icon in your individual programs, when necessary. Printing with Windows 19 During printing, the following window...
User's Guide
Page 20
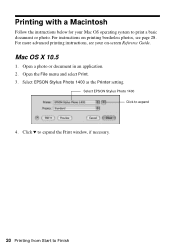
Open the File menu and select Print. 3. Mac OS X 10.5 1. Open a photo or document in an application. 2. For instructions on -screen Reference Guide. Select EPSON Stylus Photo 1400 as the Printer setting. Select EPSON Stylus Photo 1400 Click to Finish Click d to expand the Print window, if necessary. 20 Printing from Start to expand 4. For more advanced printing instructions, see page 28. Printing with a Macintosh Follow the instructions below for your on printing borderless photos, see your Mac OS operating system to print a basic document or photo.
Open the File menu and select Print. 3. Mac OS X 10.5 1. Open a photo or document in an application. 2. For instructions on -screen Reference Guide. Select EPSON Stylus Photo 1400 as the Printer setting. Select EPSON Stylus Photo 1400 Click to Finish Click d to expand the Print window, if necessary. 20 Printing from Start to expand 4. For more advanced printing instructions, see page 28. Printing with a Macintosh Follow the instructions below for your on printing borderless photos, see your Mac OS operating system to print a basic document or photo.

User's Guide
Page 22
Click Print. 22 Printing from the pop-up menu, then select the following print settings: Select your Media Type Select Color or Grayscale Select higher quality or faster printing (if available) Click Print 7. See the on-screen Reference Guide for details. 8. 6. Choose any other printing options you may need from Start to Finish Choose Print Settings from the pop-up menu.
Click Print. 22 Printing from the pop-up menu, then select the following print settings: Select your Media Type Select Color or Grayscale Select higher quality or faster printing (if available) Click Print 7. See the on-screen Reference Guide for details. 8. 6. Choose any other printing options you may need from Start to Finish Choose Print Settings from the pop-up menu.

User's Guide
Page 29
...,® you can select a photo on your system and click Print. Print icon Printing Borderless Photos 29 To select the rest of the screen and select Printer Properties. Then select your printer, paper size, and type on your print options, click Options at the bottom of your computer. 2. Paper name Epson Ultra Premium Presentation Paper Matte Epson Premium Presentation Paper Matte...
...,® you can select a photo on your system and click Print. Print icon Printing Borderless Photos 29 To select the rest of the screen and select Printer Properties. Then select your printer, paper size, and type on your print options, click Options at the bottom of your computer. 2. Paper name Epson Ultra Premium Presentation Paper Matte Epson Premium Presentation Paper Matte...

User's Guide
Page 30
Click Next. Select the photo(s) you want to Finish Click the Print icon at the bottom of the screen. 4. You see a Picture Selection window: 5. 3. You see the Printing Options window: Select EPSON Stylus Photo 1400 Series Click Printing Preferences 30 Printing from Start to print and click Next.
Click Next. Select the photo(s) you want to Finish Click the Print icon at the bottom of the screen. 4. You see a Picture Selection window: 5. 3. You see the Printing Options window: Select EPSON Stylus Photo 1400 Series Click Printing Preferences 30 Printing from Start to print and click Next.

User's Guide
Page 32
...list of image expansion necessary for pop-up menu. Click OK. You see a Layout Selection window: Full page photo print 14. Select Stylus Photo 1400 from Start to Finish Select portrait or landscape as the Orientation setting. In OS X 10.3 and 10.4, ...open the File menu and select Page Setup. Note: If you want to adjust the amount of supported borderless sizes on -screen instructions. 13. Click Next. Open the photo you need to print in a printing...
...list of image expansion necessary for pop-up menu. Click OK. You see a Layout Selection window: Full page photo print 14. Select Stylus Photo 1400 from Start to Finish Select portrait or landscape as the Orientation setting. In OS X 10.3 and 10.4, ...open the File menu and select Page Setup. Note: If you want to adjust the amount of supported borderless sizes on -screen instructions. 13. Click Next. Open the photo you need to print in a printing...

User's Guide
Page 37
... following: ■ To select one of the background images provided with Epson Print CD, click the Background tab, select the image, and click OK. ■ To select one of all the files in the folder. You see a different screen. You see a window like this: Note: If you have already...the File tab, click Browse to create and print a disc design with images, graphics, and text. Designing a CD/DVD with Windows 1. Printing on your desktop. 2. Select your image and click OK. Designing and Printing a CD/DVD with Windows You can use Epson Print CD to locate your image folder, then click...
... following: ■ To select one of the background images provided with Epson Print CD, click the Background tab, select the image, and click OK. ■ To select one of all the files in the folder. You see a different screen. You see a window like this: Note: If you have already...the File tab, click Browse to create and print a disc design with images, graphics, and text. Designing a CD/DVD with Windows 1. Printing on your desktop. 2. Select your image and click OK. Designing and Printing a CD/DVD with Windows You can use Epson Print CD to locate your image folder, then click...
User's Guide
Page 40
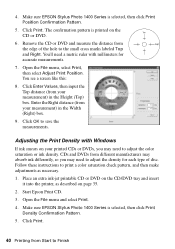
... You see a screen like this: 8. Start Epson Print CD. 3. Click Print. 40 Printing from the edge of disc. Open the File menu and select Print. 4. Click Print. The confirmation pattern is selected, then click Print Density Confirmation Pattern....color saturation or ink density. Click Enter Values, then input the Top distance (from different manufacturers may absorb ink differently, so you may need a metric ruler with Windows If ink smears on your printed CDs or DVDs, you may need to save the measurements. Make sure EPSON Stylus Photo 1400 Series is printed...
... You see a screen like this: 8. Start Epson Print CD. 3. Click Print. 40 Printing from the edge of disc. Open the File menu and select Print. 4. Click Print. The confirmation pattern is selected, then click Print Density Confirmation Pattern....color saturation or ink density. Click Enter Values, then input the Top distance (from different manufacturers may absorb ink differently, so you may need a metric ruler with Windows If ink smears on your printed CDs or DVDs, you may need to save the measurements. Make sure EPSON Stylus Photo 1400 Series is printed...


