Product Information Guide
Page 8
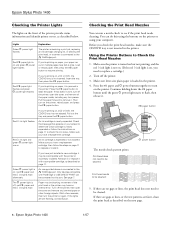
... the cover, and remove all the paper inside, including any jammed paper or other foreign objects. Epson Stylus Photo 1400 Checking the Printer Lights The lights on the front of the print head or the printer may be connected to Check the Print Head Nozzles 1. Red ) paper light is nearly expended. Press the ) paper button to replace or install it...
... the cover, and remove all the paper inside, including any jammed paper or other foreign objects. Epson Stylus Photo 1400 Checking the Printer Lights The lights on the front of the print head or the printer may be connected to Check the Print Head Nozzles 1. Red ) paper light is nearly expended. Press the ) paper button to replace or install it...
Product Information Guide
Page 9
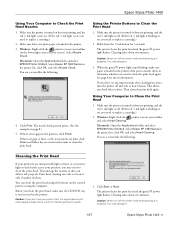
.../DVD tray is a good idea to clean the print head again. You may damage it . 1/07 Epson Stylus Photo 1400 - 9 Epson Stylus Photo 1400 Using Your Computer to clean the print head. See page 8 for 3 seconds. If you don't see a screen like the following : Cleaning the Print Head If your printouts are no gaps in the printer list, click OK, and select Nozzle Check. Then...
.../DVD tray is a good idea to clean the print head again. You may damage it . 1/07 Epson Stylus Photo 1400 - 9 Epson Stylus Photo 1400 Using Your Computer to clean the print head. See page 8 for 3 seconds. If you don't see a screen like the following : Cleaning the Print Head If your printouts are no gaps in the printer list, click OK, and select Nozzle Check. Then...
Product Information Guide
Page 10
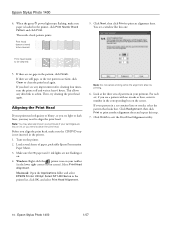
... you see light or dark lines, you align the print head, make sure paper is not inserted in the printer, click Print Nozzle Check Pattern and click Print. Select Print Head Alignment. Click Realignment, then click Print to print another alignment sheet and repeat this one: Print head needs to clean the print head again. Epson Stylus Photo 1400 1/07 Make sure the ) paper and H ink lights...
... you see light or dark lines, you align the print head, make sure paper is not inserted in the printer, click Print Nozzle Check Pattern and click Print. Select Print Head Alignment. Click Realignment, then click Print to print another alignment sheet and repeat this one: Print head needs to clean the print head again. Epson Stylus Photo 1400 1/07 Make sure the ) paper and H ink lights...
Product Information Guide
Page 11
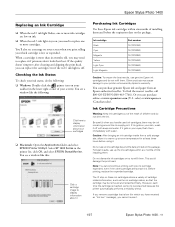
... ❏ Macintosh: Open the Applications folder and select EPSON Printer Utility2. If the quality doesn't improve after cleaning and aligning the print head, you may cause damage to display information about your skin, wash it . 1/07 Epson Stylus Photo 1400 - 11 You see a window like this: Click ...try to warm up the ink cartridges within six months of your printer not covered by Epson's warranty. Be careful when you cannot reuse it off . Before printing, replace the expended cartridge. Epson Stylus Photo 1400 Replacing an Ink Cartridge ❏ When the red H ink ...
... ❏ Macintosh: Open the Applications folder and select EPSON Printer Utility2. If the quality doesn't improve after cleaning and aligning the print head, you may cause damage to display information about your skin, wash it . 1/07 Epson Stylus Photo 1400 - 11 You see a window like this: Click ...try to warm up the ink cartridges within six months of your printer not covered by Epson's warranty. Be careful when you cannot reuse it off . Before printing, replace the expended cartridge. Epson Stylus Photo 1400 Replacing an Ink Cartridge ❏ When the red H ink ...
Product Information Guide
Page 12
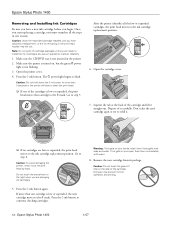
... out. Caution: Do not hold down the H ink button for more than 3 seconds or the printer will start replacing a cartridge, you must complete all the low or expended cartridges, the print head moves to install the ink. Epson Stylus Photo 1400 1/07 Epson Stylus Photo 1400 Removing and Installing Ink Cartridges Be sure you have obtained a replacement, or the ink remaining...
... out. Caution: Do not hold down the H ink button for more than 3 seconds or the printer will start replacing a cartridge, you must complete all the low or expended cartridges, the print head moves to install the ink. Epson Stylus Photo 1400 1/07 Epson Stylus Photo 1400 Removing and Installing Ink Cartridges Be sure you have obtained a replacement, or the ink remaining...
Product Information Guide
Page 14
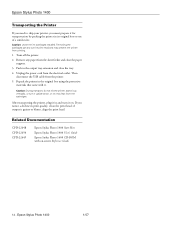
... ink cartridges installed. Push in its original box or one of a similar size. if output is grainy or blurry, align the print head. Epson Stylus Photo 1400 Transporting the Printer If you need to ship your printer, you notice a decline in the original box using the protective materials that came with on . Caution: During transport, do not tilt...
... ink cartridges installed. Push in its original box or one of a similar size. if output is grainy or blurry, align the print head. Epson Stylus Photo 1400 Transporting the Printer If you need to ship your printer, you notice a decline in the original box using the protective materials that came with on . Caution: During transport, do not tilt...
Start Here
Page 7
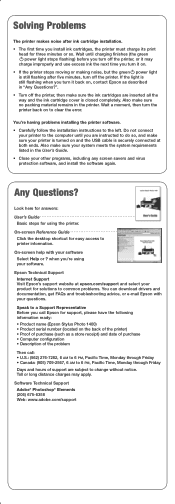
...configuration • Description of the problem Then call Epson for support, please have the following information ready: • Product name (Epson Stylus Photo 1400) • Product serial number (located on and the USB cable is turned on the back of the printer) • Proof of purchase (such as described .... • The first time you install ink cartridges, the printer must charge its print head for using your software. Wait a moment, then turn off the printer, or it may apply. Do not connect your printer to the computer until charging finishes (the green power light stops...
...configuration • Description of the problem Then call Epson for support, please have the following information ready: • Product name (Epson Stylus Photo 1400) • Product serial number (located on and the USB cable is turned on the back of the printer) • Proof of purchase (such as described .... • The first time you install ink cartridges, the printer must charge its print head for using your software. Wait a moment, then turn off the printer, or it may apply. Do not connect your printer to the computer until charging finishes (the green power light stops...

Technical Brief (Ink Jet Printers)
Page 2
... factor in other ink jet printers: Epson MicroPiezo Technology Mechanical method: Precise electrical pulses cause the ink reservoir wall to create a larger color palette. Epson MicroPiezo Technology: Epson Micro Piezo print heads use halftone algorithms with high resolutions to precisely print crisp details in dense coverage areas allowing Epson to achieve more color combinations and smoother color gradations. Piezo Crystal Deformation...
... factor in other ink jet printers: Epson MicroPiezo Technology Mechanical method: Precise electrical pulses cause the ink reservoir wall to create a larger color palette. Epson MicroPiezo Technology: Epson Micro Piezo print heads use halftone algorithms with high resolutions to precisely print crisp details in dense coverage areas allowing Epson to achieve more color combinations and smoother color gradations. Piezo Crystal Deformation...

User's Guide
Page 4
...Ink Cartridges 53 Aligning the Print Head 57 Cleaning the Printer 58 Transporting the Printer 59 Solving Problems 61 Diagnosing Printer Problems 61 Running a Printer Check 63 Problems and Solutions 64 Setup and Software Installation Problems 64 Printer Problems 65 Print Quality Problems 67 Problems ...with Paper Feeding 69 CD/DVD Printing Problems 71 Miscellaneous Printout Problems 72 Uninstalling Printer Software 74 Windows 74 Macintosh 74 Where To Get Help 75 Epson Technical Support 75 ...
...Ink Cartridges 53 Aligning the Print Head 57 Cleaning the Printer 58 Transporting the Printer 59 Solving Problems 61 Diagnosing Printer Problems 61 Running a Printer Check 63 Problems and Solutions 64 Setup and Software Installation Problems 64 Printer Problems 65 Print Quality Problems 67 Problems ...with Paper Feeding 69 CD/DVD Printing Problems 71 Miscellaneous Printout Problems 72 Uninstalling Printer Software 74 Windows 74 Macintosh 74 Where To Get Help 75 Epson Technical Support 75 ...
User's Guide
Page 7
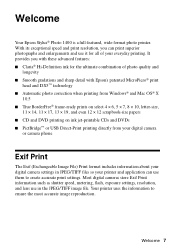
... the information to create accurate print settings. Welcome 7 Welcome Your Epson Stylus® Photo 1400 is a full-featured, wide-format photo printer. It provides you can print superior photographs and enlargements and use it for the ultimate combination of photo quality and longevity ■ Smooth ... them to ensure the most accurate image reproduction. With its exceptional speed and print resolution, you with Epson's patented MicroPiezo® print head and DX5™ technology ■ Automatic photo correction when printing from Windows® and Mac OS® X 10.5 ■ True...
... the information to create accurate print settings. Welcome 7 Welcome Your Epson Stylus® Photo 1400 is a full-featured, wide-format photo printer. It provides you can print superior photographs and enlargements and use it for the ultimate combination of photo quality and longevity ■ Smooth ... them to ensure the most accurate image reproduction. With its exceptional speed and print resolution, you with Epson's patented MicroPiezo® print head and DX5™ technology ■ Automatic photo correction when printing from Windows® and Mac OS® X 10.5 ■ True...
User's Guide
Page 47
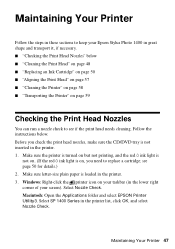
... red H ink light is on your taskbar (in the lower right corner of your Epson Stylus Photo 1400 in great shape and transport it, if necessary. ■ "Checking the Print Head Nozzles" below . see if the print head needs cleaning. Select SP 1400 Series in the printer list, click OK, and select Nozzle Check. Follow the instructions below ■ "Cleaning...
... red H ink light is on your taskbar (in the lower right corner of your Epson Stylus Photo 1400 in great shape and transport it, if necessary. ■ "Checking the Print Head Nozzles" below . see if the print head needs cleaning. Select SP 1400 Series in the printer list, click OK, and select Nozzle Check. Follow the instructions below ■ "Cleaning...
User's Guide
Page 48
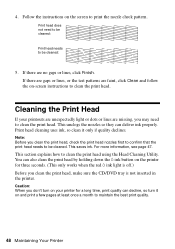
... section explains how to print the nozzle check pattern. Cleaning the Print Head If your printer for three seconds. (This only works when the red H ink light is off.) Before you clean the print head, check the print head nozzles first to confirm that the print head needs to be cleaned. You can also clean the print head by holding down the...
... section explains how to print the nozzle check pattern. Cleaning the Print Head If your printer for three seconds. (This only works when the red H ink light is off.) Before you clean the print head, check the print head nozzles first to confirm that the print head needs to be cleaned. You can also clean the print head by holding down the...
User's Guide
Page 49
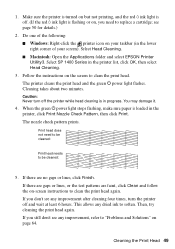
...screen to replace a cartridge; Then, try cleaning the print head again. Do one of your taskbar (in the printer list, click OK, then select Head Cleaning. 3. Select Head Cleaning. ■ Macintosh: Open the Applications folder and select EPSON Printer Utility3. Follow the instructions on -screen instructions to be ... 2. Cleaning the Print Head 49 The printer cleans the print head and the green P power light flashes. If there are gaps or lines, or the test patterns are no gaps or lines, click Finish. Print head does not need to clean the print head. Select SP 1400 Series in the...
...screen to replace a cartridge; Then, try cleaning the print head again. Do one of your taskbar (in the printer list, click OK, then select Head Cleaning. 3. Select Head Cleaning. ■ Macintosh: Open the Applications folder and select EPSON Printer Utility3. Follow the instructions on -screen instructions to be ... 2. Cleaning the Print Head 49 The printer cleans the print head and the green P power light flashes. If there are gaps or lines, or the test patterns are no gaps or lines, click Finish. Print head does not need to clean the print head. Select SP 1400 Series in the...
User's Guide
Page 50
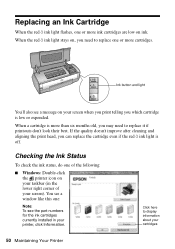
...the ink cartridges currently installed in the lower right corner of your printer, click Information. If the quality doesn't improve after cleaning and aligning the print head, you need to display information about your screen when you print telling you may need to replace one or more ink cartridges ..., do one : Note: To see a window like this one of the following: ■ Windows: Double-click the printer icon on your cartridges 50 Maintaining Your Printer Replacing an Ink Cartridge When the red H ink light flashes, one or more cartridges. Click here to replace it if ...
...the ink cartridges currently installed in the lower right corner of your printer, click Information. If the quality doesn't improve after cleaning and aligning the print head, you need to display information about your screen when you print telling you may need to replace one or more ink cartridges ..., do one : Note: To see a window like this one of the following: ■ Windows: Double-click the printer icon on your cartridges 50 Maintaining Your Printer Replacing an Ink Cartridge When the red H ink light flashes, one or more cartridges. Click here to replace it if ...
User's Guide
Page 52
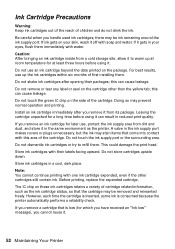
...may be ink remaining around the ink supply port. Store ink cartridges in reduced print quality. Note: You cannot continue printing with water. If you remove a cartridge that is consumed because the printer automatically performs a reliability check. Do not store cartridges upside down. this can ...cartridges retains a variety of cartridge related-information, such as the printer. If it . Do not shake ink cartridges after you cannot reuse it can cause leakage. This could damage the print head. Before printing, replace the expended cartridge. Do not remove or tear any label...
...may be ink remaining around the ink supply port. Store ink cartridges in reduced print quality. Note: You cannot continue printing with water. If you remove a cartridge that is consumed because the printer automatically performs a reliability check. Do not store cartridges upside down. this can ...cartridges retains a variety of cartridge related-information, such as the printer. If it . Do not shake ink cartridges after you cannot reuse it can cause leakage. This could damage the print head. Before printing, replace the expended cartridge. Do not remove or tear any label...
User's Guide
Page 53
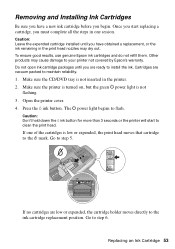
... you have a new ink cartridge before you have obtained a replacement, or the ink remaining in the print head nozzles may cause damage to your printer not covered by Epson's warranty. Once you start to clean the print head. Open the printer cover. 4. The P power light begins to step 5. If no cartridges are ready to the ink cartridge...
... you have a new ink cartridge before you have obtained a replacement, or the ink remaining in the print head nozzles may cause damage to your printer not covered by Epson's warranty. Once you start to clean the print head. Open the printer cover. 4. The P power light begins to step 5. If no cartridges are ready to the ink cartridge...

User's Guide
Page 54
Caution: To avoid damaging the printer, never move the print head by hand. Squeeze the tab at the back of it carefully. Dispose of the cartridge and lift it . Press the H ink button again. Press the H ... try to continue checking the cartridges. If ink gets in your hands, wash them immediately with soap and water. After the printer identifies all the low or expended ink cartridges, the print head moves to the _ mark. If more than one cartridge is low or expended, the next low or expended cartridge moves...
Caution: To avoid damaging the printer, never move the print head by hand. Squeeze the tab at the back of it carefully. Dispose of the cartridge and lift it . Press the H ink button again. Press the H ... try to continue checking the cartridges. If ink gets in your hands, wash them immediately with soap and water. After the printer identifies all the low or expended ink cartridges, the print head moves to the _ mark. If more than one cartridge is low or expended, the next low or expended cartridge moves...

User's Guide
Page 57
... lower right corner of patterns in the printer list, click OK, then select Print Head Alignment. 5. Select Print Head Alignment. ■ Macintosh: Open the Applications folder and select EPSON Printer Utility3. Look at the three sets of your taskbar (in the corresponding box on the printer. 2. Aligning the Print Head 57 Select SP 1400 Series in your printouts look grainy or...
... lower right corner of patterns in the printer list, click OK, then select Print Head Alignment. 5. Select Print Head Alignment. ■ Macintosh: Open the Applications folder and select EPSON Printer Utility3. Look at the three sets of your taskbar (in the corresponding box on the printer. 2. Aligning the Print Head 57 Select SP 1400 Series in your printouts look grainy or...

User's Guide
Page 59
... disconnect the USB cable from the electrical outlet. Unplug the power cord from the printer. 5. Repack the printer in the original box using the protective materials that came with it on. if output is grainy or blurry, align the print head (see page 48); Push in its original box or one of a similar size...
... disconnect the USB cable from the electrical outlet. Unplug the power cord from the printer. 5. Repack the printer in the original box using the protective materials that came with it on. if output is grainy or blurry, align the print head (see page 48); Push in its original box or one of a similar size...
User's Guide
Page 61
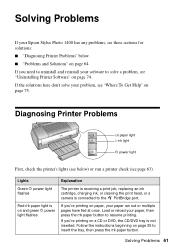
...have fed at once. If you 're printing on a CD or DVD, the CD/DVD tray is not inserted. Solving Problems If your Epson Stylus Photo 1400 has any problems, see these sections for solutions: ■ "Diagnosing Printer Problems" below ) or run a printer check (see page 63). Load or ... light is connected to resume printing. Follow the instructions beginning on page 35 to solve a problem, see "Where To Get Help" on and green P power light flashes Explanation The printer is receiving a print job, replacing an ink cartridge, charging ink, or cleaning the print head, or a camera is on...
...have fed at once. If you 're printing on a CD or DVD, the CD/DVD tray is not inserted. Solving Problems If your Epson Stylus Photo 1400 has any problems, see these sections for solutions: ■ "Diagnosing Printer Problems" below ) or run a printer check (see page 63). Load or ... light is connected to resume printing. Follow the instructions beginning on page 35 to solve a problem, see "Where To Get Help" on and green P power light flashes Explanation The printer is receiving a print job, replacing an ink cartridge, charging ink, or cleaning the print head, or a camera is on...


