User Manual (English)
Page 2
....book Page ii Tuesday, April 28, 2009 4:43 PM ii Dynex DX-LDVD19-10A 19" LCD TV/DVD Combo Contents Important safety instructions 2 Warnings 2 Cautions 2 Installing the stand 3 Removing the stand 3 Removing the stand 4 Installing a wall-mount bracket 4 TV components 4 Front and side panels 4 Back 4 Remote control 5 Using... 11 Adjusting the volume 12 Adjusting basic settings 12 Displaying additional information 12 Adjusting the picture 12 Adjusting the TV picture 12 Adjusting the computer image 13 Adjusting the sound 13 Adjusting the sound 13 Changing channel settings 14 ...
....book Page ii Tuesday, April 28, 2009 4:43 PM ii Dynex DX-LDVD19-10A 19" LCD TV/DVD Combo Contents Important safety instructions 2 Warnings 2 Cautions 2 Installing the stand 3 Removing the stand 3 Removing the stand 4 Installing a wall-mount bracket 4 TV components 4 Front and side panels 4 Back 4 Remote control 5 Using... 11 Adjusting the volume 12 Adjusting basic settings 12 Displaying additional information 12 Adjusting the picture 12 Adjusting the TV picture 12 Adjusting the computer image 13 Adjusting the sound 13 Adjusting the sound 13 Changing channel settings 14 ...
User Manual (English)
Page 5
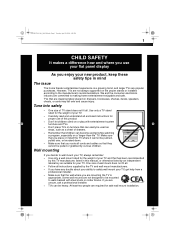
... from a professional installer. • Make sure that has been recommended by this TV manufacturer, listed in mind The issue The home theater entertainment experience is appropriate. However, TVs are not designed to be heavy. DX-LDVD19-10A_09-0340.book Page 1 Tuesday, April 28, 2009 4:43 PM 1 CHILD ...SAFETY It makes a difference how and where you use your flat panel display As you enjoy your TV. • Carefully read and...
... from a professional installer. • Make sure that has been recommended by this TV manufacturer, listed in mind The issue The home theater entertainment experience is appropriate. However, TVs are not designed to be heavy. DX-LDVD19-10A_09-0340.book Page 1 Tuesday, April 28, 2009 4:43 PM 1 CHILD ...SAFETY It makes a difference how and where you use your flat panel display As you enjoy your TV. • Carefully read and...
User Manual (English)
Page 6
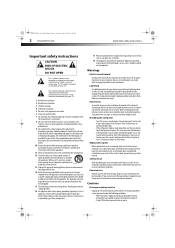
...the panel. Handling the LCD panel • Your TV's screen is a Class I television to a grounding-type, three-prong outlet. 17 Remote control batteries should be taken to prevent possible electric shock. DX-LDVD19-10A_09-0340.book Page 2 Tuesday, April 28, 2009 4:43 PM 2 DX-LDVD19-10A Important safety instructions Important... make absolutely sure that you connect the Class I apparatus, which needs to be careful of broken glass. • If the LCD panel is left unattended and unused for long periods of time, unplug it can fall into your outlet, consult an electrician for ...
...the panel. Handling the LCD panel • Your TV's screen is a Class I television to a grounding-type, three-prong outlet. 17 Remote control batteries should be taken to prevent possible electric shock. DX-LDVD19-10A_09-0340.book Page 2 Tuesday, April 28, 2009 4:43 PM 2 DX-LDVD19-10A Important safety instructions Important... make absolutely sure that you connect the Class I apparatus, which needs to be careful of broken glass. • If the LCD panel is left unattended and unused for long periods of time, unplug it can fall into your outlet, consult an electrician for ...
User Manual (English)
Page 7
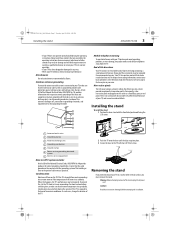
...DX-LDVD19-10A... When your TV exhibits a distinct...TV stand in performance. End of life directives Your TV... operation. • If your TV has been dropped or damaged in...TV's performance may result in your TV does not operate normally by a qualified technician to restore your TV...TV picture and sound, operating problems, or even damage, keep your TV on the TV if the TV...TV with the Front label positioned facing the LCD...TV, make sure that the room temperature rises gradually. When this installation. Your TV...breeze from the TV. Screws Screws...TV is connected to the grounding system of the...
...DX-LDVD19-10A... When your TV exhibits a distinct...TV stand in performance. End of life directives Your TV... operation. • If your TV has been dropped or damaged in...TV's performance may result in your TV does not operate normally by a qualified technician to restore your TV...TV picture and sound, operating problems, or even damage, keep your TV on the TV if the TV...TV with the Front label positioned facing the LCD...TV, make sure that the room temperature rises gradually. When this installation. Your TV...breeze from the TV. Screws Screws...TV is connected to the grounding system of the...
User Manual (English)
Page 8
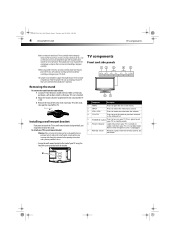
... MENU INPUT VOL+ VOL- Press to a professional installer or service personnel. DX-LDVD19-10A_09-0340.book Page 4 Tuesday, April 28, 2009 4:43 PM 4 DX-LDVD19-10A TV components Make sure that you want to attach the TV to the stand, then pull the stand off the TV. If you should first remove the stand. POWER # Component Description 1 MENU...
... MENU INPUT VOL+ VOL- Press to a professional installer or service personnel. DX-LDVD19-10A_09-0340.book Page 4 Tuesday, April 28, 2009 4:43 PM 4 DX-LDVD19-10A TV components Make sure that you want to attach the TV to the stand, then pull the stand off the TV. If you should first remove the stand. POWER # Component Description 1 MENU...
User Manual (English)
Page 9
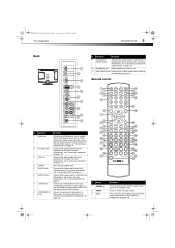
... GUIDE 789 RECALL CH+ MUTE VOL - Connect the video output from an AV device to this jack. DX-LDVD19-10A_09-0340.book Page 5 Tuesday, April 28, 2009 4:43 PM TV components DX-LDVD19-10A 5 Back PC AUDIO IN HDMI ## Component Description 9 (Component) AUDIO IN jacks Connect the audio output... (L and R) from a component device to turn on your TV. For more information, see "Connecting a computer" on page...
... GUIDE 789 RECALL CH+ MUTE VOL - Connect the video output from an AV device to this jack. DX-LDVD19-10A_09-0340.book Page 5 Tuesday, April 28, 2009 4:43 PM TV components DX-LDVD19-10A 5 Back PC AUDIO IN HDMI ## Component Description 9 (Component) AUDIO IN jacks Connect the audio output... (L and R) from a component device to turn on your TV. For more information, see "Connecting a computer" on page...
User Manual (English)
Page 10
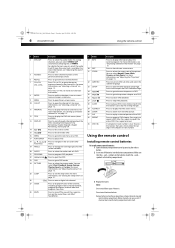
...sub-channel. 27 GUIDE 28 MUTE Press to open the channel list. For more information, see "Adjusting the TV picture" on a DVD. 17 PLAY/ENTER 18 , , , and Arrow keys 19 ANGLE Press to display the favorite channel list. Press to cancel. Each time this button is over 10,..., channel label and program show time. Press to stop DVD playback. Press again to select the audio mode. DX-LDVD19-10A_09-0340.book Page 6 Tuesday, April 28, 2009 4:43 PM 6 DX-LDVD19-10A Using the remote control # Button Description 4 MTS/SAP Press to repeat a DVD title. For more than one...
...sub-channel. 27 GUIDE 28 MUTE Press to open the channel list. For more information, see "Adjusting the TV picture" on a DVD. 17 PLAY/ENTER 18 , , , and Arrow keys 19 ANGLE Press to display the favorite channel list. Press to cancel. Each time this button is over 10,..., channel label and program show time. Press to stop DVD playback. Press again to select the audio mode. DX-LDVD19-10A_09-0340.book Page 6 Tuesday, April 28, 2009 4:43 PM 6 DX-LDVD19-10A Using the remote control # Button Description 4 MTS/SAP Press to repeat a DVD title. For more than one...

User Manual (English)
Page 11
... search to identify a code that can operate your TV. For more help, call the Dynex Customer Care Center at which you use the remote control. DX-LDVD19-10A_09-0340.book Page 7 Tuesday, April 28, 2009 4:43 PM Using the remote control DX-LDVD19-10A 7 Remove the batteries if you do not intend to... use the remote control for details. 3 If all Dynex TVs manufactured after Jan. 1, 2007) Universal remote...
... search to identify a code that can operate your TV. For more help, call the Dynex Customer Care Center at which you use the remote control. DX-LDVD19-10A_09-0340.book Page 7 Tuesday, April 28, 2009 4:43 PM Using the remote control DX-LDVD19-10A 7 Remove the batteries if you do not intend to... use the remote control for details. 3 If all Dynex TVs manufactured after Jan. 1, 2007) Universal remote...
User Manual (English)
Page 12
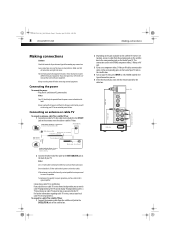
... in image or color problems. Make sure that came with your TV. Always turn the power off when connecting external equipment. DX-LDVD19-10A_09-0340.book Page 8 Tuesday, April 28, 2009 4:43 PM 8 DX-LDVD19-10A Making connections Making connections Cautions: Check the terminals for the cable ...box. Loose connections can be using your TV for an extended period of your ...
... in image or color problems. Make sure that came with your TV. Always turn the power off when connecting external equipment. DX-LDVD19-10A_09-0340.book Page 8 Tuesday, April 28, 2009 4:43 PM 8 DX-LDVD19-10A Making connections Making connections Cautions: Check the terminals for the cable ...box. Loose connections can be using your TV for an extended period of your ...
User Manual (English)
Page 13
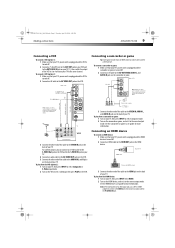
.... 2 Turn on the VCR, insert a videotape, then press PLAY on the HDMI device. DX-LDVD19-10A_09-0340.book Page 9 Tuesday, April 28, 2009 4:43 PM Making connections DX-LDVD19-10A 9 Connecting a VCR To connect a VCR (option 1): 1 Make sure that your TV's power cord is unplugged and the camcorder or game is turned off. 2 Connect an...OUT jacks on the VCR. 5 Connect the other end of the cable to the VIDEO IN, AUDIO-L, and AUDIO-R jacks on the back of your TV, then press INPUT select HDMI. 2 Turn on the HDMI device, and set it to the correct output mode. Connecting an HDMI device To connect ...
.... 2 Turn on the VCR, insert a videotape, then press PLAY on the HDMI device. DX-LDVD19-10A_09-0340.book Page 9 Tuesday, April 28, 2009 4:43 PM Making connections DX-LDVD19-10A 9 Connecting a VCR To connect a VCR (option 1): 1 Make sure that your TV's power cord is unplugged and the camcorder or game is turned off. 2 Connect an...OUT jacks on the VCR. 5 Connect the other end of the cable to the VIDEO IN, AUDIO-L, and AUDIO-R jacks on the back of your TV, then press INPUT select HDMI. 2 Turn on the HDMI device, and set it to the correct output mode. Connecting an HDMI device To connect ...
User Manual (English)
Page 14
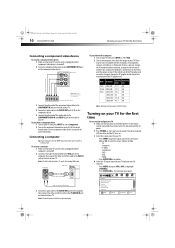
... picture is turned off . 2 Connect a component video cable to the TV, and connected the AC power. 2 Press POWER , then wait several seconds. DX-LDVD19-10A_09-0340.book Page 10 Tuesday, April 28, 2009 4:43 PM 10 DX-LDVD19-10A Turning on your TV for the first time To turn on and configure your... TV: 1 Make sure that you have inserted the batteries in VGA mode. To connect a...
... picture is turned off . 2 Connect a component video cable to the TV, and connected the AC power. 2 Press POWER , then wait several seconds. DX-LDVD19-10A_09-0340.book Page 10 Tuesday, April 28, 2009 4:43 PM 10 DX-LDVD19-10A Turning on your TV for the first time To turn on and configure your... TV: 1 Make sure that you have inserted the batteries in VGA mode. To connect a...
User Manual (English)
Page 15
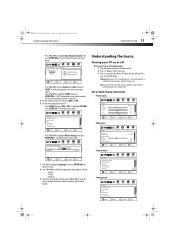
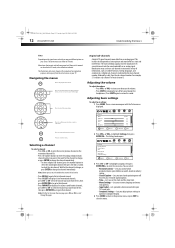
....book Page 11 Tuesday, April 28, 2009 4:43 PM Understanding the basics DX-LDVD19-10A 11 • Press CH+/CH- Settings Parental Controls Closed Caption Time Menu Settings Input Labels Computer Settings PICTURE AUDIO CHANNELS SETTINGS CH+ VOL VOL - + CH-... Audio Language PICTURE AUDIO CHANNELS SETTINGS On Custom L5 Mono English CH+ VOL VOL - + CH- PICTURE Channels Auto Channels Search AUDIO CHANNELS SETTINGS Choose your TV, it goes into an AC power outlet. 2 Press (power). to open the menu. 8 Press CH+/CH- MOVE ENTER SELECT MENU PREVIOUS EXIT EXIT • ...
....book Page 11 Tuesday, April 28, 2009 4:43 PM Understanding the basics DX-LDVD19-10A 11 • Press CH+/CH- Settings Parental Controls Closed Caption Time Menu Settings Input Labels Computer Settings PICTURE AUDIO CHANNELS SETTINGS CH+ VOL VOL - + CH-... Audio Language PICTURE AUDIO CHANNELS SETTINGS On Custom L5 Mono English CH+ VOL VOL - + CH- PICTURE Channels Auto Channels Search AUDIO CHANNELS SETTINGS Choose your TV, it goes into an AC power outlet. 2 Press (power). to open the menu. 8 Press CH+/CH- MOVE ENTER SELECT MENU PREVIOUS EXIT EXIT • ...
User Manual (English)
Page 16
... the sound. Wait for the channel to change, or press ENTER to change the channel immediately. VOL + CH- Digital sub-channels A digital TV signal transmits more than an analog signal. A digital sub-channel is indicated by the main channel number, followed by a dot, then the sub...the actual screens on your saved favorite channels, press CH+ or CH- Press to close the menu. DX-LDVD19-10A_09-0340.book Page 12 Tuesday, April 28, 2009 4:43 PM 12 DX-LDVD19-10A Understanding the basics Notes: Depending on the signal source selected, you may use these sub-channels to transmit...
... the sound. Wait for the channel to change, or press ENTER to change the channel immediately. VOL + CH- Digital sub-channels A digital TV signal transmits more than an analog signal. A digital sub-channel is indicated by the main channel number, followed by a dot, then the sub...the actual screens on your saved favorite channels, press CH+ or CH- Press to close the menu. DX-LDVD19-10A_09-0340.book Page 12 Tuesday, April 28, 2009 4:43 PM 12 DX-LDVD19-10A Understanding the basics Notes: Depending on the signal source selected, you may use these sub-channels to transmit...
User Manual (English)
Page 17
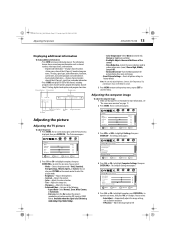
...MENU PREVIOUS EXIT EXIT 5 Press CH+ or CH- to reduce picture noise (snow). DX-LDVD19-10A_09-0340.book Page 13 Tuesday, April 28, 2009 4:43 PM Adjusting the picture DX-LDVD19-10A 13 Displaying additional information To display additional information: • Press INFO to show time Adjusting... the picture Adjusting the TV picture To adjust the picture: 1 Press MENU. The Picture menu opens. ...
...MENU PREVIOUS EXIT EXIT 5 Press CH+ or CH- to reduce picture noise (snow). DX-LDVD19-10A_09-0340.book Page 13 Tuesday, April 28, 2009 4:43 PM Adjusting the picture DX-LDVD19-10A 13 Displaying additional information To display additional information: • Press INFO to show time Adjusting... the picture Adjusting the TV picture To adjust the picture: 1 Press MENU. The Picture menu opens. ...
User Manual (English)
Page 18
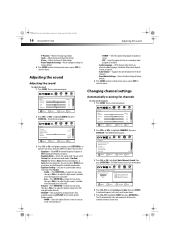
...sub-menu opens. MOVE ENTER SELECT MENU PREVIOUS EXIT EXIT 4 Press CH+/CH- to close the menu. DX-LDVD19-10A_09-0340.book Page 14 Tuesday, April 28, 2009 4:43 PM 14 DX-LDVD19-10A Adjusting the sound • V-Position-Moves the image up or down • Clock-Adjust the clock ... for channels To auto scan for all channels. • Reset Audio Settings-Resets all the active, available channels in the circle next to your TV source Antenna Cable Start 0 Analog Channels 0 Digital Channels CH+ VOL VOL - + CH- MOVE ENTER SELECT MENU PREVIOUS EXIT EXIT 3 Press CH...
...sub-menu opens. MOVE ENTER SELECT MENU PREVIOUS EXIT EXIT 4 Press CH+/CH- to close the menu. DX-LDVD19-10A_09-0340.book Page 14 Tuesday, April 28, 2009 4:43 PM 14 DX-LDVD19-10A Adjusting the sound • V-Position-Moves the image up or down • Clock-Adjust the clock ... for channels To auto scan for all channels. • Reset Audio Settings-Resets all the active, available channels in the circle next to your TV source Antenna Cable Start 0 Analog Channels 0 Digital Channels CH+ VOL VOL - + CH- MOVE ENTER SELECT MENU PREVIOUS EXIT EXIT 3 Press CH...
User Manual (English)
Page 19
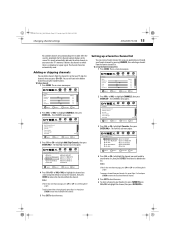
...Add/Skip Channels AUDIO CHANNELS SETTINGS Ch 3.0 Ch 10.1 WCAU-DT Ch 13.0 Ch 14.2 ATSC-2 Ch 19.0 Ch 5.1 KPI-DT Ch 11.1 MBC DTV Ch 14.1 ATSC-3 Ch 14.3 ATSC-3 Ch 23.0 CH...The channels found are automatically preset in your TV skips the channels when you want to add to scroll through the pages. to the TV's memory. The CHANNELS menu opens. MOVE ...first channel number displays on -screen menu opens. DX-LDVD19-10A_09-0340.book Page 15 Tuesday, April 28, 2009 4:43 PM Changing channel settings DX-LDVD19-10A 15 All available channels are automatically saved. The ...
...Add/Skip Channels AUDIO CHANNELS SETTINGS Ch 3.0 Ch 10.1 WCAU-DT Ch 13.0 Ch 14.2 ATSC-2 Ch 19.0 Ch 5.1 KPI-DT Ch 11.1 MBC DTV Ch 14.1 ATSC-3 Ch 14.3 ATSC-3 Ch 23.0 CH...The channels found are automatically preset in your TV skips the channels when you want to add to scroll through the pages. to the TV's memory. The CHANNELS menu opens. MOVE ...first channel number displays on -screen menu opens. DX-LDVD19-10A_09-0340.book Page 15 Tuesday, April 28, 2009 4:43 PM Changing channel settings DX-LDVD19-10A 15 All available channels are automatically saved. The ...
User Manual (English)
Page 21
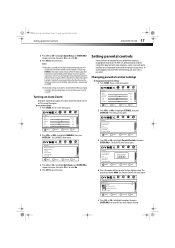
...to highlight an option, then press ENTER/VOL+ to highlight SETTINGS, then press ENTER/CH- DX-LDVD19-10A_09-0340.book Page 17 Tuesday, April 28, 2009 4:43 PM Setting parental controls DX-LDVD19-10A 17 3 Press CH+ or CH- The Enter Password screen opens. PICTURE Settings Parental Controls ...Button Lock Block Unrated TV USA Parental Locks Canadian Parental Locks Change Password AUDIO CHANNELS SETTINGS Off Off CH...
...to highlight an option, then press ENTER/VOL+ to highlight SETTINGS, then press ENTER/CH- DX-LDVD19-10A_09-0340.book Page 17 Tuesday, April 28, 2009 4:43 PM Setting parental controls DX-LDVD19-10A 17 3 Press CH+ or CH- The Enter Password screen opens. PICTURE Settings Parental Controls ...Button Lock Block Unrated TV USA Parental Locks Canadian Parental Locks Change Password AUDIO CHANNELS SETTINGS Off Off CH...
User Manual (English)
Page 22
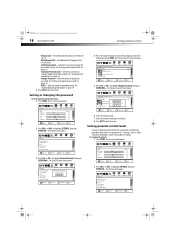
...set parental controls for controlling U.S. To set the parental control password: 1 Press MENU. See "Setting parental control levels" on page 19. 6 Press EXIT to close the menu. Settings Parental Controls Closed Caption Time Menu Settings Input Labels Computer Settings PICTURE AUDIO CHANNELS ...SELECT MENU PREVIOUS EXIT EXIT 2 Press VOL+ or VOL- TV ratings. Picture Mode Brightness Contrast Color Tint Sharpness CH+ VOL VOL - + CH- DX-LDVD19-10A_09-0340.book Page 18 Tuesday, April 28, 2009 4:43 PM 18 DX-LDVD19-10A Setting parental controls • Button Lock-Set to On to...
...set parental controls for controlling U.S. To set the parental control password: 1 Press MENU. See "Setting parental control levels" on page 19. 6 Press EXIT to close the menu. Settings Parental Controls Closed Caption Time Menu Settings Input Labels Computer Settings PICTURE AUDIO CHANNELS ...SELECT MENU PREVIOUS EXIT EXIT 2 Press VOL+ or VOL- TV ratings. Picture Mode Brightness Contrast Color Tint Sharpness CH+ VOL VOL - + CH- DX-LDVD19-10A_09-0340.book Page 18 Tuesday, April 28, 2009 4:43 PM 18 DX-LDVD19-10A Setting parental controls • Button Lock-Set to On to...
User Manual (English)
Page 23
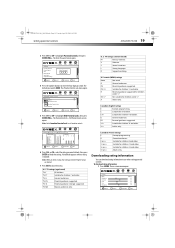
... Custom 40 60 45 R5 +5 MENU PREVIOUS EXIT EXIT D Suggestive dialog. TV-14 Parental guidance strongly suggested . DX-LDVD19-10A_09-0340.book Page 19 Tuesday, April 28, 2009 4:43 PM Setting parental controls DX-LDVD19-10A 19 3 Press CH+ or CH- movie (MPAA) ratings None Not rated. TV-G General audiences. The default password is blocked. The Parental Controls - USA...
... Custom 40 60 45 R5 +5 MENU PREVIOUS EXIT EXIT D Suggestive dialog. TV-14 Parental guidance strongly suggested . DX-LDVD19-10A_09-0340.book Page 19 Tuesday, April 28, 2009 4:43 PM Setting parental controls DX-LDVD19-10A 19 3 Press CH+ or CH- movie (MPAA) ratings None Not rated. TV-G General audiences. The default password is blocked. The Parental Controls - USA...
User Manual (English)
Page 24
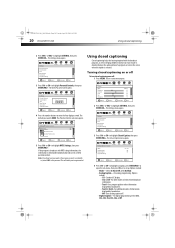
...Select CC On,CC Off, or CC On Mute. • Analog Caption-For analog programming. DX-LDVD19-10A_09-0340.book Page 20 Tuesday, April 28, 2009 4:43 PM 20 DX-LDVD19-10A Using closed captioning Closed captioning helps the hearing impaired with RRT5 rating information, the information is downloaded...8226; Text2 to regain control. Select CS1, CS2, CS3, CS4, CS5, CS6, or Off. PICTURE Settings Parental Controls Button Lock Block Unrated TV USA Parental Locks Canadian Parental Locks Change Password AUDIO CHANNELS SETTINGS Off Off CH+ VOL VOL - + CH- Using closed captioning 2 Press VOL...
...Select CC On,CC Off, or CC On Mute. • Analog Caption-For analog programming. DX-LDVD19-10A_09-0340.book Page 20 Tuesday, April 28, 2009 4:43 PM 20 DX-LDVD19-10A Using closed captioning Closed captioning helps the hearing impaired with RRT5 rating information, the information is downloaded...8226; Text2 to regain control. Select CS1, CS2, CS3, CS4, CS5, CS6, or Off. PICTURE Settings Parental Controls Button Lock Block Unrated TV USA Parental Locks Canadian Parental Locks Change Password AUDIO CHANNELS SETTINGS Off Off CH+ VOL VOL - + CH- Using closed captioning 2 Press VOL...


