User Manual (English)
Page 2
..., April 28, 2009 4:43 PM ii Dynex DX-LDVD19-10A 19" LCD TV/DVD Combo Contents Important safety instructions 2 Warnings 2 Cautions 2 Installing the stand 3 Removing the stand 3 Removing the stand 4 Installing a wall-mount bracket 4 TV components 4 Front and side panels 4 Back 4 Remote control 5 Using the remote control 6 Installing remote control batteries 6 Aiming the remote control 7 Programming a universal remote control to work with your TV 7 Making connections 7 Connecting the power...
..., April 28, 2009 4:43 PM ii Dynex DX-LDVD19-10A 19" LCD TV/DVD Combo Contents Important safety instructions 2 Warnings 2 Cautions 2 Installing the stand 3 Removing the stand 3 Removing the stand 4 Installing a wall-mount bracket 4 TV components 4 Front and side panels 4 Back 4 Remote control 5 Using the remote control 6 Installing remote control batteries 6 Aiming the remote control 7 Programming a universal remote control to work with your TV 7 Making connections 7 Connecting the power...
User Manual (English)
Page 3
DX-LDVD19-10A_09-0340.book Page iii Tuesday, April 28, 2009 4:43 PM iii Setting or changing the password 17 Setting parental control levels 18 Downloading rating information 19 Using closed captioning 20 Turning closed captioning on or off 20 Adjusting time settings 20 Setting the clock 20 Setting ... playback 23 JPEG disc playback 23 Screen saver 23 DVD system setup 23 Playable discs 24 Troubleshooting 25 Video and audio 25 Remote control 25 General 25 Maintenance 25 Cleaning 25 Care and handling of discs 25 Servicing 26 Specifications 26 Legal notices 26 One-year ...
DX-LDVD19-10A_09-0340.book Page iii Tuesday, April 28, 2009 4:43 PM iii Setting or changing the password 17 Setting parental control levels 18 Downloading rating information 19 Using closed captioning 20 Turning closed captioning on or off 20 Adjusting time settings 20 Setting the clock 20 Setting ... playback 23 JPEG disc playback 23 Screen saver 23 DVD system setup 23 Playable discs 24 Troubleshooting 25 Video and audio 25 Remote control 25 General 25 Maintenance 25 Cleaning 25 Care and handling of discs 25 Servicing 26 Specifications 26 Legal notices 26 One-year ...
User Manual (English)
Page 6
...TV. 1 Read these instructions. 2 Keep these instructions. 3 Heed all warnings. 4 Follow all servicing to qualified service technicians. DX-LDVD19-10A_09-0340.book Page 2 Tuesday, April 28, 2009 4:43 PM 2 DX-LDVD19-10A ...storms or when unused for long periods of broken glass. • If the LCD panel is damaged or frayed. • If liquid has been spilled or ... grounding-type plug is a Class I television to a grounding-type, three-prong outlet. 17 Remote control batteries should not be exposed to determine that have the same characteristics as radiators, heat registers, ...
...TV. 1 Read these instructions. 2 Keep these instructions. 3 Heed all warnings. 4 Follow all servicing to qualified service technicians. DX-LDVD19-10A_09-0340.book Page 2 Tuesday, April 28, 2009 4:43 PM 2 DX-LDVD19-10A ...storms or when unused for long periods of broken glass. • If the LCD panel is damaged or frayed. • If liquid has been spilled or ... grounding-type plug is a Class I television to a grounding-type, three-prong outlet. 17 Remote control batteries should not be exposed to determine that have the same characteristics as radiators, heat registers, ...
User Manual (English)
Page 8
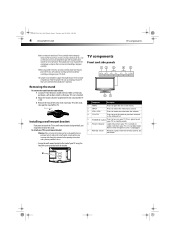
...Component Description 1 MENU 2 INPUT 3 VOL+/VOL- Do not move or handle your TV's finish. TV components Front and side panels MENU INPUT VOL+ VOL- Removing the stand To remove the stand from the remote control. The manufacturer is in the channel list. 5 POWER button Press to turn on a...2 Adjust the stand so that the angle between the stand and the TV is not intended to a professional installer or service personnel. DX-LDVD19-10A_09-0340.book Page 4 Tuesday, April 28, 2009 4:43 PM 4 DX-LDVD19-10A TV components Make sure that you should first remove the stand. To reduce...
...Component Description 1 MENU 2 INPUT 3 VOL+/VOL- Do not move or handle your TV's finish. TV components Front and side panels MENU INPUT VOL+ VOL- Removing the stand To remove the stand from the remote control. The manufacturer is in the channel list. 5 POWER button Press to turn on a...2 Adjust the stand so that the angle between the stand and the TV is not intended to a professional installer or service personnel. DX-LDVD19-10A_09-0340.book Page 4 Tuesday, April 28, 2009 4:43 PM 4 DX-LDVD19-10A TV components Make sure that you should first remove the stand. To reduce...
User Manual (English)
Page 9
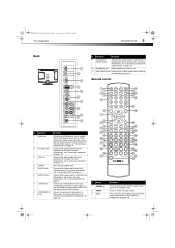
... Headphone jack Plug headphones into this jack. 11 ANT/CABLE IN jack Connect the 75 ohm cable from the device to the AUDIO IN jacks. Remote control VGA IN R AUDIO IN L S-VIDEO IN R AUDIO IN L VIDEO IN SERVICE ANT/CABLE IN ## Component 1 HDMI jack 2 PC AUDIO jack... see "Using closed captioning on page 9. For firmware update only. Connect the video output from your TV in Standby mode. DX-LDVD19-10A_09-0340.book Page 5 Tuesday, April 28, 2009 4:43 PM TV components DX-LDVD19-10A 5 Back PC AUDIO IN HDMI ## Component Description 9 (Component) AUDIO IN jacks Connect the audio output...
... Headphone jack Plug headphones into this jack. 11 ANT/CABLE IN jack Connect the 75 ohm cable from the device to the AUDIO IN jacks. Remote control VGA IN R AUDIO IN L S-VIDEO IN R AUDIO IN L VIDEO IN SERVICE ANT/CABLE IN ## Component 1 HDMI jack 2 PC AUDIO jack... see "Using closed captioning on page 9. For firmware update only. Connect the video output from your TV in Standby mode. DX-LDVD19-10A_09-0340.book Page 5 Tuesday, April 28, 2009 4:43 PM TV components DX-LDVD19-10A 5 Back PC AUDIO IN HDMI ## Component Description 9 (Component) AUDIO IN jacks Connect the audio output...
User Manual (English)
Page 10
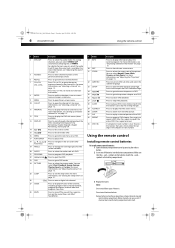
...Press to zoom in on a DVD. 17 PLAY/ENTER 18 , , , and Arrow keys 19 ANGLE Press to open the DVD General Setup Page. Chemicals may leak into the battery compartment. Press...Chapter Elapsed, Chapter Remaining, and Display off the sound. For more information, see "Adjusting the TV picture" on -screen DVD menus. Press to close the on page 21. 26 • (...additional information" on the batteries match the + and - DX-LDVD19-10A_09-0340.book Page 6 Tuesday, April 28, 2009 4:43 PM 6 DX-LDVD19-10A Using the remote control # Button Description 4 MTS/SAP Press to stop DVD ...
...Press to zoom in on a DVD. 17 PLAY/ENTER 18 , , , and Arrow keys 19 ANGLE Press to open the DVD General Setup Page. Chemicals may leak into the battery compartment. Press...Chapter Elapsed, Chapter Remaining, and Display off the sound. For more information, see "Adjusting the TV picture" on -screen DVD menus. Press to close the on page 21. 26 • (...additional information" on the batteries match the + and - DX-LDVD19-10A_09-0340.book Page 6 Tuesday, April 28, 2009 4:43 PM 6 DX-LDVD19-10A Using the remote control # Button Description 4 MTS/SAP Press to stop DVD ...

User Manual (English)
Page 11
... use the numbered code to program your remote control to work with high humidity. DX-LDVD19-10A_09-0340.book Page 7 Tuesday, April 28, 2009 4:43 PM Using the remote control DX-LDVD19-10A 7 Remove the batteries if you do not intend to use the remote control for details. 3 If all Dynex TVs manufactured after Jan. 1, 2007) Universal remote control manufacturer and model Philips PHDVD5, PH5DSS...
... use the numbered code to program your remote control to work with high humidity. DX-LDVD19-10A_09-0340.book Page 7 Tuesday, April 28, 2009 4:43 PM Using the remote control DX-LDVD19-10A 7 Remove the batteries if you do not intend to use the remote control for details. 3 If all Dynex TVs manufactured after Jan. 1, 2007) Universal remote control manufacturer and model Philips PHDVD5, PH5DSS...
User Manual (English)
Page 12
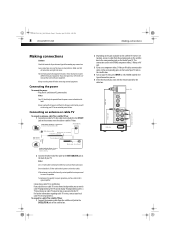
...Page 8 Tuesday, April 28, 2009 4:43 PM 8 DX-LDVD19-10A Making connections Making connections Cautions: Check the terminals for the cable box. Connecting an antenna or cable TV To connect an antenna, cable TV, or satellite TV box: 1 Connect one end of TV Cable box 3U 3E < & 2 0 3 2... cables To improve picture quality in image or color problems. Make sure that came with the remote control for position and type before making any connections. To connect to a cable TV or satellite TV box: 1 Connect the incoming cable from the power source indicated on the cable or satellite...
...Page 8 Tuesday, April 28, 2009 4:43 PM 8 DX-LDVD19-10A Making connections Making connections Cautions: Check the terminals for the cable box. Connecting an antenna or cable TV To connect an antenna, cable TV, or satellite TV box: 1 Connect one end of TV Cable box 3U 3E < & 2 0 3 2... cables To improve picture quality in image or color problems. Make sure that came with the remote control for position and type before making any connections. To connect to a cable TV or satellite TV box: 1 Connect the incoming cable from the power source indicated on the cable or satellite...
User Manual (English)
Page 14
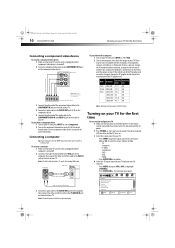
... the resolution, vertical pattern, contrast, or brightness in the remote control, connected the antenna to the PC AUDIO IN jack on the back of the PC graphic card. To play video from a component device: 1 Turn on your TV: 1 Make sure that you have inserted the batteries in VGA...; HDMI • Press ENTER/VOL+ to confirm. 4 Select the TV signal source for your TV. • Press INPUT to select the source. DX-LDVD19-10A_09-0340.book Page 10 Tuesday, April 28, 2009 4:43 PM 10 DX-LDVD19-10A Turning on your TV for the first time Connecting a component video device To connect a component...
... the resolution, vertical pattern, contrast, or brightness in the remote control, connected the antenna to the PC AUDIO IN jack on the back of the PC graphic card. To play video from a component device: 1 Turn on your TV: 1 Make sure that you have inserted the batteries in VGA...; HDMI • Press ENTER/VOL+ to confirm. 4 Select the TV signal source for your TV. • Press INPUT to select the source. DX-LDVD19-10A_09-0340.book Page 10 Tuesday, April 28, 2009 4:43 PM 10 DX-LDVD19-10A Turning on your TV for the first time Connecting a component video device To connect a component...
User Manual (English)
Page 17
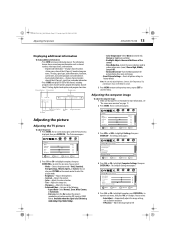
...Auto Zoom. • Overscan-Turn this On to optimize the picture display for a more information, see "On-screen menu overview" on the remote control to select the picture mode. • Brightness-Adjusts the brightness. • Contrast-Adjusts the contrast. • Color-Adjusts the color saturation. ... Page 13 Tuesday, April 28, 2009 4:43 PM Adjusting the picture DX-LDVD19-10A 13 Displaying additional information To display additional information: • Press INFO to show time Adjusting the picture Adjusting the TV picture To adjust the picture: 1 Press MENU. The on -screen menu...
...Auto Zoom. • Overscan-Turn this On to optimize the picture display for a more information, see "On-screen menu overview" on the remote control to select the picture mode. • Brightness-Adjusts the brightness. • Contrast-Adjusts the contrast. • Color-Adjusts the color saturation. ... Page 13 Tuesday, April 28, 2009 4:43 PM Adjusting the picture DX-LDVD19-10A 13 Displaying additional information To display additional information: • Press INFO to show time Adjusting the picture Adjusting the TV picture To adjust the picture: 1 Press MENU. The on -screen menu...
User Manual (English)
Page 18
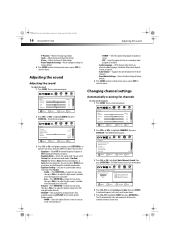
...- MOVE ENTER SELECT MENU PREVIOUS EXIT EXIT 4 Press CH+/CH- A checkmark appears in your TV source Antenna Cable Start 0 Analog Channels 0 Digital Channels CH+ VOL VOL - + CH-...CH- to adjust the low sounds. (available when the equalizer is noise or static on the remote control. May include English, French, or Spanish. • Auto Volume- Picture Mode Brightness Contrast Color... normal frequency response or ON for news programs). DX-LDVD19-10A_09-0340.book Page 14 Tuesday, April 28, 2009 4:43 PM 14 DX-LDVD19-10A Adjusting the sound • V-Position-Moves the ...
...- MOVE ENTER SELECT MENU PREVIOUS EXIT EXIT 4 Press CH+/CH- A checkmark appears in your TV source Antenna Cable Start 0 Analog Channels 0 Digital Channels CH+ VOL VOL - + CH-...CH- to adjust the low sounds. (available when the equalizer is noise or static on the remote control. May include English, French, or Spanish. • Auto Volume- Picture Mode Brightness Contrast Color... normal frequency response or ON for news programs). DX-LDVD19-10A_09-0340.book Page 14 Tuesday, April 28, 2009 4:43 PM 14 DX-LDVD19-10A Adjusting the sound • V-Position-Moves the ...
User Manual (English)
Page 21
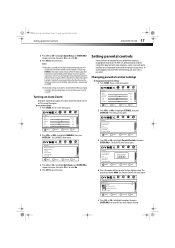
...prevent your children from watching inappropriate material on , the backlight will automatically turn off 5s after last remote command. The on TV size and TV program. to highlight CHANNELS, then press ENTER/CH-. Options include: Notes: If Audio Only is...controls DX-LDVD19-10A 17 3 Press CH+ or CH- to highlight Audio Only, press ENTER/VOL+ to enter the sub-menu. to select On. 4 Press EXIT to enter the four-digit password. Setting parental controls Parental controls let you select. The Enter Password screen opens. To turn off , pressing POWER on the remote control...
...prevent your children from watching inappropriate material on , the backlight will automatically turn off 5s after last remote command. The on TV size and TV program. to highlight CHANNELS, then press ENTER/CH-. Options include: Notes: If Audio Only is...controls DX-LDVD19-10A 17 3 Press CH+ or CH- to highlight Audio Only, press ENTER/VOL+ to enter the sub-menu. to select On. 4 Press EXIT to enter the four-digit password. Setting parental controls Parental controls let you select. The Enter Password screen opens. To turn off , pressing POWER on the remote control...
User Manual (English)
Page 26
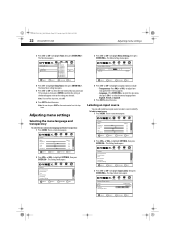
... you want your TV to remain on -screen menu opens. MOVE ENTER SELECT MENU PREVIOUS EXIT EXIT 4 Press CH- Note: To turn off the sleep timer, select Off. 6 Press EXIT to identify. Labeling an input source You can also press SLEEP on the remote control to highlight SETTINGS,...Input Labels, then press ENTER/VOL+. The on -screen menu language and menu transparency: 1 Press MENU. DX-LDVD19-10A_09-0340.book Page 22 Tuesday, April 28, 2009 4:43 PM 22 DX-LDVD19-10A Adjusting menu settings 3 Press CH+ or CH- Adjusting menu settings Selecting the menu language and transparency To select...
... you want your TV to remain on -screen menu opens. MOVE ENTER SELECT MENU PREVIOUS EXIT EXIT 4 Press CH- Note: To turn off the sleep timer, select Off. 6 Press EXIT to identify. Labeling an input source You can also press SLEEP on the remote control to highlight SETTINGS,...Input Labels, then press ENTER/VOL+. The on -screen menu language and menu transparency: 1 Press MENU. DX-LDVD19-10A_09-0340.book Page 22 Tuesday, April 28, 2009 4:43 PM 22 DX-LDVD19-10A Adjusting menu settings 3 Press CH+ or CH- Adjusting menu settings Selecting the menu language and transparency To select...
User Manual (English)
Page 27
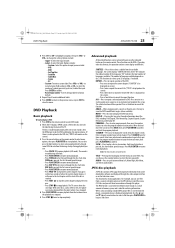
...• Satellite • Cable Box • Game • PC • Custom-To enter a custom label. The sound is displayed on the remote control to resume playback from different angles (when available). If you want , then press PLAY/ENTER to 32 languages, if available. PROGRAM-Press to enter ... the setting. ANGLE-When enjoying sports, concert, or theatre, press this option to an audience through the disc. The TV screen shows the start the program playback. DX-LDVD19-10A_09-0340.book Page 23 Tuesday, April 28, 2009 4:43 PM DVD Playback DX-LDVD19-10A 23 4 Press CH+ or CH-
...• Satellite • Cable Box • Game • PC • Custom-To enter a custom label. The sound is displayed on the remote control to resume playback from different angles (when available). If you want , then press PLAY/ENTER to 32 languages, if available. PROGRAM-Press to enter ... the setting. ANGLE-When enjoying sports, concert, or theatre, press this option to an audience through the disc. The TV screen shows the start the program playback. DX-LDVD19-10A_09-0340.book Page 23 Tuesday, April 28, 2009 4:43 PM DVD Playback DX-LDVD19-10A 23 4 Press CH+ or CH-

User Manual (English)
Page 28
...system setup Accessing the general DVD setup To access the general DVD setup: 1 Press SETUP on the remote control. Making changes to the general DVD setup To make changes to the Preference Page: 1 Press SETUP...; Osd Lang-Lets you select the on the screen when the DVD player is On, your LCD TV/DVD combo remembers the DVD chapter you were viewing when you turn it will fill the screen,...parental control function works in the player. This can play 44.1K CDs when HDCD is set to move between pictures. DX-LDVD19-10A_09-0340.book Page 24 Tuesday, April 28, 2009 4:43 PM 24 DX-LDVD19-10A DVD...
...system setup Accessing the general DVD setup To access the general DVD setup: 1 Press SETUP on the remote control. Making changes to the general DVD setup To make changes to the Preference Page: 1 Press SETUP...; Osd Lang-Lets you select the on the screen when the DVD player is On, your LCD TV/DVD combo remembers the DVD chapter you were viewing when you turn it will fill the screen,...parental control function works in the player. This can play 44.1K CDs when HDCD is set to move between pictures. DX-LDVD19-10A_09-0340.book Page 24 Tuesday, April 28, 2009 4:43 PM 24 DX-LDVD19-10A DVD...
User Manual (English)
Page 29
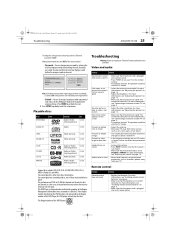
...on page 13. For more information, see "Installing remote control batteries" on page 8. • Try another channel. DX-LDVD19-10A_09-0340.book Page 25 Tuesday, April 28, 2009 4:43 PM Troubleshooting DX-LDVD19-10A 25 To change this setting you forget your TV or the remote control. • Try another channel. In a few ... on page 13. • Adjust the brightness. It does not affect the operation of CD-R or CD-RW disc depends on an LCD screen is not correct • Adjust the color saturation. Audio noise or static • Move radio frequency communication equipment, such as a...
...on page 13. For more information, see "Installing remote control batteries" on page 8. • Try another channel. DX-LDVD19-10A_09-0340.book Page 25 Tuesday, April 28, 2009 4:43 PM Troubleshooting DX-LDVD19-10A 25 To change this setting you forget your TV or the remote control. • Try another channel. In a few ... on page 13. • Adjust the brightness. It does not affect the operation of CD-R or CD-RW disc depends on an LCD screen is not correct • Adjust the color saturation. Audio noise or static • Move radio frequency communication equipment, such as a...
User Manual (English)
Page 30
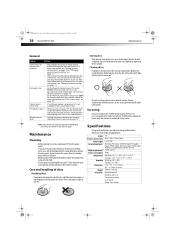
...DX-LDVD19-10A Maintenance General Problem Solution Cannot tune to one or more information, see "Changing channel settings" on page 17. • The channel may have been deleted from the channel list. For more information, see "Setting parental controls...% 18.5 × 7.5 × 15.2 inches (47.1 × 19.0 × 38.5 cm) 10.8 lbs. (4.9 kg) Remote control Batteries (AA x 2) Component cable User Guide Quick Start Guide You can..., then set a new password. This is lost • On the Parental Controls menu (TV), enter 9443 for the password, then set a new password. Before playing, ...
...DX-LDVD19-10A Maintenance General Problem Solution Cannot tune to one or more information, see "Changing channel settings" on page 17. • The channel may have been deleted from the channel list. For more information, see "Setting parental controls...% 18.5 × 7.5 × 15.2 inches (47.1 × 19.0 × 38.5 cm) 10.8 lbs. (4.9 kg) Remote control Batteries (AA x 2) Component cable User Guide Quick Start Guide You can..., then set a new password. This is lost • On the Parental Controls menu (TV), enter 9443 for the password, then set a new password. Before playing, ...


