User Manual (English)
Page 2
... Dynex DX-LDVD19-10A 19" LCD TV/DVD Combo Contents Important safety instructions 2 Warnings 2 Cautions 2 Installing the stand 3 Removing the stand 3 Removing the stand 4 Installing a wall-mount bracket 4 TV components 4 Front and side panels 4 Back 4 Remote control 5 Using the remote control 6 Installing remote control batteries 6 Aiming the remote control 7 Programming a universal remote control to work with your TV 7 Making connections 7 Connecting the power 7 Connecting an antenna or cable TV 8 Connecting a VCR 8 Connecting a camcorder or game 9 Connecting an HDMI device...
... Dynex DX-LDVD19-10A 19" LCD TV/DVD Combo Contents Important safety instructions 2 Warnings 2 Cautions 2 Installing the stand 3 Removing the stand 3 Removing the stand 4 Installing a wall-mount bracket 4 TV components 4 Front and side panels 4 Back 4 Remote control 5 Using the remote control 6 Installing remote control batteries 6 Aiming the remote control 7 Programming a universal remote control to work with your TV 7 Making connections 7 Connecting the power 7 Connecting an antenna or cable TV 8 Connecting a VCR 8 Connecting a camcorder or game 9 Connecting an HDMI device...
User Manual (English)
Page 6
... the service technician uses replacement parts specified by the manufacturer, or sold with liquids, such as the original part. This helps prevent property damage and personal injury from tip-over. When installing an outside antenna system should not be fatal. Handling the LCD panel • Your TV's screen is made of electric shock is a Class I television to a grounding-type, three-prong outlet. 17 Remote control batteries...
... the service technician uses replacement parts specified by the manufacturer, or sold with liquids, such as the original part. This helps prevent property damage and personal injury from tip-over. When installing an outside antenna system should not be fatal. Handling the LCD panel • Your TV's screen is made of electric shock is a Class I television to a grounding-type, three-prong outlet. 17 Remote control batteries...
User Manual (English)
Page 7
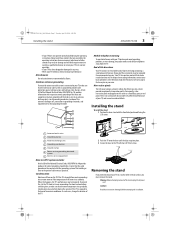
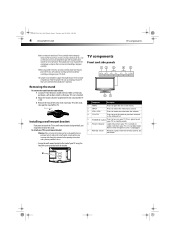
... clamps 6 Power service grounding electrode system 7 Electric service equipment Note to grounding electrodes, and requirements for environmental reasons. Installing the stand To install the stand: 1 Position the base stand with respect to your TV exhibits a distinct change the location of the stand, unplug the AC power cord. Attachments Use only attachments recommended by following the operating instructions. In such cases, change in wire to mount your area. Screws Screws Removing the stand If you...
... clamps 6 Power service grounding electrode system 7 Electric service equipment Note to grounding electrodes, and requirements for environmental reasons. Installing the stand To install the stand: 1 Position the base stand with respect to your TV exhibits a distinct change the location of the stand, unplug the AC power cord. Attachments Use only attachments recommended by following the operating instructions. In such cases, change in wire to mount your area. Screws Screws Removing the stand If you...
User Manual (English)
Page 8
... aid to assembly, make sure that contained in the operating instructions unless you are for any servicing other than that you put your TV in standby mode. 6 Power indicator Lights blue when your TV is in the channel list. 5 POWER button Press to put down on your TV's finish. When using the four M4 screws provided with the bracket. POWER # Component Description 1 MENU 2 INPUT 3 VOL+/VOL- Press again to turn on a table or bench...
... aid to assembly, make sure that contained in the operating instructions unless you are for any servicing other than that you put your TV in standby mode. 6 Power indicator Lights blue when your TV is in the channel list. 5 POWER button Press to put down on your TV's finish. When using the four M4 screws provided with the bracket. POWER # Component Description 1 MENU 2 INPUT 3 VOL+/VOL- Press again to turn on a table or bench...
User Manual (English)
Page 9
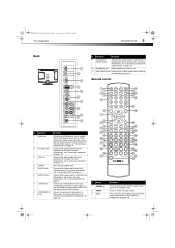
... GUIDE 789 RECALL CH+ MUTE VOL - Connect the video output from an AV device to select the input source. For more information, see "Connecting a VCR" on or off. Press again to put your computer to this jack. Connect the audio output (L and R) from your TV in Standby mode. MENU ENTER CH- For more information, see "Using closed captioning on page 9. Remote control VGA IN R AUDIO IN L S-VIDEO IN R AUDIO IN L VIDEO IN SERVICE ANT/CABLE IN ## Component 1 HDMI...
... GUIDE 789 RECALL CH+ MUTE VOL - Connect the video output from an AV device to select the input source. For more information, see "Connecting a VCR" on or off. Press again to put your computer to this jack. Connect the audio output (L and R) from your TV in Standby mode. MENU ENTER CH- For more information, see "Using closed captioning on page 9. Remote control VGA IN R AUDIO IN L S-VIDEO IN R AUDIO IN L VIDEO IN SERVICE ANT/CABLE IN ## Component 1 HDMI...
User Manual (English)
Page 10
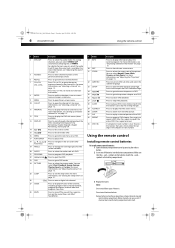
... more information, see "Selecting a channel" on page 14. 5 Numbers Press to enter channel numbers or the parental control password. 6 RECALL Press to go to pause DVD playback. Press again to select the aspect ratio of batteries. For more information, see "Adjusting the sound" on page 12. DX-LDVD19-10A_09-0340.book Page 6 Tuesday, April 28, 2009 4:43 PM 6 DX-LDVD19-10A Using the remote control # Button Description 4 MTS/SAP Press...
... more information, see "Selecting a channel" on page 14. 5 Numbers Press to enter channel numbers or the parental control password. 6 RECALL Press to go to pause DVD playback. Press again to select the aspect ratio of batteries. For more information, see "Adjusting the sound" on page 12. DX-LDVD19-10A_09-0340.book Page 6 Tuesday, April 28, 2009 4:43 PM 6 DX-LDVD19-10A Using the remote control # Button Description 4 MTS/SAP Press...

User Manual (English)
Page 11
.... You will use the numbered code to program your remote control to use the remote control in the market. DX-LDVD19-10A_09-0340.book Page 7 Tuesday, April 28, 2009 4:43 PM Using the remote control DX-LDVD19-10A 7 Remove the batteries if you do not intend to work with your TV. Aiming the remote control To use the remote control. The remote control may need to try codes for other compatible models are available online at a time. Tips: • If your universal remote control's instructions and try...
.... You will use the numbered code to program your remote control to use the remote control in the market. DX-LDVD19-10A_09-0340.book Page 7 Tuesday, April 28, 2009 4:43 PM Using the remote control DX-LDVD19-10A 7 Remove the batteries if you do not intend to work with your TV. Aiming the remote control To use the remote control. The remote control may need to try codes for other compatible models are available online at a time. Tips: • If your universal remote control's instructions and try...
User Manual (English)
Page 12
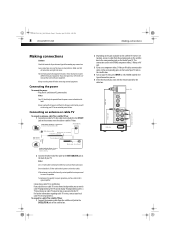
... other cables. The external audio/video equipment shown in a poor signal area, purchase and install a signal amplifier. Connecting the power To connect the power: • Plug the AC cord into an AC power outlet. Multi-family dwellings or apartments Connect to tighten Bronze wire - ANT/CABLE IN VHF antenna UHF antenna Wall antenna outlet Bronze wire - Do not bundle the 75 ohm cable with the remote control for the cable box. For further information regarding cable TV service...
... other cables. The external audio/video equipment shown in a poor signal area, purchase and install a signal amplifier. Connecting the power To connect the power: • Plug the AC cord into an AC power outlet. Multi-family dwellings or apartments Connect to tighten Bronze wire - ANT/CABLE IN VHF antenna UHF antenna Wall antenna outlet Bronze wire - Do not bundle the 75 ohm cable with the remote control for the cable box. For further information regarding cable TV service...
User Manual (English)
Page 13
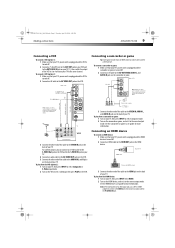
... output mode. Note: If the external device has DVI output only, use a DVI-to-HDMI adapter to connect to the HDMI jack, then connect an audio cable to the correct output mode. DX-LDVD19-10A_09-0340.book Page 9 Tuesday, April 28, 2009 4:43 PM Making connections DX-LDVD19-10A 9 Connecting a VCR To connect a VCR (option 1): 1 Make sure that your TV's power cord is unplugged and the VCR is turned off . 2 Connect an AV cable to the AV OUT VIDEO, AUDIO...
... output mode. Note: If the external device has DVI output only, use a DVI-to-HDMI adapter to connect to the HDMI jack, then connect an audio cable to the correct output mode. DX-LDVD19-10A_09-0340.book Page 9 Tuesday, April 28, 2009 4:43 PM Making connections DX-LDVD19-10A 9 Connecting a VCR To connect a VCR (option 1): 1 Make sure that your TV's power cord is unplugged and the VCR is turned off . 2 Connect an AV cable to the AV OUT VIDEO, AUDIO...
User Manual (English)
Page 14
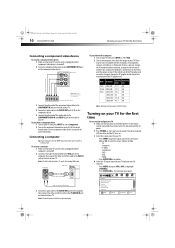
... mode to another resolution, change the PC graphic card or consult the manufacturer of your TV. to highlight CHANNELS. • Press ENTER/VOL+. DX-LDVD19-10A_09-0340.book Page 10 Tuesday, April 28, 2009 4:43 PM 10 DX-LDVD19-10A Turning on your TV for the first time Connecting a component video device To connect a component video device: 1 Make sure that your TV's power cord is unplugged and the component video device is turned off . 2 Connect a VGA cable...
... mode to another resolution, change the PC graphic card or consult the manufacturer of your TV. to highlight CHANNELS. • Press ENTER/VOL+. DX-LDVD19-10A_09-0340.book Page 10 Tuesday, April 28, 2009 4:43 PM 10 DX-LDVD19-10A Turning on your TV for the first time Connecting a component video device To connect a component video device: 1 Make sure that your TV's power cord is unplugged and the component video device is turned off . 2 Connect a VGA cable...
User Manual (English)
Page 15
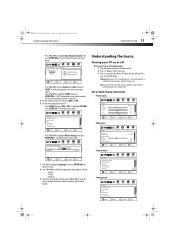
Settings Parental Controls Closed Caption Time Menu Settings Input Labels Computer Settings PICTURE AUDIO CHANNELS SETTINGS CH+ VOL VOL - + CH- to turn off To turn off (standby mode): 1 Plug the power cord into an AC power outlet. 2 Press (power). Your TV turns on. 3 Press again to highlight Menu Settings, then press ENTER/VOL+. Warning: When your TV, it goes into standby mode. MOVE ENTER SELECT MENU PREVIOUS EXIT EXIT Channel menu CH+ VOL VOL - + CH- to select Antenna or Cable, then press ENTER. to select the...
Settings Parental Controls Closed Caption Time Menu Settings Input Labels Computer Settings PICTURE AUDIO CHANNELS SETTINGS CH+ VOL VOL - + CH- to turn off To turn off (standby mode): 1 Plug the power cord into an AC power outlet. 2 Press (power). Your TV turns on. 3 Press again to highlight Menu Settings, then press ENTER/VOL+. Warning: When your TV, it goes into standby mode. MOVE ENTER SELECT MENU PREVIOUS EXIT EXIT Channel menu CH+ VOL VOL - + CH- to select Antenna or Cable, then press ENTER. to select the...
User Manual (English)
Page 16
... digital channel, then press the dot (.) button to scroll through the pages. You can select: • Parental Controls-Lets you control which programs/movies your children can watch, based on industry ratings. • Closed Caption-Lets you turn off . Digital sub-channels A digital TV signal transmits more than an analog signal. Picture Mode Brightness Contrast Color Tint Sharpness CH+ VOL VOL - + CH- Settings Parental Controls Closed Caption Time Menu Settings Input Labels Computer Settings PICTURE AUDIO CHANNELS SETTINGS CH+ VOL VOL - + CH- DX-LDVD19...
... digital channel, then press the dot (.) button to scroll through the pages. You can select: • Parental Controls-Lets you control which programs/movies your children can watch, based on industry ratings. • Closed Caption-Lets you turn off . Digital sub-channels A digital TV signal transmits more than an analog signal. Picture Mode Brightness Contrast Color Tint Sharpness CH+ VOL VOL - + CH- Settings Parental Controls Closed Caption Time Menu Settings Input Labels Computer Settings PICTURE AUDIO CHANNELS SETTINGS CH+ VOL VOL - + CH- DX-LDVD19...
User Manual (English)
Page 17
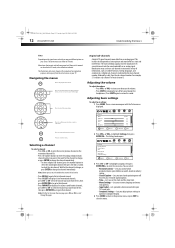
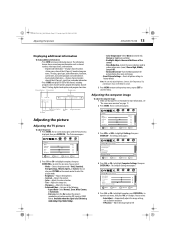
...image settings, such as channel number, video input source, and resolution. • Digital mode information-Displays channel number, station name, channel label (if preset), broadcast program name, TV rating, signal type, audio information, resolution, current time, and current program start and end times. • Analog mode information-Displays channel number, channel label (if preset), signal type, and audio information. • Press GUIDE to display EPG OSD of the screen. • Noise Reduction-Selects the noise reduction mode to close the menu. Picture Mode Brightness Contrast Color...
...image settings, such as channel number, video input source, and resolution. • Digital mode information-Displays channel number, station name, channel label (if preset), broadcast program name, TV rating, signal type, audio information, resolution, current time, and current program start and end times. • Analog mode information-Displays channel number, channel label (if preset), signal type, and audio information. • Press GUIDE to display EPG OSD of the screen. • Noise Reduction-Selects the noise reduction mode to close the menu. Picture Mode Brightness Contrast Color...
User Manual (English)
Page 18
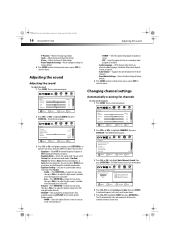
... DX-LDVD19-10A Adjusting the sound • V-Position-Moves the image up or down • Clock-Adjust the clock setting of the picture • Phase-Adjusts the focus of stable images • Reset Computer Settings-Resets computer settings to factory default 6 Press MENU to return to the previous menu, or press EXIT to highlight AUDIO, then press ENTER/CH-. Adjusting the sound Adjusting the sound To adjust the sound: 1 Press MENU. The on the remote control. to close...
... DX-LDVD19-10A Adjusting the sound • V-Position-Moves the image up or down • Clock-Adjust the clock setting of the picture • Phase-Adjusts the focus of stable images • Reset Computer Settings-Resets computer settings to factory default 6 Press MENU to return to the previous menu, or press EXIT to highlight AUDIO, then press ENTER/CH-. Adjusting the sound Adjusting the sound To adjust the sound: 1 Press MENU. The on the remote control. to close...
User Manual (English)
Page 22
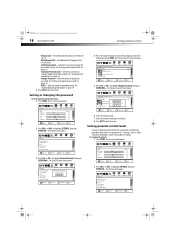
... PM 18 DX-LDVD19-10A Setting parental controls • Button Lock-Set to On to lock the buttons on -screen menu opens. PICTURE Settings Parental Controls Button Lock Block Unrated TV USA Parental Locks Canadian Parental Locks Change Password AUDIO CHANNELS SETTINGS Off Off CH+ VOL VOL - + CH- and Canada. Picture Mode Brightness Contrast Color Tint Sharpness CH+ VOL VOL - + CH- The on the front of the TV. • Block Unrated TV-Set to On to block TV programs that are not rated. • USA Parental Locks-Select this...
... PM 18 DX-LDVD19-10A Setting parental controls • Button Lock-Set to On to lock the buttons on -screen menu opens. PICTURE Settings Parental Controls Button Lock Block Unrated TV USA Parental Locks Canadian Parental Locks Change Password AUDIO CHANNELS SETTINGS Off Off CH+ VOL VOL - + CH- and Canada. Picture Mode Brightness Contrast Color Tint Sharpness CH+ VOL VOL - + CH- The on the front of the TV. • Block Unrated TV-Set to On to block TV programs that are not rated. • USA Parental Locks-Select this...
User Manual (English)
Page 23
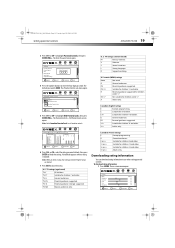
... four-digit password. USA Parental Locks screen opens. U. U.S. MOVE ENTER SELECT MENU PREVIOUS EXIT EXIT 4 Press the number buttons to highlight USA Parental Locks, then press ENTER/VOL+. Note: Select Canadian Parental Locks to close the menu. D Suggestive dialog. PG Parental guidance suggested . TV-G General audiences. Canadian English ratings E Exempt programming. PICTURE AUDIO CHANNELS SETTINGS Settings Parental Controls USA Parental Locks MPPA Rating None G PG PG-13 R NC-17 X TV Ratings ALL FV L S V D None TV-Y TV-Y7 TV-G TV-PG TV-14 TV...
... four-digit password. USA Parental Locks screen opens. U. U.S. MOVE ENTER SELECT MENU PREVIOUS EXIT EXIT 4 Press the number buttons to highlight USA Parental Locks, then press ENTER/VOL+. Note: Select Canadian Parental Locks to close the menu. D Suggestive dialog. PG Parental guidance suggested . TV-G General audiences. Canadian English ratings E Exempt programming. PICTURE AUDIO CHANNELS SETTINGS Settings Parental Controls USA Parental Locks MPPA Rating None G PG PG-13 R NC-17 X TV Ratings ALL FV L S V D None TV-Y TV-Y7 TV-G TV-PG TV-14 TV...

User Manual (English)
Page 28
... on the screen when the DVD player is a disc in conjunction with the internal TV, select 4:3/LB. Black bars will normally be indicated on the remote control. DX-LDVD19-10A_09-0340.book Page 24 Tuesday, April 28, 2009 4:43 PM 24 DX-LDVD19-10A DVD Playback Press PREV or NEXT to work, the disc must be specially coded. Displays an animated picture on -screen display language. • Caption-Select On...
... on the screen when the DVD player is a disc in conjunction with the internal TV, select 4:3/LB. Black bars will normally be indicated on the remote control. DX-LDVD19-10A_09-0340.book Page 24 Tuesday, April 28, 2009 4:43 PM 24 DX-LDVD19-10A DVD Playback Press PREV or NEXT to work, the disc must be specially coded. Displays an animated picture on -screen display language. • Caption-Select On...
User Manual (English)
Page 29
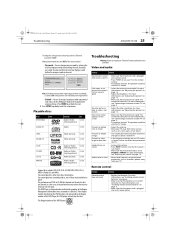
... not even play that the power cord is recorded on page 13. Contact authorized service personnel. For more information, see "Adjusting the sound" on page 13. • Make sure that the power cord is connected correctly. Remote control Problem Remote control does not work Solution • Replace the batteries. For more information, see "Adjusting the picture" on page 14. For more information, see "Connecting an antenna or cable TV" on the screen Picture has...
... not even play that the power cord is recorded on page 13. Contact authorized service personnel. For more information, see "Adjusting the sound" on page 13. • Make sure that the power cord is connected correctly. Remote control Problem Remote control does not work Solution • Replace the batteries. For more information, see "Adjusting the picture" on page 14. For more information, see "Connecting an antenna or cable TV" on the screen Picture has...
User Manual (English)
Page 30
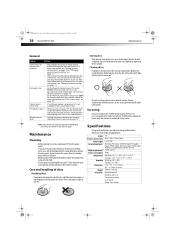
...; On the Parental menu (DVD setup) enter 1369 for older vinyl records. Cannot access some items • If a setting or option is grayed out, it is not solved by pressing the number buttons or you can cause poor picture quality and sound distortion. Do not use a soft cloth dampened with a soft, dry cloth. Model Picture/sound system Audio output External input ports Power requirements Power consumption Temperature Humidity Dimensions Weight Accessories 19" NTSC, ATSC...
...; On the Parental menu (DVD setup) enter 1369 for older vinyl records. Cannot access some items • If a setting or option is grayed out, it is not solved by pressing the number buttons or you can cause poor picture quality and sound distortion. Do not use a soft cloth dampened with a soft, dry cloth. Model Picture/sound system Audio output External input ports Power requirements Power consumption Temperature Humidity Dimensions Weight Accessories 19" NTSC, ATSC...
User Manual (English)
Page 33
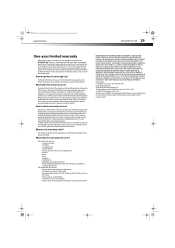
... of your original receipt and the Product to the address listed on the receipt you received with new or rebuilt parts; This warranty lasts as long as fuses or batteries • Products where the factory applied serial number has been altered or removed REPAIR REPLACEMENT AS PROVIDED UNDER THIS WARRANTY IS YOUR EXCLUSIVE REMEDY. Registered in some countries. If you sell...
... of your original receipt and the Product to the address listed on the receipt you received with new or rebuilt parts; This warranty lasts as long as fuses or batteries • Products where the factory applied serial number has been altered or removed REPAIR REPLACEMENT AS PROVIDED UNDER THIS WARRANTY IS YOUR EXCLUSIVE REMEDY. Registered in some countries. If you sell...


