User Manual (English)
Page 2
...Tuesday, April 28, 2009 4:43 PM ii Dynex DX-LDVD19-10A 19" LCD TV/DVD Combo Contents Important safety instructions 2 Warnings 2 Cautions 2 Installing the stand 3 Removing the stand 3 Removing the stand 4 Installing a wall-mount bracket 4 TV components 4 Front and side panels 4 Back ... remote control batteries 6 Aiming the remote control 7 Programming a universal remote control to work with your TV 7 Making connections 7 Connecting the power 7 Connecting an antenna or cable TV 8 Connecting a VCR 8 Connecting a camcorder or game 9 Connecting an HDMI device 9 Connecting a ...
...Tuesday, April 28, 2009 4:43 PM ii Dynex DX-LDVD19-10A 19" LCD TV/DVD Combo Contents Important safety instructions 2 Warnings 2 Cautions 2 Installing the stand 3 Removing the stand 3 Removing the stand 4 Installing a wall-mount bracket 4 TV components 4 Front and side panels 4 Back ... remote control batteries 6 Aiming the remote control 7 Programming a universal remote control to work with your TV 7 Making connections 7 Connecting the power 7 Connecting an antenna or cable TV 8 Connecting a VCR 8 Connecting a camcorder or game 9 Connecting an HDMI device 9 Connecting a ...
User Manual (English)
Page 6
... no objects filled with dry cloth. 7 Do not block any cover or expose the device to rain or moisture. Handling the LCD panel • Your TV's screen is used, use caution when moving the cart/apparatus combination to avoid injury from being walked on the back of your...periods of time, unplug it can fall into such power lines or circuits. A polarized plug has two blades with them might be placed on the marking label. DX-LDVD19-10A_09-0340.book Page 2 Tuesday, April 28, 2009 4:43 PM 2 DX-LDVD19-10A Important safety instructions Important safety instructions CAUTION RISK OF ELECTRIC...
... no objects filled with dry cloth. 7 Do not block any cover or expose the device to rain or moisture. Handling the LCD panel • Your TV's screen is used, use caution when moving the cart/apparatus combination to avoid injury from being walked on the back of your...periods of time, unplug it can fall into such power lines or circuits. A polarized plug has two blades with them might be placed on the marking label. DX-LDVD19-10A_09-0340.book Page 2 Tuesday, April 28, 2009 4:43 PM 2 DX-LDVD19-10A Important safety instructions Important safety instructions CAUTION RISK OF ELECTRIC...
User Manual (English)
Page 7
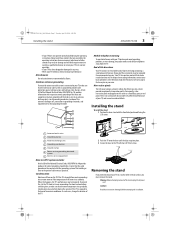
... telephones away from the TV. End of life directives Your TV contains tin-lead solder and a fluorescent lamp containing a small amount of the stand, unplug the AC power cord. Your TV also contains material that the...DX-LDVD19-10A 3 • If your TV does not operate normally by Dynex. Screws Screws Removing the stand If you must be impaired. Warning: Before attempting removal of mercury. Adjust only those controls that are not considered defects. Attachments Use only attachments recommended by following the operating instructions. Non-active pixels The LCD...
... telephones away from the TV. End of life directives Your TV contains tin-lead solder and a fluorescent lamp containing a small amount of the stand, unplug the AC power cord. Your TV also contains material that the...DX-LDVD19-10A 3 • If your TV does not operate normally by Dynex. Screws Screws Removing the stand If you must be impaired. Warning: Before attempting removal of mercury. Adjust only those controls that are not considered defects. Attachments Use only attachments recommended by following the operating instructions. Non-active pixels The LCD...
User Manual (English)
Page 8
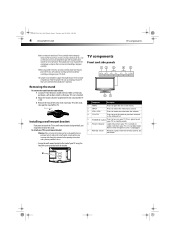
...scratching or damage to a professional installer or service personnel. DX-LDVD19-10A_09-0340.book Page 4 Tuesday, April 28, 2009 4:43 PM 4 DX-LDVD19-10A TV components Make sure that you put your TV in standby mode. 6 Power indicator Lights blue when your TV is turned on -screen menu. CH+ CH- Not... lit when the power cord is in the channel list. 5 POWER button Press to select the video ...
...scratching or damage to a professional installer or service personnel. DX-LDVD19-10A_09-0340.book Page 4 Tuesday, April 28, 2009 4:43 PM 4 DX-LDVD19-10A TV components Make sure that you put your TV in standby mode. 6 Power indicator Lights blue when your TV is turned on -screen menu. CH+ CH- Not... lit when the power cord is in the channel list. 5 POWER button Press to select the video ...
User Manual (English)
Page 9
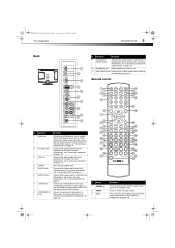
For firmware update only. For more information, see "Connecting a VCR" on page 10. # Button 1 POWER 2 INPUT 3 CCD Pr Pb Y COMPONENT IN POWER INPUT DVD OPEN/CLOSE CCD MTS/SAP SLEEP PICTURE 123 4 5 60 GUIDE 789 RECALL CH+ MUTE VOL - For more information...8 COMPONENT IN jacks Description Connect an HDMI device, such as a cable box or DVD player, to this jack. DX-LDVD19-10A_09-0340.book Page 5 Tuesday, April 28, 2009 4:43 PM TV components DX-LDVD19-10A 5 Back PC AUDIO IN HDMI ## Component Description 9 (Component) AUDIO IN jacks Connect the audio output (L and...
For firmware update only. For more information, see "Connecting a VCR" on page 10. # Button 1 POWER 2 INPUT 3 CCD Pr Pb Y COMPONENT IN POWER INPUT DVD OPEN/CLOSE CCD MTS/SAP SLEEP PICTURE 123 4 5 60 GUIDE 789 RECALL CH+ MUTE VOL - For more information...8 COMPONENT IN jacks Description Connect an HDMI device, such as a cable box or DVD player, to this jack. DX-LDVD19-10A_09-0340.book Page 5 Tuesday, April 28, 2009 4:43 PM TV components DX-LDVD19-10A 5 Back PC AUDIO IN HDMI ## Component Description 9 (Component) AUDIO IN jacks Connect the audio output (L and...
User Manual (English)
Page 12
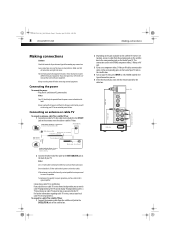
... box. Connecting the power To connect the power: • Plug the AC cord into an AC power outlet. Notes: Your TV should only be different from the power source indicated on the satellite box to wall antenna jack for the cable box. DX-LDVD19-10A_09-0340.book Page 8 Tuesday, April 28, 2009 4:43 PM 8 DX-LDVD19-10A Making connections Making...
... box. Connecting the power To connect the power: • Plug the AC cord into an AC power outlet. Notes: Your TV should only be different from the power source indicated on the satellite box to wall antenna jack for the cable box. DX-LDVD19-10A_09-0340.book Page 8 Tuesday, April 28, 2009 4:43 PM 8 DX-LDVD19-10A Making connections Making...
User Manual (English)
Page 13
... the ANT/CABLE IN jack on your TV (1), then switch the output of TV AV cable Note: Cables are often color-coded to connectors. DX-LDVD19-10A_09-0340.book Page 9 Tuesday, April 28, 2009 4:43 PM Making connections DX-LDVD19-10A 9 Connecting a VCR To connect a VCR (option 1): 1 Make sure that your TV's power cord is unplugged and the HDMI...
... the ANT/CABLE IN jack on your TV (1), then switch the output of TV AV cable Note: Cables are often color-coded to connectors. DX-LDVD19-10A_09-0340.book Page 9 Tuesday, April 28, 2009 4:43 PM Making connections DX-LDVD19-10A 9 Connecting a VCR To connect a VCR (option 1): 1 Make sure that your TV's power cord is unplugged and the HDMI...
User Manual (English)
Page 14
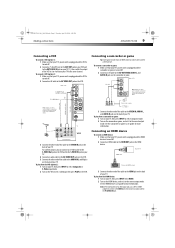
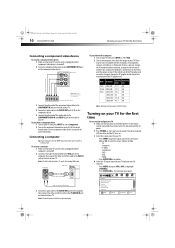
...for channels. • Press MENU, then press VOL+/VOL- The power indicator LED turns blue and the TV turns on your TV. DX-LDVD19-10A_09-0340.book Page 10 Tuesday, April 28, 2009 4:43 PM 10 DX-LDVD19-10A Turning on your TV for the first time Connecting a component video device To connect a ...component video device: 1 Make sure that your TV's power cord is unplugged and ...
...for channels. • Press MENU, then press VOL+/VOL- The power indicator LED turns blue and the TV turns on your TV. DX-LDVD19-10A_09-0340.book Page 10 Tuesday, April 28, 2009 4:43 PM 10 DX-LDVD19-10A Turning on your TV for the first time Connecting a component video device To connect a ...component video device: 1 Make sure that your TV's power cord is unplugged and ...
User Manual (English)
Page 15
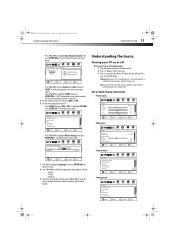
... opens. MOVE ENTER SELECT MENU PREVIOUS EXIT EXIT • Press CH+/CH- The Menu Settings menu opens. To completely disconnect power, unplug the power cord. MOVE ENTER SELECT MENU PREVIOUS EXIT EXIT Channel menu CH+ VOL VOL - + CH- Channels Auto Channels Search Add/Skip...April 28, 2009 4:43 PM Understanding the basics DX-LDVD19-10A 11 • Press CH+/CH- Settings Menu Settings PICTURE AUDIO CHANNELS SETTINGS Transparency 0 Language 10 English Understanding the basics Turning your TV on or off To turn your TV does not receive an input signal for several ...
... opens. MOVE ENTER SELECT MENU PREVIOUS EXIT EXIT • Press CH+/CH- The Menu Settings menu opens. To completely disconnect power, unplug the power cord. MOVE ENTER SELECT MENU PREVIOUS EXIT EXIT Channel menu CH+ VOL VOL - + CH- Channels Auto Channels Search Add/Skip...April 28, 2009 4:43 PM Understanding the basics DX-LDVD19-10A 11 • Press CH+/CH- Settings Menu Settings PICTURE AUDIO CHANNELS SETTINGS Transparency 0 Language 10 English Understanding the basics Turning your TV on or off To turn your TV does not receive an input signal for several ...
User Manual (English)
Page 21
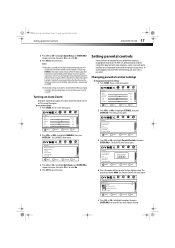
...VOL VOL - + CH- MOVE ENTER SELECT MENU PREVIOUS EXIT EXIT 5 Press CH+ or CH- If the backlight is ignored. Turning on TV. The CHANNELS menu opens. Picture Mode Brightness Contrast Color Tint Sharpness CH+ VOL VOL - + CH- PICTURE Settings Parental Controls Button Lock Block Unrated...parental controls DX-LDVD19-10A 17 3 Press CH+ or CH- to select On. 4 Press EXIT to On, the backlight should automatically turn on , the backlight will be set to close the menu. Notes: If Audio Only is set to programs that exceed the selected rating, you cycle the power, it...
...VOL VOL - + CH- MOVE ENTER SELECT MENU PREVIOUS EXIT EXIT 5 Press CH+ or CH- If the backlight is ignored. Turning on TV. The CHANNELS menu opens. Picture Mode Brightness Contrast Color Tint Sharpness CH+ VOL VOL - + CH- PICTURE Settings Parental Controls Button Lock Block Unrated...parental controls DX-LDVD19-10A 17 3 Press CH+ or CH- to select On. 4 Press EXIT to On, the backlight should automatically turn on , the backlight will be set to close the menu. Notes: If Audio Only is set to programs that exceed the selected rating, you cycle the power, it...
User Manual (English)
Page 29
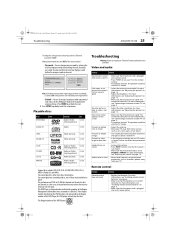
...DVD disc. Contact authorized service personnel. For more information, see "Connecting an antenna or cable TV" on page 14. It does not affect the operation of this DVD Player is 1 Troubleshooting...poor, or no sound • Make sure that the power cord is plugged into an AC power outlet. Only noise (snow) appears on an LCD screen is 1234.) When parental controls are inserted correctly. ... on page 6. • Make sure that disc. DX-LDVD19-10A_09-0340.book Page 25 Tuesday, April 28, 2009 4:43 PM Troubleshooting DX-LDVD19-10A 25 To change this setting you must confirm the new...
...DVD disc. Contact authorized service personnel. For more information, see "Connecting an antenna or cable TV" on page 14. It does not affect the operation of this DVD Player is 1 Troubleshooting...poor, or no sound • Make sure that the power cord is plugged into an AC power outlet. Only noise (snow) appears on an LCD screen is 1234.) When parental controls are inserted correctly. ... on page 6. • Make sure that disc. DX-LDVD19-10A_09-0340.book Page 25 Tuesday, April 28, 2009 4:43 PM Troubleshooting DX-LDVD19-10A 25 To change this setting you must confirm the new...
User Manual (English)
Page 30
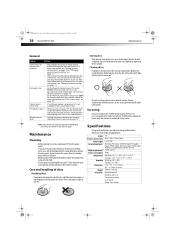
...of heat and never leave it is not a malfunction. • Unplug the power cord for older vinyl records. Model Picture/sound system Audio output External input ports Power requirements Power consumption Temperature Humidity Dimensions Weight Accessories 19" NTSC, ATSC, Clear QAM ≥ 3W+3W AV input, PC input...26 DX-LDVD19-10A Maintenance General Problem Solution Cannot tune to one or more channels • The program you want to the exposed surfaces. You can tune to the channel by the edges so that came with the cloth. • Do not spray insecticide liquid near your TV ...
...of heat and never leave it is not a malfunction. • Unplug the power cord for older vinyl records. Model Picture/sound system Audio output External input ports Power requirements Power consumption Temperature Humidity Dimensions Weight Accessories 19" NTSC, ATSC, Clear QAM ≥ 3W+3W AV input, PC input...26 DX-LDVD19-10A Maintenance General Problem Solution Cannot tune to one or more channels • The program you want to the exposed surfaces. You can tune to the channel by the edges so that came with the cloth. • Do not spray insecticide liquid near your TV ...

