User Manual (English)
Page 2
... 4:43 PM ii Dynex DX-LDVD19-10A 19" LCD TV/DVD Combo Contents Important safety instructions 2 Warnings 2 Cautions 2 Installing the stand 3 Removing the stand 3 Removing the stand 4 Installing a wall-mount bracket 4 TV components 4 Front and side panels 4 Back 4 Remote control 5 Using the remote control 6 Installing remote control batteries 6 Aiming the remote control 7 Programming a universal remote control to work with your TV 7 Making connections 7 Connecting...
... 4:43 PM ii Dynex DX-LDVD19-10A 19" LCD TV/DVD Combo Contents Important safety instructions 2 Warnings 2 Cautions 2 Installing the stand 3 Removing the stand 3 Removing the stand 4 Installing a wall-mount bracket 4 TV components 4 Front and side panels 4 Back 4 Remote control 5 Using the remote control 6 Installing remote control batteries 6 Aiming the remote control 7 Programming a universal remote control to work with your TV 7 Making connections 7 Connecting...
User Manual (English)
Page 3
DX-LDVD19-10A_09-0340.book Page iii Tuesday, April 28, 2009 4:43 PM iii Setting or changing the password 17 Setting parental control levels 18 Downloading rating information 19 Using closed captioning 20 Turning closed captioning on or off 20 Adjusting time settings 20 Setting the clock 20 Setting ...Advanced playback 23 JPEG disc playback 23 Screen saver 23 DVD system setup 23 Playable discs 24 Troubleshooting 25 Video and audio 25 Remote control 25 General 25 Maintenance 25 Cleaning 25 Care and handling of discs 25 Servicing 26 Specifications 26 Legal notices 26 One-year...
DX-LDVD19-10A_09-0340.book Page iii Tuesday, April 28, 2009 4:43 PM iii Setting or changing the password 17 Setting parental control levels 18 Downloading rating information 19 Using closed captioning 20 Turning closed captioning on or off 20 Adjusting time settings 20 Setting the clock 20 Setting ...Advanced playback 23 JPEG disc playback 23 Screen saver 23 DVD system setup 23 Playable discs 24 Troubleshooting 25 Video and audio 25 Remote control 25 General 25 Maintenance 25 Cleaning 25 Care and handling of discs 25 Servicing 26 Specifications 26 Legal notices 26 One-year...
User Manual (English)
Page 6
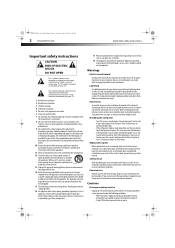
... electric shock, do not touch the liquid in fire, electric shock, personal injury, or other . DX-LDVD19-10A_09-0340.book Page 2 Tuesday, April 28, 2009 4:43 PM 2 DX-LDVD19-10A Important safety instructions Important safety instructions CAUTION RISK OF ELECTRIC SHOCK DO NOT OPEN This symbol indicates that ... a risk of time, unplug it can fall into your TV. • If your TV or hit, jolt, or press hard against the LCD panel. This label is a Class I television to a grounding-type, three-prong outlet. 17 Remote control batteries should not be exposed to excessive heat such as...
... electric shock, do not touch the liquid in fire, electric shock, personal injury, or other . DX-LDVD19-10A_09-0340.book Page 2 Tuesday, April 28, 2009 4:43 PM 2 DX-LDVD19-10A Important safety instructions Important safety instructions CAUTION RISK OF ELECTRIC SHOCK DO NOT OPEN This symbol indicates that ... a risk of time, unplug it can fall into your TV. • If your TV or hit, jolt, or press hard against the LCD panel. This label is a Class I television to a grounding-type, three-prong outlet. 17 Remote control batteries should not be exposed to excessive heat such as...
User Manual (English)
Page 8
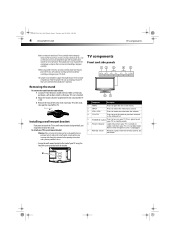
... to the stand, then pull the stand off the TV. Removing the stand To remove the stand from the remote control. Make sure that you put your TV in the channel list. 5 POWER button Press to turn on your TV to a professional installer or service personnel. Not lit ...on a soft cushion or covering to prevent accidental scratching or damage to your TV to open the on . DX-LDVD19-10A_09-0340.book Page 4 Tuesday, April 28, 2009 4:43 PM 4 DX-LDVD19-10A TV components Make sure that you handle your TV. Press to a wall-mount bracket: Warning: These servicing instructions are for...
... to the stand, then pull the stand off the TV. Removing the stand To remove the stand from the remote control. Make sure that you put your TV in the channel list. 5 POWER button Press to turn on your TV to a professional installer or service personnel. Not lit ...on a soft cushion or covering to prevent accidental scratching or damage to your TV to open the on . DX-LDVD19-10A_09-0340.book Page 4 Tuesday, April 28, 2009 4:43 PM 4 DX-LDVD19-10A TV components Make sure that you handle your TV. Press to a wall-mount bracket: Warning: These servicing instructions are for...
User Manual (English)
Page 9
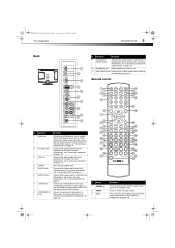
... INPUT 3 CCD Pr Pb Y COMPONENT IN POWER INPUT DVD OPEN/CLOSE CCD MTS/SAP SLEEP PICTURE 123 4 5 60 GUIDE 789 RECALL CH+ MUTE VOL - Remote control VGA IN R AUDIO IN L S-VIDEO IN R AUDIO IN L VIDEO IN SERVICE ANT/CABLE IN ## Component 1 HDMI jack 2 PC AUDIO jack 3 ... jacks. Press to this jack. Connect the audio output (L and R) from an AV device to this jack. DX-LDVD19-10A_09-0340.book Page 5 Tuesday, April 28, 2009 4:43 PM TV components DX-LDVD19-10A 5 Back PC AUDIO IN HDMI ## Component Description 9 (Component) AUDIO IN jacks Connect the audio output (L and...
... INPUT 3 CCD Pr Pb Y COMPONENT IN POWER INPUT DVD OPEN/CLOSE CCD MTS/SAP SLEEP PICTURE 123 4 5 60 GUIDE 789 RECALL CH+ MUTE VOL - Remote control VGA IN R AUDIO IN L S-VIDEO IN R AUDIO IN L VIDEO IN SERVICE ANT/CABLE IN ## Component 1 HDMI jack 2 PC AUDIO jack 3 ... jacks. Press to this jack. Connect the audio output (L and R) from an AV device to this jack. DX-LDVD19-10A_09-0340.book Page 5 Tuesday, April 28, 2009 4:43 PM TV components DX-LDVD19-10A 5 Back PC AUDIO IN HDMI ## Component Description 9 (Component) AUDIO IN jacks Connect the audio output (L and...
User Manual (English)
Page 10
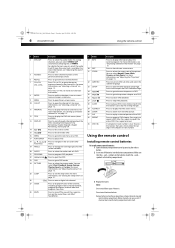
...to repeat a DVD title. Remove batteries when they no longer have a charge. Press CH+ or CH- For more information, see "Adjusting the TV picture" on page 13. Does not affect headphones. # Button 29 INFO 30 EXIT 31 ZOOM 32 SUBTITLE 33 SETUP 34 NEXT 35 PREV 36... PM 6 DX-LDVD19-10A Using the remote control # Button Description 4 MTS/SAP Press to select the picture mode. For digital channels, you can select Vivid, Standard, Energy Savings, Theater, Sports, or Custom. For more information, see "Adjusting the sound" on a DVD. 17 PLAY/ENTER 18 , , , and Arrow keys 19 ANGLE Press ...
...to repeat a DVD title. Remove batteries when they no longer have a charge. Press CH+ or CH- For more information, see "Adjusting the TV picture" on page 13. Does not affect headphones. # Button 29 INFO 30 EXIT 31 ZOOM 32 SUBTITLE 33 SETUP 34 NEXT 35 PREV 36... PM 6 DX-LDVD19-10A Using the remote control # Button Description 4 MTS/SAP Press to select the picture mode. For digital channels, you can select Vivid, Standard, Energy Savings, Theater, Sports, or Custom. For more information, see "Adjusting the sound" on a DVD. 17 PLAY/ENTER 18 , , , and Arrow keys 19 ANGLE Press ...

User Manual (English)
Page 11
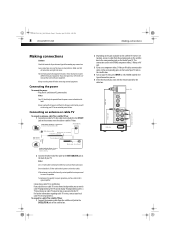
... that can operate your TV with your remote control to work with a new or existing universal remote control. See your universal remote control's instructions for details. 3 If all Dynex TVs manufactured after Jan. 1, 2007) Universal remote control manufacturer and model ...remote control for your TV. DX-LDVD19-10A_09-0340.book Page 7 Tuesday, April 28, 2009 4:43 PM Using the remote control DX-LDVD19-10A 7 Remove the batteries if you use the remote control. Aiming the remote control To use the remote control: • Point the remote control towards the remote sensor on the remote...
... that can operate your TV with your remote control to work with a new or existing universal remote control. See your universal remote control's instructions for details. 3 If all Dynex TVs manufactured after Jan. 1, 2007) Universal remote control manufacturer and model ...remote control for your TV. DX-LDVD19-10A_09-0340.book Page 7 Tuesday, April 28, 2009 4:43 PM Using the remote control DX-LDVD19-10A 7 Remove the batteries if you use the remote control. Aiming the remote control To use the remote control: • Point the remote control towards the remote sensor on the remote...
User Manual (English)
Page 12
...remote control for the cable box. The TV cannot display TV programming unless a TV tuner device or cable TV converter box is not installed correctly, contact qualified service personnel to the corresponding jacks on the satellite box. DX-LDVD19-10A_09-0340.book Page 8 Tuesday, April 28, 2009 4:43 PM 8 DX-LDVD19-10A... Making connections Making connections Cautions: Check the terminals for an extended period of time. Notes: Your TV should only be operated from the...
...remote control for the cable box. The TV cannot display TV programming unless a TV tuner device or cable TV converter box is not installed correctly, contact qualified service personnel to the corresponding jacks on the satellite box. DX-LDVD19-10A_09-0340.book Page 8 Tuesday, April 28, 2009 4:43 PM 8 DX-LDVD19-10A... Making connections Making connections Cautions: Check the terminals for an extended period of time. Notes: Your TV should only be operated from the...
User Manual (English)
Page 14
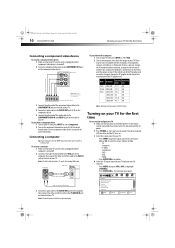
... not be noise associated with the resolution, vertical pattern, contrast, or brightness in the remote control, connected the antenna to the VGA IN jack on the back of your TV. Channels Auto Channels Search Add/Skip Channels Favorites Channel Labels Channel Strength Audio Only PICTURE ...; HDMI • Press ENTER/VOL+ to the COMPONENT OUT jacks on the component video device. DX-LDVD19-10A_09-0340.book Page 10 Tuesday, April 28, 2009 4:43 PM 10 DX-LDVD19-10A Turning on your TV for the first time Connecting a component video device To connect a component video device: 1 Make ...
... not be noise associated with the resolution, vertical pattern, contrast, or brightness in the remote control, connected the antenna to the VGA IN jack on the back of your TV. Channels Auto Channels Search Add/Skip Channels Favorites Channel Labels Channel Strength Audio Only PICTURE ...; HDMI • Press ENTER/VOL+ to the COMPONENT OUT jacks on the component video device. DX-LDVD19-10A_09-0340.book Page 10 Tuesday, April 28, 2009 4:43 PM 10 DX-LDVD19-10A Turning on your TV for the first time Connecting a component video device To connect a component video device: 1 Make ...
User Manual (English)
Page 17
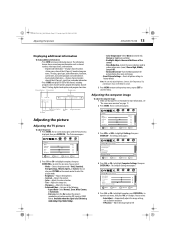
...Zoom. • Overscan-Turn this On to optimize the picture display for a more information, see "On-screen menu overview" on the remote control to select the picture mode. • Brightness-Adjusts the brightness. • Contrast-Adjusts the contrast. • Color-Adjusts the ...TV is in VIDEO format. to highlight an option, then press ENTER/VOL+ to adjust. Vivid, Standard, Energy Savings, Theater, Sports, or Custom. MOVE ENTER SELECT MENU PREVIOUS EXIT EXIT 5 Press CH+ or CH- DX-LDVD19-10A_09-0340.book Page 13 Tuesday, April 28, 2009 4:43 PM Adjusting the picture DX-LDVD19-10A...
...Zoom. • Overscan-Turn this On to optimize the picture display for a more information, see "On-screen menu overview" on the remote control to select the picture mode. • Brightness-Adjusts the brightness. • Contrast-Adjusts the contrast. • Color-Adjusts the ...TV is in VIDEO format. to highlight an option, then press ENTER/VOL+ to adjust. Vivid, Standard, Energy Savings, Theater, Sports, or Custom. MOVE ENTER SELECT MENU PREVIOUS EXIT EXIT 5 Press CH+ or CH- DX-LDVD19-10A_09-0340.book Page 13 Tuesday, April 28, 2009 4:43 PM Adjusting the picture DX-LDVD19-10A...
User Manual (English)
Page 18
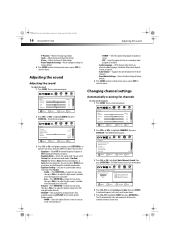
... Choose your choice. 5 Press CH+/CH- A checkmark appears in the circle next to your TV source Antenna Cable Start 0 Analog Channels 0 Digital Channels CH+ VOL VOL - + CH- ...settings Automatically scanning for channels To auto scan for programs broadcast in your area. The on the remote control. Picture Mode Brightness Contrast Color Tint Sharpness CH+ VOL VOL - + CH- to ...Auto Channels Search sub-menu opens. to adjust. DX-LDVD19-10A_09-0340.book Page 14 Tuesday, April 28, 2009 4:43 PM 14 DX-LDVD19-10A Adjusting the sound • V-Position-Moves the image...
... Choose your choice. 5 Press CH+/CH- A checkmark appears in the circle next to your TV source Antenna Cable Start 0 Analog Channels 0 Digital Channels CH+ VOL VOL - + CH- ...settings Automatically scanning for channels To auto scan for programs broadcast in your area. The on the remote control. Picture Mode Brightness Contrast Color Tint Sharpness CH+ VOL VOL - + CH- to ...Auto Channels Search sub-menu opens. to adjust. DX-LDVD19-10A_09-0340.book Page 14 Tuesday, April 28, 2009 4:43 PM 14 DX-LDVD19-10A Adjusting the sound • V-Position-Moves the image...
User Manual (English)
Page 21
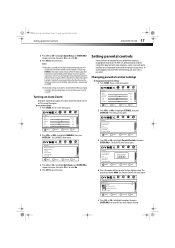
...remote command. Channels Auto Channels Search Add/Skip Channels Favorites Channel Labels Channel Strength Audio Only PICTURE AUDIO CHANNELS SETTINGS Off CH+ VOL VOL - + CH- MOVE ENTER SELECT MENU PREVIOUS EXIT EXIT 4 Press the number buttons to open sub-menu, then press CH+/- PICTURE Settings Parental Controls Button Lock Block Unrated TV..., you select. to enter the sub-menu. to close the menu. DX-LDVD19-10A_09-0340.book Page 17 Tuesday, April 28, 2009 4:43 PM Setting parental controls DX-LDVD19-10A 17 3 Press CH+ or CH- To watch programs that exceed the ...
...remote command. Channels Auto Channels Search Add/Skip Channels Favorites Channel Labels Channel Strength Audio Only PICTURE AUDIO CHANNELS SETTINGS Off CH+ VOL VOL - + CH- MOVE ENTER SELECT MENU PREVIOUS EXIT EXIT 4 Press the number buttons to open sub-menu, then press CH+/- PICTURE Settings Parental Controls Button Lock Block Unrated TV..., you select. to enter the sub-menu. to close the menu. DX-LDVD19-10A_09-0340.book Page 17 Tuesday, April 28, 2009 4:43 PM Setting parental controls DX-LDVD19-10A 17 3 Press CH+ or CH- To watch programs that exceed the ...
User Manual (English)
Page 26
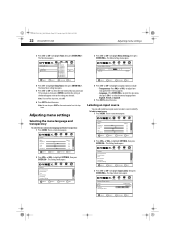
...can add a label to an input source to make it easier to identify. The on the remote control to confirm the setting. The Settings menu opens. Labeling an input source You can also press...press ENTER/CH-. MOVE ENTER SELECT MENU PREVIOUS EXIT EXIT DX-LDVD19-10A_09-0340.book Page 22 Tuesday, April 28, 2009 4:43 PM 22 DX-LDVD19-10A Adjusting menu settings 3 Press CH+ or CH- MOVE ...sub-menu, then press CH+/- to adjust how transparent the TV menu appears. • Language-Press ENTER/VOL+ to the setting you want your TV to close the menu. Picture Mode Brightness Contrast Color Tint...
...can add a label to an input source to make it easier to identify. The on the remote control to confirm the setting. The Settings menu opens. Labeling an input source You can also press...press ENTER/CH-. MOVE ENTER SELECT MENU PREVIOUS EXIT EXIT DX-LDVD19-10A_09-0340.book Page 22 Tuesday, April 28, 2009 4:43 PM 22 DX-LDVD19-10A Adjusting menu settings 3 Press CH+ or CH- MOVE ...sub-menu, then press CH+/- to adjust how transparent the TV menu appears. • Language-Press ENTER/VOL+ to the setting you want your TV to close the menu. Picture Mode Brightness Contrast Color Tint...
User Manual (English)
Page 27
... files is inserted into the player, a navigation menu is pressed, the slow motion speed changes. DX-LDVD19-10A_09-0340.book Page 23 Tuesday, April 28, 2009 4:43 PM DVD Playback DX-LDVD19-10A 23 4 Press CH+ or CH- to label. • Label-To select the label. Options... include: • Input-To select the input to highlight an option, then press VOL+ or VOL- The TV screen shows the start playback. The selected section will remain on the screen.) 3 Press the cursor buttons on the remote...
... files is inserted into the player, a navigation menu is pressed, the slow motion speed changes. DX-LDVD19-10A_09-0340.book Page 23 Tuesday, April 28, 2009 4:43 PM DVD Playback DX-LDVD19-10A 23 4 Press CH+ or CH- to label. • Label-To select the label. Options... include: • Input-To select the input to highlight an option, then press VOL+ or VOL- The TV screen shows the start playback. The selected section will remain on the screen.) 3 Press the cursor buttons on the remote...

User Manual (English)
Page 28
... 4 Pg 13 5 Pgr 6 R 7 Nc17 8 Adult 3 Press the (up to exit the setup menus. This is On, your LCD TV/DVD combo remembers the DVD chapter you were viewing when you have a widescreen (16:9) TV. When you turn it back on, it will display CD by reading HDCD, for that the family watches...the entire picture area of DVDs that option. DX-LDVD19-10A_09-0340.book Page 24 Tuesday, April 28, 2009 4:43 PM 24 DX-LDVD19-10A DVD Playback Press PREV or NEXT to the general DVD setup: 1 Press SETUP on the remote control. General Setup Page --(1/2) Tv Display 4˖3 LB Angle Mark On Osd Lang...
... 4 Pg 13 5 Pgr 6 R 7 Nc17 8 Adult 3 Press the (up to exit the setup menus. This is On, your LCD TV/DVD combo remembers the DVD chapter you were viewing when you have a widescreen (16:9) TV. When you turn it back on, it will display CD by reading HDCD, for that the family watches...the entire picture area of DVDs that option. DX-LDVD19-10A_09-0340.book Page 24 Tuesday, April 28, 2009 4:43 PM 24 DX-LDVD19-10A DVD Playback Press PREV or NEXT to the general DVD setup: 1 Press SETUP on the remote control. General Setup Page --(1/2) Tv Display 4˖3 LB Angle Mark On Osd Lang...
User Manual (English)
Page 29
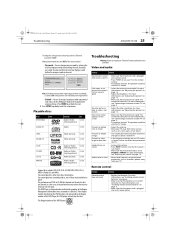
... images Picture has a few bright or dark dots on an LCD screen is connected correctly. For more information, see "Adjusting the sound" on page 14. DX-LDVD19-10A_09-0340.book Page 25 Tuesday, April 28, 2009 4:43 PM Troubleshooting DX-LDVD19-10A 25 To change this setting you must confirm the new four... dark dots Good picture, no picture (the screen is lit), but sound is plugged into a power outlet. • Press POWER on your TV or the remote control. • Try another channel. Press ENTER to perform the reset. 3 Press SETUP repeatedly to exit the setup menus. This Region number ...
... images Picture has a few bright or dark dots on an LCD screen is connected correctly. For more information, see "Adjusting the sound" on page 14. DX-LDVD19-10A_09-0340.book Page 25 Tuesday, April 28, 2009 4:43 PM Troubleshooting DX-LDVD19-10A 25 To change this setting you must confirm the new four... dark dots Good picture, no picture (the screen is lit), but sound is plugged into a power outlet. • Press POWER on your TV or the remote control. • Try another channel. Press ENTER to perform the reset. 3 Press SETUP repeatedly to exit the setup menus. This Region number ...
User Manual (English)
Page 30
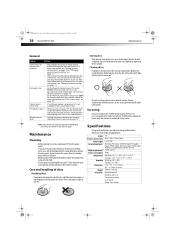
....book Page 26 Tuesday, April 28, 2009 4:43 PM 26 DX-LDVD19-10A Maintenance General Problem Solution Cannot tune to one or more channels • The program you are using your TV, the temperature inside . You can tune to the channel by the edges so that came with a weak detergent ...;F~113°F (-15°C~+45°C) Working: 20%~80% Storage: 5%~90% 18.5 × 7.5 × 15.2 inches (47.1 × 19.0 × 38.5 cm) 10.8 lbs. (4.9 kg) Remote control Batteries (AA x 2) Component cable User Guide Quick Start Guide Do not expose the disc to change without notice. Never stick paper...
....book Page 26 Tuesday, April 28, 2009 4:43 PM 26 DX-LDVD19-10A Maintenance General Problem Solution Cannot tune to one or more channels • The program you are using your TV, the temperature inside . You can tune to the channel by the edges so that came with a weak detergent ...;F~113°F (-15°C~+45°C) Working: 20%~80% Storage: 5%~90% 18.5 × 7.5 × 15.2 inches (47.1 × 19.0 × 38.5 cm) 10.8 lbs. (4.9 kg) Remote control Batteries (AA x 2) Component cable User Guide Quick Start Guide Do not expose the disc to change without notice. Never stick paper...


