User Manual (English)
Page 2
....book Page ii Tuesday, April 28, 2009 4:43 PM ii Dynex DX-LDVD19-10A 19" LCD TV/DVD Combo Contents Important safety instructions 2 Warnings 2 Cautions 2 Installing the stand 3 Removing the stand 3 Removing the stand 4 Installing a wall-mount bracket 4 TV components 4 Front and side panels 4 Back 4 Remote control 5 Using... 11 Adjusting the volume 12 Adjusting basic settings 12 Displaying additional information 12 Adjusting the picture 12 Adjusting the TV picture 12 Adjusting the computer image 13 Adjusting the sound 13 Adjusting the sound 13 Changing channel settings 14 ...
....book Page ii Tuesday, April 28, 2009 4:43 PM ii Dynex DX-LDVD19-10A 19" LCD TV/DVD Combo Contents Important safety instructions 2 Warnings 2 Cautions 2 Installing the stand 3 Removing the stand 3 Removing the stand 4 Installing a wall-mount bracket 4 TV components 4 Front and side panels 4 Back 4 Remote control 5 Using... 11 Adjusting the volume 12 Adjusting basic settings 12 Displaying additional information 12 Adjusting the picture 12 Adjusting the TV picture 12 Adjusting the computer image 13 Adjusting the sound 13 Adjusting the sound 13 Changing channel settings 14 ...
User Manual (English)
Page 5
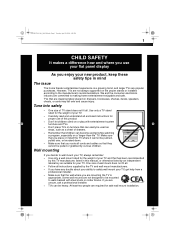
...to walls backed with entertainment system furniture and TVs. • Don't place TVs on a "larger-than-life" TV. One size of wall mount does not fit all. • Follow all . Wall mounting If you decide to making home entertainment enjoyable and safe. DX-LDVD19-10A_09-0340.book Page 1 Tuesday, April... may fall over , or knocked down. • Make sure that you route all enclosed instructions for safe wall mount installation. However, TVs are required for proper use your flat panel display As you enjoy your new product, keep these safety tips in this manual, or otherwise...
...to walls backed with entertainment system furniture and TVs. • Don't place TVs on a "larger-than-life" TV. One size of wall mount does not fit all. • Follow all . Wall mounting If you decide to making home entertainment enjoyable and safe. DX-LDVD19-10A_09-0340.book Page 1 Tuesday, April... may fall over , or knocked down. • Make sure that you route all enclosed instructions for safe wall mount installation. However, TVs are required for proper use your flat panel display As you enjoy your new product, keep these safety tips in this manual, or otherwise...
User Manual (English)
Page 6
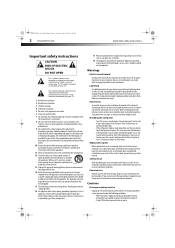
...your local power company. Servicing is made of your doctor. Also, if the liquid gets in clean water. Handling the LCD panel • Your TV's screen is required when the apparatus has been damaged in any way, such as contact with liquids, such as sunshine,...water. 6 Clean only with the apparatus. When installing an outside antenna system should not be fatal. DX-LDVD19-10A_09-0340.book Page 2 Tuesday, April 28, 2009 4:43 PM 2 DX-LDVD19-10A Important safety instructions Important safety instructions CAUTION RISK OF ELECTRIC SHOCK DO NOT OPEN This symbol indicates that...
...your local power company. Servicing is made of your doctor. Also, if the liquid gets in clean water. Handling the LCD panel • Your TV's screen is required when the apparatus has been damaged in any way, such as contact with liquids, such as sunshine,...water. 6 Clean only with the apparatus. When installing an outside antenna system should not be fatal. DX-LDVD19-10A_09-0340.book Page 2 Tuesday, April 28, 2009 4:43 PM 2 DX-LDVD19-10A Important safety instructions Important safety instructions CAUTION RISK OF ELECTRIC SHOCK DO NOT OPEN This symbol indicates that...
User Manual (English)
Page 7
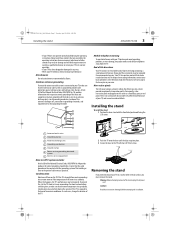
... keep your cordless and cellular telephones away from the TV. DX-LDVD19-10A_09-0340.book Page 3 Tuesday, April 28, 2009 4:43 PM Installing the stand DX-LDVD19-10A 3 • If your TV does not operate normally by Dynex. Attachments Use only attachments recommended by following the operating ...instructions. Article 810 of the building as a fixed blue, green, or red point. Non-active pixels The LCD panel contains almost ...
... keep your cordless and cellular telephones away from the TV. DX-LDVD19-10A_09-0340.book Page 3 Tuesday, April 28, 2009 4:43 PM Installing the stand DX-LDVD19-10A 3 • If your TV does not operate normally by Dynex. Attachments Use only attachments recommended by following the operating ...instructions. Article 810 of the building as a fixed blue, green, or red point. Non-active pixels The LCD panel contains almost ...
User Manual (English)
Page 8
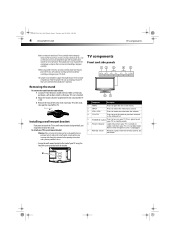
...remote control. If you are for any servicing other than that contained in standby mode. 6 Power indicator Lights blue when your TV that is not intended to use by the speaker. Remove screws Installing a wall-mount bracket If you want to attach the... (2) M4 screws that secure your TV very carefully when attempting removal of your TV is turned on a soft cushion or covering to prevent accidental scratching or damage to mishandling or improper assembly. DX-LDVD19-10A_09-0340.book Page 4 Tuesday, April 28, 2009 4:43 PM 4 DX-LDVD19-10A TV components Make sure that you handle your...
...remote control. If you are for any servicing other than that contained in standby mode. 6 Power indicator Lights blue when your TV that is not intended to use by the speaker. Remove screws Installing a wall-mount bracket If you want to attach the... (2) M4 screws that secure your TV very carefully when attempting removal of your TV is turned on a soft cushion or covering to prevent accidental scratching or damage to mishandling or improper assembly. DX-LDVD19-10A_09-0340.book Page 4 Tuesday, April 28, 2009 4:43 PM 4 DX-LDVD19-10A TV components Make sure that you handle your...
User Manual (English)
Page 9
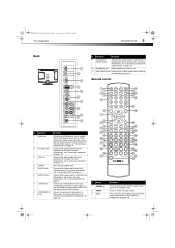
Connect the video output from your computer to put your TV in Standby mode. For more information, see "Connecting a VCR" on page 9. Connect a component video device to these jacks. Press again to this jack. Press to ... more information, see "Connecting a computer" on page 10. 10 Headphone jack Plug headphones into this jack. DX-LDVD19-10A_09-0340.book Page 5 Tuesday, April 28, 2009 4:43 PM TV components DX-LDVD19-10A 5 Back PC AUDIO IN HDMI ## Component Description 9 (Component) AUDIO IN jacks Connect the audio output (L and R) from a component device to the AUDIO IN...
Connect the video output from your computer to put your TV in Standby mode. For more information, see "Connecting a VCR" on page 9. Connect a component video device to these jacks. Press again to this jack. Press to ... more information, see "Connecting a computer" on page 10. 10 Headphone jack Plug headphones into this jack. DX-LDVD19-10A_09-0340.book Page 5 Tuesday, April 28, 2009 4:43 PM TV components DX-LDVD19-10A 5 Back PC AUDIO IN HDMI ## Component Description 9 (Component) AUDIO IN jacks Connect the audio output (L and R) from a component device to the AUDIO IN...
User Manual (English)
Page 10
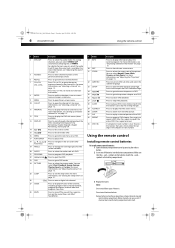
...the picture" on a DVD. 17 PLAY/ENTER 18 , , , and Arrow keys 19 ANGLE Press to play a DVD. Press to fast reverse a DVD. 15 FWD ...MENU Press to go to select the aspect ratio of the picture. For more information, see "Adjusting the TV picture" on the batteries match the + and - For more information, see "Selecting a channel" on ... page 12. For more information, see "Selecting a channel" on page 13. DX-LDVD19-10A_09-0340.book Page 6 Tuesday, April 28, 2009 4:43 PM 6 DX-LDVD19-10A Using the remote control # Button Description 4 MTS/SAP Press to repeat a DVD...
...the picture" on a DVD. 17 PLAY/ENTER 18 , , , and Arrow keys 19 ANGLE Press to play a DVD. Press to fast reverse a DVD. 15 FWD ...MENU Press to go to select the aspect ratio of the picture. For more information, see "Adjusting the TV picture" on the batteries match the + and - For more information, see "Selecting a channel" on ... page 12. For more information, see "Selecting a channel" on page 13. DX-LDVD19-10A_09-0340.book Page 6 Tuesday, April 28, 2009 4:43 PM 6 DX-LDVD19-10A Using the remote control # Button Description 4 MTS/SAP Press to repeat a DVD...

User Manual (English)
Page 11
...fire. Dynex TV codes for universal remote controls (for the brands Orion, Emerson, Memorex, Sansui, Sylvania, or Zenith. Aiming the remote control To use a different universal remote control that matches your TV. DX-LDVD19-10A_09-0340.book Page 7 Tuesday, April 28, 2009 4:43 PM Using the remote control DX-LDVD19-10A 7... Remove the batteries if you do not intend to use the numbered code to program your remote control to work with your TV. Either move your TV. You may not work if direct sunlight or bright ...
...fire. Dynex TV codes for universal remote controls (for the brands Orion, Emerson, Memorex, Sansui, Sylvania, or Zenith. Aiming the remote control To use a different universal remote control that matches your TV. DX-LDVD19-10A_09-0340.book Page 7 Tuesday, April 28, 2009 4:43 PM Using the remote control DX-LDVD19-10A 7... Remove the batteries if you do not intend to use the numbered code to program your remote control to work with your TV. Either move your TV. You may not work if direct sunlight or bright ...
User Manual (English)
Page 12
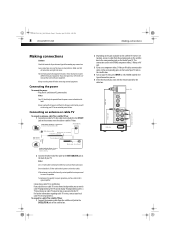
....book Page 8 Tuesday, April 28, 2009 4:43 PM 8 DX-LDVD19-10A Making connections Making connections Cautions: Check the terminals for outdoor antenna. 2 Connect the other cables. Always turn the power off when connecting external equipment. Always ... not bend Single-family dwellings or houses Connect to wall antenna jack for position and type before making any connections. The TV cannot display TV programming unless a TV tuner device or cable TV converter box is not installed correctly, contact qualified service personnel to the SATELLITE IN jack on the label. Back of your...
....book Page 8 Tuesday, April 28, 2009 4:43 PM 8 DX-LDVD19-10A Making connections Making connections Cautions: Check the terminals for outdoor antenna. 2 Connect the other cables. Always turn the power off when connecting external equipment. Always ... not bend Single-family dwellings or houses Connect to wall antenna jack for position and type before making any connections. The TV cannot display TV programming unless a TV tuner device or cable TV converter box is not installed correctly, contact qualified service personnel to the SATELLITE IN jack on the label. Back of your...
User Manual (English)
Page 13
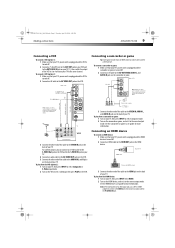
....book Page 9 Tuesday, April 28, 2009 4:43 PM Making connections DX-LDVD19-10A 9 Connecting a VCR To connect a VCR (option 1): 1 Make sure that your TV's power cord is unplugged and the VCR is turned off. 2 Connect a ... an S-Video cable to the S-VIDEO Out jack on the VCR and to the S-VIDEO IN jack on your TV. 4 Connect an audio cable to the AV AUDIO OUT jacks on the VCR. 5 Connect the other end of... and white to white. Connecting an HDMI device To connect an HDMI device: 1 Make sure that your TV's power cord is unplugged and the VCR is turned off . 2 Connect an AV cable to the VIDEO IN ...
....book Page 9 Tuesday, April 28, 2009 4:43 PM Making connections DX-LDVD19-10A 9 Connecting a VCR To connect a VCR (option 1): 1 Make sure that your TV's power cord is unplugged and the VCR is turned off. 2 Connect a ... an S-Video cable to the S-VIDEO Out jack on the VCR and to the S-VIDEO IN jack on your TV. 4 Connect an audio cable to the AV AUDIO OUT jacks on the VCR. 5 Connect the other end of... and white to white. Connecting an HDMI device To connect an HDMI device: 1 Make sure that your TV's power cord is unplugged and the VCR is turned off . 2 Connect an AV cable to the VIDEO IN ...
User Manual (English)
Page 14
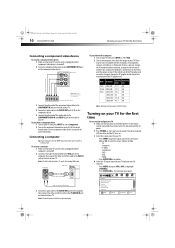
... ENTER/VOL+ to confirm. 4 Select the TV signal source for your TV. • Press INPUT to open the signal source menu, then press CH+ or CH- DX-LDVD19-10A_09-0340.book Page 10 Tuesday, April 28, 2009 4:43 PM 10 DX-LDVD19-10A Turning on your TV for the first time Connecting a component video ...device To connect a component video device: 1 Make sure that your TV's power cord is unplugged and the component ...
... ENTER/VOL+ to confirm. 4 Select the TV signal source for your TV. • Press INPUT to open the signal source menu, then press CH+ or CH- DX-LDVD19-10A_09-0340.book Page 10 Tuesday, April 28, 2009 4:43 PM 10 DX-LDVD19-10A Turning on your TV for the first time Connecting a component video ...device To connect a component video device: 1 Make sure that your TV's power cord is unplugged and the component ...
User Manual (English)
Page 15
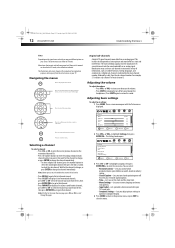
...Digital Channels CH+ VOL VOL - + CH- Settings Menu Settings PICTURE AUDIO CHANNELS SETTINGS Transparency 0 Language 10 English Understanding the basics Turning your TV on or off (standby mode): 1 Plug the power cord into standby mode. To completely disconnect power, unplug the power cord. PICTURE Channels ... SETTINGS Off CH+ VOL VOL - + CH- MOVE ENTER SELECT MENU PREVIOUS EXIT EXIT • Press CH+/CH- DX-LDVD19-10A_09-0340.book Page 11 Tuesday, April 28, 2009 4:43 PM Understanding the basics DX-LDVD19-10A 11 • Press CH+/CH- The Settings menu opens.
...Digital Channels CH+ VOL VOL - + CH- Settings Menu Settings PICTURE AUDIO CHANNELS SETTINGS Transparency 0 Language 10 English Understanding the basics Turning your TV on or off (standby mode): 1 Plug the power cord into standby mode. To completely disconnect power, unplug the power cord. PICTURE Channels ... SETTINGS Off CH+ VOL VOL - + CH- MOVE ENTER SELECT MENU PREVIOUS EXIT EXIT • Press CH+/CH- DX-LDVD19-10A_09-0340.book Page 11 Tuesday, April 28, 2009 4:43 PM Understanding the basics DX-LDVD19-10A 11 • Press CH+/CH- The Settings menu opens.
User Manual (English)
Page 16
.... For example, 5.1 indicates sub-channel 1 of memorized channels, press CH+ or CH- to close the menu. Digital sub-channels A digital TV signal transmits more than an analog signal. CH+ VOL ENTER - Note: Button presses must be within three seconds of information, such as an ... of main channel 5. You can watch, based on -screen menu opens with less static and interference. DX-LDVD19-10A_09-0340.book Page 12 Tuesday, April 28, 2009 4:43 PM 12 DX-LDVD19-10A Understanding the basics Notes: Depending on the signal source selected, you want, then wait for the channel...
.... For example, 5.1 indicates sub-channel 1 of memorized channels, press CH+ or CH- to close the menu. Digital sub-channels A digital TV signal transmits more than an analog signal. CH+ VOL ENTER - Note: Button presses must be within three seconds of information, such as an ... of main channel 5. You can watch, based on -screen menu opens with less static and interference. DX-LDVD19-10A_09-0340.book Page 12 Tuesday, April 28, 2009 4:43 PM 12 DX-LDVD19-10A Understanding the basics Notes: Depending on the signal source selected, you want, then wait for the channel...
User Manual (English)
Page 17
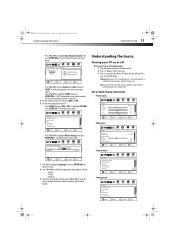
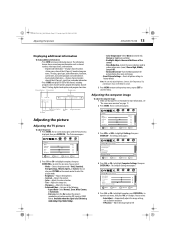
...). • Backlight-Adjusts the overall brilliance of the channel, including program name. DX-LDVD19-10A_09-0340.book Page 13 Tuesday, April 28, 2009 4:43 PM Adjusting the picture DX-LDVD19-10A 13 Displaying additional information To display additional information: • Press INFO to show ...time. The Computer Settings menu opens. Channel Number Channel label Program name 2.1 WGBH-SD TV-Rating TV-14 CS No Program Info Program ...
...). • Backlight-Adjusts the overall brilliance of the channel, including program name. DX-LDVD19-10A_09-0340.book Page 13 Tuesday, April 28, 2009 4:43 PM Adjusting the picture DX-LDVD19-10A 13 Displaying additional information To display additional information: • Press INFO to show ...time. The Computer Settings menu opens. Channel Number Channel label Program name 2.1 WGBH-SD TV-Rating TV-14 CS No Program Info Program ...
User Manual (English)
Page 18
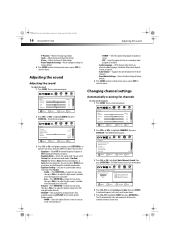
...open the sub-menu, then press CH+/- MOVE ENTER SELECT MENU PREVIOUS EXIT EXIT 4 Press CH+/CH- DX-LDVD19-10A_09-0340.book Page 14 Tuesday, April 28, 2009 4:43 PM 14 DX-LDVD19-10A Adjusting the sound • V-Position-Moves the image up or down • Clock-Adjust the clock setting... select Custom. • Treble-Press ENTER/VOL+ to adjust. The on weak stereo broadcasts. • STEREO-Select this option to listen to your TV source Antenna Cable Start 0 Analog Channels 0 Digital Channels CH+ VOL VOL - + CH- MOVE PICTURE AUDIO CHANNELS SETTINGS Custom 40 60 45 R5 ...
...open the sub-menu, then press CH+/- MOVE ENTER SELECT MENU PREVIOUS EXIT EXIT 4 Press CH+/CH- DX-LDVD19-10A_09-0340.book Page 14 Tuesday, April 28, 2009 4:43 PM 14 DX-LDVD19-10A Adjusting the sound • V-Position-Moves the image up or down • Clock-Adjust the clock setting... select Custom. • Treble-Press ENTER/VOL+ to adjust. The on weak stereo broadcasts. • STEREO-Select this option to listen to your TV source Antenna Cable Start 0 Analog Channels 0 Digital Channels CH+ VOL VOL - + CH- MOVE PICTURE AUDIO CHANNELS SETTINGS Custom 40 60 45 R5 ...
User Manual (English)
Page 19
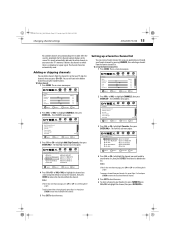
... Add/Skip Channels AUDIO CHANNELS SETTINGS Ch 3.0 Ch 10.1 WCAU-DT Ch 13.0 Ch 14.2 ATSC-2 Ch 19.0 Ch 5.1 KPI-DT Ch 11.1 MBC DTV Ch 14.1 ATSC-3 Ch 14.3 ATSC-3 Ch 23.0 CH... to 4 and press ENTER to return the checkmark to the channel. 5 Press EXIT to the TV's memory. Adding or skipping channels You can quickly browse through your favorite channels by using the number...CHANNELS SETTINGS Off CH+ VOL VOL - + CH- DX-LDVD19-10A_09-0340.book Page 15 Tuesday, April 28, 2009 4:43 PM Changing channel settings DX-LDVD19-10A 15 All available channels are automatically saved. Notes: If...
... Add/Skip Channels AUDIO CHANNELS SETTINGS Ch 3.0 Ch 10.1 WCAU-DT Ch 13.0 Ch 14.2 ATSC-2 Ch 19.0 Ch 5.1 KPI-DT Ch 11.1 MBC DTV Ch 14.1 ATSC-3 Ch 14.3 ATSC-3 Ch 23.0 CH... to 4 and press ENTER to return the checkmark to the channel. 5 Press EXIT to the TV's memory. Adding or skipping channels You can quickly browse through your favorite channels by using the number...CHANNELS SETTINGS Off CH+ VOL VOL - + CH- DX-LDVD19-10A_09-0340.book Page 15 Tuesday, April 28, 2009 4:43 PM Changing channel settings DX-LDVD19-10A 15 All available channels are automatically saved. Notes: If...
User Manual (English)
Page 21
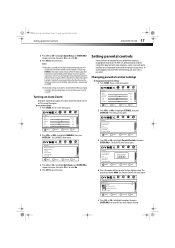
...EXIT to Off. Notes: If Audio Only is set to close the menu. The Audio Only setting of the picture, based on TV size and TV program. The on the remote control will turn off 5s after last remote command. The default password is not remembered. MOVE ENTER ...turn off 5 seconds after last remote command. to highlight SETTINGS, then press ENTER/CH- Options include: DX-LDVD19-10A_09-0340.book Page 17 Tuesday, April 28, 2009 4:43 PM Setting parental controls DX-LDVD19-10A 17 3 Press CH+ or CH- The on the backlight and the button's function is turned off ...
...EXIT to Off. Notes: If Audio Only is set to close the menu. The Audio Only setting of the picture, based on TV size and TV program. The on the remote control will turn off 5s after last remote command. The default password is not remembered. MOVE ENTER ...turn off 5 seconds after last remote command. to highlight SETTINGS, then press ENTER/CH- Options include: DX-LDVD19-10A_09-0340.book Page 17 Tuesday, April 28, 2009 4:43 PM Setting parental controls DX-LDVD19-10A 17 3 Press CH+ or CH- The on the backlight and the button's function is turned off ...
User Manual (English)
Page 22
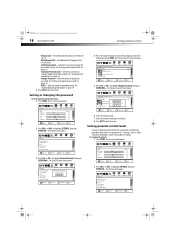
...4 Press the number buttons to highlight SETTINGS, then press ENTER/CH-. to enter the four-digit password. See "Downloading rating information" on page 19. 6 Press EXIT to close the menu. to highlight SETTINGS, then press ENTER/CH-. Settings Parental Controls Closed Caption Time Menu Settings Input Labels ....book Page 18 Tuesday, April 28, 2009 4:43 PM 18 DX-LDVD19-10A Setting parental controls • Button Lock-Set to On to lock the buttons on the front of the TV. • Block Unrated TV-Set to On to block TV programs that are not rated. • USA Parental Locks-Select ...
...4 Press the number buttons to highlight SETTINGS, then press ENTER/CH-. to enter the four-digit password. See "Downloading rating information" on page 19. 6 Press EXIT to close the menu. to highlight SETTINGS, then press ENTER/CH-. Settings Parental Controls Closed Caption Time Menu Settings Input Labels ....book Page 18 Tuesday, April 28, 2009 4:43 PM 18 DX-LDVD19-10A Setting parental controls • Button Lock-Set to On to lock the buttons on the front of the TV. • Block Unrated TV-Set to On to block TV programs that are not rated. • USA Parental Locks-Select ...
User Manual (English)
Page 23
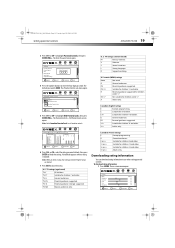
...-13 R NC-17 X TV Ratings ALL FV L S V D None TV-Y TV-Y7 TV-G TV-PG TV-14 TV-MA CH+ VOL VOL - + CH- TV-MA Mature audiences only. TV-Y7 Suitable for children 8 and older. X Adults only. DX-LDVD19-10A_09-0340.book Page 19 Tuesday, April 28, 2009 4:43 PM Setting parental controls DX-LDVD19-10A 19 3 Press CH+ or CH- TV ratings (age-based) TV-Y All children. MOVE...
...-13 R NC-17 X TV Ratings ALL FV L S V D None TV-Y TV-Y7 TV-G TV-PG TV-14 TV-MA CH+ VOL VOL - + CH- TV-MA Mature audiences only. TV-Y7 Suitable for children 8 and older. X Adults only. DX-LDVD19-10A_09-0340.book Page 19 Tuesday, April 28, 2009 4:43 PM Setting parental controls DX-LDVD19-10A 19 3 Press CH+ or CH- TV ratings (age-based) TV-Y All children. MOVE...
User Manual (English)
Page 24
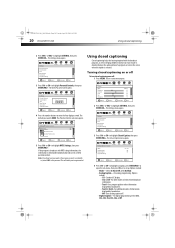
... menu opens. MOVE ENTER SELECT MENU PREVIOUS EXIT EXIT 4 Press CH+ or CH- PICTURE Settings Parental Controls Button Lock Block Unrated TV USA Parental Locks Canadian Parental Locks Change Password AUDIO CHANNELS SETTINGS Off Off CH+ VOL VOL - + CH- to open the sub...-For analog programming. MOVE ENTER SELECT MENU PREVIOUS EXIT EXIT 5 Press CH+ or CH- DX-LDVD19-10A_09-0340.book Page 20 Tuesday, April 28, 2009 4:43 PM 20 DX-LDVD19-10A Using closed captioning Closed captioning helps the hearing impaired with RRT5 rating information, the information is downloaded...
... menu opens. MOVE ENTER SELECT MENU PREVIOUS EXIT EXIT 4 Press CH+ or CH- PICTURE Settings Parental Controls Button Lock Block Unrated TV USA Parental Locks Canadian Parental Locks Change Password AUDIO CHANNELS SETTINGS Off Off CH+ VOL VOL - + CH- to open the sub...-For analog programming. MOVE ENTER SELECT MENU PREVIOUS EXIT EXIT 5 Press CH+ or CH- DX-LDVD19-10A_09-0340.book Page 20 Tuesday, April 28, 2009 4:43 PM 20 DX-LDVD19-10A Using closed captioning Closed captioning helps the hearing impaired with RRT5 rating information, the information is downloaded...


