
Dynex DX-L42-10A Support Question
Dynex DX-L42-10A Support Question
Find answers below for this question about Dynex DX-L42-10A - 42" LCD TV.Need a Dynex DX-L42-10A manual? We have 5 online manuals for this item!
Question posted by sheffron on February 27th, 2012
Change Tv Type
How do I change the TV Type it is set on 16.9 and we are unable to get a full picture. It was changed in error somehow.
Current Answers
Answer #1: Posted by 1stLadyDawn on February 27th, 2012 12:19 PM
1stLadyDawn
Member since:
January 25th, 2012 Points: 821,520

Member since:
January 25th, 2012 Points: 821,520
You want to change the aspect ratio on your DX-L42-10A for viewing. Someone probably hit the MENU button and since Picture comes up first in the top row...pressed a few more arrows and buttons and not you have lost the full picture.
- So with your remote, select MENU. At the top of the screen you will see 4 boxes. Picture, Audio, Setup and Channel.
- Select picture by using the > and then the UP arrow to highlight
- Go down to Advanced video (below sharpness) and highlight that row and press ENTER on your remote
- This will open the Advanced Video where you will see zoom modes. When Aspect Ratio is set to Auto Zoom ON (it's probably OFF now) the TV will automatically select the correct aspect ratio.
- NORMAL = correct aspect ration to match the source image
- WIDE = shows a full screen picture
- ZOOM = enlarges a screen picture but might actually crop the picture as well so that you lose the top and bottom
- CINEMA = stretches the sides but maintains a good center screen aspect ration
- The choice is yours.
- So highlight AUTO ZOOM with the arrow and that submenu will open.
- Make your selection and press ENTER on the remote.
- You can then leave this menu area by either pressing MENU on the remote to back out or by pressing EXIT to close the menu
HelpOwl has the manual for your DX-L42-10A online or your can open a PDF from this answer.
Related Dynex DX-L42-10A Manual Pages
User Manual (English) - Page 1
37" and 42" LCD TVs
DX-L37-10A/DX-L42-10A
USER GUIDE
User Manual (English) - Page 2
ii
Dynex DX-L37-10A/DX-L42-10A
37" and 42" LCD TVs
Contents
Child Safety 1
Important safety instructions 2
Warnings 2 Cautions 2
Installing and removing the stand 3
Installing the stand 3 Installing a wall-mount bracket 4
TV components 4
Front 4 Side 4 Back 5 Remote control 5
Using the remote control 6
Installing remote control batteries 6 Aiming the remote control 6 Programming a ...
User Manual (English) - Page 4
... it cannot be heavy. Some wall mounts are not designed to be mounted to wall mount your TV, always: • Use only a wall mount rated for proper use your flat panel display
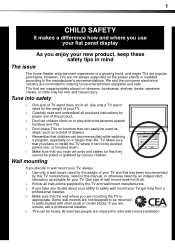
As you enjoy your new product, keep these safety tips in this product.
• Don't let children climb on or play...
User Manual (English) - Page 5

...gargle, rinse, and consult with your TV. The plug must
remain readily operable.
16 The apparatus with one
wider than the ...liquid gets in the vicinity of the polarized or
grounding-type plug. 2
Important safety instructions
Important safety instructions
CAUTION
RISK... antenna system should not be fatal. Handling the LCD panel
• Your TV's screen is damaged or frayed. • If...
User Manual (English) - Page 6
... summer if the TV is not intended to support the weight of your ability to provide some protection against voltage surges and built-up static charges.
Non-active pixels
The LCD panel contains almost 3 ...a cabinet or other flat surface.
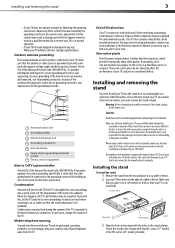
Installing and removing the stand
You must be recycled and reused. In such cases, change in damage and will form on the TV if the TV is not covered by ...
User Manual (English) - Page 7
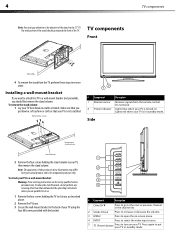
...from your actual product, and is not scratched. Note: The appearance of the stand on the 37" TV. Press to increase or decrease the volume.
3 MENU
Press to open the on a table or bench.... are for comparative purposes only. Do not block.
2 Power indicator Lights blue when your TV is turned on your TV using the
four M6 screws provided with the bracket.
# Component
Description
1 CH /CH ...
User Manual (English) - Page 8

...audio cables to the
audio jacks.
# Button
1
(Power)
2 COMP/HDMI/ VIDEO/TV
INFO
Description Press to turn on page 8.
10 RS-232 jack
For service only.
For more information, see...to a digital sound system
jack
to these
COMPONENT IN 2 jacks. Connect a computer to play your TV in Standby mode. For more information, see "Connecting a component
video device" on page 7.
9 S-...
User Manual (English) - Page 9

... a channel" on or off . Notes: Do not mix different types of batteries in the
on the sound.
8 MENU
Press to navigate...
Press to turn on -screen menus.
For more information, see "Setting up a favorite channel list" on page 14. You can select... Cinema. Dispose of your TV.
16.4 ft (5m)
Notes: Do not expose the remote control to select the picture mode. For more information,...
User Manual (English) - Page 10
... . You may need to try codes for your universal remote control by identifying its model (or your set -top box manufacturer, or call technical support for position and type before fi nding a match.
2 Follow your TV or change the angle at 1-800-305-2204.
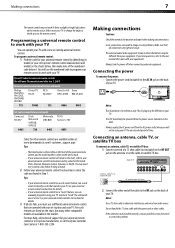
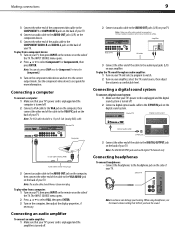
Always turn the power off when connecting external equipment. Connecting...
User Manual (English) - Page 11
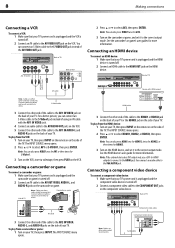
...jacks on the back of the TV. To play from a camcorder or game: 1 Turn on your TV. Component video cable Component video device
Audio cable
For a better picture, you can connect an S-Video... Turn on the HDMI device, and set it to the correct output mode. Connecting a component video device
To connect a component video device: 1 Make sure that your TV's power cord is unplugged and the ...
User Manual (English) - Page 12
....
See the component video device's user guide for Component2.
3 Turn on the component video device and set it to the correct output mode. Note: The audio cable should be a 15-pin D-Sub (analog...once for Component1 or twice for more information. When using headphones, use the lowest volume setting that your TV's power cord is unplugged and the computer is turned off . 2 Connect a VGA cable...
User Manual (English) - Page 13
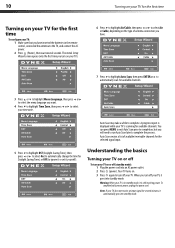
...into standby mode.
Your TV turns on. 3 Press again to turn on your TV).
6 Press to highlight Air/Cable, then press or to select Air or Cable, depending on the type of available/receivable channels ... to select On (to automatically change the time for Daylight Saving Time), or Off (to ignore it or set it automatically goes into standby mode. Note: If your TV does not receive an input signal...
User Manual (English) - Page 15
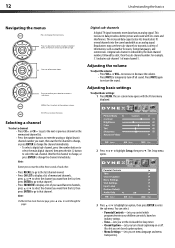
...TV... want, then wait for the channel to change, or press ENTER to change the channel immediately. • To select ...sub-channel. This increase in data provides a better picture and sound with the Picture menu displayed. The Setup menu opens.
Parental Controls... with less static and interference. Adjusting basic settings
To adjust basic settings: 1 Press MENU. The increased data capacity...
User Manual (English) - Page 16

... information-Displays channel number, channel label (if preset), signal type, audio information, and resolution. 2 Press GUIDE to show a list of the picture.
Adjusting the picture
13
• VGA Settings-Lets you adjust picture settings to optimize a computer display.
• Input Label-Lets you label a device connected to your TV's input jacks.
• Restore Default-Lets you reset...
User Manual (English) - Page 17

... adjust the computer image: 1 Make sure that your TV is in VGA mode. H-Position V-Position
5 Press or to highlight Setup, then press . The VGA settings menu opens.
You can select:
• Sound Mode... Adaptive Contrast-Turn this On to optimize the picture display for a more vivid image.
• Auto Zoom-In TV mode, setting Auto Zoom to On lets you set the Zoom Mode to Auto.
4 Press MENU...
User Manual (English) - Page 18
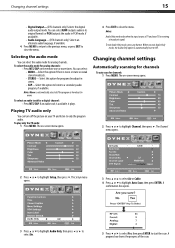
Changing channel settings
Automatically scanning for channels
To auto scan for a digital channel: • Press MTS/SAP.
You can turn off the picture on your TV is broadcast in PCM mode...it plays. The Setup menu opens. A progress box shows the progress of the scan. Changing channel settings
15
• Digital Output-(DTV channels only) Selects the digital audio output mode. Note...
User Manual (English) - Page 19

...16
Selecting the signal source
To select the signal source: 1 Press MENU. The Channel menu opens.
3 Press or to highlight Channel, then press .
You can create a favorite channel list so you press CH /CH . Note: If the list has more than one page, press or to scroll through your TV...then press .
The on -screen menu opens. Changing channel settings
2 Press or to remove the check mark from...
User Manual (English) - Page 21
... inappropriate material on TV.
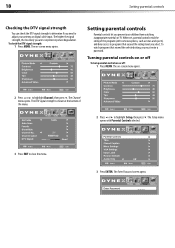
To watch programs that exceed the ratings level you prevent your antenna or digital cable input. The Channel menu opens. Setting parental controls
Parental controls...DTV signal strength:
1 Press MENU. When set, parental controls read the rating of the menu.
3 Press EXIT to close the menu.
2 Press or to experience picture degradation. The on or off: 1 ...
User Manual (English) - Page 30
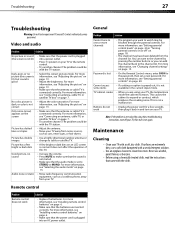
... (snow) appears on the screen
Picture has dotted lines or stripes
• Make sure that the antenna or cable TV is normal. General
Problem
Solution
Cannot tune to one or more information, see "Connecting an antenna, cable TV, or satellite TV box" on again. For more information, see "Changing channel settings" on page 15.
• On...
User Manual (English) - Page 31
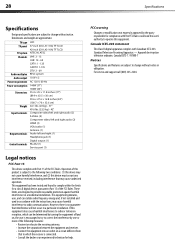
TV type TV panel
TV system Channels
LCD 37-inch (DX-L37-10A) TFT LCD 42-inch (DX-L42-10A) TFT LCD NTSC-M, ATSC VHF: 2 - 13 UHF: 14 - 69 CATV: 1 - 125
Audio multiplex Audio output
Power requirement Power consumption
Dimensions
Weight Input terminals
CADTV: 1-135 DTV: 2 - 69 BTSC system
10 W × 2
AC 120 V, 60 Hz
140W (37") 180W (42") 35.4 × 25 × 11.8 inches (37...
Similar Questions


When Turn On Tv, It Says Input Is Blocked. How Do I Get It To Unblock?
(Posted by franciseagan 10 years ago)
My Picture Drops Out On My Tv. Sound Stays On Just No Picture. 42' Dynex Lcd Tv
(Posted by elmateo27 12 years ago)
How Do You Change The Type Without The Remote For The Tvi Want To Put It On Hdmi
the remote signal is gone on my tv and I want to change the type? by manual mode. I want to change f...
the remote signal is gone on my tv and I want to change the type? by manual mode. I want to change f...
(Posted by gypsiemarie 12 years ago)