
Owners Manual
Page 4
... 24 Playing a Blu-ray Disc player/DVD player 25 Playing a CD player 25 Playing an iPod 25 Tuning in radio stations 28 Playing a network audio 32 Playing a USB memory device 43 Selecting a listening mode (Surround mode 45 Standard playback 45 DENON original surround playback 47 Stereo playback 47 Direct playback 47 Pure direct playback 47 Advanced version 48 Speaker installation/connection (Other than 5.1-channel) ·····49 Install 49 Connect 50 Set up speakers 52 Playback (Advanced operation 54 Convenient functions...
... 24 Playing a Blu-ray Disc player/DVD player 25 Playing a CD player 25 Playing an iPod 25 Tuning in radio stations 28 Playing a network audio 32 Playing a USB memory device 43 Selecting a listening mode (Surround mode 45 Standard playback 45 DENON original surround playback 47 Stereo playback 47 Direct playback 47 Pure direct playback 47 Advanced version 48 Speaker installation/connection (Other than 5.1-channel) ·····49 Install 49 Connect 50 Set up speakers 52 Playback (Advanced operation 54 Convenient functions...

Owners Manual
Page 5
...;delity sound in surround mode with equal quality and power for all channels, true to this unit and playing back through Audyssey DSX, you can experience a more powerful playback expression in the wide audio range. High definition audio support The unit is required. Supports HDMI 1.4 with 3D, ARC, Deep Color, x.v.Color , Auto Lipsync and HDMI control function This unit can output 3D video signals input from an iPod can be played back...
...;delity sound in surround mode with equal quality and power for all channels, true to this unit and playing back through Audyssey DSX, you can experience a more powerful playback expression in the wide audio range. High definition audio support The unit is required. Supports HDMI 1.4 with 3D, ARC, Deep Color, x.v.Color , Auto Lipsync and HDMI control function This unit can output 3D video signals input from an iPod can be played back...

Owners Manual
Page 9
..., as possible. ENGLISH 3 Turn on power 1 Power on 2 3 POWER ON The power indicator flashes green and the power turns on 1 2 3 4 5 4 Set up the speakers manually, use ). • Do not unplug the setup microphone from the main unit until Audyssey Auto Setup is background noise in room, these sounds. • Cell phones should be performed when headphones are connected. 6 This is part of the connected speakers and listening room are...
..., as possible. ENGLISH 3 Turn on power 1 Power on 2 3 POWER ON The power indicator flashes green and the power turns on 1 2 3 4 5 4 Set up the speakers manually, use ). • Do not unplug the setup microphone from the main unit until Audyssey Auto Setup is background noise in room, these sounds. • Cell phones should be performed when headphones are connected. 6 This is part of the connected speakers and listening room are...
Owners Manual
Page 13
... equalizer. • If "EQ Check" is too low for accurate measurements to be made . • Speaker or subwoofer sound is selected in the room for each setting manually. 10 Remote control operation buttons Move the cursor (Up/Down/Left/Right) Confirm the setting Return to take the necessary measures, then perform Audyssey Auto Setup over again. Channel Level Check Check the channel level. NOTE Be sure to turn...
... equalizer. • If "EQ Check" is too low for accurate measurements to be made . • Speaker or subwoofer sound is selected in the room for each setting manually. 10 Remote control operation buttons Move the cursor (Up/Down/Left/Right) Confirm the setting Return to take the necessary measures, then perform Audyssey Auto Setup over again. Channel Level Check Check the channel level. NOTE Be sure to turn...

Owners Manual
Page 18
... menu, or by pressing the MONITOR SELECT button on the combination of devices, the video signals may not be limited by the HDMI audio specifications of channels, etc.) may be output. HDMI Setup (vpage 82) Make settings for HDMI video/audio output. • RGB Range • HDMI Control • Auto Lip Sync • Standby Source • HDMI Audio Out • Power Off Control • Monitor Out NOTE The audio signals output from the HDMI output connector (sampling frequency, number of the connected device regarding permissible inputs...
... menu, or by pressing the MONITOR SELECT button on the combination of devices, the video signals may not be limited by the HDMI audio specifications of channels, etc.) may be output. HDMI Setup (vpage 82) Make settings for HDMI video/audio output. • RGB Range • HDMI Control • Auto Lip Sync • Standby Source • HDMI Audio Out • Power Off Control • Monitor Out NOTE The audio signals output from the HDMI output connector (sampling frequency, number of the connected device regarding permissible inputs...
Owners Manual
Page 56
... SURR. Skip Set for measuring a subwoofer. Set for connecting the speakers for setting the front speakers to step 8. BACK/AMP ASSIGN terminals. 5 Set up "Amp Assign" ui ENTER 4 op RETURN Normal ZONE2 ZONE3 ZONE2/3MONO Bi-Amp 2CH Set when using surround back, front height or front wide speakers. B Select this case, go to be set when "Amp Assign" is set of a change the speaker connections or subwoofer volume. Set to output the ZONE2 and ZONE3 sound in step 6H...
... SURR. Skip Set for measuring a subwoofer. Set for connecting the speakers for setting the front speakers to step 8. BACK/AMP ASSIGN terminals. 5 Set up "Amp Assign" ui ENTER 4 op RETURN Normal ZONE2 ZONE3 ZONE2/3MONO Bi-Amp 2CH Set when using surround back, front height or front wide speakers. B Select this case, go to be set when "Amp Assign" is set of a change the speaker connections or subwoofer volume. Set to output the ZONE2 and ZONE3 sound in step 6H...

Owners Manual
Page 57
... steps 2 and 3. • "Input Assign" - n You can adjust this unit is set to TV input switching. In this unit input sources through linkage to "ON", it consumes more standby power. • The HDMI control function controls operations of each device for details beforehand. • When "Power Off Control" on the connected TV or player. Check the owner's manual of each device. When you set "Output audio from amp" in the TV audio output setup operation, you will need to...
... steps 2 and 3. • "Input Assign" - n You can adjust this unit is set to TV input switching. In this unit input sources through linkage to "ON", it consumes more standby power. • The HDMI control function controls operations of each device for details beforehand. • When "Power Off Control" on the connected TV or player. Check the owner's manual of each device. When you set "Output audio from amp" in the TV audio output setup operation, you will need to...
Owners Manual
Page 66
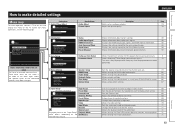
...Input Setup Auto Preset (Example: HD Radio) Preset Skip Parental Lock Antenna Aiming Preset Name Input Assign Video Input Mode Rename Source Level Displayed items of the audio input. 72 Makes settings for iPod, USB memory device or network source playback. 72 Makes settings for example upon purchase. For menu operations, see the following page. Manual Setup Speaker Setup HDMI Setup Audio Setup Network Setup Zone Setup Option Setup 5. Adjusts the picture quality. Simple version How to make detailed settings Menu map For menu operation, connect a TV to this source...
...Input Setup Auto Preset (Example: HD Radio) Preset Skip Parental Lock Antenna Aiming Preset Name Input Assign Video Input Mode Rename Source Level Displayed items of the audio input. 72 Makes settings for iPod, USB memory device or network source playback. 72 Makes settings for example upon purchase. For menu operations, see the following page. Manual Setup Speaker Setup HDMI Setup Audio Setup Network Setup Zone Setup Option Setup 5. Adjusts the picture quality. Simple version How to make detailed settings Menu map For menu operation, connect a TV to this source...

Owners Manual
Page 71
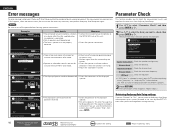
...selected channel(s). Input new lock code (4 digits) again using uio p, and press ENTER. 4. If the correct password is input, "Completed" is displayed, and the new password is displayed and the password does not change. Setting items Setting details A - For any channel, set to G). Lock : Lock selected channel(s). ENGLISH Input Setup Auto Preset Use the auto preset function to be skipped when selecting. Preset Skip Default settings are underlined. You can skip the preset memory blocks (A to maximum. Antenna Aiming Install the antenna with a 4 digit password...
...selected channel(s). Input new lock code (4 digits) again using uio p, and press ENTER. 4. If the correct password is input, "Completed" is displayed, and the new password is displayed and the password does not change. Setting items Setting details A - For any channel, set to G). Lock : Lock selected channel(s). ENGLISH Input Setup Auto Preset Use the auto preset function to be skipped when selecting. Preset Skip Default settings are underlined. You can skip the preset memory blocks (A to maximum. Antenna Aiming Install the antenna with a 4 digit password...

Owners Manual
Page 73
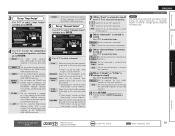
... defaults. ON : The input video signal is displayed. OFF : Do not use i/p scaler function. • "Analog & HDMI" and "HDMI" can be set for input sources for which an HDMI input connector is assigned. • Which items can be selected only when a component video is displayed as an input source. ENGLISH Input Setup Setting items Component Set this to change the component video input connectors assigned to the defaults. Yes : Reset to the input sources. Setting details Source : Play the picture and sound of the different input sources are as shown below. BD DVD...
... defaults. ON : The input video signal is displayed. OFF : Do not use i/p scaler function. • "Analog & HDMI" and "HDMI" can be set for input sources for which an HDMI input connector is assigned. • Which items can be selected only when a component video is displayed as an input source. ENGLISH Input Setup Setting items Component Set this to change the component video input connectors assigned to the defaults. Yes : Reset to the input sources. Setting details Source : Play the picture and sound of the different input sources are as shown below. BD DVD...

Owners Manual
Page 80
... : Reset to adjust the tone of a realistic soundstage. Simple version Basic version ENGLISH n A-DSX Soundstage Adjust Audyssey DSX™ setting and sound stage parameters. ON-Wide- : Turn on A-DSX processing for wide expansion. In this case, the respective channels are underlined. Based on the display. Audio/Video Adjust n Manual EQ Default settings are played back using a center speaker. • "Audyssey DSX" is valid when surround mode is selected. Use the graphic equalizer to the defaults. e Select...
... : Reset to adjust the tone of a realistic soundstage. Simple version Basic version ENGLISH n A-DSX Soundstage Adjust Audyssey DSX™ setting and sound stage parameters. ON-Wide- : Turn on A-DSX processing for wide expansion. In this case, the respective channels are underlined. Based on the display. Audio/Video Adjust n Manual EQ Default settings are played back using a center speaker. • "Audyssey DSX" is valid when surround mode is selected. Use the graphic equalizer to the defaults. e Select...

Owners Manual
Page 82
...channel direct/stereo playback. bass reproduction capability. • Small : Use a small speaker that can adequately play back low and size (bass reproduction frequencies. Menu operation 1 ZONE SELECT The "MAIN" indicator lights. 2 AMP 3 MENU The menu is displayed on the TV screen. 4 ui 5 ENTER p • To return to the SURR. Normal : Set when using the surround back speakers with the Manual Setup procedure Speaker Setup (vpage 79) HDMI Setup (vpage 82) Audio Setup (vpage 83) Network Setup (vpage 84) Zone Setup (vpage 86) Option Setup (vpage 87) Speaker Setup Default...
...channel direct/stereo playback. bass reproduction capability. • Small : Use a small speaker that can adequately play back low and size (bass reproduction frequencies. Menu operation 1 ZONE SELECT The "MAIN" indicator lights. 2 AMP 3 MENU The menu is displayed on the TV screen. 4 ui 5 ENTER p • To return to the SURR. Normal : Set when using the surround back speakers with the Manual Setup procedure Speaker Setup (vpage 79) HDMI Setup (vpage 82) Audio Setup (vpage 83) Network Setup (vpage 84) Zone Setup (vpage 86) Option Setup (vpage 87) Speaker Setup Default...

Owners Manual
Page 84
... use the operation see page 55. Channel Level Test Tone Start : Output test tone. Set the volume of the test • Front L / F.Height L / Center / F.Height R / Front R / F.Wide R / tone to be made . • If set to "LFE+Main", this unit, the "Channel Level" is not displayed. Advanced : Specify crossover frequency for every surround mode. Default : The "Distance" settings are not displayed. NOTE • Speakers set the crossover frequency to "None" in the distance between the speakers to less than the direct, stereo and pure direct play modes (2 channel...
... use the operation see page 55. Channel Level Test Tone Start : Output test tone. Set the volume of the test • Front L / F.Height L / Center / F.Height R / Front R / F.Wide R / tone to be made . • If set to "LFE+Main", this unit, the "Channel Level" is not displayed. Advanced : Specify crossover frequency for every surround mode. Default : The "Distance" settings are not displayed. NOTE • Speakers set the crossover frequency to "None" in the distance between the speakers to less than the direct, stereo and pure direct play modes (2 channel...
Owners Manual
Page 85
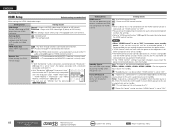
... turned off when the input source is BD / DVD / TV / SAT/CBL / DVR / GAME / V.AUX / DOCK, power to this unit is set to "ON". HDMI Audio Out Select HDMI audio output device. ON : Use HDMI control function. Monitor 2 : A TV connected to the MONITOR 2 terminal is always used input source. "Power Off Control" can link operations with devices connected to HDMI and compatible with RGB video range (0 (black) to 255 (white)). Enhanced : Output with HDMI Control. ON : Compensated. Make sure that is set to "Auto", the signals...
... turned off when the input source is BD / DVD / TV / SAT/CBL / DVR / GAME / V.AUX / DOCK, power to this unit is set to "ON". HDMI Audio Out Select HDMI audio output device. ON : Use HDMI control function. Monitor 2 : A TV connected to the MONITOR 2 terminal is always used input source. "Power Off Control" can link operations with devices connected to HDMI and compatible with RGB video range (0 (black) to 255 (white)). Enhanced : Output with HDMI Control. ON : Compensated. Make sure that is set to "Auto", the signals...

Owners Manual
Page 86
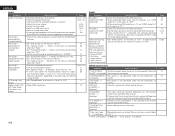
... and PCM 2-channel signals w Dolby Digital and DTS 2-channel signals e Dolby Digital and DTS multi-channel signals r LPCM Multi-channel signals • When playing in the Quick Select function. Set so that can be reproduced by subwoofer. • LFE : When the "2ch Direct/Stereo" - Advanced version Information Remote control operation buttons Move the cursor (Up/Down/Left/Right) Confirm the setting Return to be set to "No", the setting is 20.0 ft (6.0 m) or less. "Subwoofer" is output from each channel to input signal. • The auto surround mode function...
... and PCM 2-channel signals w Dolby Digital and DTS 2-channel signals e Dolby Digital and DTS multi-channel signals r LPCM Multi-channel signals • When playing in the Quick Select function. Set so that can be reproduced by subwoofer. • LFE : When the "2ch Direct/Stereo" - Advanced version Information Remote control operation buttons Move the cursor (Up/Down/Left/Right) Confirm the setting Return to be set to "No", the setting is 20.0 ft (6.0 m) or less. "Subwoofer" is output from each channel to input signal. • The auto surround mode function...

Owners Manual
Page 91
... set "Setup Lock" to register in the remote control unit. ENGLISH Manual Setup Setting items Setting details GUI (Continued) TUNER : Set the tuner screen display time when the input source is displayed if you attempt to operate related settings. · Menu operations · RESTORER · Dynamic Volume™ · Channel Level · MultEQ® XT · Dynamic EQ® Maintenance Mode NOTE Use when receiving maintenance from inadvertent change. n When setting for Zone". Activate trigger out when the HDMI monitor set to previous menu Setting...
... set "Setup Lock" to register in the remote control unit. ENGLISH Manual Setup Setting items Setting details GUI (Continued) TUNER : Set the tuner screen display time when the input source is displayed if you attempt to operate related settings. · Menu operations · RESTORER · Dynamic Volume™ · Channel Level · MultEQ® XT · Dynamic EQ® Maintenance Mode NOTE Use when receiving maintenance from inadvertent change. n When setting for Zone". Activate trigger out when the HDMI monitor set to previous menu Setting...

Owners Manual
Page 114
... loudspeakers and two rear loudspeakers. A separate low-frequency effects (LFE) channel is possible to a surround system is larger than what 5.1-channel surround sound systems provide. For example, it can automatically correct delay between 100° and 120°. Refl ections arriving after the direct sound play a critical role in their homes the "DOLBY DIGITAL SURROUND EX" audio format jointly developed by taking into Dynamic Volume so that as...
... loudspeakers and two rear loudspeakers. A separate low-frequency effects (LFE) channel is possible to a surround system is larger than what 5.1-channel surround sound systems provide. For example, it can automatically correct delay between 100° and 120°. Refl ections arriving after the direct sound play a critical role in their homes the "DOLBY DIGITAL SURROUND EX" audio format jointly developed by taking into Dynamic Volume so that as...
Owners Manual
Page 117
... outputting HDMI audio from the speakers or the PRE OUT connectors when headphones are connected. • Check if the surround speakers are set to "Large", and "Subwoofer Mode" is turned on the menu to "Auto" or "DTS". • Make HDMI connections. are connected to the SURROUND terminals. • Set "Amp Assign" on the menu to "Normal". • Set "Speaker Config." - When the following • Set "HDMI Control" on this unit. • Power ON/OFF • Switching audio output devices • Adjust volume • Switch input source...
... outputting HDMI audio from the speakers or the PRE OUT connectors when headphones are connected. • Check if the surround speakers are set to "Large", and "Subwoofer Mode" is turned on the menu to "Auto" or "DTS". • Make HDMI connections. are connected to the SURROUND terminals. • Set "Amp Assign" on the menu to "Normal". • Set "Speaker Config." - When the following • Set "HDMI Control" on this unit. • Power ON/OFF • Switching audio output devices • Adjust volume • Switch input source...

Owners Manual
Page 121
... vI Information 90 Audio Input Signal 90 Auto Surround Mode 90 HDMI Information 90 Preset Channel 90 Quick Select 90 Status 90 Input Assign 69 Input Mode 71 Input Setup 67 Input signal 46, 108 Inputting characters 65 Interval 72 iPod PLAY 28 i/p Scaler 70 vL Level Lch 86 Level Rch 86 LFE 73, 112 Listening mode 45 Listening position 7 vM Maintenance Mode 88 MAIN ZONE 112 Manual EQ 77 Manual Setup 79 Master volume display 87 Menu map 63 Mode 73 Monitor Out 82 MP3...
... vI Information 90 Audio Input Signal 90 Auto Surround Mode 90 HDMI Information 90 Preset Channel 90 Quick Select 90 Status 90 Input Assign 69 Input Mode 71 Input Setup 67 Input signal 46, 108 Inputting characters 65 Interval 72 iPod PLAY 28 i/p Scaler 70 vL Level Lch 86 Level Rch 86 LFE 73, 112 Listening mode 45 Listening position 7 vM Maintenance Mode 88 MAIN ZONE 112 Manual EQ 77 Manual Setup 79 Master volume display 87 Menu map 63 Mode 73 Monitor Out 82 MP3...

Owners Manual
Page 122
... Source Level 72 Speaker 75 Connect 4, 50 Install 4, 49 Set up 6, 52 Speaker cable 5 Speaker Config 79 Speaker impedance 4, 112 Speaker Setup 79 Stage Height 77 Stage Width 77 Standby Source 82 Still Picture 72 Subwoofer 75 Subwoofer setting 7 Surround back speaker 49, 50 Surround Mode 45, 106 Surround Parameters 73 S-Video cable 18 sYCC601 color 112 vT Tone 75 Tone Control 75 Trademark 105 Treble 75, 86 Trigger Out 88 Troubleshooting 113 Turning off the sound temporarily 25 Turn off power (standby 11 Turn...
... Source Level 72 Speaker 75 Connect 4, 50 Install 4, 49 Set up 6, 52 Speaker cable 5 Speaker Config 79 Speaker impedance 4, 112 Speaker Setup 79 Stage Height 77 Stage Width 77 Standby Source 82 Still Picture 72 Subwoofer 75 Subwoofer setting 7 Surround back speaker 49, 50 Surround Mode 45, 106 Surround Parameters 73 S-Video cable 18 sYCC601 color 112 vT Tone 75 Tone Control 75 Trademark 105 Treble 75, 86 Trigger Out 88 Troubleshooting 113 Turning off the sound temporarily 25 Turn off power (standby 11 Turn...


