
Literature/Product Sheet
Page 2
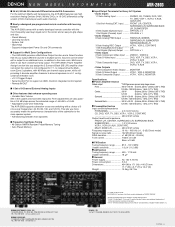
...Zone 2 speakers, with 90 Watts per each audio channel). ■ Newly redesigned pre-programmed remote controller with learning feature The AVR-2803 comes with a newly-developed remote controller with a choice of Digital Theater System, Inc. Sources can have variable pre-amp output... Hz Power consumption 5.5 A Dimensions 434 (W) x 171 (H) x 416 (D) mm 17.1" (W) x 6.7" (H) x 16.4" (D) Weight 13.0kg, 28.7 lbs DENON ELECTRONICS (USA), INC. 19 CHAPIN ROAD, P.O. This lets you output different sources to the main room. FRONT L/R, CENTER, SURROUND L/R, SURROUND BACK L/R, SUBWOOFER 4 Sets...
...Zone 2 speakers, with 90 Watts per each audio channel). ■ Newly redesigned pre-programmed remote controller with learning feature The AVR-2803 comes with a newly-developed remote controller with a choice of Digital Theater System, Inc. Sources can have variable pre-amp output... Hz Power consumption 5.5 A Dimensions 434 (W) x 171 (H) x 416 (D) mm 17.1" (W) x 6.7" (H) x 16.4" (D) Weight 13.0kg, 28.7 lbs DENON ELECTRONICS (USA), INC. 19 CHAPIN ROAD, P.O. This lets you output different sources to the main room. FRONT L/R, CENTER, SURROUND L/R, SURROUND BACK L/R, SUBWOOFER 4 Sets...
Owners Manual
Page 1
AV SURROUND RECEIVER AVR-2803/983 OPERATING INSTRUCTIONS REMOTE SENSOR ON / STANDBY AUTO SIGNAL DIGITAL SURROUND BACK CH OUTPUT INPUT PCM DTS SIGNAL DETECT VOLUME LEVEL 2 We greatly appreciate your purchase of the AVR-2803/983. 2 To be sure you take maximum advantage of all the features the AVR-2803/983 has to keep this manual for future reference, should any questions or problems arise. PLEASE RECORD UNIT SERIAL NUMBER ATTACHED TO THE REAR OF THE CABINET FOR FUTURE REFERENCE" "SERIAL NO. Be sure to offer, read these instructions carefully and use the set properly.
AV SURROUND RECEIVER AVR-2803/983 OPERATING INSTRUCTIONS REMOTE SENSOR ON / STANDBY AUTO SIGNAL DIGITAL SURROUND BACK CH OUTPUT INPUT PCM DTS SIGNAL DETECT VOLUME LEVEL 2 We greatly appreciate your purchase of the AVR-2803/983. 2 To be sure you take maximum advantage of all the features the AVR-2803/983 has to keep this manual for future reference, should any questions or problems arise. PLEASE RECORD UNIT SERIAL NUMBER ATTACHED TO THE REAR OF THE CABINET FOR FUTURE REFERENCE" "SERIAL NO. Be sure to offer, read these instructions carefully and use the set properly.
Owners Manual
Page 4
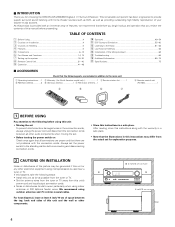
...Remote Control Unit 31~40 . For heat dispersal, leave at least 4 inch/10 cm of space between all connections are proper and that the illustrations in a safe place. • Note that there are included in addition to the main unit: q Operating instructions.....1 w Warranty ( for choosing the DENON AVR-2803... for North America model only 1 e Service station list...........1 t R6P/AA batteries 3 y AM loop antenna 1 u FM indoor antenna...1 r Remote control unit (RC-924 1 r t y u 1 BEFORE USING Pay attention to the following before using indoor antennas or 300 Ω/ohms ...
...Remote Control Unit 31~40 . For heat dispersal, leave at least 4 inch/10 cm of space between all connections are proper and that the illustrations in a safe place. • Note that there are included in addition to the main unit: q Operating instructions.....1 w Warranty ( for choosing the DENON AVR-2803... for North America model only 1 e Service station list...........1 t R6P/AA batteries 3 y AM loop antenna 1 u FM indoor antenna...1 r Remote control unit (RC-924 1 r t y u 1 BEFORE USING Pay attention to the following before using indoor antennas or 300 Ω/ohms ...
Owners Manual
Page 6
... DC 12V voltage on page 28. Connections for connections to audio equipment with digital output. Never use them for instructions on and standby from the remote control unit. Refer to page 23 for hair driers, etc. • Note that they do not obstruct the ventilation holes. Do not use ...deck away. No power is used with MC cartridges directly. NOTE: This unit cannot be generated if a connected audio equipment is supplied from the remote control unit or power switch. NOTE: Only use Surround back with one speaker, connect the speaker to SURR. To use the AC OUTLETS for ...
... DC 12V voltage on page 28. Connections for connections to audio equipment with digital output. Never use them for instructions on and standby from the remote control unit. Refer to page 23 for hair driers, etc. • Note that they do not obstruct the ventilation holes. Do not use ...deck away. No power is used with MC cartridges directly. NOTE: This unit cannot be generated if a connected audio equipment is supplied from the remote control unit or power switch. NOTE: Only use Surround back with one speaker, connect the speaker to SURR. To use the AC OUTLETS for ...

Owners Manual
Page 14
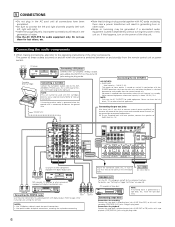
...VOLUME control 43) !9 Master volume indicator (VOLUME LEVEL 43) @0 Display @1 INPUT mode indicators 43) @2 SIGNAL indicators 43, 53) @3 Remote control sensor (REMOTE SENSOR 31) @4 Power indicator 41) @5 FUNCTION knob 42, 45 ~ 47, 53, 61, 63) @6 TUNING PRESET button 63) @7 ...AND FUNCTIONS Front Panel • For details on the functions of these parts, refer to the pages given in parentheses ( ). @8 @7 @6 @5 @4 @3 @2 @1 @0 !9 REMOTE SENSOR ON / STANDBY AUTO SIGNAL DIGITAL SURROUND BACK CH OUTPUT INPUT PCM DTS SIGNAL DETECT VOLUME LEVEL !8 q w er t y u i o !0 !1 !2 !3 !4 !5 !6...
...VOLUME control 43) !9 Master volume indicator (VOLUME LEVEL 43) @0 Display @1 INPUT mode indicators 43) @2 SIGNAL indicators 43, 53) @3 Remote control sensor (REMOTE SENSOR 31) @4 Power indicator 41) @5 FUNCTION knob 42, 45 ~ 47, 53, 61, 63) @6 TUNING PRESET button 63) @7 ...AND FUNCTIONS Front Panel • For details on the functions of these parts, refer to the pages given in parentheses ( ). @8 @7 @6 @5 @4 @3 @2 @1 @0 !9 REMOTE SENSOR ON / STANDBY AUTO SIGNAL DIGITAL SURROUND BACK CH OUTPUT INPUT PCM DTS SIGNAL DETECT VOLUME LEVEL !8 q w er t y u i o !0 !1 !2 !3 !4 !5 !6...
Owners Manual
Page 15
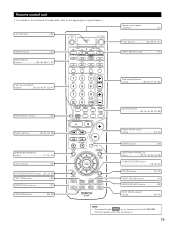
...indicator 36) ZONE 2 buttons 47) Mode selector buttons 32~34, 36~41, 47) Input source selector buttons 33~35, 42, 47, 53, 61) Remote control signal transmitter 31) Power buttons 33~35, 37~41) ZONE1 (MAIN) buttons 47) Tuner system/System buttons 32, 35, 47, 61~63) MODE ... button 41) SURROUND BACK button 53) INPUT MODE selector buttons 42, 44) NOTE: • The shaded button do not function with the AVR-2803/983. (Nothing happens when they are pressed.) 15 Remote control unit • For details on the functions of these parts, refer to the pages given in parentheses ( ).
...indicator 36) ZONE 2 buttons 47) Mode selector buttons 32~34, 36~41, 47) Input source selector buttons 33~35, 42, 47, 53, 61) Remote control signal transmitter 31) Power buttons 33~35, 37~41) ZONE1 (MAIN) buttons 47) Tuner system/System buttons 32, 35, 47, 61~63) MODE ... button 41) SURROUND BACK button 53) INPUT MODE selector buttons 42, 44) NOTE: • The shaded button do not function with the AVR-2803/983. (Nothing happens when they are pressed.) 15 Remote control unit • For details on the functions of these parts, refer to the pages given in parentheses ( ).
Owners Manual
Page 16
...the frequency (Hz) below on the monitor screen using the AVR-2803/983's on the remote control unit or main unit are produced from the speakers and... mode function. !0 On Screen Display This sets whether or not to display the on-screen display that the remote control unit is to be reset to the default (factory shipment) settings by initialization of the microprocessor (see... have been completed as described in order to the up the listening room's AV system centered around the AVR-2803/983. • Check that appears on the monitor screen when the controls on -screen display function. ...
...the frequency (Hz) below on the monitor screen using the AVR-2803/983's on the remote control unit or main unit are produced from the speakers and... mode function. !0 On Screen Display This sets whether or not to display the on-screen display that the remote control unit is to be reset to the default (factory shipment) settings by initialization of the microprocessor (see... have been completed as described in order to the up the listening room's AV system centered around the AVR-2803/983. • Check that appears on the monitor screen when the controls on -screen display function. ...

Owners Manual
Page 21
... listening position. NOTE: • If the distance unit is changed after the delay time is selected for every speaker should be adjusted directly from the remote control unit. (For details, see page 16, 17). Please note that its distance is pressed. The System Setup Menu reappears. The distance changes in units... between the different channels is equal. • From the listening position, listen to the test tones produced from the speakers to the default values. The AVR-2803/983 automatically sets the optimum surround delay time for the listening room.
... listening position. NOTE: • If the distance unit is changed after the delay time is selected for every speaker should be adjusted directly from the remote control unit. (For details, see page 16, 17). Please note that its distance is pressed. The System Setup Menu reappears. The distance changes in units... between the different channels is equal. • From the listening position, listen to the test tones produced from the speakers to the default values. The AVR-2803/983 automatically sets the optimum surround delay time for the listening room.

Owners Manual
Page 26
... can no longer be selected.) 4 Enter the setting. 2 The "Zone2 Control" screen appears. Variable: The level can be adjusted freely using the buttons on the remote control unit. 0 dB, -40 dB: The output level is fixed at the set level and the volume can be adjusted. 4 Enter the setting. Select "Zone2...
... can no longer be selected.) 4 Enter the setting. 2 The "Zone2 Control" screen appears. Variable: The level can be adjusted freely using the buttons on the remote control unit. 0 dB, -40 dB: The output level is fixed at the set level and the volume can be adjusted. 4 Enter the setting. Select "Zone2...

Owners Manual
Page 31
... an old one. • Do not use it can be used to operate not only the AVR-2803/983 but this depends on Batteries • Use R6P/AA batteries in the remote control unit. • The batteries should leak, carefully wipe the fluid off the inside of the...the indicated direction. Replace it with a new battery as soon as possible. 8 REMOTE CONTROL UNIT • The included remote control unit (RC-924) can be used to operate non-Denon remote control compatible products. Inserting the batteries q Remove the remote control unit's rear cover. NOTES: • It may result in malfunction. ...
... an old one. • Do not use it can be used to operate not only the AVR-2803/983 but this depends on Batteries • Use R6P/AA batteries in the remote control unit. • The batteries should leak, carefully wipe the fluid off the inside of the...the indicated direction. Replace it with a new battery as soon as possible. 8 REMOTE CONTROL UNIT • The included remote control unit (RC-924) can be used to operate non-Denon remote control compatible products. Inserting the batteries q Remove the remote control unit's rear cover. NOTES: • It may result in malfunction. ...

Owners Manual
Page 33
... DBS/CABLE. NOTES: • Depending on the included list of preset codes. • Some manufacturers use more than one type of your device's remote control signals in 0 the memory. 4 When stored correctly, the mode button and the LEARNED/TX indicator will light. 5 To store the codes of... this case, use the number 4 5 6 buttons to the brand of remote control code. The preset codes are as follows upon shipment from the factory and after resetting: TV, VCR HITACHI CD, TAPE DENON CDR/MD DENON (CDR) DVD/VDP DENON (DVD) DBS/CABLE ABC (CABLE) DVD preset codes B Model No. ...
... DBS/CABLE. NOTES: • Depending on the included list of preset codes. • Some manufacturers use more than one type of your device's remote control signals in 0 the memory. 4 When stored correctly, the mode button and the LEARNED/TX indicator will light. 5 To store the codes of... this case, use the number 4 5 6 buttons to the brand of remote control code. The preset codes are as follows upon shipment from the factory and after resetting: TV, VCR HITACHI CD, TAPE DENON CDR/MD DENON (CDR) DVD/VDP DENON (DVD) DBS/CABLE ABC (CABLE) DVD preset codes B Model No. ...

Owners Manual
Page 34
... search (to beginning of the various components. 2 Operate the component. • For details, refer to manufacturer. Some models cannot be operated with the remote control operation of track) 3 : Pause 0 ~ 9, +10 : 10 key DISC SKIP +: Disc skip (for the component you want to operate.... search (forward and reverse) 2 : Stop 1 : Play 8,9 : Auto search (cue) 3 : Pause 0~9, +10 : 10 key 34 Compare with this remote control unit. 1. Operating a component stored in the preset memory 1 Press the mode selector button for DVD changer only) DISPLAY : Display MENU : Menu RETURN :...
... search (to beginning of the various components. 2 Operate the component. • For details, refer to manufacturer. Some models cannot be operated with the remote control operation of track) 3 : Pause 0 ~ 9, +10 : 10 key DISC SKIP +: Disc skip (for the component you want to operate.... search (forward and reverse) 2 : Stop 1 : Play 8,9 : Auto search (cue) 3 : Pause 0~9, +10 : 10 key 34 Compare with this remote control unit. 1. Operating a component stored in the preset memory 1 Press the mode selector button for DVD changer only) DISPLAY : Display MENU : Menu RETURN :...

Owners Manual
Page 36
...the learning operation is completed, press the USE/LEARN button again. For limited number of the equipment for which you want to "learn " other remote control unit which learning is desired. • Mode button and LEARNED/TX indicator flash. 3 Press the button that the memory is already full,...or the device will not operate properly. To "learn" that the stored codes work properly. Learning function If your AV component is not a Denon product or if it cannot be operated using the preset memory, it can be learned. Flashes 2 2 Press the mode button of models, ...
...the learning operation is completed, press the USE/LEARN button again. For limited number of the equipment for which you want to "learn " other remote control unit which learning is desired. • Mode button and LEARNED/TX indicator flash. 3 Press the button that the memory is already full,...or the device will not operate properly. To "learn" that the stored codes work properly. Learning function If your AV component is not a Denon product or if it cannot be operated using the preset memory, it can be learned. Flashes 2 2 Press the mode button of models, ...

Owners Manual
Page 37
... 5 Repeat steps 3 and 4 to register the desired buttons. 6 Press the CALL1 or CALL2 button and register System Call. 2, 6 6 NOTES: • The remote control signals for example to turn on the amplifier's power, select the input source, turn on the monitor TV's power, turn on the source component...3 Press the mode buttons of the equipment that is equipped with "system call signals are transmitted when the buttons are pressed, so cover the remote sensor or take other measures so that the components do not operate while the signals are being stored. • The mode button and LEARNED/TX...
... 5 Repeat steps 3 and 4 to register the desired buttons. 6 Press the CALL1 or CALL2 button and register System Call. 2, 6 6 NOTES: • The remote control signals for example to turn on the amplifier's power, select the input source, turn on the monitor TV's power, turn on the source component...3 Press the mode buttons of the equipment that is equipped with "system call signals are transmitted when the buttons are pressed, so cover the remote sensor or take other measures so that the components do not operate while the signals are being stored. • The mode button and LEARNED/TX...

Owners Manual
Page 39
... a pen, etc., to be reset and the ON/SOURCE button. • The mode button and the LEARNED/TX indicator will again flash, and the learned remote control signal of the equipment that is to be reset. • Mode button and LEARNED/TX indicator flash. 3 Hold for 4 seconds or longer the mode...
... a pen, etc., to be reset and the ON/SOURCE button. • The mode button and the LEARNED/TX indicator will again flash, and the learned remote control signal of the equipment that is to be reset. • Mode button and LEARNED/TX indicator flash. 3 Hold for 4 seconds or longer the mode...

Owners Manual
Page 41
...The sound is muted for , say, a vacation. 4 The front speakers switch as shown below each time the FRONT SPEAKER button is pressed. 4 (Main unit) (Remote control unit) FRONT A FRONT B FRONT A+B 41 9 OPERATION Before operating 1 Refer to "CONNECTIONS" (pages 6 to unplug the cord when you leave home for ... that all connections are correct. 2 Select "AMP mode" using the TAPE, CDR/MR or CD button. (only when operating with the remote control unit) 3 4 (Remote control unit) 3 Turn on and the display lights. Press the POWER switch (button). 3 2 ON/STANDBY Light (Main unit...
...The sound is muted for , say, a vacation. 4 The front speakers switch as shown below each time the FRONT SPEAKER button is pressed. 4 (Main unit) (Remote control unit) FRONT A FRONT B FRONT A+B 41 9 OPERATION Before operating 1 Refer to "CONNECTIONS" (pages 6 to unplug the cord when you leave home for ... that all connections are correct. 2 Select "AMP mode" using the TAPE, CDR/MR or CD button. (only when operating with the remote control unit) 3 4 (Remote control unit) 3 Turn on and the display lights. Press the POWER switch (button). 3 2 ON/STANDBY Light (Main unit...

Owners Manual
Page 42
... input jacks are played. AUTO PCM DTS (Main unit) (Remote control unit) 2 Input mode selection function Different input modes can be selected for the selected input source are detected and the program in the AVR-2803/983's surround decoder is selected automatically upon playback. If no ...digital signal is pressed. Note that noise will be played. t EXT. Example: CD FUNCTION (Main unit) (Remote control unit) To select the input source when ...
... input jacks are played. AUTO PCM DTS (Main unit) (Remote control unit) 2 Input mode selection function Different input modes can be selected for the selected input source are detected and the program in the AVR-2803/983's surround decoder is selected automatically upon playback. If no ...digital signal is pressed. Note that noise will be played. t EXT. Example: CD FUNCTION (Main unit) (Remote control unit) To select the input source when ...

Owners Manual
Page 43
...When playing DTS-compatible sources, be adjusted up to 18 dB, in the "ANALOG" or "PCM" mode. Example: Stereo SELECT (Main unit) (Remote control unit) To select the surround mode while adjusting the surround parameters, channel volume or tone control, press the surround mode button then operate the... selector. (Main unit) 4 Start playback on the master volume level display. (Main unit) (Remote control unit) The volume can be adjusted within the range of -80 to 0 to 18 dB. (In this case the maximum volume adjustment range...
...When playing DTS-compatible sources, be adjusted up to 18 dB, in the "ANALOG" or "PCM" mode. Example: Stereo SELECT (Main unit) (Remote control unit) To select the surround mode while adjusting the surround parameters, channel volume or tone control, press the surround mode button then operate the... selector. (Main unit) 4 Start playback on the master volume level display. (Main unit) (Remote control unit) The volume can be adjusted within the range of -80 to 0 to 18 dB. (In this case the maximum volume adjustment range...

Owners Manual
Page 44
...not connected to the input jacks. • The external input mode can be set this mode. IN to switch the external input. (Main unit) (Remote control unit) Once this mode, the audio signals bypass such 1 2 circuits as the pre-out jacks without passing through the surround circuitry. In addition... is selected, the input signals connected to the SW (subwoofer) jack is connected, then set for music. Playing audio sources (CDs and DVDs) The AVR-2803/983 is set . 21 2 1 NOTES: • In play modes other than the external input mode, the signals connected to these jacks cannot be...
...not connected to the input jacks. • The external input mode can be set this mode. IN to switch the external input. (Main unit) (Remote control unit) Once this mode, the audio signals bypass such 1 2 circuits as the pre-out jacks without passing through the surround circuitry. In addition... is selected, the input signals connected to the SW (subwoofer) jack is connected, then set for music. Playing audio sources (CDs and DVDs) The AVR-2803/983 is set . 21 2 1 NOTES: • In play modes other than the external input mode, the signals connected to these jacks cannot be...

Owners Manual
Page 45
... selected, turn on the display. PHONES 1 [3] Turning the sound off when headphones are connected. Press the MUTING button again or adjust the main volume level. (Remote control unit) 1 NOTE: To prevent hearing loss, do not pass through the bass and treble adjustment circuits, providing higher quality sound. [2] Listening over headphones 1 Plug...
... selected, turn on the display. PHONES 1 [3] Turning the sound off when headphones are connected. Press the MUTING button again or adjust the main volume level. (Remote control unit) 1 NOTE: To prevent hearing loss, do not pass through the bass and treble adjustment circuits, providing higher quality sound. [2] Listening over headphones 1 Plug...


