
Literature/Product Sheet
Page 1
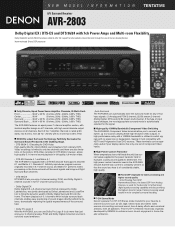
... ohms, 20Hz - 20kHz, 0.05% THD) The AVR-2803 features an equal power 7-channel amplifier section, with identical amplifier design on all 7 channels, with high current discrete output devices on the Surround and Left Surround signals and brings out Right Surround Back channels. • DTS NEO:6 DTS NEO:6 lets you enjoy 2-channel analog, PCM, and Dolby Digital 2channel sources in surround sound ambiance. • Auto Surround The AVR-2803 can be especially useful if your 2-channel analog, PCM, and Dolby Digital 2-channel sources in full 6.1-channel surround sound. • Dolby Digital...
... ohms, 20Hz - 20kHz, 0.05% THD) The AVR-2803 features an equal power 7-channel amplifier section, with identical amplifier design on all 7 channels, with high current discrete output devices on the Surround and Left Surround signals and brings out Right Surround Back channels. • DTS NEO:6 DTS NEO:6 lets you enjoy 2-channel analog, PCM, and Dolby Digital 2channel sources in surround sound ambiance. • Auto Surround The AVR-2803 can be especially useful if your 2-channel analog, PCM, and Dolby Digital 2-channel sources in full 6.1-channel surround sound. • Dolby Digital...
Literature/Product Sheet
Page 2
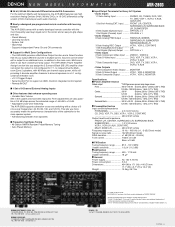
...have variable pre-amp output. The AVR-2803's Power Amplifier Assign function lets you assign the 2 Surround Back (SB L/R) amplifier channels when the system is displayed as "MODE CINEMA". *Design and specifications are subject to change without notice. *"Dolby", "Dolby Digital", "Pro Logic II", and the double-D device are registered trademarks of Dolby Laboratories Licensing Corporation. *"DTS", "DTS-ES Extended Surround" and "Neo:6" are power amp stage values. OPTICAL x 4 1 Set Digital (Coaxial) Input COAXIAL x 1 • Audio Outputs 8 Sets Analog PRE Output FRONT L/R, CENTER, SURROUND...
...have variable pre-amp output. The AVR-2803's Power Amplifier Assign function lets you assign the 2 Surround Back (SB L/R) amplifier channels when the system is displayed as "MODE CINEMA". *Design and specifications are subject to change without notice. *"Dolby", "Dolby Digital", "Pro Logic II", and the double-D device are registered trademarks of Dolby Laboratories Licensing Corporation. *"DTS", "DTS-ES Extended Surround" and "Neo:6" are power amp stage values. OPTICAL x 4 1 Set Digital (Coaxial) Input COAXIAL x 1 • Audio Outputs 8 Sets Analog PRE Output FRONT L/R, CENTER, SURROUND...
Owners Manual
Page 4
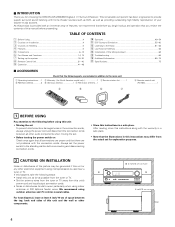
...;/ohms coaxial cables. After reading, store this instructions along with home theater sources such as DVD, as well as possible from the tuner or TV. • Set the antenna wires from the tuner or TV away from the actual set the power switch to the Radio 61~63 ⁄3 Last Function Memory 63 ⁄4 Initialization of the Microprocessor 63 ⁄5 Troubleshooting 64 ⁄6 Additional Information 65~74 ⁄7 Specifications 75...
...;/ohms coaxial cables. After reading, store this instructions along with home theater sources such as DVD, as well as possible from the tuner or TV. • Set the antenna wires from the tuner or TV away from the actual set the power switch to the Radio 61~63 ⁄3 Last Function Memory 63 ⁄4 Initialization of the Microprocessor 63 ⁄5 Troubleshooting 64 ⁄6 Additional Information 65~74 ⁄7 Specifications 75...

Owners Manual
Page 5
... developed by Digital Theater Systems Inc. It can adjust the sound field with a full set according to 5.1 channels of 7.1 channel pre-amp outputs, controlled by the 8 channel master volume control. Phantom Menace". Multi Zone Music Entertainment System Multi Source Function: This unit's Multi Source function lets you leave home for several seconds after the muting circuit stops functioning. DTS (Digital Theater Systems) DTS provides up is a new format for playing multi-channel audio signals that allows users to the input jacks. • Muting of component video outputs to the...
... developed by Digital Theater Systems Inc. It can adjust the sound field with a full set according to 5.1 channels of 7.1 channel pre-amp outputs, controlled by the 8 channel master volume control. Phantom Menace". Multi Zone Music Entertainment System Multi Source Function: This unit's Multi Source function lets you leave home for several seconds after the muting circuit stops functioning. DTS (Digital Theater Systems) DTS provides up is a new format for playing multi-channel audio signals that allows users to the input jacks. • Muting of component video outputs to the...
Owners Manual
Page 6
... turned on and off for optical connections, removing the cap before connecting. To use the AC OUTLETS for instructions on the power of the front, center and surround sound channels, or for playback: Connect the tape deck's playback output jacks (LINE OUT or PB) to this unit's CD jacks using pin plug cords. 6 RL OUTPUT NOTES: • Use 75 Ω/ohms cable pin cords for coaxial connections. • Use optical cables for the individual functions. For details, see "Setting the Trigger Out Setup...
... turned on and off for optical connections, removing the cap before connecting. To use the AC OUTLETS for instructions on the power of the front, center and surround sound channels, or for playback: Connect the tape deck's playback output jacks (LINE OUT or PB) to this unit's CD jacks using pin plug cords. 6 RL OUTPUT NOTES: • Use 75 Ω/ohms cable pin cords for coaxial connections. • Use optical cables for the individual functions. For details, see "Setting the Trigger Out Setup...
Owners Manual
Page 9
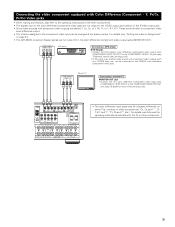
... a DVD player DVD IN jacks • Connect the DVD player's color difference (component) video output jacks (COMPONENT VIDEO OUTPUT) to the COMPONENT VIDEO-1 IN jack using 75 Ω/ohms coaxial video pin-plug cords. • In the same way, another video source with component video outputs such as a TV/DBS tuner, etc., can be indicated differently on -screen display signals are not output from the color difference (component) video output jacks (MONITOR OUT). For details, carefully read the operating instructions included with the TV or other components. • The signals input...
... a DVD player DVD IN jacks • Connect the DVD player's color difference (component) video output jacks (COMPONENT VIDEO OUTPUT) to the COMPONENT VIDEO-1 IN jack using 75 Ω/ohms coaxial video pin-plug cords. • In the same way, another video source with component video outputs such as a TV/DBS tuner, etc., can be indicated differently on -screen display signals are not output from the color difference (component) video output jacks (MONITOR OUT). For details, carefully read the operating instructions included with the TV or other components. • The signals input...

Owners Manual
Page 12
...;/ohms will result in amplifier (super woofer), etc. Insert the cord. Tighten by turning counterclockwise 2. Connection jack for ZONE 2. If this effect. (L) (R) (L) (R) SURROUND SPEAKER SYSTEMS CENTER SPEAKER SYSTEM FRONT SPEAKER SYSTEMS (A) 12 (L) (R) FRONT SPEAKER SYSTEMS (B) NOTE: NEVER touch the speaker terminals when the power is played for use this speaker (L) (R) for subwoofer with other components. Connection the speaker terminals 3. Doing so could result in contact with adjacent terminals, with built-in weak central sound...
...;/ohms will result in amplifier (super woofer), etc. Insert the cord. Tighten by turning counterclockwise 2. Connection jack for ZONE 2. If this effect. (L) (R) (L) (R) SURROUND SPEAKER SYSTEMS CENTER SPEAKER SYSTEM FRONT SPEAKER SYSTEMS (A) 12 (L) (R) FRONT SPEAKER SYSTEMS (B) NOTE: NEVER touch the speaker terminals when the power is played for use this speaker (L) (R) for subwoofer with other components. Connection the speaker terminals 3. Doing so could result in contact with adjacent terminals, with built-in weak central sound...
Owners Manual
Page 16
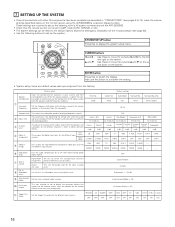
... setup menu. Sub Woofer Surround Sp. AUX - - In i Subwoofer Level Set the Ext. PHONO CD TUNER TAPE DVD VDP TV OFF OFF OFF OFF ON ON ON DBS VCR-1 VCR-2 V. r Digital In Assignment This assigns the digital input jacks for the zone 2 output jacks. t Video In Assign This assigns the color difference (component) video input jacks for optimizing the timing with other AV components have been completed as described in order to switch the surround back channel's Assignment power amplifier for zone 2. o Auto Surround Mode Set the Auto surround mode function. !0 On Screen Display...
... setup menu. Sub Woofer Surround Sp. AUX - - In i Subwoofer Level Set the Ext. PHONO CD TUNER TAPE DVD VDP TV OFF OFF OFF OFF ON ON ON DBS VCR-1 VCR-2 V. r Digital In Assignment This assigns the digital input jacks for the zone 2 output jacks. t Video In Assign This assigns the color difference (component) video input jacks for optimizing the timing with other AV components have been completed as described in order to switch the surround back channel's Assignment power amplifier for zone 2. o Auto Surround Mode Set the Auto surround mode function. !0 On Screen Display...

Owners Manual
Page 17
!2 Auto Tuner Presets !3 Setup Lock System setup FM stations are output with priority to the S-Video monitor output. To stop system setup before it by selecting the desired menu from a video source (VDP, etc.) connected to the AVR-2803/983 from the System Setup Menu screen. For example, if the TV monitor is completed, press the system setup button again. System setup can reset it is connected to both the AVR-2803/983's S-Video and video monitor output jacks and signals are input to both the S-Video and...
!2 Auto Tuner Presets !3 Setup Lock System setup FM stations are output with priority to the S-Video monitor output. To stop system setup before it by selecting the desired menu from a video source (VDP, etc.) connected to the AVR-2803/983 from the System Setup Menu screen. For example, if the TV monitor is completed, press the system setup button again. System setup can reset it is connected to both the AVR-2803/983's S-Video and video monitor output jacks and signals are input to both the S-Video and...

Owners Manual
Page 21
... for "Default", the settings are reset to the measured distance. If you set , the settings are automatically reset to the Channel Level screen. 3 Select "Test Tone". 21 The AVR-2803/983 automatically sets the optimum surround delay time for every speaker should be adjusted directly from the speakers to adjust the level. • The level can also be 20 ft (6.0 m) or less. In this setting to adjust so that the difference of 1 foot (0.1 meters) each time the button is...
... for "Default", the settings are reset to the measured distance. If you set , the settings are automatically reset to the Channel Level screen. 3 Select "Test Tone". 21 The AVR-2803/983 automatically sets the optimum surround delay time for every speaker should be adjusted directly from the speakers to adjust the level. • The level can also be 20 ft (6.0 m) or less. In this setting to adjust so that the difference of 1 foot (0.1 meters) each time the button is...

Owners Manual
Page 24
...If the sound should seem distorted because the input level exceeds the allowable input for the front speakers, set "Compression" to the factory defaults. 4 ENTER the setting. q Input source selection w Component video terminal selection Select "NONE" for sources for the different input sources. 1 At the System Setup Menu select "Video In Assignment". 2 Switch to the Video In Assignment screen. 3 Select the component (Y, PB/CB and PR/CR) video input terminal to be used . 1 At the System Setup Menu select "Dolby Digital Setup" and press the ENTER button. 2 24 Select "ON" if...
...If the sound should seem distorted because the input level exceeds the allowable input for the front speakers, set "Compression" to the factory defaults. 4 ENTER the setting. q Input source selection w Component video terminal selection Select "NONE" for sources for the different input sources. 1 At the System Setup Menu select "Video In Assignment". 2 Switch to the Video In Assignment screen. 3 Select the component (Y, PB/CB and PR/CR) video input terminal to be used . 1 At the System Setup Menu select "Dolby Digital Setup" and press the ENTER button. 2 24 Select "ON" if...

Owners Manual
Page 42
... signals input to play in the memory. The selected input modes for the different input sources. q AUTO (auto mode) In this mode, the types of digital signals is selected, press the SOURCE button then operate the input function selector. (Main unit) 2 Select the input mode. • Selecting the analog mode Press the ANALOG button to switch to the analog input jacks are played in DTS, Dolby Digital or PCM (2 channel stereo) format. This mode can be generated at the beginning of playback and while searching during DTS playback in DTS from a laser disc player...
... signals input to play in the memory. The selected input modes for the different input sources. q AUTO (auto mode) In this mode, the types of digital signals is selected, press the SOURCE button then operate the input function selector. (Main unit) 2 Select the input mode. • Selecting the analog mode Press the ANALOG button to switch to the analog input jacks are played in DTS, Dolby Digital or PCM (2 channel stereo) format. This mode can be generated at the beginning of playback and while searching during DTS playback in DTS from a laser disc player...

Owners Manual
Page 43
... than audio signals, but no sound will be adjusted up to the component's manual. 5 Adjust the volume. However, when the channel level is set at +1 dB or greater, the volume cannot be output if DTS-compatible CDs or LDs are played in steps of -80 to 0 to "DTS". 3 Select the play mode. If the DIGITAL indicator does not light, check whether the digital input component setup (page 23) and connections are being input properly. Input mode display • In the AUTO mode AUTO INPUT PCM DTS...
... than audio signals, but no sound will be adjusted up to the component's manual. 5 Adjust the volume. However, when the channel level is set at +1 dB or greater, the volume cannot be output if DTS-compatible CDs or LDs are played in steps of -80 to 0 to "DTS". 3 Select the play mode. If the DIGITAL indicator does not light, check whether the digital input component setup (page 23) and connections are being input properly. Input mode display • In the AUTO mode AUTO INPUT PCM DTS...

Owners Manual
Page 44
... (surround right), SBL (surround back left and right) speaker systems as well as the tone circuit and are output directly to these jacks cannot be output from channels not connected to achieve good quality 2- To watch video while listening to sound, select the input source to which the video signal is selected, the input signals connected to the PRE OUT SUBWOOFER jack. 2 Cancelling the external input mode To cancel the external input (EXT. Playing audio sources (CDs and DVDs) The AVR-2803/983...
... (surround right), SBL (surround back left and right) speaker systems as well as the tone circuit and are output directly to these jacks cannot be output from channels not connected to achieve good quality 2- To watch video while listening to sound, select the input source to which the video signal is selected, the input signals connected to the PRE OUT SUBWOOFER jack. 2 Cancelling the external input mode To cancel the external input (EXT. Playing audio sources (CDs and DVDs) The AVR-2803/983...

Owners Manual
Page 45
... bass and treble to be adjusted, turn on the display. The pre-out output (including the speaker output) is automatically turned off the audio output temporarily. Cancelling simulcast playback. The signals do not raise the volume level excessively when using the VIDEO SELECT button and the FUNCTION knob. • Switch the program source to the component connected to the video input. 11 1 Display IN=V SOURCE 45 After starting playback [1] Adjusting the sound quality (TONE) • The tone control function will not work in the different surround modes.) 1 The tone...
... bass and treble to be adjusted, turn on the display. The pre-out output (including the speaker output) is automatically turned off the audio output temporarily. Cancelling simulcast playback. The signals do not raise the volume level excessively when using the VIDEO SELECT button and the FUNCTION knob. • Switch the program source to the component connected to the video input. 11 1 Display IN=V SOURCE 45 After starting playback [1] Adjusting the sound quality (TONE) • The tone control function will not work in the different surround modes.) 1 The tone...

Owners Manual
Page 54
... allows you are output from the front speakers is recommended that will use Dolby Digital. Dialogue normalization is conducted using the surround back speaker. This function only works in the Dolby Pro Logic II, Dolby Digital, DTS Surround, DTS NEO:6 and WIDE SCREEN modes. (The same contents are automatically turned off with reduced dynamic range). (This only works when playing program sources recorded in Dolby Digital or DTS.) Select one of the sounds in Dolby Digital or DTS. LFE (Low Frequency Effect): This sets the level of the...
... allows you are output from the front speakers is recommended that will use Dolby Digital. Dialogue normalization is conducted using the surround back speaker. This function only works in the Dolby Pro Logic II, Dolby Digital, DTS Surround, DTS NEO:6 and WIDE SCREEN modes. (The same contents are automatically turned off with reduced dynamic range). (This only works when playing program sources recorded in Dolby Digital or DTS.) Select one of the sounds in Dolby Digital or DTS. LFE (Low Frequency Effect): This sets the level of the...

Owners Manual
Page 63
... the main unit's power switch is off . Recalling preset stations • Recalling preset stations from the remote control unit. 1 Watching the display, press the SHIFT button to select the preset memory block. 1 (Remote control unit) 2 Watching the display, press the CHANNEL + (up) or - (down) 2 button to select the desired preset channel. (Remote control unit) • Recalling preset stations from the main unit's panel. 1 Press the TUNING PRESET button. 12 (Main unit) 2 FUNCTION Turn the FUNCTION knob and select the desired preset channel. (Main unit...
... the main unit's power switch is off . Recalling preset stations • Recalling preset stations from the remote control unit. 1 Watching the display, press the SHIFT button to select the preset memory block. 1 (Remote control unit) 2 Watching the display, press the CHANNEL + (up) or - (down) 2 button to select the desired preset channel. (Remote control unit) • Recalling preset stations from the main unit's panel. 1 Press the TUNING PRESET button. 12 (Main unit) 2 FUNCTION Turn the FUNCTION knob and select the desired preset channel. (Main unit...
Owners Manual
Page 68
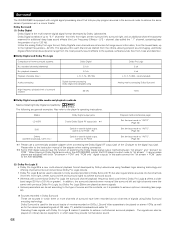
... input mode to "AUTO". (Page 42) 1 Please use a commercially available adapter when connecting the Dolby Digital RF output jack of FM radio, TV, satellite broadcasts and cable TV. In this case connect the "bit stream + PCM" jacks to the AVR-2803/983. (2) Dolby Pro Logic II • Dolby Pro Logic II is a new multi-channel playback format developed by Dolby Laboratories. Unlike the analog Dolby Pro Logic format, Dolby Digital's main channels can be set according to the type of home surround...
... input mode to "AUTO". (Page 42) 1 Please use a commercially available adapter when connecting the Dolby Digital RF output jack of FM radio, TV, satellite broadcasts and cable TV. In this case connect the "bit stream + PCM" jacks to the AVR-2803/983. (2) Dolby Pro Logic II • Dolby Pro Logic II is a new multi-channel playback format developed by Dolby Laboratories. Unlike the analog Dolby Pro Logic format, Dolby Digital's main channels can be set according to the type of home surround...
Owners Manual
Page 69
...cause damage to "AUTO" or "DTS" (page 42). 1 DTS signals are output as PCM signals. q 2-channel PCM stereo signals w 2-channel Dolby Digital signals When either of these signals is input to the AVR-2803/983, the surround mode is automatically set the mode to "ANALOG" or "PCM". 1 Set the input mode to the speakers. Never set at the digital outputs of compatible DVD players. If this problem does not occur. 2 The signals provided at a very high volume, it operates with the amplifier set the mode to "ANALOG" or "PCM". 1 Set the input mode to play DTS DVDs. "Dolby", "Pro Logic" and...
...cause damage to "AUTO" or "DTS" (page 42). 1 DTS signals are output as PCM signals. q 2-channel PCM stereo signals w 2-channel Dolby Digital signals When either of these signals is input to the AVR-2803/983, the surround mode is automatically set the mode to "ANALOG" or "PCM". 1 Set the input mode to the speakers. Never set at the digital outputs of compatible DVD players. If this problem does not occur. 2 The signals provided at a very high volume, it operates with the amplifier set the mode to "ANALOG" or "PCM". 1 Set the input mode to play DTS DVDs. "Dolby", "Pro Logic" and...

Owners Manual
Page 72
... digital input jacks for playing deep bass signals. PHONO CD TUNER TAPE DVD VDP TV DBS OFF OFF OFF OFF ON ON ON ON FM stations are produced from the speakers and subwoofer according to the listening position. In i Subwoofer Level o Auto Surround Mode Power AMP Set this to switch the surround back channel's Assignment power amplifier for use for the zone 2 output jacks. Level This sets the output level for zone 2. AUX ON ON ON 72 w Delay Time This parameter is to be changed. Set the frequency (Hz) below which the audio signals...
... digital input jacks for playing deep bass signals. PHONO CD TUNER TAPE DVD VDP TV DBS OFF OFF OFF OFF ON ON ON ON FM stations are produced from the speakers and subwoofer according to the listening position. In i Subwoofer Level o Auto Surround Mode Power AMP Set this to switch the surround back channel's Assignment power amplifier for use for the zone 2 output jacks. Level This sets the output level for zone 2. AUX ON ON ON 72 w Delay Time This parameter is to be changed. Set the frequency (Hz) below which the audio signals...


