
Owners Manual
Page 1
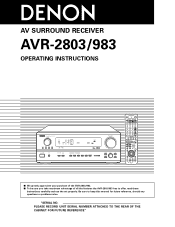
AV SURROUND RECEIVER AVR-2803/983 OPERATING INSTRUCTIONS REMOTE SENSOR ON / STANDBY AUTO SIGNAL DIGITAL SURROUND BACK CH OUTPUT INPUT PCM DTS SIGNAL DETECT VOLUME LEVEL 2 We greatly appreciate your purchase of the AVR-2803/983. 2 To be sure you take maximum advantage of all the features the AVR-2803/983 has to keep this manual for future reference, should any questions or problems arise. "SERIAL NO. PLEASE RECORD UNIT SERIAL NUMBER ATTACHED TO THE REAR OF THE CABINET FOR FUTURE REFERENCE" Be sure to offer, read these instructions carefully and use the set properly.
AV SURROUND RECEIVER AVR-2803/983 OPERATING INSTRUCTIONS REMOTE SENSOR ON / STANDBY AUTO SIGNAL DIGITAL SURROUND BACK CH OUTPUT INPUT PCM DTS SIGNAL DETECT VOLUME LEVEL 2 We greatly appreciate your purchase of the AVR-2803/983. 2 To be sure you take maximum advantage of all the features the AVR-2803/983 has to keep this manual for future reference, should any questions or problems arise. "SERIAL NO. PLEASE RECORD UNIT SERIAL NUMBER ATTACHED TO THE REAR OF THE CABINET FOR FUTURE REFERENCE" Be sure to offer, read these instructions carefully and use the set properly.
Owners Manual
Page 4
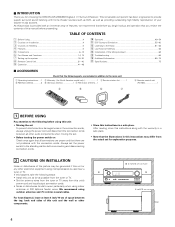
... as possible from the tuner or TV. • Set the antenna wires from the tuner or TV away from the actual set for choosing the DENON AVR-2803/983 Digital A / V Surround Receiver. Always set . • Before turning the power switch on Handling 5 v Features ...5 b Connections 6~13 n Part Names ... Functions 14, 15 m Setting up the system 16~30 , Remote Control Unit 31~40 . 2 INTRODUCTION Thank you review the contents of this manual before connecting and disconnecting connection cords. • Store this product is used near a B tuner or TV. If this happens, take the following...
... as possible from the tuner or TV. • Set the antenna wires from the tuner or TV away from the actual set for choosing the DENON AVR-2803/983 Digital A / V Surround Receiver. Always set . • Before turning the power switch on Handling 5 v Features ...5 b Connections 6~13 n Part Names ... Functions 14, 15 m Setting up the system 16~30 , Remote Control Unit 31~40 . 2 INTRODUCTION Thank you review the contents of this manual before connecting and disconnecting connection cords. • Store this product is used near a B tuner or TV. If this happens, take the following...

Owners Manual
Page 8
... described on the S input jacks The input selectors for the S inputs and Video inputs work in mind and make connections according to the equipment's instruction manuals.
... described on the S input jacks The input selectors for the S inputs and Video inputs work in mind and make connections according to the equipment's instruction manuals.
Owners Manual
Page 22
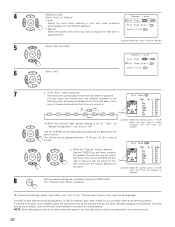
... reappears. Example: When the "Auto" mode is selected 8 After the above settings are automatically emitted from the different speakers. When the "Manual" mode is selected Use the CURSOR up and down to select the speaker for which you may also need to 75 dB (C-weighted, slow...and adjust for "Speaker Configuration", this is the same. Select "Auto" or "Manual". • Auto: Adjust the level while listening to the test tones produced automatically from the different speakers. • Manual: Select the speaker from the different speakers in units of each channel should be ...
... reappears. Example: When the "Auto" mode is selected 8 After the above settings are automatically emitted from the different speakers. When the "Manual" mode is selected Use the CURSOR up and down to select the speaker for which you may also need to 75 dB (C-weighted, slow...and adjust for "Speaker Configuration", this is the same. Select "Auto" or "Manual". • Auto: Adjust the level while listening to the test tones produced automatically from the different speakers. • Manual: Select the speaker from the different speakers in units of each channel should be ...

Owners Manual
Page 28
NOTE: • If an FM station cannot be preset automatically due to poor reception, use the "Manual tuning" operation to tune in the station, then preset it using the manual "Preset memory" operation. 1 At the System Setup Menu select "Auto Tuner Presets". 2 Switch to 8. Auto Tuner Presets Use this to automatically search for...
NOTE: • If an FM station cannot be preset automatically due to poor reception, use the "Manual tuning" operation to tune in the station, then preset it using the manual "Preset memory" operation. 1 At the System Setup Menu select "Auto Tuner Presets". 2 Switch to 8. Auto Tuner Presets Use this to automatically search for...
Owners Manual
Page 32
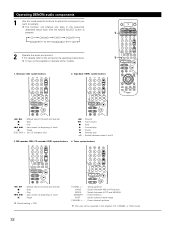
MD recorder (MD), CD recorder (CDR) system buttons 4. Operating DENON audio components 1 Use the mode selector buttons to select the component you want to operate some models. 1. Tuner system buttons 6, 7 2 1 8, 9 3 : Manual search (forward and reverse) : Stop : Play : Auto search (to beginning of ...changers only) 6 : Rewind 7 : Fast forward 2 : Stop 1 : Forward play 3 : Pause 0 : Reverse play A/B : Switch between AUTO and MANUAL MEMORY : Preset memory SHIFT : Switch preset channel range CHANNEL +, - : Preset channel up /down BAND : Switch between AM and FM bands MODE : Switch...
MD recorder (MD), CD recorder (CDR) system buttons 4. Operating DENON audio components 1 Use the mode selector buttons to select the component you want to operate some models. 1. Tuner system buttons 6, 7 2 1 8, 9 3 : Manual search (forward and reverse) : Stop : Play : Auto search (to beginning of ...changers only) 6 : Rewind 7 : Fast forward 2 : Stop 1 : Forward play 3 : Pause 0 : Reverse play A/B : Switch between AUTO and MANUAL MEMORY : Preset memory SHIFT : Switch preset channel range CHANNEL +, - : Preset channel up /down BAND : Switch between AM and FM bands MODE : Switch...

Owners Manual
Page 34
... components. 2 Operate the component. • For details, refer to manufacturer. Digital video disc player (DVD, DVD SETUP) system buttons POWER : Power on /standby (ON/SOURCE) 6,7 : Manual search (forward and reverse) 2 : Stop 1 : Play 8,9 : Auto search (cue) 3 : Pause 0~9, +10 : 10 key 34 Compare with this remote control unit. 1. Operating a component stored in the...
... components. 2 Operate the component. • For details, refer to manufacturer. Digital video disc player (DVD, DVD SETUP) system buttons POWER : Power on /standby (ON/SOURCE) 6,7 : Manual search (forward and reverse) 2 : Stop 1 : Play 8,9 : Auto search (cue) 3 : Pause 0~9, +10 : 10 key 34 Compare with this remote control unit. 1. Operating a component stored in the...
Owners Manual
Page 35
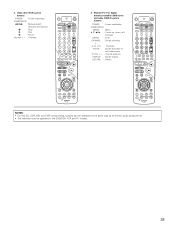
Monitor TV (TV), digital broadcast satellite (DBS) tuner and cable (CABLE) system buttons POWER : Power on /standby (ON/SOURCE) 6,7 : Manual search (forward and reverse) 2 : Stop 1 : Play 3 : Pause Channel +, - : Channels 4. Video deck (VCR) system buttons POWER : Power on /standby (ON/SOURCE) MENU : Menu •, ª, 0, 1 : Cursor... : Switch display RETURN : Return NOTES: • For this CD, CDR, MD and TAPE components, buttons can be operated in the same way as for Denon audio components. • The television can be operated in the DVD/VDP, VCR and TV modes. 35 3.
Monitor TV (TV), digital broadcast satellite (DBS) tuner and cable (CABLE) system buttons POWER : Power on /standby (ON/SOURCE) 6,7 : Manual search (forward and reverse) 2 : Stop 1 : Play 3 : Pause Channel +, - : Channels 4. Video deck (VCR) system buttons POWER : Power on /standby (ON/SOURCE) MENU : Menu •, ª, 0, 1 : Cursor... : Switch display RETURN : Return NOTES: • For this CD, CDR, MD and TAPE components, buttons can be operated in the same way as for Denon audio components. • The television can be operated in the DVD/VDP, VCR and TV modes. 35 3.

Owners Manual
Page 38
... DBS/CABLE modes. For example, when the CD mode is set to the punch through mode in the TV mode, the CD mode's PLAY, STOP, MANUAL SEARCH, AUTO SEARCH, PAUSE and DISC SKIP buttons' signals are sent in the CD, CDR/MD, TAPE, DVD/VDP, and VCR modes can be assigned...
... DBS/CABLE modes. For example, when the CD mode is set to the punch through mode in the TV mode, the CD mode's PLAY, STOP, MANUAL SEARCH, AUTO SEARCH, PAUSE and DISC SKIP buttons' signals are sent in the CD, CDR/MD, TAPE, DVD/VDP, and VCR modes can be assigned...

Owners Manual
Page 43
... described on the selected component. • For operating instructions, refer to "DTS". However, when the channel level is set the input mode to the component's manual. 5 Adjust the volume. Input mode display • In the AUTO mode AUTO INPUT PCM DTS • In the DIGITAL PCM mode AUTO INPUT PCM DTS...
... described on the selected component. • For operating instructions, refer to "DTS". However, when the channel level is set the input mode to the component's manual. 5 Adjust the volume. Input mode display • In the AUTO mode AUTO INPUT PCM DTS • In the DIGITAL PCM mode AUTO INPUT PCM DTS...

Owners Manual
Page 46
... not output from the REC SOURCE or audio output jacks. 46 FUNCTION (Main unit) 3 Set the recording mode. • For operating instructions, refer to the manual of the component on which you wish to record. • The "REC" indicator and the indicator of the selected source light. [5] Checking the currently playing...
... not output from the REC SOURCE or audio output jacks. 46 FUNCTION (Main unit) 3 Set the recording mode. • For operating instructions, refer to the manual of the component on which you wish to record. • The "REC" indicator and the indicator of the selected source light. [5] Checking the currently playing...

Owners Manual
Page 47
... be output. • For operating instructions, refer to TUNER, the preset channel can be controlled only if ZONE2 vol. This operation is set to the manuals of ZONE 2 OUT can be controlled using the VOLUME + and - level is not possible in the REC OUT mode. 1 Select "ZONE2" using the CHANNEL + and...
... be output. • For operating instructions, refer to TUNER, the preset channel can be controlled only if ZONE2 vol. This operation is set to the manuals of ZONE 2 OUT can be controlled using the VOLUME + and - level is not possible in the REC OUT mode. 1 Select "ZONE2" using the CHANNEL + and...

Owners Manual
Page 50
... mode. 3 4, 5, 6 50 FL C FR SR SBR SBL 2 2 FADER SW SL 1 2 Press the 0 button to reduce the volume of the front channels, the 1 button to the manuals of the respective components.
... mode. 3 4, 5, 6 50 FL C FR SR SBR SBL 2 2 FADER SW SL 1 2 Press the 0 button to reduce the volume of the front channels, the 1 button to the manuals of the respective components.

Owners Manual
Page 61
... mode is tuned in. (Remote control unit) If tuning does not stop at the desired station, use to the "Manual tuning" operation. Check that the remote control unit is tuned in. The frequency changes continuously when the button is held in. (Main unit) (...auto tuning mode on the FM band, the "STEREO" indicator lights on the display. 3 2 (Remote control unit) 1 4 4 Press the TUNING + (up ) or - (down ) button. Manual tuning 1 Set the input function to "TUNER". FUNCTION 4 Press the TUNING + (up ) or - (down ) button to tune in the desired station. Auto tuning 1 Set the...
... mode is tuned in. (Remote control unit) If tuning does not stop at the desired station, use to the "Manual tuning" operation. Check that the remote control unit is tuned in. The frequency changes continuously when the button is held in. (Main unit) (...auto tuning mode on the FM band, the "STEREO" indicator lights on the display. 3 2 (Remote control unit) 1 4 4 Press the TUNING + (up ) or - (down ) button. Manual tuning 1 Set the input function to "TUNER". FUNCTION 4 Press the TUNING + (up ) or - (down ) button to tune in the desired station. Auto tuning 1 Set the...

Owners Manual
Page 62
... SCREEN/DISPLAY button repeatedly until the "Tuner Preset Stations" screen appears on the OSD. 1 (Remote control unit) 62 Preset memory 1 Use the "Auto tuning" or "Manual tuning" operation to tune in the station to be preset in the memory. 2 Press the MEMORY button. (Remote control unit) 2, 5 3 3 Press the SHIFT button and...
... SCREEN/DISPLAY button repeatedly until the "Tuner Preset Stations" screen appears on the OSD. 1 (Remote control unit) 62 Preset memory 1 Use the "Auto tuning" or "Manual tuning" operation to tune in the station to be preset in the memory. 2 Press the MEMORY button. (Remote control unit) 2, 5 3 3 Press the SHIFT button and...

Owners Manual
Page 67
... the surround back channel signals from the listening position than the front speakers. • Consult the owner's manual for your system according to 20 cm) than the front speakers. • Consult the owner's manual for your subwoofer for the surround back speakers as surround back speaker installation method (1). As seen from above...
... the surround back channel signals from the listening position than the front speakers. • Consult the owner's manual for your system according to 20 cm) than the front speakers. • Consult the owner's manual for your subwoofer for the surround back speakers as surround back speaker installation method (1). As seen from above...
Owners Manual
Page 68
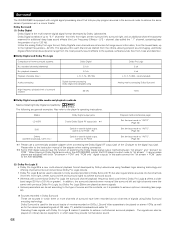
... outputs. recommended) Analog matrix processing Dolby Surround High frequency playback limit of up to "5.1" channels - Please refer to the instruction manual of the adapter when making connection. 2 Some DVD digital outputs have been recorded as two channels of signals using feedback logic steering...Logic 2 ch 4 ch L, R, C, S (SW - When playing in a movie theater. recorded channels (elements) No. Also refer to the AVR-2803/983. (2) Dolby Pro Logic II • Dolby Pro Logic II is a new multi-channel playback format developed by Dolby Laboratories. The signals within ...
... outputs. recommended) Analog matrix processing Dolby Surround High frequency playback limit of up to "5.1" channels - Please refer to the instruction manual of the adapter when making connection. 2 Some DVD digital outputs have been recorded as two channels of signals using feedback logic steering...Logic 2 ch 4 ch L, R, C, S (SW - When playing in a movie theater. recorded channels (elements) No. Also refer to the AVR-2803/983. (2) Dolby Pro Logic II • Dolby Pro Logic II is a new multi-channel playback format developed by Dolby Laboratories. The signals within ...
Owners Manual
Page 69
... great, and when DTS playback is a multi-channel digital signal format developed by the AVR-2803/983, or may undergo some sort of compatible DVD players. These CDs include 5.1-channel ... the different channels are trademarks of DVD Dolby surround recording signals. consult the player's owner's manual for information on the same disc, so the discs can be sure to switch the input mode...the stereo 2-channel mode. the pictures and sound can be processed erroneously, in DTS. Recent DENON DVD player models feature DTS-compatible digital output - In this case the DTS-encoded signals ...
... great, and when DTS playback is a multi-channel digital signal format developed by the AVR-2803/983, or may undergo some sort of compatible DVD players. These CDs include 5.1-channel ... the different channels are trademarks of DVD Dolby surround recording signals. consult the player's owner's manual for information on the same disc, so the discs can be sure to switch the input mode...the stereo 2-channel mode. the pictures and sound can be processed erroneously, in DTS. Recent DENON DVD player models feature DTS-compatible digital output - In this case the DTS-encoded signals ...

Owners Manual
Page 70
... the effect of this format, the additional SB channel signals undergo matrix encoding and are input to achieve a sense that of recording can be set manually to play DTS-ES Matrix 6.1 encoded sources with a DTS 5.1-channel decoder. DTS-ES Extended Surround includes two signal formats with different surround signal recording methods...
... the effect of this format, the additional SB channel signals undergo matrix encoding and are input to achieve a sense that of recording can be set manually to play DTS-ES Matrix 6.1 encoded sources with a DTS 5.1-channel decoder. DTS-ES Extended Surround includes two signal formats with different surround signal recording methods...

Serial Protocol
Page 9
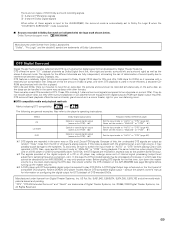
"EML" can change DOLBY PL2,NEO:6 mode.) PSMODE : CINEMA MODE : EMULATION --- EVENT PARAMETER function example PS TONE DEFEAT ON PARAMETER setting PSTONE DEFEAT ON TONE DEFEAT OFF TONE DEFEAT ON/OFF PSTONE DEFEAT OFF SB:MTRX ON SURROUND BACK SP MODE set PSSB:MTRX ON SB:NON MTRX ---MTRX ON = SURR.EX ON = DSCRT ON PSSB:NON MTRX SB:OFF (at THX mode) (at FM band ( ON/OFF PSCINEMA EQ.ON CINEMA EQ.OFF PSCINEMA EQ.OFF MODE : MUSIC CINEMA / MUSIC /PL mode change PSMODE : MUSIC MODE : CINEMA (This parameter can change TFUP * DOWN TFDOWN * ****** (6 digits kHz ...
"EML" can change DOLBY PL2,NEO:6 mode.) PSMODE : CINEMA MODE : EMULATION --- EVENT PARAMETER function example PS TONE DEFEAT ON PARAMETER setting PSTONE DEFEAT ON TONE DEFEAT OFF TONE DEFEAT ON/OFF PSTONE DEFEAT OFF SB:MTRX ON SURROUND BACK SP MODE set PSSB:MTRX ON SB:NON MTRX ---MTRX ON = SURR.EX ON = DSCRT ON PSSB:NON MTRX SB:OFF (at THX mode) (at FM band ( ON/OFF PSCINEMA EQ.ON CINEMA EQ.OFF PSCINEMA EQ.OFF MODE : MUSIC CINEMA / MUSIC /PL mode change PSMODE : MUSIC MODE : CINEMA (This parameter can change TFUP * DOWN TFDOWN * ****** (6 digits kHz ...


