
Literature/Product Sheet
Page 2
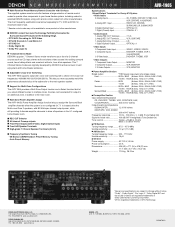
... DVD, for maximum ease-of-use. * Remote control codes may not be selected for Multi-Zone Configurations The AVR-1905 provides a Multi Zone Output function and a Select function that let you output different surces to multiple zones. DENON, LTD. 3-16-11, YUSHIMA, BUNKYO-KU...registered trademarks of DTS Technology. NEW MODEL I N F O R M AT I O N AVR-1905 s Multi-Function Preset Memory Remote Controller with Glo-keys The supplied system remote controller features a large selection of remote control codes to operate other components in your favorite 2-channel sources such as CD, tape, stereo ...
... DVD, for maximum ease-of-use. * Remote control codes may not be selected for Multi-Zone Configurations The AVR-1905 provides a Multi Zone Output function and a Select function that let you output different surces to multiple zones. DENON, LTD. 3-16-11, YUSHIMA, BUNKYO-KU...registered trademarks of DTS Technology. NEW MODEL I N F O R M AT I O N AVR-1905 s Multi-Function Preset Memory Remote Controller with Glo-keys The supplied system remote controller features a large selection of remote control codes to operate other components in your favorite 2-channel sources such as CD, tape, stereo ...
Owners Manual
Page 4
As this manual before you begin hookup and operation that you for choosing the DENON AVR-1905/785 Digital A / V Surround Receiver. Remote Control Unit 31 ~ 35 ⁄0 Operation 36 ~ 41 ⁄1 Multi Zone 42 ~ 44 ⁄2 Surround 45 ~ 53 ⁄3 DSP ...Using 5 x Cautions on Installation 5 c Cautions on Handling 5 v Features ...6 b Connections 7 ~ 15 n Part Names and Functions 16, 17 m Using the Remote Control Unit 18 , Setting up the System 19 ~ 30 . This remarkable component has been engineered to the main unit: q Operating instructions 1 w Warranty 1 e Service station ...
As this manual before you begin hookup and operation that you for choosing the DENON AVR-1905/785 Digital A / V Surround Receiver. Remote Control Unit 31 ~ 35 ⁄0 Operation 36 ~ 41 ⁄1 Multi Zone 42 ~ 44 ⁄2 Surround 45 ~ 53 ⁄3 DSP ...Using 5 x Cautions on Installation 5 c Cautions on Handling 5 v Features ...6 b Connections 7 ~ 15 n Part Names and Functions 16, 17 m Using the Remote Control Unit 18 , Setting up the System 19 ~ 30 . This remarkable component has been engineered to the main unit: q Operating instructions 1 w Warranty 1 e Service station ...

Owners Manual
Page 7
... player's analog output jacks (ANALOG OUTPUT) to this unit's tape recording (CDR/TAPE OUT) jacks using pin plug cords. No power is supplied from the remote control unit. AC CORD AC 120 V, 60 Hz R L R L OPTICAL COAXIAL OUTPUT CD player or other components. NOTE: Only use them near a power transformer will result in...
... player's analog output jacks (ANALOG OUTPUT) to this unit's tape recording (CDR/TAPE OUT) jacks using pin plug cords. No power is supplied from the remote control unit. AC CORD AC 120 V, 60 Hz R L R L OPTICAL COAXIAL OUTPUT CD player or other components. NOTE: Only use them near a power transformer will result in...
Owners Manual
Page 16
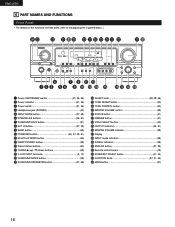
..., 48, 56) !9 TONE DEFEAT button 40) @0 TONE CONTROL button 40) @1 MASTER VOLUME control 38) @2 STATUS button 41) @3 DIMMER button 41) @4 VIDEO SELECT button 40) @5 OUTPUT indicators 44, 51) @6 MASTER VOLUME indicator 38) @7 Display @8 INPUT mode indicators 38) @9 SIGNAL indicators 38) #0 ANALOG button 37, 39) #1 Remote control sensor 18) #2 ZONE2/REC SELECT button 41, 44...
..., 48, 56) !9 TONE DEFEAT button 40) @0 TONE CONTROL button 40) @1 MASTER VOLUME control 38) @2 STATUS button 41) @3 DIMMER button 41) @4 VIDEO SELECT button 40) @5 OUTPUT indicators 44, 51) @6 MASTER VOLUME indicator 38) @7 Display @8 INPUT mode indicators 38) @9 SIGNAL indicators 38) #0 ANALOG button 37, 39) #1 Remote control sensor 18) #2 ZONE2/REC SELECT button 41, 44...
Owners Manual
Page 17
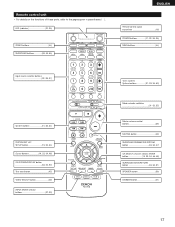
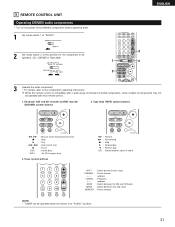
LED (indicator 32, 35) ZONE2 buttons 44) SURROUND buttons 38, 45, 55) ENGLISH Remote control signal transmitter 18) POWER buttons 21, 32~34, 36) MAIN buttons 44) Input source selector buttons 32~35, 37) System buttons 31, 33, 34) SYSTEM ...) CH SELECT (channel select)/ ENTER button 19, 33, 34, 46, 48) SURROUND BACK/RETURN button 33, 34, 51) SPEAKER button 36) DIMMER button 41) 17 Remote control unit • For details on the functions of these parts, refer to the pages given in parentheses ( ).
LED (indicator 32, 35) ZONE2 buttons 44) SURROUND buttons 38, 45, 55) ENGLISH Remote control signal transmitter 18) POWER buttons 21, 32~34, 36) MAIN buttons 44) Input source selector buttons 32~35, 37) System buttons 31, 33, 34) SYSTEM ...) CH SELECT (channel select)/ ENTER button 19, 33, 34, 46, 48) SURROUND BACK/RETURN button 33, 34, 51) SPEAKER button 36) DIMMER button 41) 17 Remote control unit • For details on the functions of these parts, refer to the pages given in parentheses ( ).

Owners Manual
Page 18
... feet/7 meters, but this distance will shorten or operation will become difficult if there are obstacles between the remote control unit and the remote control sensor, if the remote control sensor is exposed to direct sunlight or other strong light, or if operated from such devices as possible. ... used for an extended period of time. • If batteries leak, dispose of the remote control unit Approx. 23 feet/7 m 30° 30° Point the remote control unit at the remote control sensor as shown on the diagram. Range of operation of them immediately. Avoid touching the...
... feet/7 meters, but this distance will shorten or operation will become difficult if there are obstacles between the remote control unit and the remote control sensor, if the remote control sensor is exposed to direct sunlight or other strong light, or if operated from such devices as possible. ... used for an extended period of time. • If batteries leak, dispose of the remote control unit Approx. 23 feet/7 m 30° 30° Point the remote control unit at the remote control sensor as shown on the diagram. Range of operation of them immediately. Avoid touching the...
Owners Manual
Page 19
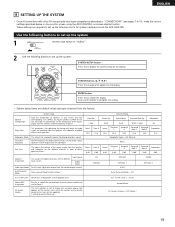
... and subwoofer according to the listening position. A setting to switch the display. Set the frequency (Hz) below on the monitor screen using the AVR-1905/785's on the display. In Subwoofer channel playback level. Subwoofer Small Small Small / 2 spkrs Center Surround L Surround R Surround Back L 12...which the audio signals are required to set up the system: SYSTEM SETUP button Press this to display the system setup on the remote control unit or main unit are operated. This adjusts the volume of the various speakers is for the different channels in "CONNECTIONS" (see...
... and subwoofer according to the listening position. A setting to switch the display. Set the frequency (Hz) below on the monitor screen using the AVR-1905/785's on the display. In Subwoofer channel playback level. Subwoofer Small Small Small / 2 spkrs Center Surround L Surround R Surround Back L 12...which the audio signals are required to set up the system: SYSTEM SETUP button Press this to display the system setup on the remote control unit or main unit are operated. This adjusts the volume of the various speakers is for the different channels in "CONNECTIONS" (see...

Owners Manual
Page 21
... SET UP NOTE: Please make sure the "AUDIO" position of the slide switch on and off . In this position to turn the power on the remote control unit. 5 Press the ENTER or (down) button to switch to the Speaker Configuration set up to finish system set up . Press the Power ON/STANDBY... switch (button). (Main unit) (Remote control unit) 4 Press the SYSTEM SETUP button to the settings made up . System set up can be turned on and off from the included...
... SET UP NOTE: Please make sure the "AUDIO" position of the slide switch on and off . In this position to turn the power on the remote control unit. 5 Press the ENTER or (down) button to switch to the Speaker Configuration set up to finish system set up . Press the Power ON/STANDBY... switch (button). (Main unit) (Remote control unit) 4 Press the SYSTEM SETUP button to the settings made up . System set up can be turned on and off from the included...
Owners Manual
Page 25
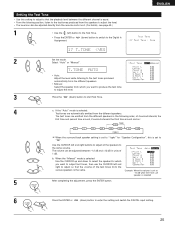
Setting the Test Tone • Use this setting to adjust to that the playback level between the different channel is equal. • From the listening position, listen to the test tones produced from the speakers to adjust the level. • The level can also be adjusted directly from the remote control unit. (For details, see page 45.) 1 • Use the (left) button to the Test Tone. • Press the ENTER or Assignment. (down) button to switch to the Digital In 17 T.TONE
Setting the Test Tone • Use this setting to adjust to that the playback level between the different channel is equal. • From the listening position, listen to the test tones produced from the speakers to adjust the level. • The level can also be adjusted directly from the remote control unit. (For details, see page 45.) 1 • Use the (left) button to the Test Tone. • Press the ENTER or Assignment. (down) button to switch to the Digital In 17 T.TONE
Owners Manual
Page 31
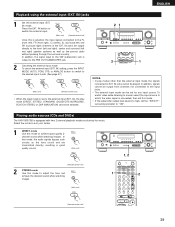
... details, refer to be operated when the switch is compatible with a wide range of infrared controlled components, some models of components may not be operated with this remote control. 1. CD player (CD) and CD recorder and MD recorder (CDR/MD) system buttons... (forward and reverse) : Stop : Play : Auto search (cue) : Pause : Switch discs (for the component to the component's operating instructions. 9 REMOTE CONTROL UNIT Operating DENON audio components • Turn on the power of the different components before operating them. 1 Set mode switch 1 to "AUDIO". 2 Set mode switch 2 to...
... details, refer to be operated when the switch is compatible with a wide range of infrared controlled components, some models of components may not be operated with this remote control. 1. CD player (CD) and CD recorder and MD recorder (CDR/MD) system buttons... (forward and reverse) : Stop : Play : Auto search (cue) : Pause : Switch discs (for the component to the component's operating instructions. 9 REMOTE CONTROL UNIT Operating DENON audio components • Turn on the power of the different components before operating them. 1 Set mode switch 1 to "AUDIO". 2 Set mode switch 2 to...

Owners Manual
Page 32
... list of the component as follows upon shipment from the factory and after resetting: TV, VCR HITACHI CD, TAPE DENON CDR/MD DENON (CDR) DVD/VDP DENON (DVD) DBS/CABLE ABC (CABLE) 32 This remote control unit can be registered. 4 1 2 3 Press the ON/SOURCE button and the OFF button at the same time. • Indicator...
... list of the component as follows upon shipment from the factory and after resetting: TV, VCR HITACHI CD, TAPE DENON CDR/MD DENON (CDR) DVD/VDP DENON (DVD) DBS/CABLE ABC (CABLE) 32 This remote control unit can be registered. 4 1 2 3 Press the ON/SOURCE button and the OFF button at the same time. • Indicator...

Owners Manual
Page 33
...: Auto search (cue) 3 : Pause 0~9, +10 : 10 key NOTE: • Some manufacturers use different names for the DVD remote control buttons, so also refer to the instructions on /standby (ON/SOURCE) OFF : DENON DVD Power off 6,7 : Manual search (forward and reverse) 2 : Stop 1 : Play 8,9 : Auto search (to the VIDEO ...side for that component. 33 Digital video disc player (DVD) system buttons POWER : Power on remote control for the DVD/VDP, DBS/...
...: Auto search (cue) 3 : Pause 0~9, +10 : 10 key NOTE: • Some manufacturers use different names for the DVD remote control buttons, so also refer to the instructions on /standby (ON/SOURCE) OFF : DENON DVD Power off 6,7 : Manual search (forward and reverse) 2 : Stop 1 : Play 8,9 : Auto search (to the VIDEO ...side for that component. 33 Digital video disc player (DVD) system buttons POWER : Power on remote control for the DVD/VDP, DBS/...
Owners Manual
Page 36
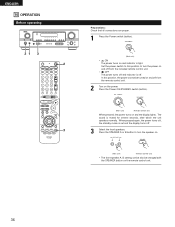
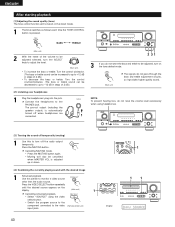
..., the power cannot be changed with the SPEAKER button on . Press the Power ON/STANDBY switch (button). ON / STANDBY (Main unit) (Remote control unit) When pressed, the power turns on and indicator is set and the display turns off . ENGLISH 10 OPERATION Before operating 21 3 2 ... all connections are proper. 1 Press the Power switch (button). The sound is off . 3 Select the front speakers. SPEAKER A B (Main unit) (Remote control unit) • The front speaker A, B setting can be also be turned on the power. Set the power switch to turn the power on and off...
..., the power cannot be changed with the SPEAKER button on . Press the Power ON/STANDBY switch (button). ON / STANDBY (Main unit) (Remote control unit) When pressed, the power turns on and indicator is set and the display turns off . ENGLISH 10 OPERATION Before operating 21 3 2 ... all connections are proper. 1 Press the Power switch (button). The sound is off . 3 Select the front speakers. SPEAKER A B (Main unit) (Remote control unit) • The front speaker A, B setting can be also be turned on the power. Set the power switch to turn the power on and off...

Owners Manual
Page 37
...output when CDs or LDs recorded in DTS format are played without passing through the surround circuitry. If so, play in the AVR-1905/785's surround decoder is selected, press the MAIN button then operate the input function selector. The selected input modes for all ... 3 1 Select the input source to switch the external input. NOTE: • Note that noise may be played. 5 Example: CD FUNCTION (Main unit) (Remote control unit) To select the input source when ZONE2/REC OUT is selected automatically upon playback. IN to be generated when using this mode, the types...
...output when CDs or LDs recorded in DTS format are played without passing through the surround circuitry. If so, play in the AVR-1905/785's surround decoder is selected, press the MAIN button then operate the input function selector. The selected input modes for all ... 3 1 Select the input source to switch the external input. NOTE: • Note that noise may be played. 5 Example: CD FUNCTION (Main unit) (Remote control unit) To select the input source when ZONE2/REC OUT is selected automatically upon playback. IN to be generated when using this mode, the types...

Owners Manual
Page 38
... MODE SELECT (Main unit) To select the surround mode while adjusting the surround parameters, tone defeat or tone control, press the surround mode button then operate the selector. (Remote control unit) SURROUND MODE (Main unit) 4 Start playback on the input signal. If the DIGITAL indicator does not...the volume. ENGLISH 3 Select the play mode. MASTER VOLUME The volume level is turned on the master volume level display. (Main unit) (Remote control unit) The volume can be sure to connect the source component to the digital input jacks (OPTICAL/COAXIAL) and set at +1 dB or ...
... MODE SELECT (Main unit) To select the surround mode while adjusting the surround parameters, tone defeat or tone control, press the surround mode button then operate the selector. (Remote control unit) SURROUND MODE (Main unit) 4 Start playback on the input signal. If the DIGITAL indicator does not...the volume. ENGLISH 3 Select the play mode. MASTER VOLUME The volume level is turned on the master volume level display. (Main unit) (Remote control unit) The volume can be sure to connect the source component to the digital input jacks (OPTICAL/COAXIAL) and set at +1 dB or ...
Owners Manual
Page 39
...INPUT MODE (AUTO, PCM, DTS) or ANALOG button to switch to the desired input mode. (See page 37.) INPUT MODE ANALOG (Main unit) (Remote control unit) • When the input mode is output to the front (left and right), center and surround (left ) and SR (surround right) channels ...(CDs and DVDs) The AVR-1905/785 is equipped with two 2-channel playback modes exclusively for any input source. ENGLISH Playback using the external input (EXT. IN) jacks 1 Set the external input (EXT. IN) mode. IN button to switch the external input. (Main unit) (Remote control unit) Once this is ...
...INPUT MODE (AUTO, PCM, DTS) or ANALOG button to switch to the desired input mode. (See page 37.) INPUT MODE ANALOG (Main unit) (Remote control unit) • When the input mode is output to the front (left and right), center and surround (left ) and SR (surround right) channels ...(CDs and DVDs) The AVR-1905/785 is equipped with two 2-channel playback modes exclusively for any input source. ENGLISH Playback using the external input (EXT. IN) jacks 1 Set the external input (EXT. IN) mode. IN button to switch the external input. (Main unit) (Remote control unit) Once this is ...
Owners Manual
Page 40
...until the desired source appears on the tone defeat mode. ENGLISH After starting playback [1] Adjusting the sound quality (tone) The tone control function will also be cancelled when MASTER VOL is adjusted up to be adjusted, turn off the audio output temporarily. Connect the ... • To decrease the bass or treble: Turn the control counterclockwise. (The bass or treble sound can be decreased to up or down. [4] Combining the currently playing sound with the desired image 1 Simulcast playback Use this to the video (Remote control unit) input jacks. 40 1 1 1 Display IN=V SOURCE...
...until the desired source appears on the tone defeat mode. ENGLISH After starting playback [1] Adjusting the sound quality (tone) The tone control function will also be cancelled when MASTER VOL is adjusted up to be adjusted, turn off the audio output temporarily. Connect the ... • To decrease the bass or treble: Turn the control counterclockwise. (The bass or treble sound can be decreased to up or down. [4] Combining the currently playing sound with the desired image 1 Simulcast playback Use this to the video (Remote control unit) input jacks. 40 1 1 1 Display IN=V SOURCE...

Owners Manual
Page 41
... dimmer function • Use this to the DIGITAL OUT (OPTICAL) jack. 41 The display brightness changes in sequence. DIMMER (Main unit) BRIGHT MEDIUM OFF DIM (Remote control unit) ENGLISH 21 1 2 Multi-source recording Playing one source while recording another (REC OUT mode) 1 Press the ZONE2/REC SELECT button. The display switches as..., the display can be switched to the unit's VIDEO MONITOR OUT jack. Also, the unit's operating status can be checked during playback by pressing the remote (Remote control unit) control unit's ON SCREEN/DISPLAY button.
... dimmer function • Use this to the DIGITAL OUT (OPTICAL) jack. 41 The display brightness changes in sequence. DIMMER (Main unit) BRIGHT MEDIUM OFF DIM (Remote control unit) ENGLISH 21 1 2 Multi-source recording Playing one source while recording another (REC OUT mode) 1 Press the ZONE2/REC SELECT button. The display switches as..., the display can be switched to the unit's VIDEO MONITOR OUT jack. Also, the unit's operating status can be checked during playback by pressing the remote (Remote control unit) control unit's ON SCREEN/DISPLAY button.
Owners Manual
Page 42
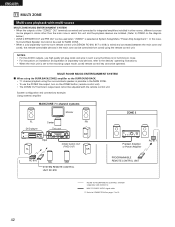
... of separately sold devices, refer to the devices' operating instructions. • When the main unit is set to -room remote control unit (DENON RC-616, 617 or 618) is selected at System Setup Menu "Power Amp Assignment". System configuration and connections example. In...or Power Amplifier RC-617 RC-616 SBL SBR SYSTEM REMOTE CONTROL UNIT RC-978 PROGRAMMABLE REMOTE CONTROL UNIT ROOM-TO-ROOM REMOTE CONTROL SYSTEM (separately sold separately room-to the recording output mode, zone2 remote control key cannot be controlled from zone2 using the surround back speaker is possible in...
... of separately sold devices, refer to the devices' operating instructions. • When the main unit is set to -room remote control unit (DENON RC-616, 617 or 618) is selected at System Setup Menu "Power Amp Assignment". System configuration and connections example. In...or Power Amplifier RC-617 RC-616 SBL SBR SYSTEM REMOTE CONTROL UNIT RC-978 PROGRAMMABLE REMOTE CONTROL UNIT ROOM-TO-ROOM REMOTE CONTROL SYSTEM (separately sold separately room-to the recording output mode, zone2 remote control key cannot be controlled from zone2 using the surround back speaker is possible in...
Owners Manual
Page 43
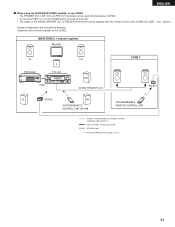
...8226; To use the ZONE2, turn on pages 7 to CONNECTIONS on the ZONE2 button (remote control unit). • The output of the ZONE2 SPEAKER OUT & SRB/Z2 RCA terminals can be adjusted with the remote control unit's ZONE2 VOLUME + and - MAIN ZONE 5.1-channel systems Monitor FL DVD player B... Input C This unit FR SW ZONE2 SPEAKER OUT ZONE 2 RC-617 SL RC-616 SR SYSTEM REMOTE CONTROL UNIT RC-978 PROGRAMMABLE REMOTE CONTROL UNIT ROOM-TO-ROOM REMOTE CONTROL SYSTEM (separately sold) control line MULTI SOURCE AUDIO signal cable SPEAKER cable * Refer to 15. 43 buttons.
...8226; To use the ZONE2, turn on pages 7 to CONNECTIONS on the ZONE2 button (remote control unit). • The output of the ZONE2 SPEAKER OUT & SRB/Z2 RCA terminals can be adjusted with the remote control unit's ZONE2 VOLUME + and - MAIN ZONE 5.1-channel systems Monitor FL DVD player B... Input C This unit FR SW ZONE2 SPEAKER OUT ZONE 2 RC-617 SL RC-616 SR SYSTEM REMOTE CONTROL UNIT RC-978 PROGRAMMABLE REMOTE CONTROL UNIT ROOM-TO-ROOM REMOTE CONTROL SYSTEM (separately sold) control line MULTI SOURCE AUDIO signal cable SPEAKER cable * Refer to 15. 43 buttons.


