
Literature/Product Sheet
Page 2
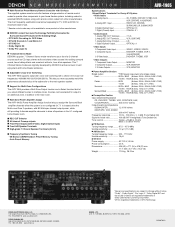
...DENON to enhance music lovers' enjoyment with home theater ambience. s Multi Zone Power Amplifier Assign The AVR-1905's Power Amplifier Assign function lets you assign the Surround Back amplifier channels when the system is registered trademarks of DTS Technology. NEW MODEL I N F O R M AT I O N AVR-1905 s Multi-Function Preset Memory Remote... Controller with Glo-keys The supplied system remote controller features a large selection of remote control codes to operate other components in your favorite 2-channel ...
...DENON to enhance music lovers' enjoyment with home theater ambience. s Multi Zone Power Amplifier Assign The AVR-1905's Power Amplifier Assign function lets you assign the Surround Back amplifier channels when the system is registered trademarks of DTS Technology. NEW MODEL I N F O R M AT I O N AVR-1905 s Multi-Function Preset Memory Remote... Controller with Glo-keys The supplied system remote controller features a large selection of remote control codes to operate other components in your favorite 2-channel ...
Owners Manual
Page 4
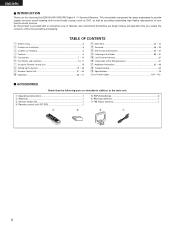
...loop antenna 1 u FM indoor antenna 1 r t y u 4 As this manual before you begin hookup and operation that you for choosing the DENON AVR-1905/785 Digital A / V Surround Receiver. Remote Control Unit 31 ~ 35 ⁄0 Operation 36 ~ 41 ⁄1 Multi Zone 42 ~ 44 ⁄2 Surround 45 ~ 53 ⁄3 ... on Installation 5 c Cautions on Handling 5 v Features ...6 b Connections 7 ~ 15 n Part Names and Functions 16, 17 m Using the Remote Control Unit 18 , Setting up the System 19 ~ 30 . ENGLISH 2 INTRODUCTION Thank you review the contents of this product is provided with home...
...loop antenna 1 u FM indoor antenna 1 r t y u 4 As this manual before you begin hookup and operation that you for choosing the DENON AVR-1905/785 Digital A / V Surround Receiver. Remote Control Unit 31 ~ 35 ⁄0 Operation 36 ~ 41 ⁄1 Multi Zone 42 ~ 44 ⁄2 Surround 45 ~ 53 ⁄3 ... on Installation 5 c Cautions on Handling 5 v Features ...6 b Connections 7 ~ 15 n Part Names and Functions 16, 17 m Using the Remote Control Unit 18 , Setting up the System 19 ~ 30 . ENGLISH 2 INTRODUCTION Thank you review the contents of this product is provided with home...

Owners Manual
Page 7
.... • Use optical cables for optical connections, removing the cap before connecting. NOTE: If humming noise is above 120 W (1 A.). No power is supplied from the remote control unit. Never use Surround back with one speaker, connect the speaker to these outlets when this unit's tape playback (CDR/TAPE IN) jacks using...
.... • Use optical cables for optical connections, removing the cap before connecting. NOTE: If humming noise is above 120 W (1 A.). No power is supplied from the remote control unit. Never use Surround back with one speaker, connect the speaker to these outlets when this unit's tape playback (CDR/TAPE IN) jacks using...
Owners Manual
Page 16
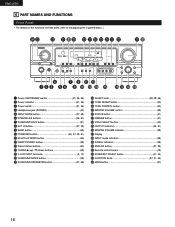
... 41) @4 VIDEO SELECT button 40) @5 OUTPUT indicators 44, 51) @6 MASTER VOLUME indicator 38) @7 Display @8 INPUT mode indicators 38) @9 SIGNAL indicators 38) #0 ANALOG button 37, 39) #1 Remote control sensor 18) #2 ZONE2/REC SELECT button 41, 44) #3 FUNCTION knob 37, 41, 44) #4 MAIN button 37) 16
... 41) @4 VIDEO SELECT button 40) @5 OUTPUT indicators 44, 51) @6 MASTER VOLUME indicator 38) @7 Display @8 INPUT mode indicators 38) @9 SIGNAL indicators 38) #0 ANALOG button 37, 39) #1 Remote control sensor 18) #2 ZONE2/REC SELECT button 41, 44) #3 FUNCTION knob 37, 41, 44) #4 MAIN button 37) 16
Owners Manual
Page 17
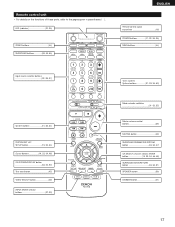
LED (indicator 32, 35) ZONE2 buttons 44) SURROUND buttons 38, 45, 55) ENGLISH Remote control signal transmitter 18) POWER buttons 21, 32~34, 36) MAIN buttons 44) Input source selector buttons 32~35, 37) System buttons 31, 33, 34) ...) CH SELECT (channel select)/ ENTER button 19, 33, 34, 46, 48) SURROUND BACK/RETURN button 33, 34, 51) SPEAKER button 36) DIMMER button 41) 17 Remote control unit • For details on the functions of these parts, refer to the pages given in parentheses ( ).
LED (indicator 32, 35) ZONE2 buttons 44) SURROUND buttons 38, 45, 55) ENGLISH Remote control signal transmitter 18) POWER buttons 21, 32~34, 36) MAIN buttons 44) Input source selector buttons 32~35, 37) System buttons 31, 33, 34) ...) CH SELECT (channel select)/ ENTER button 19, 33, 34, 46, 48) SURROUND BACK/RETURN button 33, 34, 51) SPEAKER button 36) DIMMER button 41) 17 Remote control unit • For details on the functions of these parts, refer to the pages given in parentheses ( ).

Owners Manual
Page 18
...Neon signs or other strong light, or if operated from such devices as shown by the arrow and slide off. NOTES: • The remote control unit can be replaced as quickly as possible when the time comes. • Even if less than a year has passed, replace ...the batteries with a new battery as soon as possible.) 18 Clean the battery compartment thoroughly before using the remote control unit. ENGLISH 7 USING THE REMOTE CONTROL UNIT Following the procedure outlined below, insert the batteries before installing new batteries. • Have replacement batteries on hand...
...Neon signs or other strong light, or if operated from such devices as shown by the arrow and slide off. NOTES: • The remote control unit can be replaced as quickly as possible when the time comes. • Even if less than a year has passed, replace ...the batteries with a new battery as soon as possible.) 18 Clean the battery compartment thoroughly before using the remote control unit. ENGLISH 7 USING THE REMOTE CONTROL UNIT Following the procedure outlined below, insert the batteries before installing new batteries. • Have replacement batteries on hand...
Owners Manual
Page 19
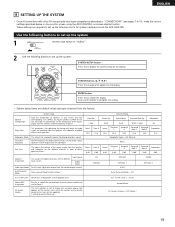
...the remote control unit or main unit are required to obtain optimum effects. Also use for optimizing the timing with other AV components have been completed as described in "CONNECTIONS" (see pages 7 to the listening position. Set the frequency (Hz) below on the monitor screen using the AVR-1905/785's...Set this button to complete the setting. • System setup items and default values (set up the listening room's AV system centered around the AVR-1905/785. Use the following buttons to set up the system 1 Set the slide switch to "AUDIO". 2 Use the following buttons to set ...
...the remote control unit or main unit are required to obtain optimum effects. Also use for optimizing the timing with other AV components have been completed as described in "CONNECTIONS" (see pages 7 to the listening position. Set the frequency (Hz) below on the monitor screen using the AVR-1905/785's...Set this button to complete the setting. • System setup items and default values (set up the listening room's AV system centered around the AVR-1905/785. Use the following buttons to set up the system 1 Set the slide switch to "AUDIO". 2 Use the following buttons to set ...

Owners Manual
Page 21
...4 Press the SYSTEM SETUP button to enter the setting. *SYSTEM SET UP NOTE: Please make sure the "AUDIO" position of the slide switch on the remote control unit. 5 Press the ENTER or (down) button to switch to the Speaker Configuration set up. In this position to turn the power on and... time. NOTE: Press the SYSTEM SETUP button again to finish system set up. System set up can be turned on and off from the included remote control unit. (Main unit) • £ OFF The power turns off and indicator is light. ENGLISH Before setting up the system 1 Refer to "CONNECTIONS" ...
...4 Press the SYSTEM SETUP button to enter the setting. *SYSTEM SET UP NOTE: Please make sure the "AUDIO" position of the slide switch on the remote control unit. 5 Press the ENTER or (down) button to switch to the Speaker Configuration set up. In this position to turn the power on and... time. NOTE: Press the SYSTEM SETUP button again to finish system set up. System set up can be turned on and off from the included remote control unit. (Main unit) • £ OFF The power turns off and indicator is light. ENGLISH Before setting up the system 1 Refer to "CONNECTIONS" ...
Owners Manual
Page 25
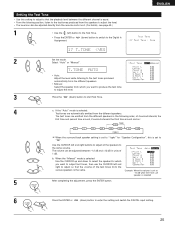
Setting the Test Tone • Use this setting to adjust to that the playback level between the different channel is equal. • From the listening position, listen to the test tones produced from the speakers to adjust the level. • The level can also be adjusted directly from the remote control unit. (For details, see page 45.) 1 • Use the (left) button to the Test Tone. • Press the ENTER or Assignment. (down) button to switch to the Digital In 17 T.TONE
Setting the Test Tone • Use this setting to adjust to that the playback level between the different channel is equal. • From the listening position, listen to the test tones produced from the speakers to adjust the level. • The level can also be adjusted directly from the remote control unit. (For details, see page 45.) 1 • Use the (left) button to the Test Tone. • Press the ENTER or Assignment. (down) button to switch to the Digital In 17 T.TONE
Owners Manual
Page 31
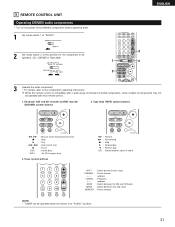
...Reverse play A/B : Switch between auto and mono MEMORY : Preset memory NOTE: • TUNER can be operated when the switch is compatible with this remote control is at "AUDIO" position. 31 up /down BAND : Switch between the AM and FM bands MODE : Switch between decks A and B ...1 3 ENGLISH 3 2 3 Operate the audio component. • For details, refer to the position for CD changers only) 3. 9 REMOTE CONTROL UNIT Operating DENON audio components • Turn on the power of components may not be operated with a wide range of infrared controlled components, some models of...
...Reverse play A/B : Switch between auto and mono MEMORY : Preset memory NOTE: • TUNER can be operated when the switch is compatible with this remote control is at "AUDIO" position. 31 up /down BAND : Switch between the AM and FM bands MODE : Switch between decks A and B ...1 3 ENGLISH 3 2 3 Operate the audio component. • For details, refer to the position for CD changers only) 3. 9 REMOTE CONTROL UNIT Operating DENON audio components • Turn on the power of components may not be operated with a wide range of infrared controlled components, some models of...

Owners Manual
Page 32
... code. The preset codes are emitted while setting the preset memory. This remote control unit can be set for some models, even if they are of makes listed on the included list of preset codes. • Some manufacturers ... the component as follows upon shipment from the factory and after resetting: TV, VCR HITACHI CD, TAPE DENON CDR/MD DENON (CDR) DVD/VDP DENON (DVD) DBS/CABLE ABC (CABLE) 32 To avoid accidental operation, cover the remote control unit's transmitting window while setting the preset memory. • Depending on the List of preset...
... code. The preset codes are emitted while setting the preset memory. This remote control unit can be set for some models, even if they are of makes listed on the included list of preset codes. • Some manufacturers ... the component as follows upon shipment from the factory and after resetting: TV, VCR HITACHI CD, TAPE DENON CDR/MD DENON (CDR) DVD/VDP DENON (DVD) DBS/CABLE ABC (CABLE) 32 To avoid accidental operation, cover the remote control unit's transmitting window while setting the preset memory. • Depending on the List of preset...

Owners Manual
Page 33
Operating component stored in the preset memory 1 Set mode switch 1 to the instructions on remote control for that component. 33 Video disc player (VDP) system buttons POWER : Power on /standby (ON/SOURCE) OFF : DENON DVD Power off 6,7 : Manual search (forward and reverse) 2 : Stop 1 : Play 8,9 : ...track) 3 : Pause 0 ~ 9, +10 : 10 key DISC SKIP +: Disc skip (for the DVD remote control buttons, so also refer to "AUDIO" or "VIDEO". Some models cannot be operated with this remote control unit. 1. Digital video disc player (DVD) system buttons POWER : Power on /standby (ON/SOURCE)...
Operating component stored in the preset memory 1 Set mode switch 1 to the instructions on remote control for that component. 33 Video disc player (VDP) system buttons POWER : Power on /standby (ON/SOURCE) OFF : DENON DVD Power off 6,7 : Manual search (forward and reverse) 2 : Stop 1 : Play 8,9 : ...track) 3 : Pause 0 ~ 9, +10 : 10 key DISC SKIP +: Disc skip (for the DVD remote control buttons, so also refer to "AUDIO" or "VIDEO". Some models cannot be operated with this remote control unit. 1. Digital video disc player (DVD) system buttons POWER : Power on /standby (ON/SOURCE)...
Owners Manual
Page 36
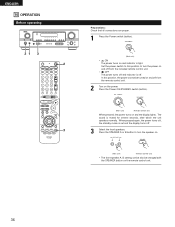
...button on and off and indicator is light. In this position to turn the power on the remote control unit. 36 Press the Power ON/STANDBY switch (button). ON / STANDBY (Main unit) (Remote control unit) When pressed, the power turns on and indicator is off , the standby mode... unit) • The front speaker A, B setting can be also be turned on and off from the included remote control unit. • £ OFF The power turns off from the remote control unit. 2 Turn on . When pressed again, the power turns off . ENGLISH 10 OPERATION Before operating 21 3 2 3 ...
...button on and off and indicator is light. In this position to turn the power on the remote control unit. 36 Press the Power ON/STANDBY switch (button). ON / STANDBY (Main unit) (Remote control unit) When pressed, the power turns on and indicator is off , the standby mode... unit) • The front speaker A, B setting can be also be turned on and off from the included remote control unit. • £ OFF The power turns off from the remote control unit. 2 Turn on . When pressed again, the power turns off . ENGLISH 10 OPERATION Before operating 21 3 2 3 ...

Owners Manual
Page 37
...when you preform the operation to stop playback of signals being input to play Dolby Digital signals. AUTO PCM DTS INPUT MODE (Main unit) (Remote control unit) 2 Input mode selection function Different input modes can be selected for the separate input sources are selected. t EXT. IN to...DTS mode. • In some rare cases the noise may be selected for the selected input source are detected and the program in the AVR-1905/785's surround decoder is selected, press the MAIN button then operate the input function selector. Notes on playing a source encoded with DTS &#...
...when you preform the operation to stop playback of signals being input to play Dolby Digital signals. AUTO PCM DTS INPUT MODE (Main unit) (Remote control unit) 2 Input mode selection function Different input modes can be selected for the separate input sources are selected. t EXT. IN to...DTS mode. • In some rare cases the noise may be selected for the selected input source are detected and the program in the AVR-1905/785's surround decoder is selected, press the MAIN button then operate the input function selector. Notes on playing a source encoded with DTS &#...

Owners Manual
Page 38
... select the surround mode while adjusting the surround parameters, tone defeat or tone control, press the surround mode button then operate the selector. (Remote control unit) SURROUND MODE (Main unit) 4 Start playback on the input signal. Input mode display • In the AUTO mode AUTO ... (page 26) and connections are correct and whether the component's power is turned on the master volume level display. (Main unit) (Remote control unit) The volume can be adjusted within the range of these lights, depending on the selected component. • For operating instructions,...
... select the surround mode while adjusting the surround parameters, tone defeat or tone control, press the surround mode button then operate the selector. (Remote control unit) SURROUND MODE (Main unit) 4 Start playback on the input signal. Input mode display • In the AUTO mode AUTO ... (page 26) and connections are correct and whether the component's power is turned on the master volume level display. (Main unit) (Remote control unit) The volume can be adjusted within the range of these lights, depending on the selected component. • For operating instructions,...
Owners Manual
Page 39
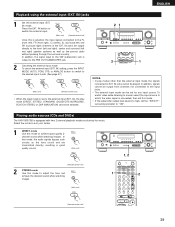
...input mode To cancel the external input (EXT. Playing audio sources (CDs and DVDs) The AVR-1905/785 is output to the desired input mode. (See page 37.) INPUT MODE ANALOG (Main unit) (Remote control unit) • When the input mode is set for music. IN) jacks 1 Set...In addition, the signal input to adjust the tone and DIRECT / STEREO 1 achieve the desired sound while watching images. (Main unit) 1, 2 2 (Remote control unit) 39 In this mode to the SW (subwoofer) jack is equipped with two 2-channel playback modes exclusively for any input source. DIRECT / ...
...input mode To cancel the external input (EXT. Playing audio sources (CDs and DVDs) The AVR-1905/785 is output to the desired input mode. (See page 37.) INPUT MODE ANALOG (Main unit) (Remote control unit) • When the input mode is set for music. IN) jacks 1 Set...In addition, the signal input to adjust the tone and DIRECT / STEREO 1 achieve the desired sound while watching images. (Main unit) 1, 2 2 (Remote control unit) 39 In this mode to the SW (subwoofer) jack is equipped with two 2-channel playback modes exclusively for any input source. DIRECT / ...
Owners Manual
Page 40
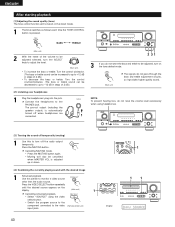
... the currently playing sound with the desired image 1 Simulcast playback Use this to turn off the audio output temporarily. Connect the headphones to the video (Remote control unit) input jacks. 40 1 1 1 Display IN=V SOURCE Press the MUTING button. TONE CONTROL BASS TREBLE (Main unit) 2 With the name of the volume to...
... the currently playing sound with the desired image 1 Simulcast playback Use this to turn off the audio output temporarily. Connect the headphones to the video (Remote control unit) input jacks. 40 1 1 1 Display IN=V SOURCE Press the MUTING button. TONE CONTROL BASS TREBLE (Main unit) 2 With the name of the volume to...

Owners Manual
Page 41
.... STATUS (Main unit) 2 Using the dimmer function • Use this to check the unit's operating status while playing a source by pressing the remote (Remote control unit) control unit's ON SCREEN/DISPLAY button. FUNCTION 2, 4 1 2 (Main unit) 3 Set the recording mode. • For operating ...repeatedly. In addition, the display can be switched to change the brightness of the display. DIMMER (Main unit) BRIGHT MEDIUM OFF DIM (Remote control unit) ENGLISH 21 1 2 Multi-source recording Playing one source while recording another (REC OUT mode) 1 Press the ZONE2/REC...
.... STATUS (Main unit) 2 Using the dimmer function • Use this to check the unit's operating status while playing a source by pressing the remote (Remote control unit) control unit's ON SCREEN/DISPLAY button. FUNCTION 2, 4 1 2 (Main unit) 3 Set the recording mode. • For operating ...repeatedly. In addition, the display can be switched to change the brightness of the display. DIMMER (Main unit) BRIGHT MEDIUM OFF DIM (Remote control unit) ENGLISH 21 1 2 Multi-source recording Playing one source while recording another (REC OUT mode) 1 Press the ZONE2/REC...
Owners Manual
Page 42
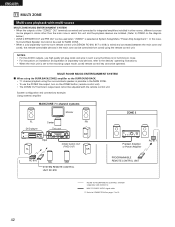
... sold ) control line MULTI SOURCE AUDIO signal cable * Refer to CONNECTIONS on pages 7 to -room remote control unit (DENON RC-616, 617 or 618) is possible in the MAIN ZONE. • To use the ZONE2... line output, turn on the ZONE2 button (remote control unit). • The ZONE2 OUT... When using the SURR.BACK/ZONE2 amplifier as the SURROUND BACK. • 7.1-channel playback using the remote control unit. System configuration and connections example. In this unit and the playback devices are installed. (Refer...
... sold ) control line MULTI SOURCE AUDIO signal cable * Refer to CONNECTIONS on pages 7 to -room remote control unit (DENON RC-616, 617 or 618) is possible in the MAIN ZONE. • To use the ZONE2... line output, turn on the ZONE2 button (remote control unit). • The ZONE2 OUT... When using the SURR.BACK/ZONE2 amplifier as the SURROUND BACK. • 7.1-channel playback using the remote control unit. System configuration and connections example. In this unit and the playback devices are installed. (Refer...
Owners Manual
Page 43
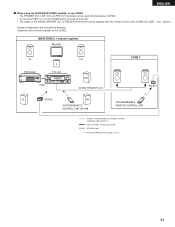
... Monitor FL DVD player B Input C This unit FR SW ZONE2 SPEAKER OUT ZONE 2 RC-617 SL RC-616 SR SYSTEM REMOTE CONTROL UNIT RC-978 PROGRAMMABLE REMOTE CONTROL UNIT ROOM-TO-ROOM REMOTE CONTROL SYSTEM (separately sold) control line MULTI SOURCE AUDIO signal cable SPEAKER cable * Refer to CONNECTIONS on the ZONE2 button...
... Monitor FL DVD player B Input C This unit FR SW ZONE2 SPEAKER OUT ZONE 2 RC-617 SL RC-616 SR SYSTEM REMOTE CONTROL UNIT RC-978 PROGRAMMABLE REMOTE CONTROL UNIT ROOM-TO-ROOM REMOTE CONTROL SYSTEM (separately sold) control line MULTI SOURCE AUDIO signal cable SPEAKER cable * Refer to CONNECTIONS on the ZONE2 button...


