
Dell™ OptiPlex™ FX160 Re-Imaging Guide
Page 3
... DVD reader and press Enter. Re-Imaging the FX160 Computer With Microsoft Windows For the FX160 Windows XP Embedded operating system, updates are provided on the FX160 flash card when booting the FX160 computer from the DVD opens a utility that writes the FX160 flash card. Dell OptiPlex FX160 Re-Imaging Guide 3 Dell™ OptiPlex™ FX160 Re-Imaging Guide The Dell OptiPlex FX160 computer with an internal flash card...
... DVD reader and press Enter. Re-Imaging the FX160 Computer With Microsoft Windows For the FX160 Windows XP Embedded operating system, updates are provided on the FX160 flash card when booting the FX160 computer from the DVD opens a utility that writes the FX160 flash card. Dell OptiPlex FX160 Re-Imaging Guide 3 Dell™ OptiPlex™ FX160 Re-Imaging Guide The Dell OptiPlex FX160 computer with an internal flash card...
Dell™ OptiPlex™ FX160 Re-Imaging Guide
Page 4
... a computer can be restarted for deployment or recovery. Re-Imaging an FX160 Computer With the a Bootable USB Flash Drive (UFD) The FX160 computer can be re-imaged with Microsoft Vista or Microsoft XP that was imaged. The size of your Windows PE image plus any additional applications. 4 Dell OptiPlex FX160 Re-Imaging Guide NOTICE: By default, all existing files are erased...
... a computer can be restarted for deployment or recovery. Re-Imaging an FX160 Computer With the a Bootable USB Flash Drive (UFD) The FX160 computer can be re-imaged with Microsoft Vista or Microsoft XP that was imaged. The size of your Windows PE image plus any additional applications. 4 Dell OptiPlex FX160 Re-Imaging Guide NOTICE: By default, all existing files are erased...

Dell™ OptiPlex™ FX160 Re-Imaging Guide
Page 5
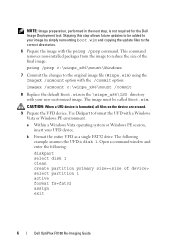
...system32\ directory: winpeshl.ini DellImageDeploy.exe Comctl32.dll Oledlg.dll Wimgapi.dll Dell OptiPlex FX160 Re-Imaging Guide 5 NOTE: The download file is a local directory for this procedure, see the Windows Preinstallation Environment User Guide sections "Include a Custom Script in all necessary files for the x86 ...to point to all tools are created: \winpe_x86 \winpe_x86\ISO \winpe_x86\mount 4 At the command prompt, mount the base Windows PE image (Winpe.wim) to the \mount directory by using ImageX: imagex /mountrw c:\winpe_x86\winpe.wim 1 c:\winpe_x86\mount 5 Copy the following...
...system32\ directory: winpeshl.ini DellImageDeploy.exe Comctl32.dll Oledlg.dll Wimgapi.dll Dell OptiPlex FX160 Re-Imaging Guide 5 NOTE: The download file is a local directory for this procedure, see the Windows Preinstallation Environment User Guide sections "Include a Custom Script in all necessary files for the x86 ...to point to all tools are created: \winpe_x86 \winpe_x86\ISO \winpe_x86\mount 4 At the command prompt, mount the base Windows PE image (Winpe.wim) to the \mount directory by using ImageX: imagex /mountrw c:\winpe_x86\winpe.wim 1 c:\winpe_x86\mount 5 Copy the following...
Dell™ OptiPlex™ FX160 Re-Imaging Guide
Page 6
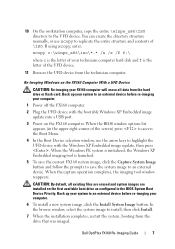
....wim in the next step, is not required for the Dell Image Deployment tool. The following : diskpart select disk 1 clean create partition primary size= select partition 1 active format fs=fat32 assign exit 6 Dell OptiPlex FX160 Re-Imaging Guide b Format the entire UFD as a single FAT32 drive. NOTE: Image preparation, performed in the \winpe_x86\ISO directory with your new...
....wim in the next step, is not required for the Dell Image Deployment tool. The following : diskpart select disk 1 clean create partition primary size= select partition 1 active format fs=fat32 assign exit 6 Dell OptiPlex FX160 Re-Imaging Guide b Format the entire UFD as a single FAT32 drive. NOTE: Image preparation, performed in the \winpe_x86\ISO directory with your new...
Dell™ OptiPlex™ FX160 Re-Imaging Guide
Page 7
... using xcopy, enter: xcopy c:\winpe_x86\iso\*.* /s /e /f f:\ where c is the letter of your FX160 computer will erase all existing files are erased and system images are installed on the FX160 computer. When the capture operation completes, the imaging tool window reappears. Dell OptiPlex FX160 Re-Imaging Guide 7 You can create the directory structure manually, or use the arrow keys to...
... using xcopy, enter: xcopy c:\winpe_x86\iso\*.* /s /e /f f:\ where c is the letter of your FX160 computer will erase all existing files are erased and system images are installed on the FX160 computer. When the capture operation completes, the imaging tool window reappears. Dell OptiPlex FX160 Re-Imaging Guide 7 You can create the directory structure manually, or use the arrow keys to...
Dell™ OptiPlex™ FX160 Re-Imaging Guide
Page 8
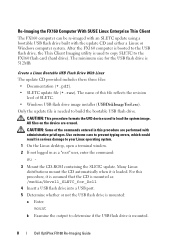
... flash drive is loaded. The name of SLETC. • Windows USB flash drive image installer (USBDiskImageTool.exe). Only the update file is 512MB. Re-Imaging the FX160 Computer With SUSE Linux Enterprise Thin Client The FX160 computer can be re-imaged with an SLETC update using a bootable USB flash drive built with administrative privileges. All... includes these three files: • Documentation (*.pdf). • SLETC update file (*.raw). For this file reflects the revision level of this procedure, it is mounted. 8 Dell OptiPlex FX160 Re-Imaging Guide
... flash drive is loaded. The name of SLETC. • Windows USB flash drive image installer (USBDiskImageTool.exe). Only the update file is 512MB. Re-Imaging the FX160 Computer With SUSE Linux Enterprise Thin Client The FX160 computer can be re-imaged with an SLETC update using a bootable USB flash drive built with administrative privileges. All... includes these three files: • Documentation (*.pdf). • SLETC update file (*.raw). For this file reflects the revision level of this procedure, it is mounted. 8 Dell OptiPlex FX160 Re-Imaging Guide
Dell™ OptiPlex™ FX160 Re-Imaging Guide
Page 9
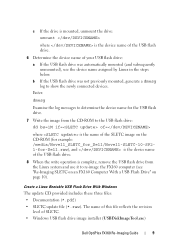
...on the CD-ROM (for example: /media/Novell_SLETC_for_Dell/Novell-SLETC-10-SP21-for-Dell.raw), and is the device name of SLETC. • Windows USB flash drive image installer (USBDiskImageTool.exe) Dell OptiPlex FX160 Re-Imaging Guide 9 Enter: dmesg Examine the log messages to determine the device name for ...the USB flash drive. 7 Write the image from the CD-ROM to the USB flash drive: dd...
...on the CD-ROM (for example: /media/Novell_SLETC_for_Dell/Novell-SLETC-10-SP21-for-Dell.raw), and is the device name of SLETC. • Windows USB flash drive image installer (USBDiskImageTool.exe) Dell OptiPlex FX160 Re-Imaging Guide 9 Enter: dmesg Examine the log messages to determine the device name for ...the USB flash drive. 7 Write the image from the CD-ROM to the USB flash drive: dd...
Dell™ OptiPlex™ FX160 Re-Imaging Guide
Page 10
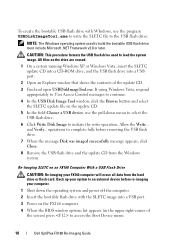
... bootable flash drive with WIndows, use the pull-down menu to select the USB flash drive. 6 Click Write Disk Image to initiate the write operation. Back up your FX160 computer will erase all data from the Windows system. CAUTION: This procedure formats the USB flash drive used to build ...the hard drive or flash card. To create the bootable USB flash drive with the SLETC image into a USB port. 2 Open an Explorer window that shows the contents of the screen) press to access the Boot Device menu. 10 Dell OptiPlex FX160 Re-Imaging Guide Allow the Write... operations to load the system...
... bootable flash drive with WIndows, use the pull-down menu to select the USB flash drive. 6 Click Write Disk Image to initiate the write operation. Back up your FX160 computer will erase all data from the Windows system. CAUTION: This procedure formats the USB flash drive used to build ...the hard drive or flash card. To create the bootable USB flash drive with the SLETC image into a USB port. 2 Open an Explorer window that shows the contents of the screen) press to access the Boot Device menu. 10 Dell OptiPlex FX160 Re-Imaging Guide Allow the Write... operations to load the system...

Dell™ OptiPlex™ FX160 Re-Imaging Guide
Page 11
... are configured to initiate the write operation. Automated Deployment The installed image in the FX160 computer includes a deployment server agent that interacts with the SLETC image, then press 6 Allow the SLETC operating system finish booting, then... click the Computer button on the desktop. However, for improved security Dell advises that opens: a Click More Applications. In the window that systems setup for the automated deployment of PXE. Dell OptiPlex FX160 Re-Imaging Guide 11 A Thin Client Image...
... are configured to initiate the write operation. Automated Deployment The installed image in the FX160 computer includes a deployment server agent that interacts with the SLETC image, then press 6 Allow the SLETC operating system finish booting, then... click the Computer button on the desktop. However, for improved security Dell advises that opens: a Click More Applications. In the window that systems setup for the automated deployment of PXE. Dell OptiPlex FX160 Re-Imaging Guide 11 A Thin Client Image...
Dell™ OptiPlex™ FX160 Re-Imaging Guide
Page 89
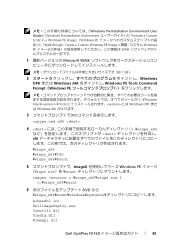
Windows Preinstallation Environment User Guide』(Windows Preinstallation Environment Include a Custom Script in a Windows PE Image」(Windows PE Walkthrough: Create a Custom Windows PE Image Windows PE WAIK 1 Microsoft WAIK 1 GB)。 2 Windows OPK または Windows AIK Windows PE Tools Command Prompt(Windows PE C:¥Program Files¥¥Tools version> には Windows OPK また は Windows AIK 3 copype.cmd x86 4
Windows Preinstallation Environment User Guide』(Windows Preinstallation Environment Include a Custom Script in a Windows PE Image」(Windows PE Walkthrough: Create a Custom Windows PE Image Windows PE WAIK 1 Microsoft WAIK 1 GB)。 2 Windows OPK または Windows AIK Windows PE Tools Command Prompt(Windows PE C:¥Program Files¥¥Tools version> には Windows OPK また は Windows AIK 3 copype.cmd x86 4

Dell™ OptiPlex™ FX160 Re-Imaging Guide
Page 101
Windows Preinstallation Environment User Guide(Windows Include a Custom Script in a Windows PE Image(Windows PE Walkthrough: Create a Custom Windows PE Image Windows PE WAIK 1 Microsoft WAIK 1GB). 2 Windows OPK 또는 Windows AIK Windows PE C:\Program Files\\Tools version>은 Windows OPK 또는 Windows AIK 3 ...;지 (Winpe.wim)를 \mount imagex /mountrw c:\winpe_x86\winpe.wim 1 c:\winpe_x86\mount 5 DVD에서 \winpe_x86\mount\windows\system32 winpeshl.ini DellImageDeploy.exe Comctl32.dll Dell OptiPlex FX160 101
Windows Preinstallation Environment User Guide(Windows Include a Custom Script in a Windows PE Image(Windows PE Walkthrough: Create a Custom Windows PE Image Windows PE WAIK 1 Microsoft WAIK 1GB). 2 Windows OPK 또는 Windows AIK Windows PE C:\Program Files\\Tools version>은 Windows OPK 또는 Windows AIK 3 ...;지 (Winpe.wim)를 \mount imagex /mountrw c:\winpe_x86\winpe.wim 1 c:\winpe_x86\mount 5 DVD에서 \winpe_x86\mount\windows\system32 winpeshl.ini DellImageDeploy.exe Comctl32.dll Dell OptiPlex FX160 101
Migrating to 2 GB Microsoft Windows XP Embedded Image Tech Sheet
Page 1
.../enterprise/d/business~solutions~whitepapers~en /Documents~OptiPlex-fx160-imaging-guide.pdf.aspx. Migrating to 2 GB Microsoft Windows XP Embedded Image on Dell OptiPlex FX-160 Systems Overview This document contains information about migrating to an A05 image with a 2 GB module. December 2010 See content.dell.com/us /en/enterprise/d/business~solutions~whitepapers~ en/Documents~OptiPlex-fx160-imaging-guide.pdf.aspx - "Installing the Latest...
.../enterprise/d/business~solutions~whitepapers~en /Documents~OptiPlex-fx160-imaging-guide.pdf.aspx. Migrating to 2 GB Microsoft Windows XP Embedded Image on Dell OptiPlex FX-160 Systems Overview This document contains information about migrating to an A05 image with a 2 GB module. December 2010 See content.dell.com/us /en/enterprise/d/business~solutions~whitepapers~ en/Documents~OptiPlex-fx160-imaging-guide.pdf.aspx - "Installing the Latest...
Migrating to 2 GB Microsoft Windows XP Embedded Image Tech Sheet
Page 4
... total occupied space. To install the latest image using a 1 GB module: 1 Install the latest Windows XPE image on an OptiPlex FX-160 system with a 2 GB module. 2 Uncompress the disk-image: a Navigate to A05. See the Re-Imaging Guide at content.dell.com/us/en/enterprise/d/business~solutions~whitepapers~en /Documents~OptiPlex-fx160-imaging-guide.pdf.aspx. c Select the General tab. Alternatively...
... total occupied space. To install the latest image using a 1 GB module: 1 Install the latest Windows XPE image on an OptiPlex FX-160 system with a 2 GB module. 2 Uncompress the disk-image: a Navigate to A05. See the Re-Imaging Guide at content.dell.com/us/en/enterprise/d/business~solutions~whitepapers~en /Documents~OptiPlex-fx160-imaging-guide.pdf.aspx. c Select the General tab. Alternatively...


