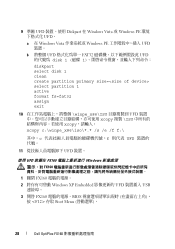
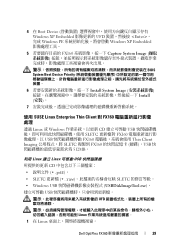
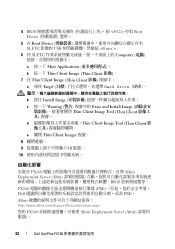
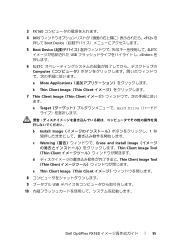
Setup and Quick Reference Guide
Page 11
... 800 MHz memory is installed, the computer still operates at 667 MHz. Processor Processor type Level 2 (L2) cache System Information Chipset DMA channels Interrupt levels BIOS chip (ROM) NIC Memory Type Memory connectors Memory capacities Intel® Atom™ 200 Series Single-Core processor or Intel Atom 300 Series Dual-Core...
Setup and Quick Reference Guide
Page 12
... drive is optional and requires a hard drive kit. one NVRAM Flash module (for Linux) 4 GB default 128 MB shared video memory (can be changed in BIOS system setup) one 2.5-in drive bay one 9-pin connector two 6-pin mini-DINs 12 Specifications
Setup and Quick Reference Guide
Page 13
...: Serial ATA (hard drive) Serial ATA (NVRAM module) Fan Mini-PCI Express X1 Front panel LED Front panel USB Front panel audio Memory Power 12 V BIOS ROM Serial ATA hard drive power Controls and Lights Front of computer: Power button Power light (within the power button) Network link light Wireless light...
Dell™ OptiPlex™ FX160 Re-Imaging Guide
Page 3
... updates are released, or special configurations are required, the internal FX160 flash card or hard drive can then installed on the FX160 computer. Dell OptiPlex FX160 Re-Imaging Guide 3 Dell™ OptiPlex™ FX160 Re-Imaging Guide The Dell OptiPlex FX160 computer with an internal flash card hard drive is preloaded with ... BIOS window options list appears (in the upper right-corner of the screen) press to access the Boot Device menu. 4 In the Boot Device selection window, use the arrow keys to the FX160 computer. 3 Power on the FX160 flash card when booting the FX160 ...
Dell™ OptiPlex™ FX160 Re-Imaging Guide
Page 4
... will need: • A workstation computer with a bootable Windows PE RAM Disk on the first available boot drive as configured in the BIOS System Boot Device Priority. Create a Bootable Windows UFD Device CAUTION: Re-imaging your computer 7 To install a new system image, click the Install System Image.... • A UFD device. NOTE: Ensure that you have sufficient memory to support the size of your Windows PE image plus any additional applications. 4 Dell OptiPlex FX160 Re-Imaging Guide The size of the UFD device must be restarted for deployment or recovery. Re-Imaging an...
Dell™ OptiPlex™ FX160 Re-Imaging Guide
Page 7
... data from the hard drive or flash card. When the capture operation completes, the imaging tool window reappears. Dell OptiPlex FX160 Re-Imaging Guide 7 When the Windows PE system is initialized, the Windows XP Embedded imaging tool is the... letter of your technician computer hard disk and f is launched. 5 To save the current FX160 system image, click the Capture System Image button and follow the prompts to save the system image to an external... 6 To install a new system image, click the Install System Image button. When the BIOS window options list appears (in the...
Dell™ OptiPlex™ FX160 Re-Imaging Guide
Page 10
... an Explorer window that shows the contents of the screen) press to access the Boot Device menu. 10 Dell OptiPlex FX160 Re-Imaging Guide Re-Imaging SLETC on the FX160 computer. 4 When the BIOS window options list appears (in the upper right-corner of the update CD. 3 Find and open USBDiskImageTool... computer. 1 Shut down menu to select the USB flash drive. 6 Click Write Disk Image to complete fully before re-imaging your FX160 computer will erase all data from the Windows system. operations to initiate the write operation. Allow the Write... CAUTION: This procedure formats the...
Dell™ OptiPlex™ FX160 Re-Imaging Guide
Page 11
...deployment are configured to use an automation partition instead of system updates including system image, application software, BIOS updates and configuration, etc. CAUTION: When the disk image is licensed to use the Altiris Deployment Server. However, for improved ... window. 8 Shut down menu and select Hard Drive. Automated Deployment The installed image in the FX160 computer includes a deployment server agent that opens: a Click More Applications. Dell OptiPlex FX160 Re-Imaging Guide 11 In the window that interacts with an Altiris Deployment Server, providing an environment...
Dell™ OptiPlex™ FX160 Re-Imaging Guide
Page 15
...; FX160 Dell OptiPlex FX160 Microsoft® Windows® XP Embedded 或 SUSE® Linux Enterprise Thin Client (SLETC FX160 Microsoft Windows 的 FX160 对于 FX160 嵌入式 Windows XP DVD DVD 引导 FX160 FX160 Microsoft Windows WAIK) 软件的 Windows DVD USB USB FX160 FX160 使用 DVD FX160 FX160 1 关闭 FX160 2 将外部 USB DVD FX160 3 打开 FX160 BIOS...
Dell™ OptiPlex™ FX160 Re-Imaging Guide
Page 18
...; UFD 设备。 11 将 UFD 使用 UFD 设备对 FX160 Windows FX160 1 关闭 FX160 2 Windows XP UFD USB 端口。 3 打开 FX160 BIOS 按 访问 Boot Menu 4 在 Boot Device 嵌入式 Windows XP UFD Enter> 键。 Windows PE Windows XP 5 FX160 Capture System Image 18 Dell OptiPlex FX160
Dell™ OptiPlex™ FX160 Re-Imaging Guide
Page 19
...;制到 FX160 USB 512MB。 使用 Linux 创建 Linux 可引导 USB CD pdf)。 • SLETC raw SLETC 的修订 Windows USB USBDiskImageTool.exe USB UFD Linux 1 在 Linux 2 su - 3 SLETC CD-ROM Linux CD CD media/Novell_SLETC_for_Dell 4 将 USB USB 端口。 Dell OptiPlex FX160 19
Dell™ OptiPlex™ FX160 Re-Imaging Guide
Page 21
... 6 单击 Write Disk Image Write Verify USB 7 Disk was imaged successfully Close 8 将 USB CD 从 Windows 使用 USB FX160 SLETC FX160 1 2 将包含 SLETC USB 端口。 3 打开 FX160 4 BIOS F12> 访问 Boot Device Menu 5 在 Boot Device SLETC 映像的 USB Enter> 键。 Dell OptiPlex FX160 21
Dell™ OptiPlex™ FX160 Re-Imaging Guide
Page 22
... Thin Client Image Tool (Thin Client d Thin Client Image Tool (Thin Client e 关闭 Thin Client Image (Thin Client 8 9 USB 10 在 FX160 Altiris Deployment Server BIOS FX160 PXE PXE。 Altiris http://www.altiris.com/Support/Documentation.aspx 您的 FX160 Altiris Deployment Server。 22 Dell OptiPlex FX160
Dell™ OptiPlex™ FX160 Re-Imaging Guide
Page 25
...; OptiPlex™ FX160 Dell OptiPlex FX160 Microsoft® Windows® XP Embedded 或 SUSE® Linux Enterprise Thin Client (SLETC FX160 使用 Microsoft Windows 對 FX160 FX 160 Windows XP Embedded DVD DVD 啟動 FX160 FX160 Microsoft Windows WAIK) 軟體的 Windows DVD USB USB FX160 FX160 DVD 對 FX160 FX160 1 關閉 FX160 2 USB DVD FX160 電腦。 3 開啟 FX160 BIOS...
Dell™ OptiPlex™ FX160 Re-Imaging Guide
Page 28
... 複製 \ISO xcopy xcopy c:\winpe_x86\iso\*.* /s /e /f f:\ 其中,c f 則代表 UFD 11 UFD 裝置。 使用 UFD 裝置在 FX160 Windows FX160 1 關閉 FX160 2 Windows XP Embedded UFD USB 3 開啟 FX160 BIOS 按 存取 Boot Menu 28 Dell OptiPlex FX160
Dell™ OptiPlex™ FX160 Re-Imaging Guide
Page 29
... Client 對 FX160 透過 Linux 或 Windows CD USB SLETC FX160 USB FX160 Thin Client Imaging SLETC 複製到 FX160 USB 512MB。 利用 Linux 建立 Linux 可啟動 USB CD pdf)。 • SLETC raw SLETC • Windows USB USBDiskImageTool.exe)。 USB UFD Linux 1 在 Linux Dell OptiPlex FX160 29
Dell™ OptiPlex™ FX160 Re-Imaging Guide
Page 32
4 BIOS F12> 存取 Boot Device 5 在 Boot Device SLETC 影像的 USB Enter>。 6 待 SLETC Computer a 按一下 More Applications b... Client d Thin Client Image Tool (Thin Client e 關閉 Thin Client Imager 視窗。 8 9 USB 裝置。 10 安裝在 FX160 Altiris Deployment Server (Altiris BIOS FX160 PXE Dell PXE。 Altiris http://www.altiris.com/Support/Documentation.aspx 您的 FX160 Altiris Deployment Server (Altiris 32 Dell OptiPlex FX160
Dell™ OptiPlex™ FX160 Re-Imaging Guide
Page 87
Dell™ OptiPlex™ FX160 Dell OptiPlex FX160 Microsoft® Windows® XP Embedded または SUSE® Linux Enterprise Thin Client(SLETC Microsoft Windows 搭載 FX160 FX160 Windows XP Embedded DVD FX160 DVD FX160 DVD Microsoft Windows Automation Installation Kit(WAIK Windows USB FX160 USB FX160 DVD FX160 警告:FX160 1 FX160 2 外付け USB DVD FX160 3 FX160 BIOS F12 Boot Device...
Dell™ OptiPlex™ FX160 Re-Imaging Guide
Page 95
3 FX160 4 BIOS F12> を 押して Boot Device 5 Boot Device SLETC USB Enter 6 SLETC Computer a More Applications b Thin Client Image(Thin Client 7 Thin Client Image(Thin Client ます。 a Target Hard Drive b Install Image 1 c Warning Erase and Install Image Thin Client Image Tool (Thin Client d Thin Client Image Tool (Thin Client e Thin Client Image(Thin Client 8 9 USB 10 Dell OptiPlex FX160 95
Dell™ OptiPlex™ FX160 Re-Imaging Guide
Page 107
1 2 SLETC USB 3 FX160 4 BIOS F12 Boot Device 5 Boot Device SLETC USB Enter 6 SLETC Computer a More Applications b Thin Client Image(Thin Client 7 Thin Client Image(Thin Client a Target Hard Drive b Install Image 1 c Warning Erase and Install Image Thin Client Image Tool(Thin Client d Thin Client Image Tool(Thin Client e Thin Client Imager(Thin Client 8 9 USB 10 Dell OptiPlex FX160 107