Setup and Features Information Tech Sheet
Page 1
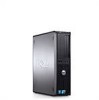
Models: DCSM1F, DCNE1F, and DCCY1F series March 2010 Dell™ OptiPlex™ 380 Setup and Features Information Mini Tower - Front and Back View 1 18 2 10 3 17 9 8 4 5 7 6 About Warnings WARNING: A WARNING indicates a potential for property damage, personal injury, or death. 11 12 13 14 15 ...
Models: DCSM1F, DCNE1F, and DCCY1F series March 2010 Dell™ OptiPlex™ 380 Setup and Features Information Mini Tower - Front and Back View 1 18 2 10 3 17 9 8 4 5 7 6 About Warnings WARNING: A WARNING indicates a potential for property damage, personal injury, or death. 11 12 13 14 15 ...
Setup and Features Information Tech Sheet
Page 4
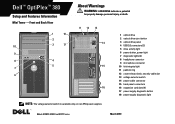
Mini Tower, Desktop, and Small Form Factor - Back Panel 1 9 8 2 3 4 7 1 parallel connector 2 link integrity light 5 3 network adapter connector 4 network activity light 5 line-out connector 6 line-in/microphone connector 7 USB 2.0 connectors (6) 6 8 VGA connector 9 serial connector
Mini Tower, Desktop, and Small Form Factor - Back Panel 1 9 8 2 3 4 7 1 parallel connector 2 link integrity light 5 3 network adapter connector 4 network activity light 5 line-out connector 6 line-in/microphone connector 7 USB 2.0 connectors (6) 6 8 VGA connector 9 serial connector

Setup and Features Information Tech Sheet
Page 6
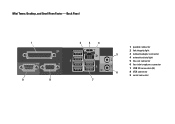
... Memory Memory module connector 2 DIMM slots Memory module capacity 1 GB, 2 GB, or 4 GB Memory type 1067 MHz DDR3 Minimum memory 1 GB Maximum memory 8 GB Drives Mini Tower Desktop Externally accessible: 3.5 inch drive bays one one 5.25 inch drive bays two one Internally accessible: 3.5 inch SATA drive bays two one Available devices: 3.5 inch...+/-RW drives Small Form Factor one one (slimline) one one one (slimline) Specifications NOTE: The following specifications are only those required by law to support.dell.com.
... Memory Memory module connector 2 DIMM slots Memory module capacity 1 GB, 2 GB, or 4 GB Memory type 1067 MHz DDR3 Minimum memory 1 GB Maximum memory 8 GB Drives Mini Tower Desktop Externally accessible: 3.5 inch drive bays one one 5.25 inch drive bays two one Internally accessible: 3.5 inch SATA drive bays two one Available devices: 3.5 inch...+/-RW drives Small Form Factor one one (slimline) one one one (slimline) Specifications NOTE: The following specifications are only those required by law to support.dell.com.
Setup and Features Information Tech Sheet
Page 7
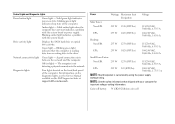
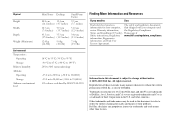
...to the network. NOTE: See the safety information that the computer is not detecting a physical connection to the drive. Power Wattage Maximum heat dissipation Voltage Mini Tower: Non-EPA 255 W 1338 (BTU/hr) 115/230 VAC, 50/60 Hz, 6.5/3.5 A EPA 255 W 1023 (BTU/hr) 100-240 VAC,...75/3.5 A NOTE: Heat dissipation is calculated by using the power supply wattage rating. Solid green light indicates power-on the Dell Support website at support.dell.com/manuals. Amber light - Drive activity light Displays the SATA hard drive or optical drive activity. Network connectivity light Green ...
...to the network. NOTE: See the safety information that the computer is not detecting a physical connection to the drive. Power Wattage Maximum heat dissipation Voltage Mini Tower: Non-EPA 255 W 1338 (BTU/hr) 115/230 VAC, 50/60 Hz, 6.5/3.5 A EPA 255 W 1023 (BTU/hr) 100-240 VAC,...75/3.5 A NOTE: Heat dissipation is calculated by using the power supply wattage rating. Solid green light indicates power-on the Dell Support website at support.dell.com/manuals. Amber light - Drive activity light Displays the SATA hard drive or optical drive activity. Network connectivity light Green ...
Setup and Features Information Tech Sheet
Page 8
...© 2009-2010 Dell Inc. Other trademarks and trade names may be used in this text: Dell, the DELL logo, and OptiPlex are registered trademarks and Core is a trademark of Dell Inc. is subject to... change without the written permission of Intel Corporation in trademarks and trade names other countries. Physical Height Width Depth Weight (Minimum) Environmental Temperature: Operating Storage Relative humidity Altitude: Operating Storage Airborne contaminant level Mini Tower...
...© 2009-2010 Dell Inc. Other trademarks and trade names may be used in this text: Dell, the DELL logo, and OptiPlex are registered trademarks and Core is a trademark of Dell Inc. is subject to... change without the written permission of Intel Corporation in trademarks and trade names other countries. Physical Height Width Depth Weight (Minimum) Environmental Temperature: Operating Storage Relative humidity Altitude: Operating Storage Airborne contaminant level Mini Tower...
Guidebook
Page 2
... Chassis Enclosure & Ventilation Requirements 35 Regulatory Compliance and Environmental 35 Acoustic Noise Emission Information 36 2 Integrated LAN 21 Communications - DELL™ OPTIPLEX™ 380 TECHNICAL GUIDEBOOK Table of Content THE OPTI Dell™ OptiPlex™ 380 ...3 OptiPlex 380 Technical Specifications 4 Mini Tower Computer (MT) View 4 Desktop Computer (DT) View 5 Small Form Factor Computer (SFF) View 6 Marketing System Configurations 9 Operating System...
... Chassis Enclosure & Ventilation Requirements 35 Regulatory Compliance and Environmental 35 Acoustic Noise Emission Information 36 2 Integrated LAN 21 Communications - DELL™ OPTIPLEX™ 380 TECHNICAL GUIDEBOOK Table of Content THE OPTI Dell™ OptiPlex™ 380 ...3 OptiPlex 380 Technical Specifications 4 Mini Tower Computer (MT) View 4 Desktop Computer (DT) View 5 Small Form Factor Computer (SFF) View 6 Marketing System Configurations 9 Operating System...
Guidebook
Page 3
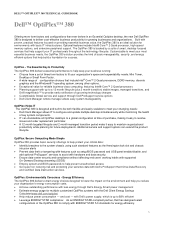
...Mini Tower, Desktop or Small Form Factor. A wide range of configuration choices that help support your IT professionals throughout the technology lifecycle. Additional service and support options can standardize all OptiPlex desktops to a global configuration at time of the OptiPlex 380... while planning for energy efficiency. 3 DELL™ OPTIPLEX™ 380 TECHNICAL GUIDEBOOK Dell™ OptiPlex™ 380 Offering more form factors and configurations than ever before in an Essential Optiplex desktop, the new Dell OptiPlex 380 is designed to deliver cost-effective business...
...Mini Tower, Desktop or Small Form Factor. A wide range of configuration choices that help support your IT professionals throughout the technology lifecycle. Additional service and support options can standardize all OptiPlex desktops to a global configuration at time of the OptiPlex 380... while planning for energy efficiency. 3 DELL™ OPTIPLEX™ 380 TECHNICAL GUIDEBOOK Dell™ OptiPlex™ 380 Offering more form factors and configurations than ever before in an Essential Optiplex desktop, the new Dell OptiPlex 380 is designed to deliver cost-effective business...
Guidebook
Page 4
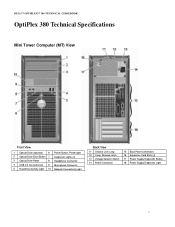
DELL™ OPTIPLEX™ 380 TECHNICAL GUIDEBOOK OptiPlex 380 Technical Specifications Mini Tower Computer (MT) View Front View 1 Optical Drive (optional) 6 Power Button, Power light 2 Optical Drive Eject Button 7 Diagnostic Lights (4) 3 Optical Drive Panel 8 Headphone Connector 4 USB 2.0 Connectors(2) 9 ...
DELL™ OPTIPLEX™ 380 TECHNICAL GUIDEBOOK OptiPlex 380 Technical Specifications Mini Tower Computer (MT) View Front View 1 Optical Drive (optional) 6 Power Button, Power light 2 Optical Drive Eject Button 7 Diagnostic Lights (4) 3 Optical Drive Panel 8 Headphone Connector 4 USB 2.0 Connectors(2) 9 ...
Service Manual
Page 1
... start button are either trademarks or registered trademarks of Microsoft Corporation in this document to refer to hardware or loss of Intel Corporation; Dell™ OptiPlex™ 380 Service Manual-Mini-Tower Working on Your Computer Specifications Removing and Replacing Parts System Board Layout System Setup Diagnostics Notes, Cautions, and Warnings NOTE: A NOTE indicates important...
... start button are either trademarks or registered trademarks of Microsoft Corporation in this document to refer to hardware or loss of Intel Corporation; Dell™ OptiPlex™ 380 Service Manual-Mini-Tower Working on Your Computer Specifications Removing and Replacing Parts System Board Layout System Setup Diagnostics Notes, Cautions, and Warnings NOTE: A NOTE indicates important...

Service Manual
Page 2
..., Asset Tag, Manufacture Date, and the Ownership Date.. or right-arrow key, or +/- Back to Contents Page System Setup Dell™ OptiPlex™ 380 Service Manual-Mini-Tower Boot Menu Navigation Keystrokes Entering System Setup System Setup Simulation System Setup Menu Options Boot Menu Press when the... Dell™ logo appears to initiate a one -time boot menu with a list of the valid boot devices for the ...
..., Asset Tag, Manufacture Date, and the Ownership Date.. or right-arrow key, or +/- Back to Contents Page System Setup Dell™ OptiPlex™ 380 Service Manual-Mini-Tower Boot Menu Navigation Keystrokes Entering System Setup System Setup Simulation System Setup Menu Options Boot Menu Press when the... Dell™ logo appears to initiate a one -time boot menu with a list of the valid boot devices for the ...
Service Manual
Page 7
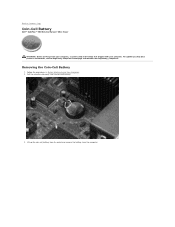
Back to Contents Page Coin-Cell Battery Dell™ OptiPlex™ 380 Service Manual-Mini-Tower WARNING: Before working inside your computer, read the safety information that shipped with your computer. Lift up the coin-cell battery from its socket and remove the battery from the coin-cell battery. 3. Removing the Coin-Cell Battery 1. Follow the procedures in Before Working Inside Your Computer. 2. For additional safety best practices information, see the Regulatory Compliance Homepage at www.dell.com/regulatory_compliance. Pull the retention clip away from the computer.
Back to Contents Page Coin-Cell Battery Dell™ OptiPlex™ 380 Service Manual-Mini-Tower WARNING: Before working inside your computer, read the safety information that shipped with your computer. Lift up the coin-cell battery from its socket and remove the battery from the coin-cell battery. 3. Removing the Coin-Cell Battery 1. Follow the procedures in Before Working Inside Your Computer. 2. For additional safety best practices information, see the Regulatory Compliance Homepage at www.dell.com/regulatory_compliance. Pull the retention clip away from the computer.
Service Manual
Page 9
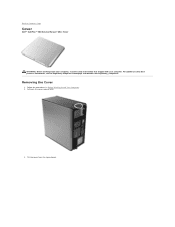
Pull back the cover release latch. 3. Back to Contents Page Cover Dell™ OptiPlex™ 380 Service Manual-Mini-Tower WARNING: Before working inside your computer, read the safety information that shipped with your computer. For additional safety best practices information, see the Regulatory Compliance Homepage at www.dell.com/regulatory_compliance. Follow the procedures in Before Working Inside Your Computer. 2. Tilt the cover from the top outward. Removing the Cover 1.
Pull back the cover release latch. 3. Back to Contents Page Cover Dell™ OptiPlex™ 380 Service Manual-Mini-Tower WARNING: Before working inside your computer, read the safety information that shipped with your computer. For additional safety best practices information, see the Regulatory Compliance Homepage at www.dell.com/regulatory_compliance. Follow the procedures in Before Working Inside Your Computer. 2. Tilt the cover from the top outward. Removing the Cover 1.
Service Manual
Page 14
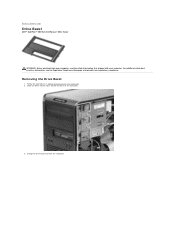
Slide the drive release latch toward the base of the computer. 3. Swing the drive bezel out from the computer. For additional safety best practices information, see the Regulatory Compliance Homepage at www.dell.com/regulatory_compliance. Follow the procedures in Before Working Inside Your Computer. 2. Back to Contents Page Drive Bezel Dell™ OptiPlex™ 380 Service Manual-Mini-Tower WARNING: Before working inside your computer, read the safety information that shipped with your computer. Removing the Drive Bezel 1.
Slide the drive release latch toward the base of the computer. 3. Swing the drive bezel out from the computer. For additional safety best practices information, see the Regulatory Compliance Homepage at www.dell.com/regulatory_compliance. Follow the procedures in Before Working Inside Your Computer. 2. Back to Contents Page Drive Bezel Dell™ OptiPlex™ 380 Service Manual-Mini-Tower WARNING: Before working inside your computer, read the safety information that shipped with your computer. Removing the Drive Bezel 1.
Service Manual
Page 16
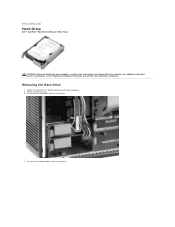
For additional safety best practices information, see the Regulatory Compliance Homepage at www.dell.com/regulatory_compliance. Remove the drive bezel. 3. Back to Contents Page Hard Drive Dell™ OptiPlex™ 380 Service Manual-Mini-Tower WARNING: Before working inside your computer, read the safety information that shipped with your computer. Removing the Hard Drive 1. Disconnect the power cable from the hard drive. 4. Follow the procedures in Before Working Inside Your Computer. 2. Disconnect the data cable from the hard drive.
For additional safety best practices information, see the Regulatory Compliance Homepage at www.dell.com/regulatory_compliance. Remove the drive bezel. 3. Back to Contents Page Hard Drive Dell™ OptiPlex™ 380 Service Manual-Mini-Tower WARNING: Before working inside your computer, read the safety information that shipped with your computer. Removing the Hard Drive 1. Disconnect the power cable from the hard drive. 4. Follow the procedures in Before Working Inside Your Computer. 2. Disconnect the data cable from the hard drive.

Service Manual
Page 18
Loosen the two captive screws that shipped with your computer. Follow the procedures in Before Working Inside Your Computer. 2. Pivot the heat sink towards the back of the computer and remove it from the computer. For additional safety best practices information, see the Regulatory Compliance Homepage at www.dell.com/regulatory_compliance. Back to Contents Page Heat Sink Dell™ OptiPlex™ 380 Service Manual-Mini-Tower WARNING: Before working inside your computer, read the safety information that secure the heat sink to the system board. 3. Removing the Heat Sink 1.
Loosen the two captive screws that shipped with your computer. Follow the procedures in Before Working Inside Your Computer. 2. Pivot the heat sink towards the back of the computer and remove it from the computer. For additional safety best practices information, see the Regulatory Compliance Homepage at www.dell.com/regulatory_compliance. Back to Contents Page Heat Sink Dell™ OptiPlex™ 380 Service Manual-Mini-Tower WARNING: Before working inside your computer, read the safety information that secure the heat sink to the system board. 3. Removing the Heat Sink 1.
Service Manual
Page 20
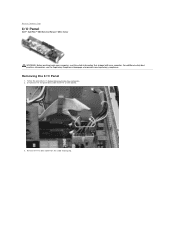
Removing the I /O Panel Dell™ OptiPlex™ 380 Service Manual-Mini-Tower WARNING: Before working inside your computer, read the safety information that shipped with your computer. Remove the I /O panel data cable from the cable routing clip. For additional safety best practices information, see the Regulatory Compliance Homepage at www.dell.com/regulatory_compliance. Back to Contents Page I /O Panel 1. Follow the procedures in Before Working Inside Your Computer. 2. Disconnect the I /O data cable from the system board. 3.
Removing the I /O Panel Dell™ OptiPlex™ 380 Service Manual-Mini-Tower WARNING: Before working inside your computer, read the safety information that shipped with your computer. Remove the I /O panel data cable from the cable routing clip. For additional safety best practices information, see the Regulatory Compliance Homepage at www.dell.com/regulatory_compliance. Back to Contents Page I /O Panel 1. Follow the procedures in Before Working Inside Your Computer. 2. Disconnect the I /O data cable from the system board. 3.
Service Manual
Page 25
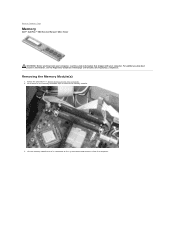
Lift the memory module out of its connector on the memory retention clips to Contents Page Memory Dell™ OptiPlex™ 380 Service Manual-Mini-Tower WARNING: Before working inside your computer, read the safety information that shipped with your computer. Follow the procedures in Before Working Inside Your Computer. 2. Back .... 3. Push down on the system board and remove it from the computer. For additional safety best practices information, see the Regulatory Compliance Homepage at www.dell.com/regulatory_compliance. Removing the Memory Module(s) 1.
Lift the memory module out of its connector on the memory retention clips to Contents Page Memory Dell™ OptiPlex™ 380 Service Manual-Mini-Tower WARNING: Before working inside your computer, read the safety information that shipped with your computer. Follow the procedures in Before Working Inside Your Computer. 2. Back .... 3. Push down on the system board and remove it from the computer. For additional safety best practices information, see the Regulatory Compliance Homepage at www.dell.com/regulatory_compliance. Removing the Memory Module(s) 1.

Service Manual
Page 27
Back to Contents Page Removing and Replacing Parts Dell™ OptiPlex™ 380 Service Manual-Mini-Tower Cover Coin-Cell Battery Optical Drive Video Card Hard Drive Power Supply System Board Drive Bezel Memory Module Fan I/O Panel Heat Sink Processor Back to Contents Page
Back to Contents Page Removing and Replacing Parts Dell™ OptiPlex™ 380 Service Manual-Mini-Tower Cover Coin-Cell Battery Optical Drive Video Card Hard Drive Power Supply System Board Drive Bezel Memory Module Fan I/O Panel Heat Sink Processor Back to Contents Page
Service Manual
Page 28
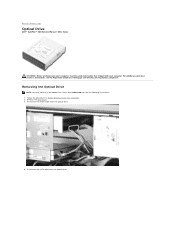
... best practices information, see the Regulatory Compliance Homepage at www.dell.com/regulatory_compliance. Remove the drive bezel. 3. Removing the Optical Drive NOTE: You may need to install Adobe Flash Player from Adobe.com to Contents Page Optical Drive Dell™ OptiPlex™ 380 Service Manual-Mini-Tower WARNING: Before working inside your computer, read the safety...
... best practices information, see the Regulatory Compliance Homepage at www.dell.com/regulatory_compliance. Remove the drive bezel. 3. Removing the Optical Drive NOTE: You may need to install Adobe Flash Player from Adobe.com to Contents Page Optical Drive Dell™ OptiPlex™ 380 Service Manual-Mini-Tower WARNING: Before working inside your computer, read the safety...
Service Manual
Page 30
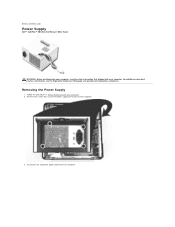
Removing the Power Supply 1. Remove the screws that secure the power supply to Contents Page Power Supply Dell™ OptiPlex™ 380 Service Manual-Mini-Tower WARNING: Before working inside your computer, read the safety information that shipped with your computer. Disconnect the hard-drive power cable from the hard drive. Back to the back of the computer. 3. Follow the procedures in Before Working Inside Your Computer. 2. For additional safety best practices information, see the Regulatory Compliance Homepage at www.dell.com/regulatory_compliance.
Removing the Power Supply 1. Remove the screws that secure the power supply to Contents Page Power Supply Dell™ OptiPlex™ 380 Service Manual-Mini-Tower WARNING: Before working inside your computer, read the safety information that shipped with your computer. Disconnect the hard-drive power cable from the hard drive. Back to the back of the computer. 3. Follow the procedures in Before Working Inside Your Computer. 2. For additional safety best practices information, see the Regulatory Compliance Homepage at www.dell.com/regulatory_compliance.

