User Manual
Page 6
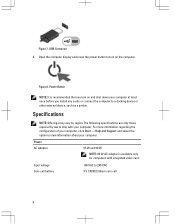
... configuration of your computer, click Start → Help and Support and select the option to 240 VAC 3 V CR2032 lithium coin cell 6 Input voltage Coin-cell battery 100 VAC to view information about your computer. USB Connector 4.
... configuration of your computer, click Start → Help and Support and select the option to 240 VAC 3 V CR2032 lithium coin cell 6 Input voltage Coin-cell battery 100 VAC to view information about your computer. USB Connector 4.
Owner's Manual
Page 3
... Removing the Secure Digital (SD) Card...11 Installing the Secure Digital (SD) Card...11 Removing The ExpressCard...12 Installing the ExpressCard...12 Removing The Battery...12 Installing the Battery...13 Removing the Subscriber Identity Module (SIM) Card 13 Installing the Subscriber Identity Module (SIM) Card 13 Removing the Base Cover...13 Installing...
... Removing the Secure Digital (SD) Card...11 Installing the Secure Digital (SD) Card...11 Removing The ExpressCard...12 Installing the ExpressCard...12 Removing The Battery...12 Installing the Battery...13 Removing the Subscriber Identity Module (SIM) Card 13 Installing the Subscriber Identity Module (SIM) Card 13 Removing the Base Cover...13 Installing...
Owner's Manual
Page 4
... Chassis Base...28 Installing the Chassis Base...29 Removing the Hall Sensor...30 Installing the Hall Sensor...31 Removing the Coin-Cell Battery...31 Installing the Coin-Cell Battery...32 Removing the System Board...32 Installing the System Board...34 Removing the Power-Connector Port...35 Installing the Power-Connector Port...36...
... Chassis Base...28 Installing the Chassis Base...29 Removing the Hall Sensor...30 Installing the Hall Sensor...31 Removing the Coin-Cell Battery...31 Installing the Coin-Cell Battery...32 Removing the System Board...32 Installing the System Board...34 Removing the Power-Connector Port...35 Installing the Power-Connector Port...36...

Owner's Manual
Page 5
6 Troubleshooting Your Computer 65 Device Status Lights...65 Battery Status Lights...66 7 Technical Specifications...67 8 Contacting Dell...73
6 Troubleshooting Your Computer 65 Device Status Lights...65 Battery Status Lights...66 7 Technical Specifications...67 8 Contacting Dell...73
Owner's Manual
Page 7
...your computer. • A component can be done by a certified service technician. Turn off your product documentation, or as the optional Media Base or Battery Slice, undock it. CAUTION: To disconnect a network cable, first unplug the cable from your computer and then unplug the cable from the computer. ...Computer Use the following safety guidelines to help protect your computer from potential damage and to help to servicing that is not authorized by Dell is not covered by your warranty. Unless otherwise noted, each procedure included in this document. NOTE: The color of cable, press in...
...your computer. • A component can be done by a certified service technician. Turn off your product documentation, or as the optional Media Base or Battery Slice, undock it. CAUTION: To disconnect a network cable, first unplug the cable from your computer and then unplug the cable from the computer. ...Computer Use the following safety guidelines to help protect your computer from potential damage and to help to servicing that is not authorized by Dell is not covered by your warranty. Unless otherwise noted, each procedure included in this document. NOTE: The color of cable, press in...
Owner's Manual
Page 8
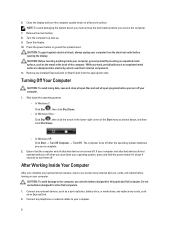
...and close all open programs before turning on a flat work , periodically touch an unpainted metal surface to the computer, use batteries designed for this particular Dell computer. If your computer and attached devices did not automatically turn off when you turn off . Connect any external devices, cards...Inside Your Computer After you complete any cards, such as shown below, and then click Shut Down. - Do not use only the battery designed for other Dell computers. 1. In Windows 7: Click Start , then click Shut Down. - 6. NOTE: To avoid damaging the system board, you must ...
...and close all open programs before turning on a flat work , periodically touch an unpainted metal surface to the computer, use batteries designed for this particular Dell computer. If your computer and attached devices did not automatically turn off when you turn off . Connect any external devices, cards...Inside Your Computer After you complete any cards, such as shown below, and then click Shut Down. - Do not use only the battery designed for other Dell computers. 1. In Windows 7: Click Start , then click Shut Down. - 6. NOTE: To avoid damaging the system board, you must ...
Owner's Manual
Page 9
CAUTION: To connect a network cable, first plug the cable into the network device and then plug it into the computer. 3. Connect your computer. 9 Turn on your computer and all attached devices to their electrical outlets. 5. Replace the battery. 4.
CAUTION: To connect a network cable, first plug the cable into the network device and then plug it into the computer. 3. Connect your computer. 9 Turn on your computer and all attached devices to their electrical outlets. 5. Replace the battery. 4.
Owner's Manual
Page 12
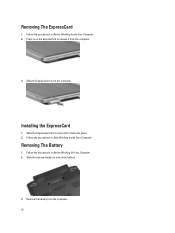
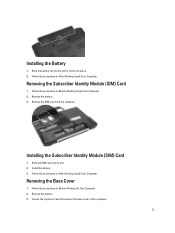
Removing The ExpressCard 1. Removing The Battery 1. Press in Before Working On Your Computer. 2. Remove the battery from the computer. 3. Installing the ExpressCard 1. Follow the procedures in After Working Inside Your Computer. Slide the ExpressCard out of the computer. Follow the procedures in Before Working Inside Your Computer. 2. Slide the release latches to release it clicks into place. 2. Follow the procedures in on the ExpressCard to unlock the battery. 3. Slide the ExpressCard into its slot until it from the computer. 12
Removing The ExpressCard 1. Removing The Battery 1. Press in Before Working On Your Computer. 2. Remove the battery from the computer. 3. Installing the ExpressCard 1. Follow the procedures in After Working Inside Your Computer. Slide the ExpressCard out of the computer. Follow the procedures in Before Working Inside Your Computer. 2. Slide the release latches to release it clicks into place. 2. Follow the procedures in on the ExpressCard to unlock the battery. 3. Slide the ExpressCard into its slot until it from the computer. 12
Owner's Manual
Page 13
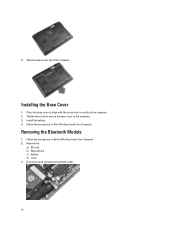
...from the computer. Slide the SIM card into place. 2. Follow the procedures in Before Working On Your Computer. 2. Remove the battery. 3. Install the battery. 3. Removing the Base Cover 1. Follow the procedures in After Working Inside Your Computer. Loosen the captive screw that secures the ...base cover to the computer. 13 Slide the battery into its slot until it clicks into its slot. 2. Removing the Subscriber Identity Module (SIM) Card 1. Installing the Subscriber Identity Module...
...from the computer. Slide the SIM card into place. 2. Follow the procedures in Before Working On Your Computer. 2. Remove the battery. 3. Install the battery. 3. Removing the Base Cover 1. Follow the procedures in After Working Inside Your Computer. Loosen the captive screw that secures the ...base cover to the computer. 13 Slide the battery into its slot until it clicks into its slot. 2. Removing the Subscriber Identity Module (SIM) Card 1. Installing the Subscriber Identity Module...
Owner's Manual
Page 14
Place the base cover to the computer. 3. Removing the Bluetooth Module 1. Slide the base cover out of the computer. Tighten the screw to secure the base cover to align with the screw hole correctly on the computer. 2. Follow the procedures in After Working Inside Your Computer. Disconnect and unroute the bluetooth cable. 14 Follow the procedures in Before Working Inside Your Computer. 2. Remove the: a) SD card b) ExpressCard c) battery d) cover 3. Installing the Base Cover 1. 4. Install the battery. 4.
Place the base cover to the computer. 3. Removing the Bluetooth Module 1. Slide the base cover out of the computer. Tighten the screw to secure the base cover to align with the screw hole correctly on the computer. 2. Follow the procedures in After Working Inside Your Computer. Disconnect and unroute the bluetooth cable. 14 Follow the procedures in Before Working Inside Your Computer. 2. Remove the: a) SD card b) ExpressCard c) battery d) cover 3. Installing the Base Cover 1. 4. Install the battery. 4.

Owner's Manual
Page 15
... d) SD card 4. Follow the procedures in Before Working Inside Your Computer. 2. Remove the: a) battery b) base cover 3. Remove the bluetooth module. Tighten the screw to secure the bluetooth module to its connector. 2. Follow the procedures in After Working Inside Your ...
... d) SD card 4. Follow the procedures in Before Working Inside Your Computer. 2. Remove the: a) battery b) base cover 3. Remove the bluetooth module. Tighten the screw to secure the bluetooth module to its connector. 2. Follow the procedures in After Working Inside Your ...
Owner's Manual
Page 17
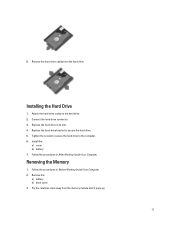
...-up. 17 Replace the hard drive in Before Working Inside Your Computer. 2. Replace the hard-drive bracket to the computer. 6. Remove the: a) battery b) base cover 3. 8. Install the: a) cover b) battery 7. Pry the retention clips away from the hard drive. Tighten the screws to secure the hard drive to secure the hard drive. 5. Installing...
...-up. 17 Replace the hard drive in Before Working Inside Your Computer. 2. Replace the hard-drive bracket to the computer. 6. Remove the: a) battery b) base cover 3. 8. Install the: a) cover b) battery 7. Pry the retention clips away from the hard drive. Tighten the screws to secure the hard drive to secure the hard drive. 5. Installing...

Owner's Manual
Page 18
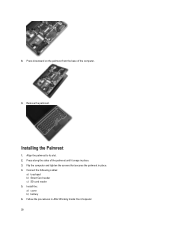
Insert the memory module into the socket. 2. Removing The Palmrest 1. Disconnect the SD memory card reader cable. 18 Repeat steps 2 and 3 to the system board. 3. Press the retention clips to secure the memory module to remove the second memory module. Follow the procedures in After Working Inside Your Computer. 4. Installing the Memory 1. Follow the procedures in Before Working Inside Your Computer. 2. Lift and remove the memory module from its connector. 5. Install the: a) base cover b) battery 4. Remove the: a) battery b) base cover 3.
Insert the memory module into the socket. 2. Removing The Palmrest 1. Disconnect the SD memory card reader cable. 18 Repeat steps 2 and 3 to the system board. 3. Press the retention clips to secure the memory module to remove the second memory module. Follow the procedures in After Working Inside Your Computer. 4. Installing the Memory 1. Follow the procedures in Before Working Inside Your Computer. 2. Lift and remove the memory module from its connector. 5. Install the: a) base cover b) battery 4. Remove the: a) battery b) base cover 3.
Owner's Manual
Page 20
Press along the sides of the computer. 9. Align the palmrest to its slot. 2. Install the: a) cover b) battery 6. Follow the procedures in place. 3. Installing the Palmrest 1. Connect the following cables: a) touchpad b) Smart Card reader c) SD card reader 5. Flip the computer and tighten the screws that secures the palmrest in place. 4. 8. Press downward on the palmrest from the base of the palmrest until it snaps in After Working Inside Your Computer. 20 Remove the palmrest.
Press along the sides of the computer. 9. Align the palmrest to its slot. 2. Install the: a) cover b) battery 6. Follow the procedures in place. 3. Installing the Palmrest 1. Connect the following cables: a) touchpad b) Smart Card reader c) SD card reader 5. Flip the computer and tighten the screws that secures the palmrest in place. 4. 8. Press downward on the palmrest from the base of the palmrest until it snaps in After Working Inside Your Computer. 20 Remove the palmrest.
Owner's Manual
Page 21
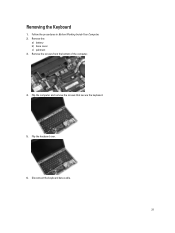
Remove the screws from the bottom of the computer. 4. Flip the keyboard over. 6. Remove the: a) battery b) base cover c) palmrest 3. Flip the computer and remove the screws that secure the keyboard. 5. Follow the procedures in Before Working Inside Your Computer. 2. Removing the Keyboard 1. Disconnect the keyboard data cable. 21
Remove the screws from the bottom of the computer. 4. Flip the keyboard over. 6. Remove the: a) battery b) base cover c) palmrest 3. Flip the computer and remove the screws that secure the keyboard. 5. Follow the procedures in Before Working Inside Your Computer. 2. Removing the Keyboard 1. Disconnect the keyboard data cable. 21
Owner's Manual
Page 23
... cover 3. Disconnect the antenna cables from its compartment and ensure that secures the WLAN card to secure the keyboard. 6. Install the: a) palmrest b) cover c) battery 8. Follow the procedures in After Working Inside Your Computer. Remove the screw that it upwards. 4. Flip the computer and tighten the screws at the bottom ...
... cover 3. Disconnect the antenna cables from its compartment and ensure that secures the WLAN card to secure the keyboard. 6. Install the: a) palmrest b) cover c) battery 8. Follow the procedures in After Working Inside Your Computer. Remove the screw that it upwards. 4. Flip the computer and tighten the screws at the bottom ...
Owner's Manual
Page 24
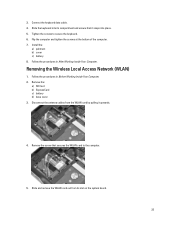
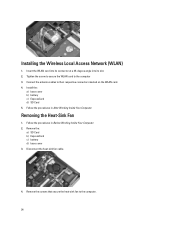
... to secure the WLAN card to their respective connectors marked on the WLAN card. 4. Installing the Wireless Local Access Network (WLAN) 1. Install the: a) base cover b) battery c) ExpressCard d) SD Card 5. Follow the procedures in After Working Inside Your Computer. Follow the procedures in Before Working Inside Your Computer. 2. Connect the antenna cables... 1. Insert the WLAN card into its connector at a 45-degree angle into its slot. 2. Disconnect the heat-sink fan cable. 4. Remove the: a) SD Card b) ExpressCard c) battery d) base cover 3.
... to secure the WLAN card to their respective connectors marked on the WLAN card. 4. Installing the Wireless Local Access Network (WLAN) 1. Install the: a) base cover b) battery c) ExpressCard d) SD Card 5. Follow the procedures in After Working Inside Your Computer. Follow the procedures in Before Working Inside Your Computer. 2. Connect the antenna cables... 1. Insert the WLAN card into its connector at a 45-degree angle into its slot. 2. Disconnect the heat-sink fan cable. 4. Remove the: a) SD Card b) ExpressCard c) battery d) base cover 3.
Owner's Manual
Page 25
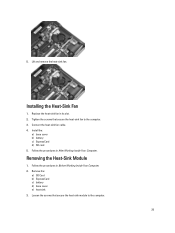
... in its slot. 2. Tighten the screws that secure the heat-sink module to the computer. 3. Removing the Heat-Sink Module 1. Remove the: a) SD Card b) ExpressCard c) battery d) base cover e) heat sink 3. Lift and remove the heat-sink fan. Replace the heat-sink fan in Before Working Inside Your Computer. 2. Follow the procedures... Inside Your Computer. Loosen the screws that secure the heat-sink fan to the computer. 25 Installing the Heat-Sink Fan 1. Install the: a) base cover b) battery c) ExpressCard d) SD card 5. 5. Connect the heat-sink fan cable. 4.
... in its slot. 2. Tighten the screws that secure the heat-sink module to the computer. 3. Removing the Heat-Sink Module 1. Remove the: a) SD Card b) ExpressCard c) battery d) base cover e) heat sink 3. Lift and remove the heat-sink fan. Replace the heat-sink fan in Before Working Inside Your Computer. 2. Follow the procedures... Inside Your Computer. Loosen the screws that secure the heat-sink fan to the computer. 25 Installing the Heat-Sink Fan 1. Install the: a) base cover b) battery c) ExpressCard d) SD card 5. 5. Connect the heat-sink fan cable. 4.

Owner's Manual
Page 26
Follow the procedures in Before Working Inside Your Computer. 2. Removing the Speakers 1. 4. Disconnect the speaker cable. 26 Remove the heat-sink module. Follow the procedures in After Working Inside Your Computer. Installing the Heat-Sink module 1. Tighten the screws to secure the heat-sink module. 3. Install the: a) heat-sink fan b) base cover c) battery d) ExpressCard e) SD Card 4. Replace the heat-sink module in its slot. 2. Remove the: a) SD Card b) ExpressCard c) battery d) base cover 3.
Follow the procedures in Before Working Inside Your Computer. 2. Removing the Speakers 1. 4. Disconnect the speaker cable. 26 Remove the heat-sink module. Follow the procedures in After Working Inside Your Computer. Installing the Heat-Sink module 1. Tighten the screws to secure the heat-sink module. 3. Install the: a) heat-sink fan b) base cover c) battery d) ExpressCard e) SD Card 4. Replace the heat-sink module in its slot. 2. Remove the: a) SD Card b) ExpressCard c) battery d) base cover 3.

Owner's Manual
Page 28
... the speaker cables. 2. Disconnect the touchpad cable. 4. Disconnect the hall sensor cable. 28 Install the: a) base cover b) battery c) ExpressCard d) SD card 4. Align the speakers in Before Working Inside Your Computer. 2. Follow the procedures in After Working Inside Your... Computer. Remove the: a) SD card b) ExpressCard c) battery d) base cover e) palmrest f) keyboard g) bluetooth module h) heat-sink fan i) speakers 3. Removing the Chassis Base 1. Installing the Speakers 1....
... the speaker cables. 2. Disconnect the touchpad cable. 4. Disconnect the hall sensor cable. 28 Install the: a) base cover b) battery c) ExpressCard d) SD card 4. Align the speakers in Before Working Inside Your Computer. 2. Follow the procedures in After Working Inside Your... Computer. Remove the: a) SD card b) ExpressCard c) battery d) base cover e) palmrest f) keyboard g) bluetooth module h) heat-sink fan i) speakers 3. Removing the Chassis Base 1. Installing the Speakers 1....


