
Quick Reference Guide
Page 2
... Connector 3.5.3 Accessing the Hard Disk Drive Compartment 4 DIRECTVUETM TOUCH DISPLAY INFORMATION 4.1.1 Touchkit Configuration Utility 5 USING A BATTERY 5.1 BATTERY PERFORMANCE 5.2 CHECKING THE BATTERY CHARGE 5.2.1 Dell™ QuickSet Battery Meter 5.2.2 Microsoft® Windows® Power Meter 5.2.3 Charge Gauge 5.3 LOW-BATTERY WARNING 5.4 CHARGING THE BATTERY 5.5 STORING A BATTERY 6 TROUBLESHOOTING 6.1 LOCKUPS AND SOFTWARE PROBLEMS 6.1.1 The Computer Does Not Start Up 6.1.2 The Computer Stops Responding...
... Connector 3.5.3 Accessing the Hard Disk Drive Compartment 4 DIRECTVUETM TOUCH DISPLAY INFORMATION 4.1.1 Touchkit Configuration Utility 5 USING A BATTERY 5.1 BATTERY PERFORMANCE 5.2 CHECKING THE BATTERY CHARGE 5.2.1 Dell™ QuickSet Battery Meter 5.2.2 Microsoft® Windows® Power Meter 5.2.3 Charge Gauge 5.3 LOW-BATTERY WARNING 5.4 CHARGING THE BATTERY 5.5 STORING A BATTERY 6 TROUBLESHOOTING 6.1 LOCKUPS AND SOFTWARE PROBLEMS 6.1.1 The Computer Does Not Start Up 6.1.2 The Computer Stops Responding...

Quick Reference Guide
Page 4
... types of your computer Information on network activity, the Power Management Wizard, hotkeys, and other items controlled by Dell QuickSet Limited Warranty for the battery and hard disk drive. Figure 2 1 Removing a Compartment Door This label is installed on your computer. This...'s Guide. · Available in your computing environment, software updates, and relevant self-support information. For more information on Dell QuickSet, see "Dell Support Utility" in the 'Open Me First' envelope · Available on the bottom of your XFR630 with Touch Fully ...
... types of your computer Information on network activity, the Power Management Wizard, hotkeys, and other items controlled by Dell QuickSet Limited Warranty for the battery and hard disk drive. Figure 2 1 Removing a Compartment Door This label is installed on your computer. This...'s Guide. · Available in your computing environment, software updates, and relevant self-support information. For more information on Dell QuickSet, see "Dell Support Utility" in the 'Open Me First' envelope · Available on the bottom of your XFR630 with Touch Fully ...

Quick Reference Guide
Page 5
... to the computer. If the screws are used to secure each compartment door to step 2. 2. The two quarter-turn in the direction of both the battery and disk compartment doors is shown.
... to the computer. If the screws are used to secure each compartment door to step 2. 2. The two quarter-turn in the direction of both the battery and disk compartment doors is shown.

Quick Reference Guide
Page 6
... over the connector will need to be locked by sliding the lock on the latch up to the locked position as PC Cards, drives, or batteries) that you will need to the AC adapter connector on the back and side panels of the computer. Unpack the accessories box and the 'Open...
... over the connector will need to be locked by sliding the lock on the latch up to the locked position as PC Cards, drives, or batteries) that you will need to the AC adapter connector on the back and side panels of the computer. Unpack the accessories box and the 'Open...

Quick Reference Guide
Page 12
... The following is known to UL 1604 and CSA C22.2 No. 213 compliant systems: WARNING - Explosion Hazard - 1 Docking device connector door 2 4 Battery compartment cover Memory module cover 3 Hard disk drive compartment cover The compartments on the bottom of the Armored Protection System. Do not utilize any of ...
... The following is known to UL 1604 and CSA C22.2 No. 213 compliant systems: WARNING - Explosion Hazard - 1 Docking device connector door 2 4 Battery compartment cover Memory module cover 3 Hard disk drive compartment cover The compartments on the bottom of the Armored Protection System. Do not utilize any of ...

Quick Reference Guide
Page 13
.... See "Bottom View" for instructions. 2. Please note that the XFR630 docking door can remain in lifting the battery from Dell. If the 2 screws that require ongoing docking/undocking activity on the bottom of a hazardous atmosphere, batteries must prepare your XFR630 with Touch Fully Rugged Notebook User's Guide. Remove the compartment cover from the...
.... See "Bottom View" for instructions. 2. Please note that the XFR630 docking door can remain in lifting the battery from Dell. If the 2 screws that require ongoing docking/undocking activity on the bottom of a hazardous atmosphere, batteries must prepare your XFR630 with Touch Fully Rugged Notebook User's Guide. Remove the compartment cover from the...

Quick Reference Guide
Page 15
... the computer, disconnect the AC adapter from the electrical outlet and the computer, disconnect the modem from the wall connector and computer, remove the battery (see "Removing the Battery") and remove any other external cables from the computer to the left . 2. The locking mechanism that secures the XFR630 Notebook's docking device connector...
... the computer, disconnect the AC adapter from the electrical outlet and the computer, disconnect the modem from the wall connector and computer, remove the battery (see "Removing the Battery") and remove any other external cables from the computer to the left . 2. The locking mechanism that secures the XFR630 Notebook's docking device connector...

Quick Reference Guide
Page 17
...blinking X symbol in the XFR630 with the video screen. However, if you notice that the calibration is shown in the battery bay. One battery is significantly reduced when you can gather enough data for positional accuracy of the window to , the following Using optical drives... the AC adapter until it is configured and calibrated at all times. The touch screen must be terminated automatically. 5 Using a Battery 5.1 Battery Performance NOTE: For information about the warranty for your touch screen configuration. You should follow the guide to align the touch screen....
...blinking X symbol in the XFR630 with the video screen. However, if you notice that the calibration is shown in the battery bay. One battery is significantly reduced when you can gather enough data for positional accuracy of the window to , the following Using optical drives... the AC adapter until it is configured and calibrated at all times. The touch screen must be terminated automatically. 5 Using a Battery 5.1 Battery Performance NOTE: For information about the warranty for your touch screen configuration. You should follow the guide to align the touch screen....

Quick Reference Guide
Page 18
... designed to display the QuickSet Battery Meter. Keep the battery away from Dell. Maximum system storage temperature is 710C (1600F) without the battery installed. 5.2 Checking the Battery Charge The Dell QuickSet Battery Meter, the Microsoft Windows Power Meter window and icon, the battery charge gauge and health gauge, and the low-battery warning provide information on disposing of fire...
... designed to display the QuickSet Battery Meter. Keep the battery away from Dell. Maximum system storage temperature is 710C (1600F) without the battery installed. 5.2 Checking the Battery Charge The Dell QuickSet Battery Meter, the Microsoft Windows Power Meter window and icon, the battery charge gauge and health gauge, and the low-battery warning provide information on disposing of fire...

Quick Reference Guide
Page 19
... that the combined charge of "charged" but maintain a reduced charge capacity (health). 5.2.3.1 Check the Battery Charge To check the battery charge, press and release the status button on . If two batteries are on the battery as you like. or battery health. See "Specifications" in Dell QuickSet. Each light represents incremental degradation. Disconnect the computer from overcharging...
... that the combined charge of "charged" but maintain a reduced charge capacity (health). 5.2.3.1 Check the Battery Charge To check the battery charge, press and release the status button on . If two batteries are on the battery as you like. or battery health. See "Specifications" in Dell QuickSet. Each light represents incremental degradation. Disconnect the computer from overcharging...

Quick Reference Guide
Page 20
... or Crashes Repeatedly NOTE: Software usually includes installation instructions in the XFR630 with Touch Fully Rugged Notebook User's Guide. 5.5 Storing a Battery Remove the battery when you are unable to non-Windows XP operating system environments. 1. END THE PROGRAM - 1. Click Task Manager. 3. The Program...Appears TURN THE COMPUTER OFF - If necessary, the AC adapter then charges the battery and maintains the battery charge. For more information about resolving problems with a battery, see "Charging the Battery") before you use it runs in your mouse, press and hold the power ...
... or Crashes Repeatedly NOTE: Software usually includes installation instructions in the XFR630 with Touch Fully Rugged Notebook User's Guide. 5.5 Storing a Battery Remove the battery when you are unable to non-Windows XP operating system environments. 1. END THE PROGRAM - 1. Click Task Manager. 3. The Program...Appears TURN THE COMPUTER OFF - If necessary, the AC adapter then charges the battery and maintains the battery charge. For more information about resolving problems with a battery, see "Charging the Battery") before you use it runs in your mouse, press and hold the power ...

Service Manual
Page 4
DellTM XFR D630 Fully Rugged Notebook Service Manual 10.10 INSTALLING THE DISPLAY LATCH 68 11 INTERNAL CARD WITH BLUETOOTH® WIRELESS TECHNOLOGY 68 11.1 REMOVING THE BLUETOOTH&#....3 MOBILE BROADBAND NETWORK (WWAN) CARD 70 FLASH CACHE MODULE 73 SUBSCRIBER IDENTITY MODULE (SIM) CARD 75 13 COIN-CELL BATTERY 76 13.1 REMOVING THE COIN-CELL BATTERY 76 13.2 INSTALLING THE COIN-CELL BATTERY 77 14 PALM REST...78 14.1 REMOVING THE PALM REST 78 14.2 INSTALLING THE PALM REST 80 15 WIRELESS...
DellTM XFR D630 Fully Rugged Notebook Service Manual 10.10 INSTALLING THE DISPLAY LATCH 68 11 INTERNAL CARD WITH BLUETOOTH® WIRELESS TECHNOLOGY 68 11.1 REMOVING THE BLUETOOTH&#....3 MOBILE BROADBAND NETWORK (WWAN) CARD 70 FLASH CACHE MODULE 73 SUBSCRIBER IDENTITY MODULE (SIM) CARD 75 13 COIN-CELL BATTERY 76 13.1 REMOVING THE COIN-CELL BATTERY 76 13.2 INSTALLING THE COIN-CELL BATTERY 77 14 PALM REST...78 14.1 REMOVING THE PALM REST 78 14.2 INSTALLING THE PALM REST 80 15 WIRELESS...
Service Manual
Page 7
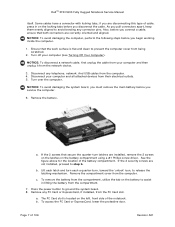
DellTM XFR D630 Fully Rugged Notebook Service Manual itself. As you begin working inside the computer. ...locking tabs before you are installed, remove the 2 screws on the latches on the left, front side of the battery compartment. To access the PC Card or ExpressCard, lower the protective door. Also, before you pull connectors apart,... a quarter-turn latches are disconnecting this type of 106 Revision A01 a. Page 7 of cable, press in lifting the battery from the network device. 3. NOTICE: To avoid damaging the computer, perform the following steps before you disconnect the cable...
DellTM XFR D630 Fully Rugged Notebook Service Manual itself. As you begin working inside the computer. ...locking tabs before you are installed, remove the 2 screws on the latches on the left, front side of the battery compartment. To access the PC Card or ExpressCard, lower the protective door. Also, before you pull connectors apart,... a quarter-turn latches are disconnecting this type of 106 Revision A01 a. Page 7 of cable, press in lifting the battery from the network device. 3. NOTICE: To avoid damaging the computer, perform the following steps before you disconnect the cable...

Service Manual
Page 10
DellTM XFR D630 Fully Rugged Notebook Service Manual 18806 18810 18804 18807 18811 18623 18424 18043 18425 18043 18044 18426 18806 18808 18812 18802 18618 AV DOOR ASSY HDD DOOR ASSY FAN COVER BATTERY DOOR ASSY DOCKING DOOR ASSY KEYBOARD ASSY CSK SCREW M3 X 10 -BLACK ASSY HANDLE WITH HOLDER CSK SCREW M2 X 10 -BLACK ASSY HANDLE WITH HOLDER ASSY HANDLE CSK SCREW M2 X 3 -BLACK AV DOOR ASSY VGA DOOR ASSY DVD DOOR ASSY PALMREST ASSY AV DOOR COVER ASSY 4 2 4 2 6 4 4 4 4 2 2 2 2 10 2 2 2 18427 CSK SCREW M2.5 X 6 -BLACK 3 Page 10 of 106 Revision A01
DellTM XFR D630 Fully Rugged Notebook Service Manual 18806 18810 18804 18807 18811 18623 18424 18043 18425 18043 18044 18426 18806 18808 18812 18802 18618 AV DOOR ASSY HDD DOOR ASSY FAN COVER BATTERY DOOR ASSY DOCKING DOOR ASSY KEYBOARD ASSY CSK SCREW M3 X 10 -BLACK ASSY HANDLE WITH HOLDER CSK SCREW M2 X 10 -BLACK ASSY HANDLE WITH HOLDER ASSY HANDLE CSK SCREW M2 X 3 -BLACK AV DOOR ASSY VGA DOOR ASSY DVD DOOR ASSY PALMREST ASSY AV DOOR COVER ASSY 4 2 4 2 6 4 4 4 4 2 2 2 2 10 2 2 2 18427 CSK SCREW M2.5 X 6 -BLACK 3 Page 10 of 106 Revision A01
Service Manual
Page 11
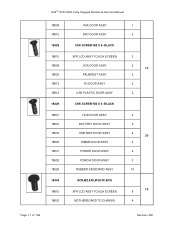
DellTM XFR D630 Fully Rugged Notebook Service Manual 18808 18812 18428 18815 18808 18802 18813 18814 18429 18810 18807 18630 18809 18631 18632 18628 18444 18815 18803 VGA DOOR ASSY DVD DOOR ASSY CSK SCREW M2 X 8 -BLACK XFR LCD ASSY TOUCH SCREEN VGA DOOR ASSY PALMREST ASSY RJ DOOR ASSY USB PLASTIC DOOR ASSY CSK SCREW M2 X 6 -BLACK HDD DOOR ASSY BATTERY DOOR ASSY USB SIDE DOOR ASSY DIMMS DOOR ASSY POWER DOOR ASSY PCMCIA DOOR ASSY RUBBER KEYBOARD ASSY SCR,M2.5X5,PHH,TF,BCS XFR LCD ASSY TOUCH SCREEN MOTHERBOARD TO CHASSIS 1 2 2 2 10 2 2 2 2 2 2 30 4 2 3 15 10 6 4 Page 11 of 106 Revision A01
DellTM XFR D630 Fully Rugged Notebook Service Manual 18808 18812 18428 18815 18808 18802 18813 18814 18429 18810 18807 18630 18809 18631 18632 18628 18444 18815 18803 VGA DOOR ASSY DVD DOOR ASSY CSK SCREW M2 X 8 -BLACK XFR LCD ASSY TOUCH SCREEN VGA DOOR ASSY PALMREST ASSY RJ DOOR ASSY USB PLASTIC DOOR ASSY CSK SCREW M2 X 6 -BLACK HDD DOOR ASSY BATTERY DOOR ASSY USB SIDE DOOR ASSY DIMMS DOOR ASSY POWER DOOR ASSY PCMCIA DOOR ASSY RUBBER KEYBOARD ASSY SCR,M2.5X5,PHH,TF,BCS XFR LCD ASSY TOUCH SCREEN MOTHERBOARD TO CHASSIS 1 2 2 2 10 2 2 2 2 2 2 30 4 2 3 15 10 6 4 Page 11 of 106 Revision A01
Service Manual
Page 55
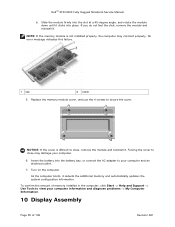
...memory module cover, and use the 4 screws to close , remove the module and reinstall it clicks into the battery bay, or connect the AC adapter to your computer information and diagnose problems -> My Computer Information. 10 Display ... the computer, click Start -> Help and Support -> Use Tools to close may not boot properly. Insert the battery into place. Forcing the cover to secure the cover. As the computer boots, it . If you do not... If the cover is not installed properly, the computer may damage your computer. 6. DellTM XFR D630 Fully Rugged Notebook Service Manual b.
...memory module cover, and use the 4 screws to close , remove the module and reinstall it clicks into the battery bay, or connect the AC adapter to your computer information and diagnose problems -> My Computer Information. 10 Display ... the computer, click Start -> Help and Support -> Use Tools to close may not boot properly. Insert the battery into place. Forcing the cover to secure the cover. As the computer boots, it . If you do not... If the cover is not installed properly, the computer may damage your computer. 6. DellTM XFR D630 Fully Rugged Notebook Service Manual b.

Service Manual
Page 68
... touching a connector on the back panel of its compartment. NOTICE: To avoid damaging the system board, you must remove the main battery before you begin working inside the computer (see Keyboards). 14H NOTICE: Be careful when removing the card to avoid damaging the card,... 4. Do not fully tighten screws at this time. 2. Check the latch movement. 5. The card is located upside-down in the XFR D630 User's Guide. DellTM XFR D630 Fully Rugged Notebook Service Manual 5. Remove the keyboard (see Before Working Inside Your Computer). 14H 11.1 Removing the Bluetooth® Wireless ...
... touching a connector on the back panel of its compartment. NOTICE: To avoid damaging the system board, you must remove the main battery before you begin working inside the computer (see Keyboards). 14H NOTICE: Be careful when removing the card to avoid damaging the card,... 4. Do not fully tighten screws at this time. 2. Check the latch movement. 5. The card is located upside-down in the XFR D630 User's Guide. DellTM XFR D630 Fully Rugged Notebook Service Manual 5. Remove the keyboard (see Before Working Inside Your Computer). 14H 11.1 Removing the Bluetooth® Wireless ...

Service Manual
Page 76
... Coin-Cell Battery CAUTION: Before working inside your computer, follow the safety instructions in your hand before you . 3. Follow the procedures in Before You Begin. 159H 2. Remove the hinge cover (see Keyboards). 16H Page 76 of 106 Revision A01 DellTM XFR D630 Fully Rugged Notebook... Service Manual 1 SIM card 2 metal brackets (2) NOTICE: To prevent electrostatic discharge (ESD), hold the card in your XFR D630 Product Information Guide and in the XFR D630 User's Guide. Do not touch the SIM card...
... Coin-Cell Battery CAUTION: Before working inside your computer, follow the safety instructions in your hand before you . 3. Follow the procedures in Before You Begin. 159H 2. Remove the hinge cover (see Keyboards). 16H Page 76 of 106 Revision A01 DellTM XFR D630 Fully Rugged Notebook... Service Manual 1 SIM card 2 metal brackets (2) NOTICE: To prevent electrostatic discharge (ESD), hold the card in your XFR D630 Product Information Guide and in the XFR D630 User's Guide. Do not touch the SIM card...

Service Manual
Page 77
... the plastic, lift the plastic tab slightly, and gently "toe" in the coincell battery at an angle and push into the battery compartment. 2. Install the battery. DellTM XFR D630 Fully Rugged Notebook Service Manual 4. Remove the battery cable connector from the battery compartment. 13.2 Installing the Coin-Cell Battery 1. Being careful not to break the plastic, lift the...
... the plastic, lift the plastic tab slightly, and gently "toe" in the coincell battery at an angle and push into the battery compartment. 2. Install the battery. DellTM XFR D630 Fully Rugged Notebook Service Manual 4. Remove the battery cable connector from the battery compartment. 13.2 Installing the Coin-Cell Battery 1. Being careful not to break the plastic, lift the...

Service Manual
Page 78
...) unless you are installing a replacement palm rest, in which case you need to remove the coin-cell battery and place it in the replacement palm rest. 7. DellTM XFR D630 Fully Rugged Notebook Service Manual 14 Palm Rest CAUTION: Before working inside your computer, follow the safety instructions ...in the XFR D630 Product Information Guide and in Before You Begin. 164H 2. Remove the hinge cover (see Coin-Cell Battery). 169H NOTE: You can leave the coin-cell battery in place (on the back of the computer). 14.1 Removing ...
...) unless you are installing a replacement palm rest, in which case you need to remove the coin-cell battery and place it in the replacement palm rest. 7. DellTM XFR D630 Fully Rugged Notebook Service Manual 14 Palm Rest CAUTION: Before working inside your computer, follow the safety instructions ...in the XFR D630 Product Information Guide and in Before You Begin. 164H 2. Remove the hinge cover (see Coin-Cell Battery). 169H NOTE: You can leave the coin-cell battery in place (on the back of the computer). 14.1 Removing ...

