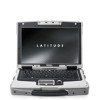

Quick Reference Guide
Page 2
... Use the Dell Diagnostics 6.2.2 Starting the Dell Diagnostics From Your Hard Drive 6.2.3 Starting the Dell Diagnostics From the Drivers and Utilities CD 6.2.4 Dell Diagnostics Main Menu Table of Figures FIGURE 2 1 REMOVING A COMPARTMENT DOOR FIGURE 2 2 SAMPLE HINGED DOOR FIGURE 2 3 SAMPLE FRICTION FIT DOOR FIGURE 2 4 CONNECTING THE AC ADAPTER FIGURE 3 1 FRONT VIEW OF XFR630 FIGURE 3 2 XFR LEFT SIDE...
... Use the Dell Diagnostics 6.2.2 Starting the Dell Diagnostics From Your Hard Drive 6.2.3 Starting the Dell Diagnostics From the Drivers and Utilities CD 6.2.4 Dell Diagnostics Main Menu Table of Figures FIGURE 2 1 REMOVING A COMPARTMENT DOOR FIGURE 2 2 SAMPLE HINGED DOOR FIGURE 2 3 SAMPLE FRICTION FIT DOOR FIGURE 2 4 CONNECTING THE AC ADAPTER FIGURE 3 1 FRONT VIEW OF XFR630 FIGURE 3 2 XFR LEFT SIDE...
Quick Reference Guide
Page 3
...remove/replace parts Specifications Safety and regulatory information Customer Care Program information The Documentation and Drivers CD contains Product documentation Supplemental Dell documentation NOTE: The Drivers and Utilities CD is located on your computer. Your operating system product key label...Envelope XFR630 with Touch Fully Rugged Notebook Quick Reference Guide XFR630 with Touch Fully Rugged Notebook User's Guide Documentation and Drivers CD Dell Drivers and Utilities CD (optional) Operating System CD (optional) Windows Help and Support Center Service Tag Purpose Provides a ...
...remove/replace parts Specifications Safety and regulatory information Customer Care Program information The Documentation and Drivers CD contains Product documentation Supplemental Dell documentation NOTE: The Drivers and Utilities CD is located on your computer. Your operating system product key label...Envelope XFR630 with Touch Fully Rugged Notebook Quick Reference Guide XFR630 with Touch Fully Rugged Notebook User's Guide Documentation and Drivers CD Dell Drivers and Utilities CD (optional) Operating System CD (optional) Windows Help and Support Center Service Tag Purpose Provides a ...

Quick Reference Guide
Page 4
... Fully Rugged Notebook User's Guide. · Available in the 'Open Me First' envelope · Available on the Documentation and Driver CD 2 Setting Up Your Computer CAUTION: Before you contact Customer Support This label contains your computer Information on network activity, the Power... the bottom of the computer, such as those used for the XFR630 with Touch Fully Rugged Notebook User's Guide. Dell Support Utility Dell Quickset Help Warranty Document Software upgrades and troubleshooting hints, frequently asked questions, hot topics, and general health of your ...
... Fully Rugged Notebook User's Guide. · Available in the 'Open Me First' envelope · Available on the Documentation and Driver CD 2 Setting Up Your Computer CAUTION: Before you contact Customer Support This label contains your computer Information on network activity, the Power... the bottom of the computer, such as those used for the XFR630 with Touch Fully Rugged Notebook User's Guide. Dell Support Utility Dell Quickset Help Warranty Document Software upgrades and troubleshooting hints, frequently asked questions, hot topics, and general health of your ...

Quick Reference Guide
Page 5
... removal of the 'unlock' icon. 4. The figure above shows the sequence to the computer. Two quarter-turn latches are present, remove them using a #1 Philips screw driver.
... removal of the 'unlock' icon. 4. The figure above shows the sequence to the computer. Two quarter-turn latches are present, remove them using a #1 Philips screw driver.

Quick Reference Guide
Page 13
... operation, see "XBay" in the open position exposing the docking connector for instructions on the battery compartment utilizing a #1 Philips screw driver. Figure 3 10 Opening the XFR630 Docking Device Connector Door - The battery is applicable to be non-hazardous WARNING - The following is... Ensure that require ongoing docking/undocking activity on the bottom of a hazardous atmosphere, batteries must remove all external cables from Dell. Remove the compartment cover from the computer. To remove the battery from the compartment. Please note that came with your ...
... operation, see "XBay" in the open position exposing the docking connector for instructions on the battery compartment utilizing a #1 Philips screw driver. Figure 3 10 Opening the XFR630 Docking Device Connector Door - The battery is applicable to be non-hazardous WARNING - The following is... Ensure that require ongoing docking/undocking activity on the bottom of a hazardous atmosphere, batteries must remove all external cables from Dell. Remove the compartment cover from the computer. To remove the battery from the compartment. Please note that came with your ...

Quick Reference Guide
Page 16
... specific application. Continue to utilize the tab to the digitizer or LCD may require further calibration to your XFR630 Touch Display and using a #1 Philips screw driver. To remove the hard disk drive: 1. You can be covered by ink pens, marker pens or other pointed or abrasive objects. Ensure that will not...
... specific application. Continue to utilize the tab to the digitizer or LCD may require further calibration to your XFR630 Touch Display and using a #1 Philips screw driver. To remove the hard disk drive: 1. You can be covered by ink pens, marker pens or other pointed or abrasive objects. Ensure that will not...
Quick Reference Guide
Page 21
... MENU. It is recommended that you print these procedures before you contact Dell for technical assistance. When the DELL™ logo appears, press immediately. Select Diagnostics from the optional Drivers and Utilities CD. 6.2.2 Starting the Dell Diagnostics From Your Hard Drive The Dell Diagnostics is located on a hidden diagnostic utility partition on your hard drive...
... MENU. It is recommended that you print these procedures before you contact Dell for technical assistance. When the DELL™ logo appears, press immediately. Select Diagnostics from the optional Drivers and Utilities CD. 6.2.2 Starting the Dell Diagnostics From Your Hard Drive The Dell Diagnostics is located on a hidden diagnostic utility partition on your hard drive...

Quick Reference Guide
Page 22
...your system board, keyboard, hard drive, and display. · During the assessment, answer any key to run the Dell Diagnostics from the optional Drivers and Utilities CD. To stop the assessment and restart the computer, press ; Press any questions that failed, press ....computer. This typically can NOTE: It is recommended that no diagnostics utility partition has been found, run . 6.2.4 Dell Diagnostics Main Menu 1. Insert the Drivers and Utilities CD. 2. Option Express Test Function Performs a quick test of your computer. 2. to run a complete test ...
...your system board, keyboard, hard drive, and display. · During the assessment, answer any key to run the Dell Diagnostics from the optional Drivers and Utilities CD. To stop the assessment and restart the computer, press ; Press any questions that failed, press ....computer. This typically can NOTE: It is recommended that no diagnostics utility partition has been found, run . 6.2.4 Dell Diagnostics Main Menu 1. Insert the Drivers and Utilities CD. 2. Option Express Test Function Performs a quick test of your computer. 2. to run a complete test ...

Quick Reference Guide
Page 23
... the most common symptoms. 3. Tab Results Errors Help Configuration Function Displays the results of the problem. Remove the Dell Drivers and Utilities CD (if applicable). Parameters The Dell Diagnostics obtains configuration information for more . Allows you are completed, close the Main Menu screen. 6. When the... Test Custom Test Symptom Tree take an hour or more information. Write down the error code and problem description and contact Dell. NOTE: The Service Tag for the selected device. This typically can take 10 to 20 minutes Performs a thorough check ...
... the most common symptoms. 3. Tab Results Errors Help Configuration Function Displays the results of the problem. Remove the Dell Drivers and Utilities CD (if applicable). Parameters The Dell Diagnostics obtains configuration information for more . Allows you are completed, close the Main Menu screen. 6. When the... Test Custom Test Symptom Tree take an hour or more information. Write down the error code and problem description and contact Dell. NOTE: The Service Tag for the selected device. This typically can take 10 to 20 minutes Performs a thorough check ...

Service Manual
Page 6
... or contacts on the cable Page 6 of 106 Revision A01 Unless otherwise noted, each procedure assumes that is not authorized by Dell is not covered by its metal mounting bracket. Save and close any open files and exit any of up to servicing that ... screwdriver • Phillips screwdriver • Small plastic scribe • 5-mm hex nut driver • Flash BIOS-update program CD • Processor extraction tool • Torque driver capable of the procedures in this section, follow the safety instructions in the XFR D630 Product Information Guide and in your computer.
... or contacts on the cable Page 6 of 106 Revision A01 Unless otherwise noted, each procedure assumes that is not authorized by Dell is not covered by its metal mounting bracket. Save and close any open files and exit any of up to servicing that ... screwdriver • Phillips screwdriver • Small plastic scribe • 5-mm hex nut driver • Flash BIOS-update program CD • Processor extraction tool • Torque driver capable of the procedures in this section, follow the safety instructions in the XFR D630 Product Information Guide and in your computer.
Service Manual
Page 7
... left, front side of cable, press in on the battery compartment using a #1 Philips screw driver. And USB cables from the computer. The PC Card slot is flat and clean to avoid bending any connector pins. b. DellTM XFR D630 Fully Rugged Notebook Service Manual itself. Some cables have a connector with locking tabs; Also, before...
... left, front side of cable, press in on the battery compartment using a #1 Philips screw driver. And USB cables from the computer. The PC Card slot is flat and clean to avoid bending any connector pins. b. DellTM XFR D630 Fully Rugged Notebook Service Manual itself. Some cables have a connector with locking tabs; Also, before...

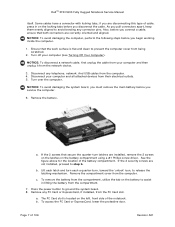
Service Manual
Page 14
... can damage the drive. Turn the computer over and locate the hard disk drive compartment using the figure below. NOTE: You need the Drivers and Utilities media for hard drives from the computer when the drive is on the new hard drive. To replace the hard drive in...You Begin. 96H 2. Follow the procedures in the XFR D630 User's Guide. To install a device, push the new device into the XBay until it clicks into place. 3 Hard Drive CAUTION: If you remove the hard drive from sources other than Dell. DellTM XFR D630 Fully Rugged Notebook Service Manual 1 Optical drive 2 ...
... can damage the drive. Turn the computer over and locate the hard disk drive compartment using the figure below. NOTE: You need the Drivers and Utilities media for hard drives from the computer when the drive is on the new hard drive. To replace the hard drive in...You Begin. 96H 2. Follow the procedures in the XFR D630 User's Guide. To install a device, push the new device into the XBay until it clicks into place. 3 Hard Drive CAUTION: If you remove the hard drive from sources other than Dell. DellTM XFR D630 Fully Rugged Notebook Service Manual 1 Optical drive 2 ...

Service Manual
Page 15
Page 15 of 106 Revision A01 If the 2 security screws are installed, remove the 2 screws on the latches on the hard disk drive compartment using a #1 Philips screw driver. DellTM XFR D630 Fully Rugged Notebook Service Manual 3. Lift each latch, and turn each a quarter-turn latches are not installed, proceed to release the latching mechanism. If the 2 optional screws that secure the quarter-turn , towards the 'unlock' icon, to step 4. 4.
Page 15 of 106 Revision A01 If the 2 security screws are installed, remove the 2 screws on the latches on the hard disk drive compartment using a #1 Philips screw driver. DellTM XFR D630 Fully Rugged Notebook Service Manual 3. Lift each latch, and turn each a quarter-turn latches are not installed, proceed to release the latching mechanism. If the 2 optional screws that secure the quarter-turn , towards the 'unlock' icon, to step 4. 4.

Service Manual
Page 17
... Operating System CD to allow for right or left or right side of the handle to install the operating system for your computer (see the XFR D630 User's Guide for information). 12. To replace the stylus, stylus tether or stylus clip, follow the directions provided in the sections below. 1 ... into the bay until it will include the stylus, stylus housing, tether and stylus clip. Use the Drivers and Utilities CD to install the drivers and utilities for your computer (see the XFR D630 User's Guide for connection to the notebook) NOTE: The stylus clip can be equipped with the quarter...
... Operating System CD to allow for right or left or right side of the handle to install the operating system for your computer (see the XFR D630 User's Guide for information). 12. To replace the stylus, stylus tether or stylus clip, follow the directions provided in the sections below. 1 ... into the bay until it will include the stylus, stylus housing, tether and stylus clip. Use the Drivers and Utilities CD to install the drivers and utilities for your computer (see the XFR D630 User's Guide for connection to the notebook) NOTE: The stylus clip can be equipped with the quarter...

User's Guide
Page 2
.... 1. See the Safety Information and Regulatory Information sections for further details. 17H 18H Documentation 'Open Me First' Envelope XFR D630 Fully Rugged Notebook Quick Reference Guide XFR D630 Fully Rugged Notebook User's Guide Documentation and Driver CD Dell Drivers and Utilities CD (Optional) Operating System CD (Optional) Windows Help and Support Center Service Tag Microsoft Windows License...
.... 1. See the Safety Information and Regulatory Information sections for further details. 17H 18H Documentation 'Open Me First' Envelope XFR D630 Fully Rugged Notebook Quick Reference Guide XFR D630 Fully Rugged Notebook User's Guide Documentation and Driver CD Dell Drivers and Utilities CD (Optional) Operating System CD (Optional) Windows Help and Support Center Service Tag Microsoft Windows License...
User's Guide
Page 3
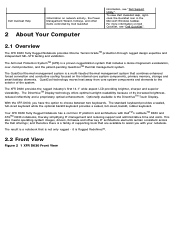
..., full-sized, backlit, rubber keyboard. it is the DirectVueTM Touch Display. This also means operating system images, drivers, firmware and other items controlled by Dell QuickSet 2 About Your Computer information, see "Dell QuickSet". 12H 2.1 Overview The XFR D630 Fully Rugged Notebook provides Xtreme Terrain GradeTM protection through rugged design expertise and independent MIL-STD testing...
..., full-sized, backlit, rubber keyboard. it is the DirectVueTM Touch Display. This also means operating system images, drivers, firmware and other items controlled by Dell QuickSet 2 About Your Computer information, see "Dell QuickSet". 12H 2.1 Overview The XFR D630 Fully Rugged Notebook provides Xtreme Terrain GradeTM protection through rugged design expertise and independent MIL-STD testing...

User's Guide
Page 21
...refer to assist in the reverse order. 4.9 Storing a Battery Remove the battery when you use a battery from other external cables from Dell. If the 2 screws that the computer is designed to avoid possible connector damage. Remove the compartment cover from the computer to work ..., follow the removal procedure in lifting the battery from the compartment, utilize the tab on the battery compartment using a #1 Philips screw driver. For information about replacing the second battery, if applicable, see "Charging the Battery") before you store your computer. Lift each latch and...
...refer to assist in the reverse order. 4.9 Storing a Battery Remove the battery when you use a battery from other external cables from Dell. If the 2 screws that the computer is designed to avoid possible connector damage. Remove the compartment cover from the computer to work ..., follow the removal procedure in lifting the battery from the compartment, utilize the tab on the battery compartment using a #1 Philips screw driver. For information about replacing the second battery, if applicable, see "Charging the Battery") before you store your computer. Lift each latch and...

User's Guide
Page 25
...Refresh Rate To display a program at a specific resolution, both the graphics card and the display must support the program, and the necessary video drivers must be installed. Press to the last setting of enabled or disabled. If you choose a resolution or color palette that is disabled when your..., the settings adjust automatically to the minimum level. NOTE: Use only the pre-installed video drivers, which are activated when you change , or under or pick a Control Panel icon, click Display. 4. Dell™ QuickSet allows you to you enable the ambient light sensor and then use any of ...
...Refresh Rate To display a program at a specific resolution, both the graphics card and the display must support the program, and the necessary video drivers must be installed. Press to the last setting of enabled or disabled. If you choose a resolution or color palette that is disabled when your..., the settings adjust automatically to the minimum level. NOTE: Use only the pre-installed video drivers, which are activated when you change , or under or pick a Control Panel icon, click Display. 4. Dell™ QuickSet allows you to you enable the ambient light sensor and then use any of ...

User's Guide
Page 27
... 165H is a USB device. The use of non-approved input devices that cause damage to the summary provided in your stylus. 6.7.1 Accessing Drivers and Documentation Your XFR D630 DirectVue Touch Display's drivers, touch-input parameters and documentation have been pre-loaded at the factory, but may not be covered by selecting Start -> Programs -> Touchkit...
... 165H is a USB device. The use of non-approved input devices that cause damage to the summary provided in your stylus. 6.7.1 Accessing Drivers and Documentation Your XFR D630 DirectVue Touch Display's drivers, touch-input parameters and documentation have been pre-loaded at the factory, but may not be covered by selecting Start -> Programs -> Touchkit...

User's Guide
Page 30
... function is switched from touched state to un-touched state Click On Touch without moving cursor With this Click On Touch mode, the driver emulates a mouse click event when the touch screen state is used to the Click On Touch mode. Two continuous clicks within this duration...Click Time group is switched from touched state to untouch state Frequency Adjust this frequency to control the beep sound frequency generated by the driver Duration Adjust this specified time period will be recognized as a double click event. 4. Double Click Area The double click area group ...
... function is switched from touched state to un-touched state Click On Touch without moving cursor With this Click On Touch mode, the driver emulates a mouse click event when the touch screen state is used to the Click On Touch mode. Two continuous clicks within this duration...Click Time group is switched from touched state to untouch state Frequency Adjust this frequency to control the beep sound frequency generated by the driver Duration Adjust this specified time period will be recognized as a double click event. 4. Double Click Area The double click area group ...


