Quick Reference Guide
Page 6
... Reference Guide NSS is necessary for your Dell computer. NSS provides critical updates for Dell™ 3.5-inch USB floppy drives, Intel® Pentium® M processors, optical drives, and USB devices. The website may not be as memory, the hard drive, and the operating system available in all... regions. • Customer Care - Certified drivers, patches, and software updates • Notebook System Software (NSS) - www.dell.com | support.dell.com What Are You Looking For? •...
... Reference Guide NSS is necessary for your Dell computer. NSS provides critical updates for Dell™ 3.5-inch USB floppy drives, Intel® Pentium® M processors, optical drives, and USB devices. The website may not be as memory, the hard drive, and the operating system available in all... regions. • Customer Care - Certified drivers, patches, and software updates • Notebook System Software (NSS) - www.dell.com | support.dell.com What Are You Looking For? •...

Quick Reference Guide
Page 19
Bottom View memory module cover battery-bay latch release hard drive battery charge gauge battery modem cover fan docking device slot Quick Reference Guide 19
Bottom View memory module cover battery-bay latch release hard drive battery charge gauge battery modem cover fan docking device slot Quick Reference Guide 19

Quick Reference Guide
Page 21
...; Ensure that the program is designed for an earlier Windows operating system I F YO U A R E U S I N G W I N D O W S X P, R U N T H E P R O G R A M C O M P A T I B I L I T Y W I O N - BACK UP YOUR FILES IMMEDIATELY USE A VIRUS-SCANNING PROGRAM TO CHECK THE HARD DRIVE, FLOPPY DISKS, OR CDS Quick Reference Guide 21 C H E C K T H E S O F T W A R E D O C U M E N T A T I Z A R D - If necessary, uninstall and then reinstall the program.
...; Ensure that the program is designed for an earlier Windows operating system I F YO U A R E U S I N G W I N D O W S X P, R U N T H E P R O G R A M C O M P A T I B I L I T Y W I O N - BACK UP YOUR FILES IMMEDIATELY USE A VIRUS-SCANNING PROGRAM TO CHECK THE HARD DRIVE, FLOPPY DISKS, OR CDS Quick Reference Guide 21 C H E C K T H E S O F T W A R E D O C U M E N T A T I Z A R D - If necessary, uninstall and then reinstall the program.

Quick Reference Guide
Page 22
... from the Drivers and Utilities CD (also known as the ResourceCD). Start the Dell Diagnostics from either your hard drive. Starting the Dell Diagnostics From Your Hard Drive The Dell Diagnostics is related to Use the Dell Diagnostics If you begin . See the documentation that came with your computer, perform the checks in "Solving Problems" and run successfully...
... from the Drivers and Utilities CD (also known as the ResourceCD). Start the Dell Diagnostics from either your hard drive. Starting the Dell Diagnostics From Your Hard Drive The Dell Diagnostics is related to Use the Dell Diagnostics If you begin . See the documentation that came with your computer, perform the checks in "Solving Problems" and run successfully...

Quick Reference Guide
Page 23
... sequence for one time only. 4 Turn on to the Dell Diagnostics. If you wait too long and the operating system logo appears, continue to wait until you see anything on your system board, keyboard, hard drive, and display. • During the assessment, answer any ...key to begin the Dell Diagnostics. to continue to the devices specified in your hard drive. NOTE: If you see the Windows desktop. Starting the Dell Diagnostics From the Drivers and Utilities CD...
... sequence for one time only. 4 Turn on to the Dell Diagnostics. If you wait too long and the operating system logo appears, continue to wait until you see anything on your system board, keyboard, hard drive, and display. • During the assessment, answer any ...key to begin the Dell Diagnostics. to continue to the devices specified in your hard drive. NOTE: If you see the Windows desktop. Starting the Dell Diagnostics From the Drivers and Utilities CD...

Quick Reference Guide
Page 28
S safety instructions, 5 Service Tag, 6 software problems, 21 spyware, 22 Starting the Dell Diagnostics From Your Hard Drive, 22 system views bottom, 19 right side, 17 T troubleshooting Dell Diagnostics, 22 Help and Support Center, 7 U User's Guide, 5 W warranty, 5 Windows XP Help and Support Center, 7 Program Compatibility Wizard, 21 wizards Program Compatibility Wizard, 21 28 Index
S safety instructions, 5 Service Tag, 6 software problems, 21 spyware, 22 Starting the Dell Diagnostics From Your Hard Drive, 22 system views bottom, 19 right side, 17 T troubleshooting Dell Diagnostics, 22 Help and Support Center, 7 U User's Guide, 5 W warranty, 5 Windows XP Help and Support Center, 7 Program Compatibility Wizard, 21 wizards Program Compatibility Wizard, 21 28 Index

Service Manual
Page 1
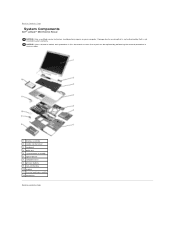
...is subject to either potential damage to avoid the problem. Dell Inc. Dell™ Latitude™ D610 Service Manual Before You Begin System Components Internal Card With Bluetooth® Wireless Technology Hard Drive Center Control Cover Keyboard Memory Module, Modem, and Devices Coin... this document to refer to change without the written permission of Dell Inc.; Bluetooth is used in this text: Dell, the DELL logo, and Latitude are trademarks of Dell Inc. and is a registered trademark owned by Dell Inc. CAUTION: A CAUTION indicates a potential for I/O Connectors ...
...is subject to either potential damage to avoid the problem. Dell Inc. Dell™ Latitude™ D610 Service Manual Before You Begin System Components Internal Card With Bluetooth® Wireless Technology Hard Drive Center Control Cover Keyboard Memory Module, Modem, and Devices Coin... this document to refer to change without the written permission of Dell Inc.; Bluetooth is used in this text: Dell, the DELL logo, and Latitude are trademarks of Dell Inc. and is a registered trademark owned by Dell Inc. CAUTION: A CAUTION indicates a potential for I/O Connectors ...
Service Manual
Page 3
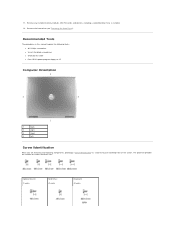
11. The placemat provides the number of the screws. Optional Device: (1 each) Hard Drive: (2 each) Keyboard: (2 each) Recommended Tools The procedures in this manual require the following tools: l #1 Phillips screwdriver l ¼-inch flat-blade screwdriver l Small plastic ...are removing and replacing components, photocopy "Screw Identification" as a tool to lay out and keep track of screws and their sizes. Remove the hard drive (see "Removing the Hard Drive"). Remove any installed memory modules, Mini PCI cards, and devices, including a second battery if one is installed. 12.
11. The placemat provides the number of the screws. Optional Device: (1 each) Hard Drive: (2 each) Keyboard: (2 each) Recommended Tools The procedures in this manual require the following tools: l #1 Phillips screwdriver l ¼-inch flat-blade screwdriver l Small plastic ...are removing and replacing components, photocopy "Screw Identification" as a tool to lay out and keep track of screws and their sizes. Remove the hard drive (see "Removing the Hard Drive"). Remove any installed memory modules, Mini PCI cards, and devices, including a second battery if one is installed. 12.
Service Manual
Page 20
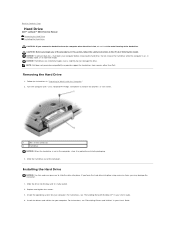
... excessive force, you may damage the connector. 1. Replace and tighten the screws. 3. Back to Contents Page Hard Drive Dell™ Latitude™ D610 Service Manual Removing the Hard Drive Installing the Hard Drive CAUTION: If you remove the hard drive from sources other than Dell. NOTICE: Hard drives are extremely fragile; For instructions, see "Reinstalling Microsoft Windows XP" in "Preparing to Work Inside the...
... excessive force, you may damage the connector. 1. Replace and tighten the screws. 3. Back to Contents Page Hard Drive Dell™ Latitude™ D610 Service Manual Removing the Hard Drive Installing the Hard Drive CAUTION: If you remove the hard drive from sources other than Dell. NOTICE: Hard drives are extremely fragile; For instructions, see "Reinstalling Microsoft Windows XP" in "Preparing to Work Inside the...

Service Manual
Page 21
5. Install the operating system for your computer. 7. Back to Contents Page Install the drivers and utilities for your computer. Press the hard drive cover down until it is fully seated in the bay, and tighten the screws. 6.
5. Install the operating system for your computer. 7. Back to Contents Page Install the drivers and utilities for your computer. Press the hard drive cover down until it is fully seated in the bay, and tighten the screws. 6.
Service Manual
Page 38
... control cover 3 keyboard 4 palm rest 5 system board assembly 6 optical device 7 computer base 8 primary battery 9 coin-cell battery 10 modem 11 thermal cooling assembly 12 hard drive Back to Contents Page Damage due to Contents Page System Components Dell™ Latitude™ D610 Service Manual NOTICE: Only a certified service technician should perform repairs on your warranty.
... control cover 3 keyboard 4 palm rest 5 system board assembly 6 optical device 7 computer base 8 primary battery 9 coin-cell battery 10 modem 11 thermal cooling assembly 12 hard drive Back to Contents Page Damage due to Contents Page System Components Dell™ Latitude™ D610 Service Manual NOTICE: Only a certified service technician should perform repairs on your warranty.
User Guide
Page 4
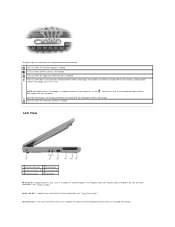
... Mini PCI functionality and Bluetooth® wireless technology are enabled. Left View 1 security cable slot 4 PC Card slot 2 audio connectors (2) 5 smart card slot 3 infrared sensor 6 hard drive PC Card slot - The computer ships with your computer. Supports one smart card. Turns on when wireless devices are enabled. NOTE: Bluetooth wireless technology is...
... Mini PCI functionality and Bluetooth® wireless technology are enabled. Left View 1 security cable slot 4 PC Card slot 2 audio connectors (2) 5 smart card slot 3 infrared sensor 6 hard drive PC Card slot - The computer ships with your computer. Supports one smart card. Turns on when wireless devices are enabled. NOTE: Bluetooth wireless technology is...
User Guide
Page 5
... device. Stores software and data. Lets you attach a commercially available antitheft device to the connector. When you receive your infrared-compatible device. security cable slot - hard drive - Attach a microphone to the computer.
... device. Stores software and data. Lets you attach a commercially available antitheft device to the connector. When you receive your infrared-compatible device. security cable slot - hard drive - Attach a microphone to the computer.

User Guide
Page 8
.... See Using a Battery. Lets you can damage the computer or cause a fire. NOTE: The computer turns on the battery charge. hard drive - Releases the battery. See Using a Battery for additional information. battery charge gauge - docking device slot - Restricting the airflow can use...docking device slot 2 battery-bay latch release 6 fan 3 battery charge gauge 7 modem/coin-cell battery cover 4 battery 8 hard drive memory module cover - See "Adding and Replacing Parts." See "Adding and Replacing Parts." battery - Do not store your docking device for instructions...
.... See Using a Battery. Lets you can damage the computer or cause a fire. NOTE: The computer turns on the battery charge. hard drive - Releases the battery. See Using a Battery for additional information. battery charge gauge - docking device slot - Restricting the airflow can use...docking device slot 2 battery-bay latch release 6 fan 3 battery charge gauge 7 modem/coin-cell battery cover 4 battery 8 hard drive memory module cover - See "Adding and Replacing Parts." See "Adding and Replacing Parts." battery - Do not store your docking device for instructions...
User Guide
Page 13
For information about QuickSet, right-click the icon in Dell QuickSet. If no charge. See Configuring Power Management Settings for more information about accessing QuickSet or the Power Options Properties window. Power Management Modes ...That is, a battery can check: l Battery charge (check by pressing and releasing the status button) l Battery health (check by turning off the display and the hard drive after a low-battery warning. See Specifications for information about the battery operating time. By default, a pop-up window warns you leave the computer unattended for...
For information about QuickSet, right-click the icon in Dell QuickSet. If no charge. See Configuring Power Management Settings for more information about accessing QuickSet or the Power Options Properties window. Power Management Modes ...That is, a battery can check: l Battery charge (check by pressing and releasing the status button) l Battery health (check by turning off the display and the hard drive after a low-battery warning. See Specifications for information about the battery operating time. By default, a pop-up window warns you leave the computer unattended for...
User Guide
Page 14
...Card), or simply restart (reboot) your computer or being in the computer for as long as you like. Charging the Battery NOTE: With Dell™ ExpressCharge™, when the computer is connected to 100 percent in hibernate mode. Charge time is in approximately 2 hours. When the computer...Wizard, double-click the in the Power Options Properties window, click the question mark icon on the title bar and then click on the hard drive and then completely turning off computer, press and hold , and then click Hibernate. To manually enter hibernate mode: l Click Start®...
...Card), or simply restart (reboot) your computer or being in the computer for as long as you like. Charging the Battery NOTE: With Dell™ ExpressCharge™, when the computer is connected to 100 percent in hibernate mode. Charge time is in approximately 2 hours. When the computer...Wizard, double-click the in the Power Options Properties window, click the question mark icon on the title bar and then click on the hard drive and then completely turning off computer, press and hold , and then click Hibernate. To manually enter hibernate mode: l Click Start®...

User Guide
Page 16
... can remove and install devices while the computer is installed, remove it . Back to Contents Page Using the Module Bay Dell™ Latitude™ D610 User's Guide About the Module Bay About the Device Security Screw Removing and Installing Devices While the Computer Is Turned Off ...screw unless you can install devices such as a floppy drive, CD drive, CD-RW drive, DVD drive, CD-RW/DVD drive, DVD+RW, second battery, or second hard drive in the bay, you want to prevent the module from being easily removed. Your Dell™ computer ships with your docking device for instructions....
... can remove and install devices while the computer is installed, remove it . Back to Contents Page Using the Module Bay Dell™ Latitude™ D610 User's Guide About the Module Bay About the Device Security Screw Removing and Installing Devices While the Computer Is Turned Off ...screw unless you can install devices such as a floppy drive, CD drive, CD-RW drive, DVD drive, CD-RW/DVD drive, DVD+RW, second battery, or second hard drive in the bay, you want to prevent the module from being easily removed. Your Dell™ computer ships with your docking device for instructions....

User Guide
Page 28
... computer automatically runs the Pre-boot System Assessment. Back to Contents Page Using the Dell Diagnostics Dell™ Latitude™ D610 User's Guide Dell Diagnostics CAUTION: Before you begin any of your system board, keyboard, hard drive, and display. Shut down the error code(s) and contact Dell before you experience a problem with your docking device for technical assistance...
... computer automatically runs the Pre-boot System Assessment. Back to Contents Page Using the Dell Diagnostics Dell™ Latitude™ D610 User's Guide Dell Diagnostics CAUTION: Before you begin any of your system board, keyboard, hard drive, and display. Shut down the error code(s) and contact Dell before you experience a problem with your docking device for technical assistance...
User Guide
Page 34
... computer to install setup files. The first time that you are installing the driver (for the specific drivers and utilities used by your CD drive directory to begin installing the driver or utility. Click Next. A link or links appear(s) for example, Modems or Infrared devices). 5. Click... the device for which you must first enable the infrared sensor in system setup before you want to detect drivers and utilities used by your hard drive as the ResourceCD). 1. Save and close any open files, and exit any open programs. 2. Click Properties. 3. Click Install from the ...
... computer to install setup files. The first time that you are installing the driver (for the specific drivers and utilities used by your CD drive directory to begin installing the driver or utility. Click Next. A link or links appear(s) for example, Modems or Infrared devices). 5. Click... the device for which you must first enable the infrared sensor in system setup before you want to detect drivers and utilities used by your hard drive as the ResourceCD). 1. Save and close any open files, and exit any open programs. 2. Click Properties. 3. Click Install from the ...

User Guide
Page 36
..., disable any virus protection software installed on your computer before you must use System Restore to return your hard drive. Undoing the Last System Restore NOTICE: Before you to do not reinstall Windows XP unless a Dell technical support representative instructs you undo the last system restore, save and close all open files and...
..., disable any virus protection software installed on your computer before you must use System Restore to return your hard drive. Undoing the Last System Restore NOTICE: Before you to do not reinstall Windows XP unless a Dell technical support representative instructs you undo the last system restore, save and close all open files and...


