
Quick Reference Guide
Page 2
... Dell Inc.; Trademarks used in any proprietary interest in trademarks and trade names other than its own. October 2004 P/N D5037 Rev. Notes, Notices, and Cautions NOTE: A NOTE indicates important information that helps you make better use of your desktop or click the Start... rights reserved. Other trademarks and trade names may not be used in this text: Dell, the DELL logo, and Latitude are not applicable. Abbreviations and Acronyms For a complete list of Dell Inc. Microsoft and Windows are registered trademarks of Microsoft Corporation. A00 Intel and Pentium ...
... Dell Inc.; Trademarks used in any proprietary interest in trademarks and trade names other than its own. October 2004 P/N D5037 Rev. Notes, Notices, and Cautions NOTE: A NOTE indicates important information that helps you make better use of your desktop or click the Start... rights reserved. Other trademarks and trade names may not be used in this text: Dell, the DELL logo, and Latitude are not applicable. Abbreviations and Acronyms For a complete list of Dell Inc. Microsoft and Windows are registered trademarks of Microsoft Corporation. A00 Intel and Pentium ...
Quick Reference Guide
Page 5
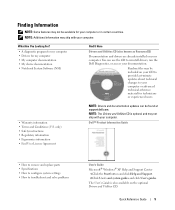
...Reference Guide 5 NOTE: The Drivers and Utilities CD is also available on your computer. Finding Information NOTE: Some features may not be found at support.dell.com. Dell™ Product Information Guide • How to remove and replace parts • Specifications • How to configure system settings • How to ...-minute updates about technical changes to troubleshoot and solve problems User's Guide Microsoft® Windows® XP Help and Support Center 1 Click the Start button and click Help and Support. 2 Click User's and system guides and click User's guides.
...Reference Guide 5 NOTE: The Drivers and Utilities CD is also available on your computer. Finding Information NOTE: Some features may not be found at support.dell.com. Dell™ Product Information Guide • How to remove and replace parts • Specifications • How to configure system settings • How to ...-minute updates about technical changes to troubleshoot and solve problems User's Guide Microsoft® Windows® XP Help and Support Center 1 Click the Start button and click Help and Support. 2 Click User's and system guides and click User's guides.

Quick Reference Guide
Page 7
... your operating system, use the Drivers and Utilities CD to reinstall my operating system Find It Here Windows Help and Support Center 1 Click the Start button and click Help and Support. 2 Type a word or phrase that describes your problem and click the arrow icon. 3 Click the topic...label is optional and may not ship with your computer. NOTE: The color of your CD varies based on your computer. To reinstall your Latitude User's Guide for instructions. Quick Reference Guide 7 See your operating system, use the Operating System CD. Operating System CD The operating system is...
... your operating system, use the Drivers and Utilities CD to reinstall my operating system Find It Here Windows Help and Support Center 1 Click the Start button and click Help and Support. 2 Type a word or phrase that describes your problem and click the arrow icon. 3 Click the topic...label is optional and may not ship with your computer. NOTE: The color of your CD varies based on your computer. To reinstall your Latitude User's Guide for instructions. Quick Reference Guide 7 See your operating system, use the Operating System CD. Operating System CD The operating system is...

Quick Reference Guide
Page 13
... when the battery charge is approximately 90 percent depleted. For more information about low-battery alarms, see your User's Guide. Charge time is connected to start charging if the light flashes alternately green and orange. If necessary, the AC adapter then charges the battery and maintains the battery charge. When you...
... when the battery charge is approximately 90 percent depleted. For more information about low-battery alarms, see your User's Guide. Charge time is connected to start charging if the light flashes alternately green and orange. If necessary, the AC adapter then charges the battery and maintains the battery charge. When you...

Quick Reference Guide
Page 20
...P U T E R O F F - The computer does not start up ENSURE THAT THE AC ADAPTER IS FIRMLY CONNECTED TO THE COMPUTER AND TO THE ELECTRICAL OUTLET The computer stops responding NOTICE: You might lose data if you are unable to 10 seconds until the computer turns off. Then restart your Dell computer. NOTICE: NSS is critical...you begin any of the procedures in this section, follow the safety instructions in the Product Information Guide. NSS is necessary for Dell 3.5-inch USB floppy drives, Intel® Pentium® M processors, optical drives, and USB devices. Install the Notebook System ...
...P U T E R O F F - The computer does not start up ENSURE THAT THE AC ADAPTER IS FIRMLY CONNECTED TO THE COMPUTER AND TO THE ELECTRICAL OUTLET The computer stops responding NOTICE: You might lose data if you are unable to 10 seconds until the computer turns off. Then restart your Dell computer. NOTICE: NSS is critical...you begin any of the procedures in this section, follow the safety instructions in the Product Information Guide. NSS is necessary for Dell 3.5-inch USB floppy drives, Intel® Pentium® M processors, optical drives, and USB devices. Install the Notebook System ...

Quick Reference Guide
Page 21
A program crashes repeatedly NOTE: Software usually includes installation instructions in an environment similar to non-Windows XP operating system environments. 1 Click the Start button, point to 10 seconds until the computer turns off. A program is designed for information. • Ensure that the program is compatible with the program. &#...
A program crashes repeatedly NOTE: Software usually includes installation instructions in an environment similar to non-Windows XP operating system environments. 1 Click the Start button, point to 10 seconds until the computer turns off. A program is designed for information. • Ensure that the program is compatible with the program. &#...

Quick Reference Guide
Page 22
... of the procedures in this section, follow the safety instructions located in your program may require an upgrade) to a software problem. Starting the Dell Diagnostics From Your Hard Drive The Dell Diagnostics is connected to an electrical outlet. 22 Quick Reference Guide For more information, go to the Internet, your computer might be...
... of the procedures in this section, follow the safety instructions located in your program may require an upgrade) to a software problem. Starting the Dell Diagnostics From Your Hard Drive The Dell Diagnostics is connected to an electrical outlet. 22 Quick Reference Guide For more information, go to the Internet, your computer might be...

Quick Reference Guide
Page 23
...to the devices specified in your hard drive. On the next start-up, the computer boots according to wait until you wait too long and the Windows logo appears, continue to start the Dell Diagnostics from the menu that no diagnostics utility partition has been found..., run the Starting the Dell Diagnostics From the Drivers and Utilities CD. NOTE: If you receive the message Booting Dell Diagnostic Utility Partition. to continue to begin the Dell Diagnostics. Starting the Dell Diagnostics From the Drivers and Utilities CD 1 Insert ...
...to the devices specified in your hard drive. On the next start-up, the computer boots according to wait until you wait too long and the Windows logo appears, continue to start the Dell Diagnostics from the menu that no diagnostics utility partition has been found..., run the Starting the Dell Diagnostics From the Drivers and Utilities CD. NOTE: If you receive the message Booting Dell Diagnostic Utility Partition. to continue to begin the Dell Diagnostics. Starting the Dell Diagnostics From the Drivers and Utilities CD 1 Insert ...

Quick Reference Guide
Page 24
...message appears with an error code and a description of devices. Lists the most common symptoms encountered and allows you to start the Dell Diagnostics. 8 Select Run the 32 Bit Dell Diagnostics from the numbered list. Performs a thorough check of the problem. If multiple versions are having. 2 If a... problem is located at the top of the problem you are listed, select the version appropriate for your User's Guide. www.dell.com | support.dell.com 6 Type 1 to start the ResourceCD menu. 7 Type 2 to select a test based on the symptom of each test screen. You can customize the ...
...message appears with an error code and a description of devices. Lists the most common symptoms encountered and allows you to start the Dell Diagnostics. 8 Select Run the 32 Bit Dell Diagnostics from the numbered list. Performs a thorough check of the problem. If multiple versions are having. 2 If a... problem is located at the top of the problem you are listed, select the version appropriate for your User's Guide. www.dell.com | support.dell.com 6 Type 1 to start the ResourceCD menu. 7 Type 2 to select a test based on the symptom of each test screen. You can customize the ...

Quick Reference Guide
Page 27
..., 14 storing, 14 C CD operating system, 7 computer crashes, 20-21 slow performance, 22 stops responding, 20 D Dell support site, 6 Dell Diagnostics, 22 Dell Premier Support website, 5-6 diagnostics Dell, 22 Drivers and Utilities CD, 5 documentation device, 5 online, 6 ResourceCD, 5 System Information Guide, 5 User's Guide...Guide, 7 Operating System CD, 7 P problems blue screen, 21 computer crashes, 20-21 computer does not start up, 20 computer stops responding, 20 Dell Diagnostics, 22 lockups, 20 program crashes, 21 program stops responding, 20 programs and Windows compatibility, 21 slow ...
..., 14 storing, 14 C CD operating system, 7 computer crashes, 20-21 slow performance, 22 stops responding, 20 D Dell support site, 6 Dell Diagnostics, 22 Dell Premier Support website, 5-6 diagnostics Dell, 22 Drivers and Utilities CD, 5 documentation device, 5 online, 6 ResourceCD, 5 System Information Guide, 5 User's Guide...Guide, 7 Operating System CD, 7 P problems blue screen, 21 computer crashes, 20-21 computer does not start up, 20 computer stops responding, 20 Dell Diagnostics, 22 lockups, 20 program crashes, 21 program stops responding, 20 programs and Windows compatibility, 21 slow ...

Quick Reference Guide
Page 28
S safety instructions, 5 Service Tag, 6 software problems, 21 spyware, 22 Starting the Dell Diagnostics From Your Hard Drive, 22 system views bottom, 19 right side, 17 T troubleshooting Dell Diagnostics, 22 Help and Support Center, 7 U User's Guide, 5 W warranty, 5 Windows XP Help and Support Center, 7 Program Compatibility Wizard, 21 wizards Program Compatibility Wizard, 21 28 Index
S safety instructions, 5 Service Tag, 6 software problems, 21 spyware, 22 Starting the Dell Diagnostics From Your Hard Drive, 22 system views bottom, 19 right side, 17 T troubleshooting Dell Diagnostics, 22 Help and Support Center, 7 U User's Guide, 5 W warranty, 5 Windows XP Help and Support Center, 7 Program Compatibility Wizard, 21 wizards Program Compatibility Wizard, 21 28 Index
Service Manual
Page 14
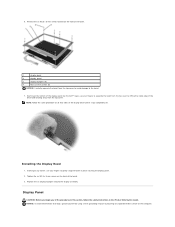
.... 2. Installing the Display Bezel 1. Display Panel CAUTION: Before you begin any corner, use your fingers to gently snap the bezel in the Product Information Guide. Starting at the bottom of the bezel. 3. NOTE: Follow the same procedure on the front of the display panel (by lifting the inside edge of the... (6) 4 M2.5 x 5-mm screws (6) NOTICE: Carefully separate the bezel from the top cover to avoid damage to separate the bezel from the top cover by the Dell™ logo), use your fingers to the bezel. 7. Replace the six display bumpers around the display assembly. 6.
.... 2. Installing the Display Bezel 1. Display Panel CAUTION: Before you begin any corner, use your fingers to gently snap the bezel in the Product Information Guide. Starting at the bottom of the bezel. 3. NOTE: Follow the same procedure on the front of the display panel (by lifting the inside edge of the... (6) 4 M2.5 x 5-mm screws (6) NOTICE: Carefully separate the bezel from the top cover to avoid damage to separate the bezel from the top cover by the Dell™ logo), use your fingers to the bezel. 7. Replace the six display bumpers around the display assembly. 6.
Service Manual
Page 22
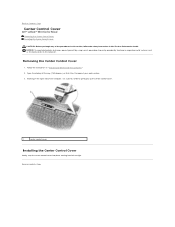
...the procedures in this section, follow the safety instructions in "Preparing to Contents Page Center Control Cover Dell™ Latitude™ D610 Service Manual Removing the Center Control Cover Installing the Center Control Cover CAUTION: Before you begin any... of the computer, use a plastic scribe to gently pry up the center control cover. 1 center control cover Installing the Center Control Cover Gently snap the center control cover into place starting...
...the procedures in this section, follow the safety instructions in "Preparing to Contents Page Center Control Cover Dell™ Latitude™ D610 Service Manual Removing the Center Control Cover Installing the Center Control Cover CAUTION: Before you begin any... of the computer, use a plastic scribe to gently pry up the center control cover. 1 center control cover Installing the Center Control Cover Gently snap the center control cover into place starting...
Service Manual
Page 30
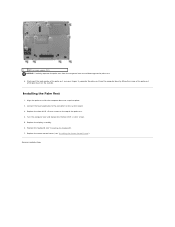
... the computer over and replace the thirteen M2.5 x 8-mm screws. 5. Back to the palm rest. 8. Replace the three M2.5 x 5-mm screws on the system board. 3. Starting at the back center of the palm rest, use your fingers to separate the palm rest from the computer base to avoid damage to Contents...
... the computer over and replace the thirteen M2.5 x 8-mm screws. 5. Back to the palm rest. 8. Replace the three M2.5 x 5-mm screws on the system board. 3. Starting at the back center of the palm rest, use your fingers to separate the palm rest from the computer base to avoid damage to Contents...
Service Manual
Page 36
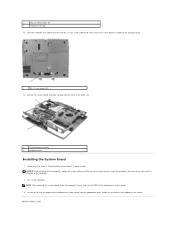
.... Turn on the computer, replace all of the steps in "Removing the System Board" in damage to Contents Page Pull out the system board assembly starting from the front of the replacement system board. 3. NOTICE: Before turning on the computer. NOTE: After replacing the system board, enter the computer Service Tag...
.... Turn on the computer, replace all of the steps in "Removing the System Board" in damage to Contents Page Pull out the system board assembly starting from the front of the replacement system board. 3. NOTICE: Before turning on the computer. NOTE: After replacing the system board, enter the computer Service Tag...
User Guide
Page 13
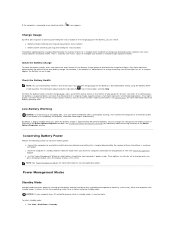
...and more information on the battery as described below and by the number of the total battery charge. To enter standby mode: l Click Start® Shut Down® Stand by pressing and holding the status button on the charge gauge on the battery charge gauge to an electrical... life is largely determined by using the charge gauge, press and hold the status button on . These options can check battery health in Dell QuickSet. Each light represents incremental degradation. l Use the Power Management Wizard to select options to an electrical outlet. When the computer exits standby...
...and more information on the battery as described below and by the number of the total battery charge. To enter standby mode: l Click Start® Shut Down® Stand by pressing and holding the status button on the charge gauge on the battery charge gauge to an electrical... life is largely determined by using the charge gauge, press and hold the status button on . These options can check battery health in Dell QuickSet. Each light represents incremental degradation. l Use the Power Management Wizard to select options to an electrical outlet. When the computer exits standby...
User Guide
Page 14
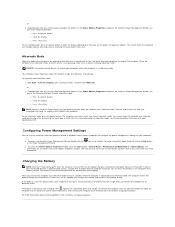
... exit hibernate mode. For more information about QuickSet, click the Help button l To access the Power Options Properties window, click the Start button® Control Panel® Performance and Maintenance® Power Options. You can use the QuickSet Power Management Wizard or Windows Power...and then click on your computer or being used in your computer. Charging the Battery NOTE: With Dell™ ExpressCharge™, when the computer is connected to start charging if the light flashes alternately green and orange. When you need information. For more information ...
... exit hibernate mode. For more information about QuickSet, click the Help button l To access the Power Options Properties window, click the Start button® Control Panel® Performance and Maintenance® Power Options. You can use the QuickSet Power Management Wizard or Windows Power...and then click on your computer or being used in your computer. Charging the Battery NOTE: With Dell™ ExpressCharge™, when the computer is connected to start charging if the light flashes alternately green and orange. When you need information. For more information ...
User Guide
Page 19
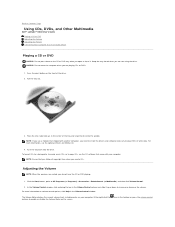
... in the taskbar or press the volume control Click the Start button, point to play DVDs or write data. Keep the tray closed when you are playing CDs or DVDs. 1. Back to Contents Page Using CDs, DVDs, and Other Multimedia Dell™ Latitude™ D610 User's Guide Playing a CD or DVD Adjusting the Volume...
... in the taskbar or press the volume control Click the Start button, point to play DVDs or write data. Keep the tray closed when you are playing CDs or DVDs. 1. Back to Contents Page Using CDs, DVDs, and Other Multimedia Dell™ Latitude™ D610 User's Guide Playing a CD or DVD Adjusting the Volume...

User Guide
Page 20
... your computer to a TV or other audio device are not included with a standard S-video cable (available from Dell. Your computer has an S-video TV-out connector that, together with your country, cables may be purchased at the... DVD playback, adjust the display properties. 1. NOTE: See the diagrams at most consumer electronics stores or from Dell), enables you to connect the computer to help you can use . l Press to 1024 by pressing the following...countries. Under Pick a category, click Appearance and Themes. 3. Click the Start button and click Control Panel. 2.
... your computer to a TV or other audio device are not included with a standard S-video cable (available from Dell. Your computer has an S-video TV-out connector that, together with your country, cables may be purchased at the... DVD playback, adjust the display properties. 1. NOTE: See the diagrams at most consumer electronics stores or from Dell), enables you to connect the computer to help you can use . l Press to 1024 by pressing the following...countries. Under Pick a category, click Appearance and Themes. 3. Click the Start button and click Control Panel. 2.

User Guide
Page 22
.... 8. Insert a DVD into the DVD drive. Plug the two RCA connectors on the other end of the audio cable in to composite video cable. 4. Click Start®Programs®PowerDVD to composite video adapter 2 composite video cable 3 standard audio cable 1. Plug the single-connector end of the audio cable in to...
.... 8. Insert a DVD into the DVD drive. Plug the two RCA connectors on the other end of the audio cable in to composite video cable. 4. Click Start®Programs®PowerDVD to composite video adapter 2 composite video cable 3 standard audio cable 1. Plug the single-connector end of the audio cable in to...


