
Quick Reference Guide
Page 2
...complete list of your desktop or click the Start button, click Help and Support Center, and click User and system guides). Other trademarks and trade names may not be used in this text: Dell, the DELL logo, and Latitude are not applicable. NOTE: Some features may... forbidden. Intel and Pentium are registered trademarks of Dell Inc. October 2004 P/N D5037 Rev. is subject to change without the written permission of Microsoft Corporation. Dell Inc. Microsoft and Windows are registered trademarks of Dell Inc.; disclaims any references in this document to ...
...complete list of your desktop or click the Start button, click Help and Support Center, and click User and system guides). Other trademarks and trade names may not be used in this text: Dell, the DELL logo, and Latitude are not applicable. NOTE: Some features may... forbidden. Intel and Pentium are registered trademarks of Dell Inc. October 2004 P/N D5037 Rev. is subject to change without the written permission of Microsoft Corporation. Dell Inc. Microsoft and Windows are registered trademarks of Dell Inc.; disclaims any references in this document to ...
Quick Reference Guide
Page 5
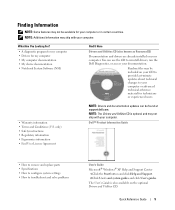
...available on your computer or advanced technical-reference material for technicians or experienced users. • Warranty information • Terms and Conditions (U.S. Dell™ Product Information Guide • How to remove and replace parts • Specifications • How to configure system settings • ...use the CD to troubleshoot and solve problems User's Guide Microsoft® Windows® XP Help and Support Center 1 Click the Start button and click Help and Support. 2 Click User's and system guides and click User's guides. Finding Information NOTE: Some features...
...available on your computer or advanced technical-reference material for technicians or experienced users. • Warranty information • Terms and Conditions (U.S. Dell™ Product Information Guide • How to remove and replace parts • Specifications • How to configure system settings • ...use the CD to troubleshoot and solve problems User's Guide Microsoft® Windows® XP Help and Support Center 1 Click the Start button and click Help and Support. 2 Click User's and system guides and click User's guides. Finding Information NOTE: Some features...

Quick Reference Guide
Page 7
...XP • Documentation for my computer • Documentation for devices (such as a modem) • How to reinstall drivers for instructions. See your Latitude User's Guide for the devices that describes your problem. 4 Follow the instructions on your computer. NOTE: The color of your CD varies based on ...your operating system, use the Drivers and Utilities CD to reinstall my operating system Find It Here Windows Help and Support Center 1 Click the Start button and click Help and Support. 2 Type a word or phrase that describes your problem and click the arrow icon. 3 Click the topic...
...XP • Documentation for my computer • Documentation for devices (such as a modem) • How to reinstall drivers for instructions. See your Latitude User's Guide for the devices that describes your problem. 4 Follow the instructions on your computer. NOTE: The color of your CD varies based on ...your operating system, use the Drivers and Utilities CD to reinstall my operating system Find It Here Windows Help and Support Center 1 Click the Start button and click Help and Support. 2 Type a word or phrase that describes your problem and click the arrow icon. 3 Click the topic...

Quick Reference Guide
Page 13
A pop-up window warns you connect the computer to start charging if the light flashes alternately green and orange. During that minimal battery operating time remains. Charging the Battery NOTE: The AC adapter charges a completely ...
A pop-up window warns you connect the computer to start charging if the light flashes alternately green and orange. During that minimal battery operating time remains. Charging the Battery NOTE: The AC adapter charges a completely ...

Quick Reference Guide
Page 20
... to 10 seconds until the computer turns off. If you are unable to perform an operating system shutdown. The computer does not start up ENSURE THAT THE AC ADAPTER IS FIRMLY CONNECTED TO THE COMPUTER AND TO THE ELECTRICAL OUTLET The computer stops responding NOTICE: You... might lose data if you begin any of your computer. TU R N T H E C O M P U T E R O F F - NOTICE: NSS is a utility that is necessary for Dell 3.5-inch USB floppy drives, Intel® Pentium® M processors, optical drives, and USB devices. NSS is no longer responding. 4 Click End Task. 20 Quick Reference...
... to 10 seconds until the computer turns off. If you are unable to perform an operating system shutdown. The computer does not start up ENSURE THAT THE AC ADAPTER IS FIRMLY CONNECTED TO THE COMPUTER AND TO THE ELECTRICAL OUTLET The computer stops responding NOTICE: You... might lose data if you begin any of your computer. TU R N T H E C O M P U T E R O F F - NOTICE: NSS is a utility that is necessary for Dell 3.5-inch USB floppy drives, Intel® Pentium® M processors, optical drives, and USB devices. NSS is no longer responding. 4 Click End Task. 20 Quick Reference...

Quick Reference Guide
Page 21
... reinstall the program. A program crashes repeatedly NOTE: Software usually includes installation instructions in an environment similar to non-Windows XP operating system environments. 1 Click the Start button, point to All Programs→ Accessories, and then click Program Compatibility Wizard. 2 In the welcome screen, click Next. 3 Follow the instructions on the screen...
... reinstall the program. A program crashes repeatedly NOTE: Software usually includes installation instructions in an environment similar to non-Windows XP operating system environments. 1 Click the Start button, point to All Programs→ Accessories, and then click Program Compatibility Wizard. 2 In the welcome screen, click Next. 3 Follow the instructions on the screen...

Quick Reference Guide
Page 22
... the error condition is recommended that came with spyware. When to scan the computer and remove spyware. Starting the Dell Diagnostics From Your Hard Drive The Dell Diagnostics is connected to an electrical outlet. 22 Quick Reference Guide See the documentation that you print these ... down the computer. 2 If the computer is located on a hidden diagnostic utility partition on Dell computers. It is related to support.dell.com and search for the keyword spyware. Start the Dell Diagnostics from the Drivers and Utilities CD (also known as the ResourceCD). NOTE: If your computer...
... the error condition is recommended that came with spyware. When to scan the computer and remove spyware. Starting the Dell Diagnostics From Your Hard Drive The Dell Diagnostics is connected to an electrical outlet. 22 Quick Reference Guide See the documentation that you print these ... down the computer. 2 If the computer is located on a hidden diagnostic utility partition on Dell computers. It is related to support.dell.com and search for the keyword spyware. Start the Dell Diagnostics from the Drivers and Utilities CD (also known as the ResourceCD). NOTE: If your computer...

Quick Reference Guide
Page 23
..., press immediately. NOTE: The next steps change the boot sequence for one time only. Quick Reference Guide 23 to begin the Dell Diagnostics. Starting the Dell Diagnostics From the Drivers and Utilities CD 1 Insert the Drivers and Utilities CD. 2 Shut down your computer and try again. ...on the computer. Press any key to continue. 6 Press any questions that no diagnostics utility partition has been found, run the Starting the Dell Diagnostics From the Drivers and Utilities CD. Then shut down and restart the computer. The computer automatically runs the Pre-boot System ...
..., press immediately. NOTE: The next steps change the boot sequence for one time only. Quick Reference Guide 23 to begin the Dell Diagnostics. Starting the Dell Diagnostics From the Drivers and Utilities CD 1 Insert the Drivers and Utilities CD. 2 Shut down your computer and try again. ...on the computer. Press any key to continue. 6 Press any questions that no diagnostics utility partition has been found, run the Starting the Dell Diagnostics From the Drivers and Utilities CD. Then shut down and restart the computer. The computer automatically runs the Pre-boot System ...

Quick Reference Guide
Page 24
... test screen. Run Express Test first to start the Dell Diagnostics. 8 Select Run the 32 Bit Dell Diagnostics from the numbered list. You can customize the tests you are listed, select the version appropriate for your computer. 9 When the Dell Diagnostics Main Menu appears, select the test...instructions on the symptom of the problem you want to run . If you contact Dell, technical support will ask for your Service Tag. 24 Quick Reference Guide www.dell.com | support.dell.com 6 Type 1 to start the ResourceCD menu. 7 Type 2 to increase the possibility of tracing the problem ...
... test screen. Run Express Test first to start the Dell Diagnostics. 8 Select Run the 32 Bit Dell Diagnostics from the numbered list. You can customize the tests you are listed, select the version appropriate for your computer. 9 When the Dell Diagnostics Main Menu appears, select the test...instructions on the symptom of the problem you want to run . If you contact Dell, technical support will ask for your Service Tag. 24 Quick Reference Guide www.dell.com | support.dell.com 6 Type 1 to start the ResourceCD menu. 7 Type 2 to increase the possibility of tracing the problem ...

Quick Reference Guide
Page 27
..., 14 storing, 14 C CD operating system, 7 computer crashes, 20-21 slow performance, 22 stops responding, 20 D Dell support site, 6 Dell Diagnostics, 22 Dell Premier Support website, 5-6 diagnostics Dell, 22 Drivers and Utilities CD, 5 documentation device, 5 online, 6 ResourceCD, 5 System Information Guide, 5 User's Guide...Guide, 7 Operating System CD, 7 P problems blue screen, 21 computer crashes, 20-21 computer does not start up, 20 computer stops responding, 20 Dell Diagnostics, 22 lockups, 20 program crashes, 21 program stops responding, 20 programs and Windows compatibility, 21 slow ...
..., 14 storing, 14 C CD operating system, 7 computer crashes, 20-21 slow performance, 22 stops responding, 20 D Dell support site, 6 Dell Diagnostics, 22 Dell Premier Support website, 5-6 diagnostics Dell, 22 Drivers and Utilities CD, 5 documentation device, 5 online, 6 ResourceCD, 5 System Information Guide, 5 User's Guide...Guide, 7 Operating System CD, 7 P problems blue screen, 21 computer crashes, 20-21 computer does not start up, 20 computer stops responding, 20 Dell Diagnostics, 22 lockups, 20 program crashes, 21 program stops responding, 20 programs and Windows compatibility, 21 slow ...

Quick Reference Guide
Page 28
S safety instructions, 5 Service Tag, 6 software problems, 21 spyware, 22 Starting the Dell Diagnostics From Your Hard Drive, 22 system views bottom, 19 right side, 17 T troubleshooting Dell Diagnostics, 22 Help and Support Center, 7 U User's Guide, 5 W warranty, 5 Windows XP Help and Support Center, 7 Program Compatibility Wizard, 21 wizards Program Compatibility Wizard, 21 28 Index
S safety instructions, 5 Service Tag, 6 software problems, 21 spyware, 22 Starting the Dell Diagnostics From Your Hard Drive, 22 system views bottom, 19 right side, 17 T troubleshooting Dell Diagnostics, 22 Help and Support Center, 7 U User's Guide, 5 W warranty, 5 Windows XP Help and Support Center, 7 Program Compatibility Wizard, 21 wizards Program Compatibility Wizard, 21 28 Index
Service Manual
Page 14
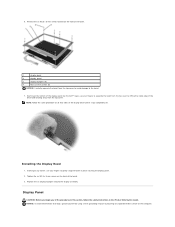
... of the procedures in this section, follow the safety instructions in place securing the display panel. 2. Starting at the bottom of the display panel (by the Dell™ logo), use your fingers to separate the bezel from the top cover by touching an unpainted metal surface on all four sides of the...
... of the procedures in this section, follow the safety instructions in place securing the display panel. 2. Starting at the bottom of the display panel (by the Dell™ logo), use your fingers to separate the bezel from the top cover by touching an unpainted metal surface on all four sides of the...
Service Manual
Page 22
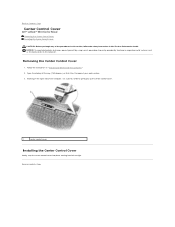
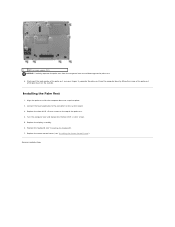
Open the display all the way (180 degrees) so that it lies flat against your work surface. 3. Starting on the computer. Back to Contents Page Removing the Center Control Cover 1. Follow the instructions in the Product Information Guide. NOTICE: To ... procedures in this section, follow the safety instructions in "Preparing to Work Inside the Computer." 2. Back to Contents Page Center Control Cover Dell™ Latitude™ D610 Service Manual Removing the Center Control Cover Installing the Center Control Cover CAUTION: Before you begin any of the computer, use a plastic scribe...
Open the display all the way (180 degrees) so that it lies flat against your work surface. 3. Starting on the computer. Back to Contents Page Removing the Center Control Cover 1. Follow the instructions in the Product Information Guide. NOTICE: To ... procedures in this section, follow the safety instructions in "Preparing to Work Inside the Computer." 2. Back to Contents Page Center Control Cover Dell™ Latitude™ D610 Service Manual Removing the Center Control Cover Installing the Center Control Cover CAUTION: Before you begin any of the computer, use a plastic scribe...
Service Manual
Page 30
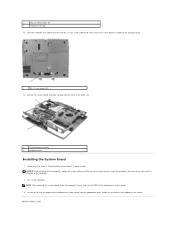
... thirteen M2.5 x 8-mm screws. 5. Back to the connector on the system board. 3. Replace the display assembly. 6. Replace the center control cover (see "Installing the Keyboard"). 7. Starting at the back center of the palm rest, use your fingers to separate the palm rest from the computer base to avoid damage to the...
... thirteen M2.5 x 8-mm screws. 5. Back to the connector on the system board. 3. Replace the display assembly. 6. Replace the center control cover (see "Installing the Keyboard"). 7. Starting at the back center of the palm rest, use your fingers to separate the palm rest from the computer base to avoid damage to the...
Service Manual
Page 36
... do so may result in reverse order. Insert the CD that secure the system board assembly to the computer. 2. Pull out the system board assembly starting from the front of the replacement system board. 3. Failure to Contents Page
... do so may result in reverse order. Insert the CD that secure the system board assembly to the computer. 2. Pull out the system board assembly starting from the front of the replacement system board. 3. Failure to Contents Page
User Guide
Page 13
...cycles, batteries lose some charge capacity-or battery health. See Configuring Power Management Settings for more information about QuickSet, right-click the icon in Dell QuickSet. l Place the computer in standby mode or hibernate mode when you leave the computer unattended for the battery alarms in QuickSet or the... battery charge. Low-Battery Warning NOTICE: To avoid losing or corrupting data, save your computer's power usage. To enter standby mode: l Click Start® Shut Down® Stand by turning off the display and the hard drive after a low-battery warning.
...cycles, batteries lose some charge capacity-or battery health. See Configuring Power Management Settings for more information about QuickSet, right-click the icon in Dell QuickSet. l Place the computer in standby mode or hibernate mode when you leave the computer unattended for the battery alarms in QuickSet or the... battery charge. Low-Battery Warning NOTICE: To avoid losing or corrupting data, save your computer's power usage. To enter standby mode: l Click Start® Shut Down® Stand by turning off the display and the hard drive after a low-battery warning.
User Guide
Page 14
...Power Options Properties to room temperature. NOTE: Some PC Cards or ExpressCards may not charge when you like. Charging the Battery NOTE: With Dell™ ExpressCharge™, when the computer is longer with a battery, see Installing a PC Card), or simply restart (reboot) your operating...a short time to continue charging the battery. Charge time is turned off, the AC adapter charges a completely discharged battery to start charging if the light flashes alternately green and orange. For more information about resolving problems with the computer turned on the area ...
...Power Options Properties to room temperature. NOTE: Some PC Cards or ExpressCards may not charge when you like. Charging the Battery NOTE: With Dell™ ExpressCharge™, when the computer is longer with a battery, see Installing a PC Card), or simply restart (reboot) your operating...a short time to continue charging the battery. Charge time is turned off, the AC adapter charges a completely discharged battery to start charging if the light flashes alternately green and orange. For more information about resolving problems with the computer turned on the area ...
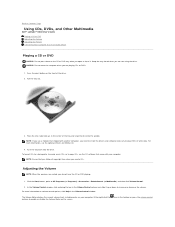
User Guide
Page 19
...are playing CDs or DVDs. 1. icon in the center of the drive. 2. Back to Contents Page Using CDs, DVDs, and Other Multimedia Dell™ Latitude™ D610 User's Guide Playing a CD or DVD Adjusting the Volume Adjusting the Picture Connecting Your Computer to copy CDs, see the optional Drivers and Utilities...the taskbar or press the volume control For more information on the front of the tray and snap the disc onto the spindle. Click the Start button, point to play DVDs or write data. Press the eject button on volume control options, click Help in the Volume Control window....
...are playing CDs or DVDs. 1. icon in the center of the drive. 2. Back to Contents Page Using CDs, DVDs, and Other Multimedia Dell™ Latitude™ D610 User's Guide Playing a CD or DVD Adjusting the Volume Adjusting the Picture Connecting Your Computer to copy CDs, see the optional Drivers and Utilities...the taskbar or press the volume control For more information on the front of the tray and snap the disc onto the spindle. Click the Start button, point to play DVDs or write data. Press the eject button on volume control options, click Help in the Volume Control window....

User Guide
Page 20
...Adjusting the Picture If an error message notifies you that the current resolution and color depth are not available in certain countries. Click the Start button and click Control Panel. 2. In the Display Properties window, click and drag the bar in the taskbar and click Help. Your...computer to 1024 by pressing the following combinations. Click OK. It is recommended that , together with a standard S-video cable (available from Dell. If available in one of connector is available on your computer and are using too much memory and preventing DVD playback, adjust the display ...
...Adjusting the Picture If an error message notifies you that the current resolution and color depth are not available in certain countries. Click the Start button and click Control Panel. 2. In the Display Properties window, click and drag the bar in the taskbar and click Help. Your...computer to 1024 by pressing the following combinations. Click OK. It is recommended that , together with a standard S-video cable (available from Dell. If available in one of connector is available on your computer and are using too much memory and preventing DVD playback, adjust the display ...

User Guide
Page 22
... your TV or other end of the composite video cable in to ensure that you connected (if applicable), and then turn on the computer. 6. Click Start®Programs®PowerDVD to composite video adapter 2 composite video cable 3 standard audio cable 1. Turn on the TV, turn on the TV. 5. See Enabling the...
... your TV or other end of the composite video cable in to ensure that you connected (if applicable), and then turn on the computer. 6. Click Start®Programs®PowerDVD to composite video adapter 2 composite video cable 3 standard audio cable 1. Turn on the TV, turn on the TV. 5. See Enabling the...


