
Quick Reference Guide
Page 3
Contents Finding Information 5 Setting Up Your Computer 8 Battery Performance 9 Checking the Battery Charge 11 Dell™ QuickSet Battery Meter 11 Microsoft® Windows® Power Meter 11 Charge Gauge 12 Health Gauge 12 Low-Battery Warning 13 Charging the Battery 13 Removing a Battery 14 Installing a Battery 14 Storing a Battery 14 About Your Computer 15 Front View 15 Left View 16 Right View 17 Back View 18 Bottom View 19 Solving Problems 20 Notebook System Software 20 Lockups and Software Problems 20 Running the Dell Diagnostics 22 Index 27 Contents 3
Contents Finding Information 5 Setting Up Your Computer 8 Battery Performance 9 Checking the Battery Charge 11 Dell™ QuickSet Battery Meter 11 Microsoft® Windows® Power Meter 11 Charge Gauge 12 Health Gauge 12 Low-Battery Warning 13 Charging the Battery 13 Removing a Battery 14 Installing a Battery 14 Storing a Battery 14 About Your Computer 15 Front View 15 Left View 16 Right View 17 Back View 18 Bottom View 19 Solving Problems 20 Notebook System Software 20 Lockups and Software Problems 20 Running the Dell Diagnostics 22 Index 27 Contents 3

Quick Reference Guide
Page 8
..., which you have ordered. 3 Connect the AC adapter to the AC adapter connector on the computer and to complete the setup of your computer. www.dell.com | support.dell.com Setting Up Your Computer CAUTION: Before you begin any software or additional hardware (such as PC Cards, drives, or...
..., which you have ordered. 3 Connect the AC adapter to the AC adapter connector on the computer and to complete the setup of your computer. www.dell.com | support.dell.com Setting Up Your Computer CAUTION: Before you begin any software or additional hardware (such as PC Cards, drives, or...

Quick Reference Guide
Page 9
... 1-year period of the procedures in this section, follow the safety instructions located in the battery bay. For optimal computer performance and to help preserve BIOS settings, operate your Dell™ portable computer with your computer, see the Product Information Guide or separate paper warranty... not connected to an electrical outlet. For more information about the Dell warranty for your computer. NOTE: Battery operating time (the time the battery can hold a charge) decreases over time. Depending on how often the battery is used and the conditions under which it is used, you ...
... 1-year period of the procedures in this section, follow the safety instructions located in the battery bay. For optimal computer performance and to help preserve BIOS settings, operate your Dell™ portable computer with your computer, see the Product Information Guide or separate paper warranty... not connected to an electrical outlet. For more information about the Dell warranty for your computer. NOTE: Battery operating time (the time the battery can hold a charge) decreases over time. Depending on how often the battery is used and the conditions under which it is used, you ...

Quick Reference Guide
Page 10
...settings, 3D screen savers, or other computers with a compatible battery purchased from children. When your battery no longer holds a charge, call your computer. Keep the battery away from Dell. CAUTION: Misuse of the battery may leak and cause personal injury or equipment damage. 10... Quick Reference Guide Handle damaged or leaking batteries with extreme care. www.dell.com | support.dell.com Battery operating time varies depending on disposing of batteries with your Dell computer. You can install an optional second battery in the module bay to temperatures above 65°...
...settings, 3D screen savers, or other computers with a compatible battery purchased from children. When your battery no longer holds a charge, call your computer. Keep the battery away from Dell. CAUTION: Misuse of the battery may leak and cause personal injury or equipment damage. 10... Quick Reference Guide Handle damaged or leaking batteries with extreme care. www.dell.com | support.dell.com Battery operating time varies depending on disposing of batteries with your Dell computer. You can install an optional second battery in the module bay to temperatures above 65°...

Quick Reference Guide
Page 11
... window displays status, charge level, and charge completion time for the battery in a docking device does not power the docking device or computer. Dell™ QuickSet Battery Meter If Dell QuickSet is connected to a docking device (docked), the Battery Meter window includes a Dock Battery tab, which displays the charge level and current status of the docking...
... window displays status, charge level, and charge completion time for the battery in a docking device does not power the docking device or computer. Dell™ QuickSet Battery Meter If Dell QuickSet is connected to a docking device (docked), the Battery Meter window includes a Dock Battery tab, which displays the charge level and current status of the docking...

Quick Reference Guide
Page 12
If no lights appear, the battery has no lights appear, the battery is charged. Each light represents incremental degradation. See your User's Guide for at least 3 seconds. www.dell.com | support.dell.com Charge Gauge Before you should consider replacing the battery. If five lights appear,... less than 80 percent of its charge remaining, four of the charge capacity remains, and you insert a battery, press the status button on the battery charge gauge...
If no lights appear, the battery has no lights appear, the battery is charged. Each light represents incremental degradation. See your User's Guide for at least 3 seconds. www.dell.com | support.dell.com Charge Gauge Before you should consider replacing the battery. If five lights appear,... less than 80 percent of its charge remaining, four of the charge capacity remains, and you insert a battery, press the status button on the battery charge gauge...

Quick Reference Guide
Page 13
.... The computer beeps once, indicating that time, the speaker beeps periodically. If necessary, the AC adapter then charges the battery and maintains the battery charge. Then connect the computer to an electrical outlet to room temperature. Then connect the computer to an electrical outlet, ...the computer checks the battery charge and temperature. You can leave the battery in a hot environment, the battery may not charge when you connect the computer to start charging if the light flashes alternately ...
.... The computer beeps once, indicating that time, the speaker beeps periodically. If necessary, the AC adapter then charges the battery and maintains the battery charge. Then connect the computer to an electrical outlet to room temperature. Then connect the computer to an electrical outlet, ...the computer checks the battery charge and temperature. You can leave the battery in a hot environment, the battery may not charge when you connect the computer to start charging if the light flashes alternately ...

Quick Reference Guide
Page 14
... bottom of time. NOTICE: If you choose to replace the battery with your User's Guide. www.dell.com | support.dell.com Removing a Battery CAUTION: Before performing these procedures, disconnect the modem from the bay. A battery discharges during prolonged storage. For information about installing the second battery, see your docking device for an extended period of the...
... bottom of time. NOTICE: If you choose to replace the battery with your User's Guide. www.dell.com | support.dell.com Removing a Battery CAUTION: Before performing these procedures, disconnect the modem from the bay. A battery discharges during prolonged storage. For information about installing the second battery, see your docking device for an extended period of the...

Quick Reference Guide
Page 19
Bottom View memory module cover battery-bay latch release hard drive battery charge gauge battery modem cover fan docking device slot Quick Reference Guide 19
Bottom View memory module cover battery-bay latch release hard drive battery charge gauge battery modem cover fan docking device slot Quick Reference Guide 19

Quick Reference Guide
Page 27
...gauge, 12 installing, 14 low-battery warning, 13 performance, 9 power meter, 11 removing, 14 storing, 14 C CD operating system, 7 computer crashes, 20-21 slow performance, 22 stops responding, 20 D Dell support site, 6 Dell Diagnostics, 22 Dell Premier Support website, 5-6 diagnostics Dell, 22 Drivers and Utilities CD, ... CD, 7 P problems blue screen, 21 computer crashes, 20-21 computer does not start up, 20 computer stops responding, 20 Dell Diagnostics, 22 lockups, 20 program crashes, 21 program stops responding, 20 programs and Windows compatibility, 21 slow computer performance, 22 software...
...gauge, 12 installing, 14 low-battery warning, 13 performance, 9 power meter, 11 removing, 14 storing, 14 C CD operating system, 7 computer crashes, 20-21 slow performance, 22 stops responding, 20 D Dell support site, 6 Dell Diagnostics, 22 Dell Premier Support website, 5-6 diagnostics Dell, 22 Drivers and Utilities CD, ... CD, 7 P problems blue screen, 21 computer crashes, 20-21 computer does not start up, 20 computer stops responding, 20 Dell Diagnostics, 22 lockups, 20 program crashes, 21 program stops responding, 20 programs and Windows compatibility, 21 slow computer performance, 22 software...

Service Manual
Page 1
... or their products. is used in this document is subject to change without the written permission of Intel Corporation; Dell™ Latitude™ D610 Service Manual Before You Begin System Components Internal Card With Bluetooth® Wireless Technology Hard Drive Center Control Cover Keyboard... Memory Module, Modem, and Devices Coin-Cell Battery Mini PCI Card Display Assembly and Display Latch Palm Rest Fan ...
... or their products. is used in this document is subject to change without the written permission of Intel Corporation; Dell™ Latitude™ D610 Service Manual Before You Begin System Components Internal Card With Bluetooth® Wireless Technology Hard Drive Center Control Cover Keyboard... Memory Module, Modem, and Devices Coin-Cell Battery Mini PCI Card Display Assembly and Display Latch Palm Rest Fan ...
Service Manual
Page 2
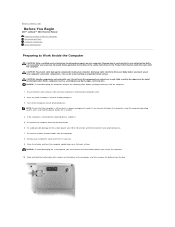
... scratching the computer cover. 2. Disconnect all attached devices. NOTICE: To avoid damaging the system board, you must remove the main battery before you cannot shut down on a card. CAUTION: Handle components and cards with the computer. Ensure that the computer is connected... from the computer. 8. Turn off and not in a power management mode. Back to Contents Page Before You Begin Dell™ Latitude™ D610 Service Manual Preparing to Work Inside the Computer Recommended Tools Computer Orientation Screw Identification Preparing to 20 seconds and then disconnect any...
... scratching the computer cover. 2. Disconnect all attached devices. NOTICE: To avoid damaging the system board, you must remove the main battery before you cannot shut down on a card. CAUTION: Handle components and cards with the computer. Ensure that the computer is connected... from the computer. 8. Turn off and not in a power management mode. Back to Contents Page Before You Begin Dell™ Latitude™ D610 Service Manual Preparing to Work Inside the Computer Recommended Tools Computer Orientation Screw Identification Preparing to 20 seconds and then disconnect any...
Service Manual
Page 3
... screws and their sizes. Optional Device: (1 each) Hard Drive: (2 each) Keyboard: (2 each) 11. Remove any installed memory modules, Mini PCI cards, and devices, including a second battery if one is installed. 12.
... screws and their sizes. Optional Device: (1 each) Hard Drive: (2 each) Keyboard: (2 each) 11. Remove any installed memory modules, Mini PCI cards, and devices, including a second battery if one is installed. 12.
Service Manual
Page 5
...update program CD to flash the BIOS, set up the computer to enter the system setup program. 4. Follow the instructions that the main battery is installed properly. When the flash update is plugged in and that appear on the computer. Press during POST to boot from the ...drive and restart the computer. Back to boot and updates the new BIOS. The computer continues to Contents Page Flashing the BIOS Dell™ Latitude™ D610 Service Manual 1. Press , select Save changes and reboot, and press to save configuration changes. 6. Remove the flash BIOS update program ...
...update program CD to flash the BIOS, set up the computer to enter the system setup program. 4. Follow the instructions that the main battery is installed properly. When the flash update is plugged in and that appear on the computer. Press during POST to boot from the ...drive and restart the computer. Back to boot and updates the new BIOS. The computer continues to Contents Page Flashing the BIOS Dell™ Latitude™ D610 Service Manual 1. Press , select Save changes and reboot, and press to save configuration changes. 6. Remove the flash BIOS update program ...
Service Manual
Page 6
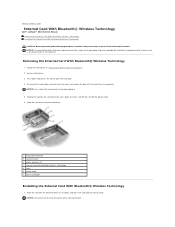
... the card cable connector from the computer. Follow the instructions in "Preparing to Contents Page Internal Card With Bluetooth® Wireless Technology Dell™ Latitude™ D610 Service Manual Removing the Internal Card With Bluetooth® Wireless Technology Installing the Internal Card With Bluetooth® Wireless Technology CAUTION: Before ...by using a wrist grounding strap or by the card connector, press down the lever gently to avoid damaging it. 5. Remove the battery. 3. Press down and pull on the computer. NOTICE: Be careful not to open the card door. 4.
... the card cable connector from the computer. Follow the instructions in "Preparing to Contents Page Internal Card With Bluetooth® Wireless Technology Dell™ Latitude™ D610 Service Manual Removing the Internal Card With Bluetooth® Wireless Technology Installing the Internal Card With Bluetooth® Wireless Technology CAUTION: Before ...by using a wrist grounding strap or by the card connector, press down the lever gently to avoid damaging it. 5. Remove the battery. 3. Press down and pull on the computer. NOTICE: Be careful not to open the card door. 4.

Service Manual
Page 7
2. Back to the card cable connector, slide the door with the card into the card compartment, and gently press the door into position. 3. Connect the card to Contents Page Replace the battery.
2. Back to the card cable connector, slide the door with the card into the card compartment, and gently press the door into position. 3. Connect the card to Contents Page Replace the battery.
Service Manual
Page 8
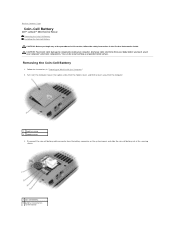
... the captive screw from the modem cover, and lift the cover away from the battery connector on system board Back to Contents Page Coin-Cell Battery Dell™ Latitude™ D610 Service Manual Removing the Coin-Cell Battery Installing the Coin-Cell Battery CAUTION: Before you touch any of the procedures in this section, follow the safety...
... the captive screw from the modem cover, and lift the cover away from the battery connector on system board Back to Contents Page Coin-Cell Battery Dell™ Latitude™ D610 Service Manual Removing the Coin-Cell Battery Installing the Coin-Cell Battery CAUTION: Before you touch any of the procedures in this section, follow the safety...

Service Manual
Page 9
Slide the battery into the securing sleeve. 3. Replace the modem cover. Back to the battery connector on the system board. 2. 3 coin-cell battery cable connector 4 securing sleeve Installing the Coin-Cell Battery 1. Connect the coin-cell battery cable connector to Contents Page
Slide the battery into the securing sleeve. 3. Replace the modem cover. Back to the battery connector on the system board. 2. 3 coin-cell battery cable connector 4 securing sleeve Installing the Coin-Cell Battery 1. Connect the coin-cell battery cable connector to Contents Page

Service Manual
Page 16
... connector 10. Remove the M2.5 x 5-mm screw that secures the display latch to the inverter connector. 3. Display Latch NOTICE: Disconnect the computer and any installed batteries. 1 display panel 2 top cover 3 M2 x 3-mm screws (4) 8. Installing the Display Panel 1. Replace the display panel inside the top cover. 4. Remove the display assembly (see "Removing...
... connector 10. Remove the M2.5 x 5-mm screw that secures the display latch to the inverter connector. 3. Display Latch NOTICE: Disconnect the computer and any installed batteries. 1 display panel 2 top cover 3 M2 x 3-mm screws (4) 8. Installing the Display Panel 1. Replace the display panel inside the top cover. 4. Remove the display assembly (see "Removing...
Service Manual
Page 35
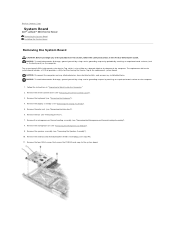
... assembly (see "Removing the Microprocessor Thermal-Cooling Assembly"). 8. Back to Contents Page System Board Dell™ Latitude™ D610 Service Manual Removing the System Board Installing the System Board Removing the System Board CAUTION: Before you begin any installed batteries. The system board's BIOS chip contains the Service Tag, which is also visible on...
... assembly (see "Removing the Microprocessor Thermal-Cooling Assembly"). 8. Back to Contents Page System Board Dell™ Latitude™ D610 Service Manual Removing the System Board Installing the System Board Removing the System Board CAUTION: Before you begin any installed batteries. The system board's BIOS chip contains the Service Tag, which is also visible on...


