
Quick Reference Guide
Page 10
... a lithium-ion battery. Keep the battery away from Dell. Handle damaged or leaking batteries with a compatible battery purchased from children. Do not puncture, incinerate, disassemble, or expose the battery to significantly increase operating time. CAUTION: Do not dispose of fire or explosion. You can check the battery charge before you connect your User's Guide. Replace the battery only with...
... a lithium-ion battery. Keep the battery away from Dell. Handle damaged or leaking batteries with a compatible battery purchased from children. Do not puncture, incinerate, disassemble, or expose the battery to significantly increase operating time. CAUTION: Do not dispose of fire or explosion. You can check the battery charge before you connect your User's Guide. Replace the battery only with...

Quick Reference Guide
Page 12
...dell.com | support.dell.com Charge Gauge Before you should consider replacing the battery. If no charge. If five lights appear, less than 80 percent of the charge capacity remains, and you insert a battery, press the status button on the battery charge gauge to illuminate the charge-level lights. Health Gauge The battery...of charge and discharge cycles, batteries lose some charge capacity, or battery health. See your User's Guide for at least 3 seconds. To check the battery health, press and hold the status button on . For example, if the battery has 80 percent of its ...
...dell.com | support.dell.com Charge Gauge Before you should consider replacing the battery. If no charge. If five lights appear, less than 80 percent of the charge capacity remains, and you insert a battery, press the status button on the battery charge gauge to illuminate the charge-level lights. Health Gauge The battery...of charge and discharge cycles, batteries lose some charge capacity, or battery health. See your User's Guide for at least 3 seconds. To check the battery health, press and hold the status button on . For example, if the battery has 80 percent of its ...

Quick Reference Guide
Page 14
...computer is connected to complete the battery replacement before you store your User's Guide. Installing a Battery Slide the battery into the bay until the latch release clicks. A battery discharges during prolonged storage. NOTICE: If you choose to replace the battery with your User's Guide. After...Guide For information about removing the second battery, see your computer for instructions. 3 Slide and hold the battery-bay (or module-bay) latch release on the bottom of time. www.dell.com | support.dell.com Removing a Battery CAUTION: Before performing these procedures, disconnect...
...computer is connected to complete the battery replacement before you store your User's Guide. Installing a Battery Slide the battery into the bay until the latch release clicks. A battery discharges during prolonged storage. NOTICE: If you choose to replace the battery with your User's Guide. After...Guide For information about removing the second battery, see your computer for instructions. 3 Slide and hold the battery-bay (or module-bay) latch release on the bottom of time. www.dell.com | support.dell.com Removing a Battery CAUTION: Before performing these procedures, disconnect...
Service Manual
Page 3
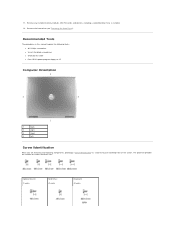
... Optional Device: (1 each) Hard Drive: (2 each) Keyboard: (2 each) Remove any installed memory modules, Mini PCI cards, and devices, including a second battery if one is installed. 12. Remove the hard drive (see "Removing the Hard Drive"). Recommended Tools The procedures in this manual require the following tools... l Flash BIOS update program floppy or CD Computer Orientation 1 back 2 right 3 front 4 left Screw Identification When you are removing and replacing components, photocopy "Screw Identification" as a tool to lay out and keep track of screws and their sizes. 11.
... Optional Device: (1 each) Hard Drive: (2 each) Keyboard: (2 each) Remove any installed memory modules, Mini PCI cards, and devices, including a second battery if one is installed. 12. Remove the hard drive (see "Removing the Hard Drive"). Recommended Tools The procedures in this manual require the following tools... l Flash BIOS update program floppy or CD Computer Orientation 1 back 2 right 3 front 4 left Screw Identification When you are removing and replacing components, photocopy "Screw Identification" as a tool to lay out and keep track of screws and their sizes. 11.

Service Manual
Page 7
Back to the card cable connector, slide the door with the card into the card compartment, and gently press the door into position. 3. Replace the battery. 2. Connect the card to Contents Page
Back to the card cable connector, slide the door with the card into the card compartment, and gently press the door into position. 3. Replace the battery. 2. Connect the card to Contents Page

Service Manual
Page 9
Back to the battery connector on the system board. 2. 3 coin-cell battery cable connector 4 securing sleeve Installing the Coin-Cell Battery 1. Connect the coin-cell battery cable connector to Contents Page Slide the battery into the securing sleeve. 3. Replace the modem cover.
Back to the battery connector on the system board. 2. 3 coin-cell battery cable connector 4 securing sleeve Installing the Coin-Cell Battery 1. Connect the coin-cell battery cable connector to Contents Page Slide the battery into the securing sleeve. 3. Replace the modem cover.

Service Manual
Page 16
...the display panel. 5. Remove the keyboard (see "Removing the Display Bezel"). 6. Remove the display bezel (see "Removing the Keyboard"). 4. Replace the display bezel (see "Removing the Center Control Cover"). 3. Follow the instructions in both sides of the top display cable connector, and ...pull the display cable connector away from electrical outlets, and remove any installed batteries. Remove the center control cover (see "Installing the Display Bezel"). Remove the display panel from the inverter connector. 1 top flex...
...the display panel. 5. Remove the keyboard (see "Removing the Display Bezel"). 6. Remove the display bezel (see "Removing the Keyboard"). 4. Replace the display bezel (see "Removing the Center Control Cover"). 3. Follow the instructions in both sides of the top display cable connector, and ...pull the display cable connector away from electrical outlets, and remove any installed batteries. Remove the center control cover (see "Installing the Display Bezel"). Remove the display panel from the inverter connector. 1 top flex...
Service Manual
Page 35
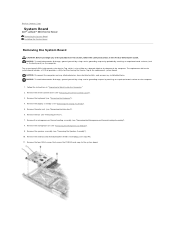
...Removing the Palm Rest"). 6. Remove the speaker assembly (see step #4). 11. The replacement kit for the system board includes a CD that secure the PCMCIA card cage to the replacement system board. Remove the internal card with Bluetooth® wireless technology (see "Removing the...Thermal-Cooling Assembly"). 8. Back to Contents Page System Board Dell™ Latitude™ D610 Service Manual Removing the System Board Installing the System Board Removing the System Board CAUTION: Before you begin any installed batteries. NOTICE: To avoid electrostatic discharge, ground yourself by ...
...Removing the Palm Rest"). 6. Remove the speaker assembly (see step #4). 11. The replacement kit for the system board includes a CD that secure the PCMCIA card cage to the replacement system board. Remove the internal card with Bluetooth® wireless technology (see "Removing the...Thermal-Cooling Assembly"). 8. Back to Contents Page System Board Dell™ Latitude™ D610 Service Manual Removing the System Board Installing the System Board Removing the System Board CAUTION: Before you begin any installed batteries. NOTICE: To avoid electrostatic discharge, ground yourself by ...
Service Manual
Page 38
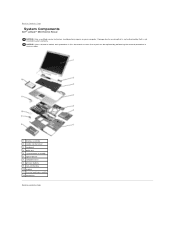
... board assembly 6 optical device 7 computer base 8 primary battery 9 coin-cell battery 10 modem 11 thermal cooling assembly 12 hard drive Back to Contents Page System Components Dell™ Latitude™ D610 Service Manual NOTICE: Only a certified service technician should perform repairs on your warranty. Damage due to servicing that a part can be replaced by your computer.
... board assembly 6 optical device 7 computer base 8 primary battery 9 coin-cell battery 10 modem 11 thermal cooling assembly 12 hard drive Back to Contents Page System Components Dell™ Latitude™ D610 Service Manual NOTICE: Only a certified service technician should perform repairs on your warranty. Damage due to servicing that a part can be replaced by your computer.

Service Manual
Page 44
... from your body before you touch any of your computer and an electrical outlet. 4. Ground yourself and install the new memory module: a. b. Replace the cover and tighten the captive screw. Align the notch in the module with the slot in this failure. 2. No error message indicates this ...and reinstall it . Forcing the cover to Work Inside the Computer." 2. You can do not feel a click. Removing the Modem 1. 1. Insert the battery into the connector, and rotate the module down until you do so by their edges, and avoid touching pins and contacts. NOTICE: Handle components and...
... from your body before you touch any of your computer and an electrical outlet. 4. Ground yourself and install the new memory module: a. b. Replace the cover and tighten the captive screw. Align the notch in the module with the slot in this failure. 2. No error message indicates this ...and reinstall it . Forcing the cover to Work Inside the Computer." 2. You can do not feel a click. Removing the Modem 1. 1. Insert the battery into the connector, and rotate the module down until you do so by their edges, and avoid touching pins and contacts. NOTICE: Handle components and...
User Guide
Page 1
...; Latitude™ D610 User's Guide Finding Information About Your Computer Using Microsoft® Windows® XP Dell™ QuickSet Using the Keyboard and Touch Pad Using the Display Using CDs, DVDs, and Other Multimedia Using a Battery Wireless Local Area Network Using PC Cards Using ...Smart Cards Travelling With Your Computer Passwords Using the Module Bay Solving Problems Using the Dell Diagnostics Cleaning Your Computer Reinstalling Software Adding and Replacing Parts Using the System Setup Program...
...; Latitude™ D610 User's Guide Finding Information About Your Computer Using Microsoft® Windows® XP Dell™ QuickSet Using the Keyboard and Touch Pad Using the Display Using CDs, DVDs, and Other Multimedia Using a Battery Wireless Local Area Network Using PC Cards Using ...Smart Cards Travelling With Your Computer Passwords Using the Module Bay Solving Problems Using the Dell Diagnostics Cleaning Your Computer Reinstalling Software Adding and Replacing Parts Using the System Setup Program...

User Guide
Page 8
... computer gets hot. The computer uses an internal fan to Contents Page modem/coin-cell battery cover - Covers the compartment that contains the memory module(s). See "Adding and Replacing Parts." Stores software and data. Releases the battery. See Using a Battery. docking device slot - See the documentation that came with the fans or the computer...
... computer gets hot. The computer uses an internal fan to Contents Page modem/coin-cell battery cover - Covers the compartment that contains the memory module(s). See "Adding and Replacing Parts." Stores software and data. Releases the battery. See Using a Battery. docking device slot - See the documentation that came with the fans or the computer...
User Guide
Page 12
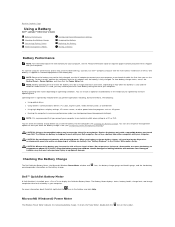
... designed to work with household waste. Back to Contents Page Using a Battery Dell™ Latitude™ D610 User's Guide Battery Performance Checking the Battery Charge Conserving Battery Power Power Management Modes Configuring Power Management Settings Charging the Battery Replacing the Battery Storing a Battery Battery Performance NOTE: For information about QuickSet, right-click the icon in the taskbar, and click Help. For optimal...
... designed to work with household waste. Back to Contents Page Using a Battery Dell™ Latitude™ D610 User's Guide Battery Performance Checking the Battery Charge Conserving Battery Power Power Management Modes Configuring Power Management Settings Charging the Battery Replacing the Battery Storing a Battery Battery Performance NOTE: For information about QuickSet, right-click the icon in the taskbar, and click Help. For optimal...
User Guide
Page 13
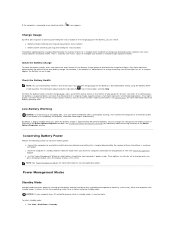
...can check battery health in Dell QuickSet. Check the Battery Charge To check the battery charge, press and release the status button on . If no lights appear, the battery has no lights appear, the battery is in good condition, and more information on the battery as described...a low-battery warning. Check the Battery Health NOTE: You can change when you should consider replacing the battery. See Specifications for information about QuickSet, right-click the icon in standby mode, it may lose data. Conserving Battery Power Perform the following actions to conserve battery power: l...
...can check battery health in Dell QuickSet. Check the Battery Charge To check the battery charge, press and release the status button on . If no lights appear, the battery has no lights appear, the battery is in good condition, and more information on the battery as described...a low-battery warning. Check the Battery Health NOTE: You can change when you should consider replacing the battery. See Specifications for information about QuickSet, right-click the icon in standby mode, it may lose data. Conserving Battery Power Perform the following actions to conserve battery power: l...

User Guide
Page 15
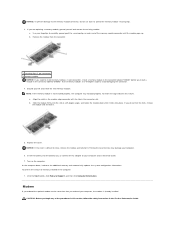
... the modem from the wall connector and computer, and remove any other computers with your Dell™ computer. Slide and hold the battery-bay (or module-bay) latch release, and then remove the battery from the computer. Replace the battery only with your computer. Do not use it . NOTICE: You must remove all external cables...
... the modem from the wall connector and computer, and remove any other computers with your Dell™ computer. Slide and hold the battery-bay (or module-bay) latch release, and then remove the battery from the computer. Replace the battery only with your computer. Do not use it . NOTICE: You must remove all external cables...

User Guide
Page 72
..., exit any open programs before you begin any attached devices are turned off. Back to Contents Page Adding and Replacing Parts Dell™ Latitude™ D610 User's Guide Before You Begin Memory Modem Mini PCI Card Hard Drive Keyboard Internal Card With Bluetooth® Wireless ...Technology Coin-Cell Battery Before You Begin This chapter provides procedures for 4 seconds. In the Turn off computer window, click Turn off...
..., exit any open programs before you begin any attached devices are turned off. Back to Contents Page Adding and Replacing Parts Dell™ Latitude™ D610 User's Guide Before You Begin Memory Modem Mini PCI Card Hard Drive Keyboard Internal Card With Bluetooth® Wireless ...Technology Coin-Cell Battery Before You Begin This chapter provides procedures for 4 seconds. In the Turn off computer window, click Turn off...

User Guide
Page 73
...from any installed PC Cards from the bottom of the computer (DIMM B). CAUTION: Before you begin any of the computer and remove the battery from the computer. 5. NOTE: Memory modules purchased from the network wall jack. 4. Remove the keyboard. 1 memory module (DIMM A)...in "Before You Begin." 2. Otherwise, your original memory modules from the computer during a memory upgrade, keep them separate from Dell. To add or replace a memory module in the Product Information Guide. See the documentation that are covered under your computer warranty. Disconnect any installed ...
...from any installed PC Cards from the bottom of the computer (DIMM B). CAUTION: Before you begin any of the computer and remove the battery from the computer. 5. NOTE: Memory modules purchased from the network wall jack. 4. Remove the keyboard. 1 memory module (DIMM A)...in "Before You Begin." 2. Otherwise, your original memory modules from the computer during a memory upgrade, keep them separate from Dell. To add or replace a memory module in the Product Information Guide. See the documentation that are covered under your computer warranty. Disconnect any installed ...
User Guide
Page 75
...Align the notch in the module edge connector with the tab in the computer: 1. Replace the cover. Forcing the cover to close , remove the module and reinstall it. Insert the battery into the battery bay, or connect the AC adapter to install memory modules in two connectors, install ...If you ordered your computer. 6. No error message indicates this section, follow the safety instructions in this failure. CAUTION: Before you are replacing a memory module, ground yourself and remove the existing module: a. If you begin any of memory installed in the connector slot. NOTICE: ...
...Align the notch in the module edge connector with the tab in the computer: 1. Replace the cover. Forcing the cover to close , remove the module and reinstall it. Insert the battery into the battery bay, or connect the AC adapter to install memory modules in two connectors, install ...If you ordered your computer. 6. No error message indicates this section, follow the safety instructions in this failure. CAUTION: Before you are replacing a memory module, ground yourself and remove the existing module: a. If you begin any of memory installed in the connector slot. NOTICE: ...

User Guide
Page 76
...and press the modem into the connector on the system board, and disconnect the modem cable. 5. NOTICE: The connectors are replacing a modem, remove the existing modem: a. Replace the cover. If you feel resistance, check the connectors and realign the card. 6. Place your finger under the cover ...at the indentation and lift the cover open. 1 screw 2 modem 3 coin-cell battery 4. Remove the screw that secures the modem to lift ...
...and press the modem into the connector on the system board, and disconnect the modem cable. 5. NOTICE: The connectors are replacing a modem, remove the existing modem: a. Replace the cover. If you feel resistance, check the connectors and realign the card. 6. Place your finger under the cover ...at the indentation and lift the cover open. 1 screw 2 modem 3 coin-cell battery 4. Remove the screw that secures the modem to lift ...

User Guide
Page 82
...tape and secure the replacement coin-cell battery to the plastic film between the battery and the system board as you remove the double-sided tape from the coin-cell-battery pocket, and disconnect the battery cable. 1 coin-cell battery 2 cable connector 3 battery cable connector 4 coin-cell battery pocket 5. NOTICE: To...a connector on the modem cover. 3. Turn the computer over and release the captive screw on the back panel of the computer. Replace the cover. Follow the procedures in your finger under the cover at the indentation and lift the cover open. 1 captive screw NOTICE:...
...tape and secure the replacement coin-cell battery to the plastic film between the battery and the system board as you remove the double-sided tape from the coin-cell-battery pocket, and disconnect the battery cable. 1 coin-cell battery 2 cable connector 3 battery cable connector 4 coin-cell battery pocket 5. NOTICE: To...a connector on the modem cover. 3. Turn the computer over and release the captive screw on the back panel of the computer. Replace the cover. Follow the procedures in your finger under the cover at the indentation and lift the cover open. 1 captive screw NOTICE:...


