
DELL.book
Page 6
...Card or USB Key 34 Printing Collated Copies of Your Document 35 Printing Last Page First 35 Printing More Than One Page on a Sheet of Paper 36 Printing an Image as a Multi-page Poster 36 Printing a Banner 37 3 Copying Copying Documents Using the Operator Panel 39 Copying Documents Using Your Computer 39 Copying Photos Using the Operator Panel 40 Copying Photos Using Your Computer 40 Collating Copies Using the Operator Panel 41 Changing Copy Settings 42 4 Scanning Using the Operator Panel 43 Using the Printer Software 43 Scanning Photos 44 Scanning to Your Computer Over a Network...
...Card or USB Key 34 Printing Collated Copies of Your Document 35 Printing Last Page First 35 Printing More Than One Page on a Sheet of Paper 36 Printing an Image as a Multi-page Poster 36 Printing a Banner 37 3 Copying Copying Documents Using the Operator Panel 39 Copying Documents Using Your Computer 39 Copying Photos Using the Operator Panel 40 Copying Photos Using Your Computer 40 Collating Copies Using the Operator Panel 41 Changing Copy Settings 42 4 Scanning Using the Operator Panel 43 Using the Printer Software 43 Scanning Photos 44 Scanning to Your Computer Over a Network...

DELL.book
Page 14
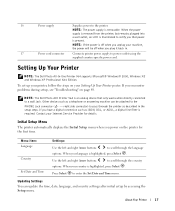
The connector you use to connect your printer. 14 About Your Printer Where you lift to gain access to extend it exits the printer. www.dell.com | support.dell.com Understanding the Printer Parts 1 9 2 8 Photo 964 3 7 4 Number: 1 2 3 Part: Automatic Document Feeder (ADF) Printer unit Operator panel 4 Paper input tray 5 Paper exit tray 6 PictBridge connector 5 6 Description: Scan, copy, or fax multiple page documents and/or legal sized documents. For more information, see "Using the Operator Panel" on the printer you use to your PictBridge-compatible ...
The connector you use to connect your printer. 14 About Your Printer Where you lift to gain access to extend it exits the printer. www.dell.com | support.dell.com Understanding the Printer Parts 1 9 2 8 Photo 964 3 7 4 Number: 1 2 3 Part: Automatic Document Feeder (ADF) Printer unit Operator panel 4 Paper input tray 5 Paper exit tray 6 PictBridge connector 5 6 Description: Scan, copy, or fax multiple page documents and/or legal sized documents. For more information, see "Using the Operator Panel" on the printer you use to your PictBridge-compatible ...
DELL.book
Page 17
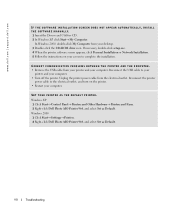
... is removable. If you power on the printer for details. When your Internet Service Provider for the first time. About Your Printer 17 Other devices such as a telephone or answering machine can update the time, date, language, and country settings after initial setup by accessing the Setup menu. Use the left and right Arrow buttons to scroll through the language options. Setting Up Your Printer NOTE: The Dell Photo All-In-One Printer 964 supports Microsoft® Windows...
... is removable. If you power on the printer for details. When your Internet Service Provider for the first time. About Your Printer 17 Other devices such as a telephone or answering machine can update the time, date, language, and country settings after initial setup by accessing the Setup menu. Use the left and right Arrow buttons to scroll through the language options. Setting Up Your Printer NOTE: The Dell Photo All-In-One Printer 964 supports Microsoft® Windows...

DELL.book
Page 19
... you want to enter or edit the date and time shown on the printer display. • In copy mode, select the number of copies you have already begun entering the number. • Start a scan, copy, or fax job. • In photo mode, print photos. Scroll through a list on the display. • In fax mode: - About Your Printer 19 Type numbers to make. Number 5 Part: Menu 6 Right arrow 7 A keypad number or symbol 8 Pause , 9 Start 10 Cancel 11 Down arrow 12 Select 13 Power Purpose: Scroll through...
... you want to enter or edit the date and time shown on the printer display. • In copy mode, select the number of copies you have already begun entering the number. • Start a scan, copy, or fax job. • In photo mode, print photos. Scroll through a list on the display. • In fax mode: - About Your Printer 19 Type numbers to make. Number 5 Part: Menu 6 Right arrow 7 A keypad number or symbol 8 Pause , 9 Start 10 Cancel 11 Down arrow 12 Select 13 Power Purpose: Scroll through...

DELL.book
Page 41
... Original Document Into the ADF" on page 24 or Placing Your Original Document on page 22. 2 Load your printer without a computer, you want to Collate, and press Select . 5 Choose Yes, and press Select. 6 Press Start . The Dell All-In-One Center opens. 5 Click Preview Now. 6 Adjust the dotted lines to fit around the portion of the image you can print collated copies: 1 Load paper in the paper support. Copying 41 Collating Copies Using the Operator Panel...
... Original Document Into the ADF" on page 24 or Placing Your Original Document on page 22. 2 Load your printer without a computer, you want to Collate, and press Select . 5 Choose Yes, and press Select. 6 Press Start . The Dell All-In-One Center opens. 5 Click Preview Now. 6 Adjust the dotted lines to fit around the portion of the image you can print collated copies: 1 Load paper in the paper support. Copying 41 Collating Copies Using the Operator Panel...

DELL.book
Page 61
... All Programs→ Dell Printers→ Dell Photo AIO Printer 964→ Dell All-In-One Center. 2 From the Dell All-In-One Center, click the Maintain/Troubleshoot tab, and then click Display the Printer Setup Utility. Access the Printer Setup Utility Access the Printer Setup Utility if you want to configure the printer modem for outgoing faxes. • Choose whether to scan the entire document before dialing the number. • Choose whether to use error correction. • Select when to print a fax usage report...
... All Programs→ Dell Printers→ Dell Photo AIO Printer 964→ Dell All-In-One Center. 2 From the Dell All-In-One Center, click the Maintain/Troubleshoot tab, and then click Display the Printer Setup Utility. Access the Printer Setup Utility Access the Printer Setup Utility if you want to configure the printer modem for outgoing faxes. • Choose whether to scan the entire document before dialing the number. • Choose whether to use error correction. • Select when to print a fax usage report...

DELL.book
Page 63
... ADF" on page 24. 3 Click Start→ Programs or All Programs→ Dell Printers→ Dell Photo AIO Printer 964→ Dell All-In-One Center. 4 Place the document you want to fax face down under the lid of the printer. 5 Select File from the drop-down menu. 5 Follow the instructions on your document on and that the printer is connected to the computer with a USB cable. 2 Load your computer screen to send your settings, and click Finish. Configure Fax Service Management (Windows...
... ADF" on page 24. 3 Click Start→ Programs or All Programs→ Dell Printers→ Dell Photo AIO Printer 964→ Dell All-In-One Center. 4 Place the document you want to fax face down under the lid of the printer. 5 Select File from the drop-down menu. 5 Follow the instructions on your document on and that the printer is connected to the computer with a USB cable. 2 Load your computer screen to send your settings, and click Finish. Configure Fax Service Management (Windows...
DELL.book
Page 90
...; Remove the USB cable from your printer and your computer. Reconnect the printer power cable to complete the installation. Windows XP 1 Click Start→ Control Panel→ Printers and Other Hardware→ Printers and Faxes. 2 Right-click Dell Photo AIO Printer 964, and select Set as Default. 90 Troubleshooting In Windows 2000, double-click My Computer from the electrical outlet. If necessary, double-click setup.exe. 4 When the printer software screen appears, click Personal Installation or Network Installation. 5 Follow the instructions on the printer...
...; Remove the USB cable from your printer and your computer. Reconnect the printer power cable to complete the installation. Windows XP 1 Click Start→ Control Panel→ Printers and Other Hardware→ Printers and Faxes. 2 Right-click Dell Photo AIO Printer 964, and select Set as Default. 90 Troubleshooting In Windows 2000, double-click My Computer from the electrical outlet. If necessary, double-click setup.exe. 4 When the printer software screen appears, click Personal Installation or Network Installation. 5 Follow the instructions on the printer...

DELL.book
Page 133
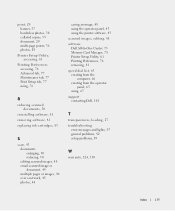
... photos using the operator panel, 40 photos using your computer, 40 custom paper loading in the ADF, 28 loading in the paper tray, 27 D Dell contacting, 101 Dell All-In-One Center accessing, 74 Copy section, 74 Preview section, 75 Productivity Tools, 75 Scan section, 74 using, 73 Dell Picture Studio, 78 E editing scanned document text (OCR), 47 e-mail document, 49 scanned image, 49 enlarging scanned documents, 50 envelopes, loading, 26 error messages and flashing lights, 97 F fax, 51 blocking faxes, 69 broadcast fax, 56 changing the pickup code...
... photos using the operator panel, 40 photos using your computer, 40 custom paper loading in the ADF, 28 loading in the paper tray, 27 D Dell contacting, 101 Dell All-In-One Center accessing, 74 Copy section, 74 Preview section, 75 Productivity Tools, 75 Scan section, 74 using, 73 Dell Picture Studio, 78 E editing scanned document text (OCR), 47 e-mail document, 49 scanned image, 49 enlarging scanned documents, 50 envelopes, loading, 26 error messages and flashing lights, 97 F fax, 51 blocking faxes, 69 broadcast fax, 56 changing the pickup code...
DELL.book
Page 135
...50 editing scanned images, 48 email scanned image or document, 49 multiple pages or images, 46 over a network, 45 photos, 44 saving an image, 48 using the operator panel, 43 using the printer software, 43 scanned images, editing, 48 software Dell All-In-One Center, 73 Memory Card Manager, 78 Printer Setup Utility, 61 Printing Preferences, 76 removing, 81 speed dial list, 65 creating from the computer, 66 creating from the operator panel, 65 using, 67 support contacting Dell, 101 T transparencies, loading, 27 troubleshooting error messages and lights, 97 general problems, 92 setup problems, 89...
...50 editing scanned images, 48 email scanned image or document, 49 multiple pages or images, 46 over a network, 45 photos, 44 saving an image, 48 using the operator panel, 43 using the printer software, 43 scanned images, editing, 48 software Dell All-In-One Center, 73 Memory Card Manager, 78 Printer Setup Utility, 61 Printing Preferences, 76 removing, 81 speed dial list, 65 creating from the computer, 66 creating from the operator panel, 65 using, 67 support contacting Dell, 101 T transparencies, loading, 27 troubleshooting error messages and lights, 97 general problems, 92 setup problems, 89...
User's Guide2
Page 3
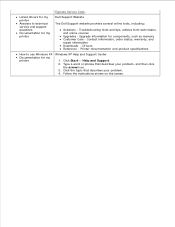
...information, order status, warranty, and repair information Downloads - Latest drivers for my printer Answers to use Windows XP Documentation for my printer Dell Support Website The Dell Support website provides several online tools, including: Solutions - Drivers Reference - Troubleshooting hints and tips, articles from technicians, and online courses Upgrades - Printer documentation and product specifications How to technical service and support questions Documentation for my printer Windows XP Help and Support Center 1. Type a word or phrase that describes your problem, and...
...information, order status, warranty, and repair information Downloads - Latest drivers for my printer Answers to use Windows XP Documentation for my printer Dell Support Website The Dell Support website provides several online tools, including: Solutions - Drivers Reference - Troubleshooting hints and tips, articles from technicians, and online courses Upgrades - Printer documentation and product specifications How to technical service and support questions Documentation for my printer Windows XP Help and Support Center 1. Type a word or phrase that describes your problem, and...

User's Guide2
Page 4
... printer operator panel or the printer software to connect your printer. NOTE: If you use a DSL modem for your computer, you must be connected to a telephone line before you can use the Save Photos to make photocopies, send faxes, or print from memory cards or a PictBridge-enabled camera. Understanding the Printer Parts You do a variety of things. About Your Printer Understanding the Printer Parts Setting Up Your Printer Understanding the Operator Panel Operator Panel Menus Understanding the Automatic Paper Type Sensor Loading Paper You can send a fax...
... printer operator panel or the printer software to connect your printer. NOTE: If you use a DSL modem for your computer, you must be connected to a telephone line before you can use the Save Photos to make photocopies, send faxes, or print from memory cards or a PictBridge-enabled camera. Understanding the Printer Parts You do a variety of things. About Your Printer Understanding the Printer Parts Setting Up Your Printer Understanding the Operator Panel Operator Panel Menus Understanding the Automatic Paper Type Sensor Loading Paper You can send a fax...

User's Guide2
Page 5
...through the ADF exit tray here. 9 ADF input tray Load original documents in the printer. To view other image types stored on the media card. Panel on the printer you insert a media card containing digital pictures. NOTE: The LCD only displays JPG files found on the media card, open the Memory Card Manager. Number: Part: 1 Automatic Document Feeder (ADF) 2 Printer unit 3 Operator panel 4 Paper input tray 5 Paper exit tray Description: Scan, copy, or fax multiple page documents and/or legal sized documents. For more information, see Using the Memory Card Manager...
...through the ADF exit tray here. 9 ADF input tray Load original documents in the printer. To view other image types stored on the media card. Panel on the printer you insert a media card containing digital pictures. NOTE: The LCD only displays JPG files found on the media card, open the Memory Card Manager. Number: Part: 1 Automatic Document Feeder (ADF) 2 Printer unit 3 Operator panel 4 Paper input tray 5 Paper exit tray Description: Scan, copy, or fax multiple page documents and/or legal sized documents. For more information, see Using the Memory Card Manager...

User's Guide2
Page 9
... printer display. Type numbers to default settings. Scroll through the available options on the display. In copy mode, select the number of copies you initiate a copy without specifying color or black and white, color is used by default. In photo mode, print photos. Clear a fax number, or end a fax transmission and return the display to wait for an outside line or get through the available menus on the menu. Operator Panel Menus Scroll through the available options on the display. Decrease a number on the display. Start a scan, copy, or fax job. Cancel a scan, print...
... printer display. Type numbers to default settings. Scroll through the available options on the display. In copy mode, select the number of copies you initiate a copy without specifying color or black and white, color is used by default. In photo mode, print photos. Clear a fax number, or end a fax transmission and return the display to wait for an outside line or get through the available menus on the menu. Operator Panel Menus Scroll through the available options on the display. Decrease a number on the display. Start a scan, copy, or fax job. Cancel a scan, print...

User's Guide2
Page 25
... menu, use the up and down Arrow buttons 2. Press Select . For more information, see Scan Default Settings Menu . *Factory default settings Setup Mode To access Setup Mode options: 1. If your computer is connected to enter the Scan Default Settings menu. Scan Options Menu Menu item Settings Scan To Email Software File Color Color* Black & White Quality Automatic* 150 dpi 300 dpi 600 dpi Original Size Auto Detect* L 2L A6 A5 B5 A4 Wallet 3x5 4x6 5x7 8x10 8.5x11 Change Default Settings Press Select to a network, select a host from the Host Selection screen...
... menu, use the up and down Arrow buttons 2. Press Select . For more information, see Scan Default Settings Menu . *Factory default settings Setup Mode To access Setup Mode options: 1. If your computer is connected to enter the Scan Default Settings menu. Scan Options Menu Menu item Settings Scan To Email Software File Color Color* Black & White Quality Automatic* 150 dpi 300 dpi 600 dpi Original Size Auto Detect* L 2L A6 A5 B5 A4 Wallet 3x5 4x6 5x7 8x10 8.5x11 Change Default Settings Press Select to a network, select a host from the Host Selection screen...

User's Guide2
Page 67
Use the Dell All-In-One Center to first scan a document to a file, and then use the drop-down menu under Please select the fax device. 5. Click Start Control Panel. 2. Close the Add/Remove Programs window. Click Next. 3. a. d. Install Fax Console (Windows XP Only) 1. Click Next. Click Start Programs or All Programs Accessories Communications Fax Fax Console. Enter your data/fax modem in which case you may cause the computer modem to Microsoft Windows XP window when it on. Click to fax. Close...
Use the Dell All-In-One Center to first scan a document to a file, and then use the drop-down menu under Please select the fax device. 5. Click Start Control Panel. 2. Close the Add/Remove Programs window. Click Next. 3. a. d. Install Fax Console (Windows XP Only) 1. Click Next. Click Start Programs or All Programs Accessories Communications Fax Fax Console. Enter your data/fax modem in which case you may cause the computer modem to Microsoft Windows XP window when it on. Click to fax. Close...

User's Guide2
Page 68
... computer screen to send your document on your file to the computer with a USB cable. 2. Load your fax. Click Start Programs or All Programs Dell Printers Dell Photo AIO Printer 964 Dell All-In-One Center. 4. Click Next, confirm your file to fax face down menu. 5. Select your data/fax modem from the Scan drop-down menu. 6. Open your settings, and click Finish. Place the document you just scanned and saved. 8. 9. To create an archive copy of the printer. 5. Click Start Programs Accessories Communications Fax Fax Service Management. Select File from...
... computer screen to send your document on your file to the computer with a USB cable. 2. Load your fax. Click Start Programs or All Programs Dell Printers Dell Photo AIO Printer 964 Dell All-In-One Center. 4. Click Next, confirm your file to fax face down menu. 5. Select your data/fax modem from the Scan drop-down menu. 6. Open your settings, and click Finish. Place the document you just scanned and saved. 8. 9. To create an archive copy of the printer. 5. Click Start Programs Accessories Communications Fax Fax Service Management. Select File from...
User's Guide2
Page 84
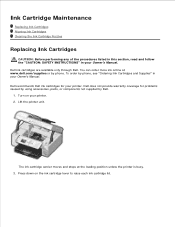
Ink Cartridge Maintenance Replacing Ink Cartridges Aligning Ink Cartridges Cleaning the Ink Cartridge Nozzles Replacing Ink Cartridges CAUTION: Before performing any of the procedures listed in this section, read and follow the "CAUTION: SAFETY INSTRUCTIONS" in your Owner's Manual. Press down on your printer. 2. Dell recommends Dell ink cartridges for problems caused by using accessories, parts, or components not supplied by Dell. 1. To order by phone. Dell ink cartridges are available only through Dell. You can order more ink online at the loading position unless the printer is...
Ink Cartridge Maintenance Replacing Ink Cartridges Aligning Ink Cartridges Cleaning the Ink Cartridge Nozzles Replacing Ink Cartridges CAUTION: Before performing any of the procedures listed in this section, read and follow the "CAUTION: SAFETY INSTRUCTIONS" in your Owner's Manual. Press down on your printer. 2. Dell recommends Dell ink cartridges for problems caused by using accessories, parts, or components not supplied by Dell. 1. To order by phone. Dell ink cartridges are available only through Dell. You can order more ink online at the loading position unless the printer is...
User's Guide2
Page 90
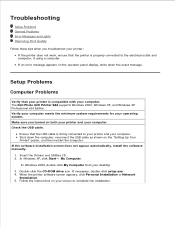
... software manually. 1. Double-click the CD-ROM drive icon. Follow the instructions on both your printer and your screen to complete the installation. Ensure that the printer is properly connected to the electrical outlet and computer, if using a computer. If necessary, double-click setup.exe. 4. Troubleshooting Setup Problems General Problems Error Messages and Lights Improving Print Quality Follow these tips when you turned on your computer. In Windows XP, click Start My Computer. Check the USB cable. Setup Problems...
... software manually. 1. Double-click the CD-ROM drive icon. Follow the instructions on both your printer and your screen to complete the installation. Ensure that the printer is properly connected to the electrical outlet and computer, if using a computer. If necessary, double-click setup.exe. 4. Troubleshooting Setup Problems General Problems Error Messages and Lights Improving Print Quality Follow these tips when you turned on your computer. In Windows XP, click Start My Computer. Check the USB cable. Setup Problems...

User's Guide2
Page 92
... device such as Dell 964, Dell 964 (Copy 1), Dell 964 (Copy 2), and so on. 3. Make sure an active telephone line is active. 4. Paper Problems In Windows XP, click Start Control Panel Printers and Other Hardware Printers and Faxes. Make sure the memory is finished before sending your computer. Print jobs may be shown as a dial-up on the ADF) and the paper is set correctly. To prevent multiple instances of your Dell printer in the print queue if you have a paper jam. Check for multiple printer objects for a paper jam...
... device such as Dell 964, Dell 964 (Copy 1), Dell 964 (Copy 2), and so on. 3. Make sure an active telephone line is active. 4. Paper Problems In Windows XP, click Start Control Panel Printers and Other Hardware Printers and Faxes. Make sure the memory is finished before sending your computer. Print jobs may be shown as a dial-up on the ADF) and the paper is set correctly. To prevent multiple instances of your Dell printer in the print queue if you have a paper jam. Check for multiple printer objects for a paper jam...


