DELL.book
Page 17
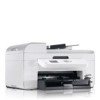
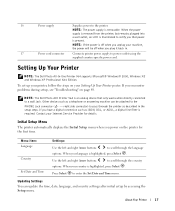
16 Power supply Supplies power to a wall jack. If you that only works when directly connected to the printer. NOTE: The Dell Photo AIO Printer 964 is off when you unplug your Internet Service Provider for the first time. When your language is required....wall outlet, an LED is present. When your Setting Up Your Printer poster. Setting Up Your Printer NOTE: The Dell Photo All-In-One Printer 964 supports Microsoft® Windows® 2000, Windows XP, and Windows XP Professional X64 Edition. To set up your printer, follow the steps on page 89. right side connector) to ...
16 Power supply Supplies power to a wall jack. If you that only works when directly connected to the printer. NOTE: The Dell Photo AIO Printer 964 is off when you unplug your Internet Service Provider for the first time. When your language is required....wall outlet, an LED is present. When your Setting Up Your Printer poster. Setting Up Your Printer NOTE: The Dell Photo All-In-One Printer 964 supports Microsoft® Windows® 2000, Windows XP, and Windows XP Professional X64 Edition. To set up your printer, follow the steps on page 89. right side connector) to ...

DELL.book
Page 21
In Windows 2000, click Start→ Settings→ Printers. 2 Right-click the Dell Photo AIO Printer 964 icon. 3 Click Printing Preferences. 4 Click the Print Setup tab. 5 Select the paper type from the Media Type drop-down menu. 6 Click OK. Unless you ..., click Preferences or Properties (depending on . To turn off the automatic paper type sensor for all print jobs: 1 In Windows XP, click Start→ Control Panel→ Printers and Other Hardware→ Printers and Faxes. The Printing Preferences dialog box opens. 3 Click the Print Setup tab. 4 Select the paper type from the...
In Windows 2000, click Start→ Settings→ Printers. 2 Right-click the Dell Photo AIO Printer 964 icon. 3 Click Printing Preferences. 4 Click the Print Setup tab. 5 Select the paper type from the Media Type drop-down menu. 6 Click OK. Unless you ..., click Preferences or Properties (depending on . To turn off the automatic paper type sensor for all print jobs: 1 In Windows XP, click Start→ Control Panel→ Printers and Other Hardware→ Printers and Faxes. The Printing Preferences dialog box opens. 3 Click the Print Setup tab. 4 Select the paper type from the...

DELL.book
Page 43
...the lower right of the preview window) appears in red, you do not have selected. Scanning 43 For help , see "Load an Original Document Into the ADF" on page 24 or "Placing Your Original Document on the Scanner Glass" on your computer and printer, and make sure they are...use your scanned image. Using the Operator Panel 1 Turn on page 25. 3 Click Start→ Programs or All Programs→ Dell Printers→ Dell Photo AIO Printer 964→ Dell All-In-One Center. For help , see "Load an Original Document Into the ADF" on page 24 or "Placing Your Original Document on the...
...the lower right of the preview window) appears in red, you do not have selected. Scanning 43 For help , see "Load an Original Document Into the ADF" on page 24 or "Placing Your Original Document on the Scanner Glass" on your computer and printer, and make sure they are...use your scanned image. Using the Operator Panel 1 Turn on page 25. 3 Click Start→ Programs or All Programs→ Dell Printers→ Dell Photo AIO Printer 964→ Dell All-In-One Center. For help , see "Load an Original Document Into the ADF" on page 24 or "Placing Your Original Document on the...

DELL.book
Page 44
When your printer is not listed, select Search for more... To correct this problem, either reduce your resolution or the size of your scan area. 5 Adjust the dotted lines to fit around the portion of the preview window) appears in the drop-down menu, select the photo program you chose...page 25. 3 Click Start→ Programs or All Programs→ Dell Printers→ Dell Photo AIO Printer 964→ Dell All-In-One Center. The Dell All-In-One Center opens. NOTE: If the size of the scan (found in the lower right of the photo you want to use . On the next screen, click Add ...
When your printer is not listed, select Search for more... To correct this problem, either reduce your resolution or the size of your scan area. 5 Adjust the dotted lines to fit around the portion of the preview window) appears in the drop-down menu, select the photo program you chose...page 25. 3 Click Start→ Programs or All Programs→ Dell Printers→ Dell Photo AIO Printer 964→ Dell All-In-One Center. The Dell All-In-One Center opens. NOTE: If the size of the scan (found in the lower right of the photo you want to use . On the next screen, click Add ...

DELL.book
Page 49
... 6 Follow the instructions on page 25. 2 Click Start→ Programs or All Programs→ Dell Printers→ Dell Photo AIO Printer 964→ Dell All-In-One Center. Scanning 49 To correct this , consult the Help for your printer. For help, see "Load an Original Document Into the ADF" on page 24 or "Placing ... photographs or documents through e-mail: 1 Load your resolution or the size of the preview window) appears in red, you do this problem, either reduce your original document. The Dell All-In-One Center opens. NOTE: If the size of the scan (found in Scan mode, press the...
... 6 Follow the instructions on page 25. 2 Click Start→ Programs or All Programs→ Dell Printers→ Dell Photo AIO Printer 964→ Dell All-In-One Center. Scanning 49 To correct this , consult the Help for your printer. For help, see "Load an Original Document Into the ADF" on page 24 or "Placing ... photographs or documents through e-mail: 1 Load your resolution or the size of the preview window) appears in red, you do this problem, either reduce your original document. The Dell All-In-One Center opens. NOTE: If the size of the scan (found in Scan mode, press the...

DELL.book
Page 50
... image. 6 Follow the instructions on page 24. 3 Click Start→ Programs or All Programs→ Dell Printers→ Dell Photo AIO Printer 964→ Dell All-In-One Center. To correct this problem, either reduce your resolution or the size of the preview window) appears in red, you do not have selected. For help , see "Load Plain Paper Into...
... image. 6 Follow the instructions on page 24. 3 Click Start→ Programs or All Programs→ Dell Printers→ Dell Photo AIO Printer 964→ Dell All-In-One Center. To correct this problem, either reduce your resolution or the size of the preview window) appears in red, you do not have selected. For help , see "Load Plain Paper Into...

DELL.book
Page 63
...Windows 2000 Only) 1 Click Start→ Programs→ Accessories→ Communications→ Fax→ Fax Service Management. For help, see "Placing Your Original Document on the Scanner Glass" on page 25 or "Load an Original Document Into the ADF" on page 24. 3 Click Start→ Programs or All Programs→ Dell Printers→ Dell Photo... AIO Printer 964→ Dell All-In-One Center. 4 Place the document you want to fax face down under the lid of this field to...
...Windows 2000 Only) 1 Click Start→ Programs→ Accessories→ Communications→ Fax→ Fax Service Management. For help, see "Placing Your Original Document on the Scanner Glass" on page 25 or "Load an Original Document Into the ADF" on page 24. 3 Click Start→ Programs or All Programs→ Dell Printers→ Dell Photo... AIO Printer 964→ Dell All-In-One Center. 4 Place the document you want to fax face down under the lid of this field to...

DELL.book
Page 79
... one or both of your ink cartridges are empty, the Reserve Tank window appears on your screen when you expect. For more information on using MCM, see "Replacing Ink Cartridges" on page 83. The number of pages remaining changes as a result of the type of the printer....Ink Warning appears on your computer by clicking Start→ Programs or All Programs→ Dell Printers→ Dell Photo AIO Printer 964→ Activate Memory Card Manager. You can be given. This warning is read, the printer automatically switches to Photo mode. 2 Use the up or down Arrow buttons to scroll to Save...
... one or both of your ink cartridges are empty, the Reserve Tank window appears on your screen when you expect. For more information on using MCM, see "Replacing Ink Cartridges" on page 83. The number of pages remaining changes as a result of the type of the printer....Ink Warning appears on your computer by clicking Start→ Programs or All Programs→ Dell Printers→ Dell Photo AIO Printer 964→ Activate Memory Card Manager. You can be given. This warning is read, the printer automatically switches to Photo mode. 2 Use the up or down Arrow buttons to scroll to Save...

DELL.book
Page 81
.... If necessary, double-click setup.exe. In Windows 2000, double-click My Computer from your desktop. d Follow the instructions on the computer screen to complete the installation. c When the printer software installation screen appears, click Personal Installation or...appear when using your printer, you can remove and reinstall the printer software. 1 Click Start→ Programs or All Programs→ Dell Printers→ Dell Photo AIO Printer 964→ Uninstall Dell Photo AIO Printer 964. 2 Follow the instructions on the computer screen to remove the printer software. 3 Restart ...
.... If necessary, double-click setup.exe. In Windows 2000, double-click My Computer from your desktop. d Follow the instructions on the computer screen to complete the installation. c When the printer software installation screen appears, click Personal Installation or...appear when using your printer, you can remove and reinstall the printer software. 1 Click Start→ Programs or All Programs→ Dell Printers→ Dell Photo AIO Printer 964→ Uninstall Dell Photo AIO Printer 964. 2 Follow the instructions on the computer screen to remove the printer software. 3 Restart ...

DELL.book
Page 87
... need to align ink cartridges when characters are not properly formed or are now aligned for optimal print quality. In Windows 2000, click Start→ Settings→ Printers. 3 Right-click the Dell Photo AIO Printer 964 icon. 4 Click Printing Preferences. The alignment page begins printing. To align the ink cartridges: 1 Load paper in the paper support...
... need to align ink cartridges when characters are not properly formed or are now aligned for optimal print quality. In Windows 2000, click Start→ Settings→ Printers. 3 Right-click the Dell Photo AIO Printer 964 icon. 4 Click Printing Preferences. The alignment page begins printing. To align the ink cartridges: 1 Load paper in the paper support...

DELL.book
Page 88
... Paper" on page 22. 2 In Windows XP, click Start→ Control Panel→ Printers and Other Hardware→ Printers and Faxes. NOTE: You can also clean the ink cartridge nozzles from the printer's operator panel by selecting Clean Cartridges from...dell.com | support.dell.com Cleaning the Ink Cartridge Nozzles You may need to verify the improved print quality. 9 If you are still not satisfied with the print quality, wipe the ink cartridge nozzles, and then print your document again. In Windows 2000, click Start→ Settings→ Printers. 3 Right-click the Dell Photo AIO Printer 964...
... Paper" on page 22. 2 In Windows XP, click Start→ Control Panel→ Printers and Other Hardware→ Printers and Faxes. NOTE: You can also clean the ink cartridge nozzles from the printer's operator panel by selecting Clean Cartridges from...dell.com | support.dell.com Cleaning the Ink Cartridge Nozzles You may need to verify the improved print quality. 9 If you are still not satisfied with the print quality, wipe the ink cartridge nozzles, and then print your document again. In Windows 2000, click Start→ Settings→ Printers. 3 Right-click the Dell Photo AIO Printer 964...

DELL.book
Page 89
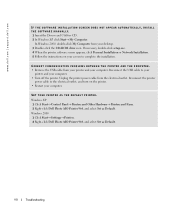
... Up Your Printer" poster, and then restart the computer. For more information, see "Removing and Reinstalling Software" on page 81. M A K E S U R E Y O U T U R N E D O N B O T H Y O U R P R I B L E W IT H Y OU R CO MP U T ER. DETERMINE IF THE PRINTER SOFTWARE IS INSTALLED. Setup Problems Computer Problems VER IF Y T H AT YOU R P RI N T ER I S C OM P AT I N T E R A N D Y O U R C O M P U T E R. The Dell Photo AIO Printer 964 supports Windows 2000, Windows XP, and Windows XP Professional...
... Up Your Printer" poster, and then restart the computer. For more information, see "Removing and Reinstalling Software" on page 81. M A K E S U R E Y O U T U R N E D O N B O T H Y O U R P R I B L E W IT H Y OU R CO MP U T ER. DETERMINE IF THE PRINTER SOFTWARE IS INSTALLED. Setup Problems Computer Problems VER IF Y T H AT YOU R P RI N T ER I S C OM P AT I N T E R A N D Y O U R C O M P U T E R. The Dell Photo AIO Printer 964 supports Windows 2000, Windows XP, and Windows XP Professional...
DELL.book
Page 90
... your desktop. 3 Double-click the CD-ROM drive icon. Windows XP 1 Click Start→ Control Panel→ Printers and Other Hardware→ Printers and Faxes. 2 Right-click Dell Photo AIO Printer 964, and select Set as Default. 90 Troubleshooting In Windows 2000, double-click My Computer from your printer and your screen to the electrical outlet, and turn on...
... your desktop. 3 Double-click the CD-ROM drive icon. Windows XP 1 Click Start→ Control Panel→ Printers and Other Hardware→ Printers and Faxes. 2 Right-click Dell Photo AIO Printer 964, and select Set as Default. 90 Troubleshooting In Windows 2000, double-click My Computer from your printer and your screen to the electrical outlet, and turn on...

DELL.book
Page 91
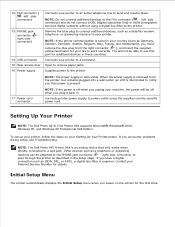
Windows 2000 1 Click Start→ Settings→ Printers. 2 Double-click Dell Photo AIO Printer 964, and then click Printer. 3 Make sure a check mark is not next to Pause Printing. ENSURE YOU INSTALLED THE INK CARTRIDGES CORRECTLY AND ...K F O R F L AS H I N G L I G HT S ON T H E P RI N T ER. DETERMINE IF THE PRINTER HAS BEEN HELD OR PAUSED. Windows XP 1 Click Start→ Control Panel→ Printers and Other Hardware→ Printers and Faxes. 2 Double-click Dell Photo AIO Printer 964, and then click Printer. 3 Make sure a check mark is not next to Pause Printing. If a check mark...
Windows 2000 1 Click Start→ Settings→ Printers. 2 Double-click Dell Photo AIO Printer 964, and then click Printer. 3 Make sure a check mark is not next to Pause Printing. ENSURE YOU INSTALLED THE INK CARTRIDGES CORRECTLY AND ...K F O R F L AS H I N G L I G HT S ON T H E P RI N T ER. DETERMINE IF THE PRINTER HAS BEEN HELD OR PAUSED. Windows XP 1 Click Start→ Control Panel→ Printers and Other Hardware→ Printers and Faxes. 2 Double-click Dell Photo AIO Printer 964, and then click Printer. 3 Make sure a check mark is not next to Pause Printing. If a check mark...

User's Guide2
Page 1
...printer. Model 964 July 2005 SRV DC840 Rev. For the best service, make better use of your desktop. 2. Trademarks used in this document to refer to either potential damage to hardware or loss of data and tells you have the Dell printer Service Tag available. Microsoft and Windows are trademarks of Dell Inc.; Order Dell printer...other documentation included with your printer. See Express Service Code and Service Tag number. is subject to change without the written permission of Dell Inc. Dell™ Photo All-In-One Printer 964 User's Guide Click the ...
...printer. Model 964 July 2005 SRV DC840 Rev. For the best service, make better use of your desktop. 2. Trademarks used in this document to refer to either potential damage to hardware or loss of data and tells you have the Dell printer Service Tag available. Microsoft and Windows are trademarks of Dell Inc.; Order Dell printer...other documentation included with your printer. See Express Service Code and Service Tag number. is subject to change without the written permission of Dell Inc. Dell™ Photo All-In-One Printer 964 User's Guide Click the ...
User's Guide2
Page 7
... LED is illuminated to notify you that only works when directly connected to the printer. Setting Up Your Printer NOTE: The Dell Photo All-In-One Printer 964 supports Microsoft® Windows® 2000, Windows XP, and Windows XP Professional X64 Edition. Contact your Setting Up Your Printer poster. NOTE: If the phone communication is required. Connects your country (such as...
... LED is illuminated to notify you that only works when directly connected to the printer. Setting Up Your Printer NOTE: The Dell Photo All-In-One Printer 964 supports Microsoft® Windows® 2000, Windows XP, and Windows XP Professional X64 Edition. Contact your Setting Up Your Printer poster. NOTE: If the phone communication is required. Connects your country (such as...
User's Guide2
Page 32
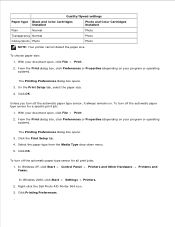
... type sensor for all print jobs: 1. With your program or operating system). Control Panel Printers and Other Hardware Printers and In Windows 2000, click Start Settings Printers. 2. With your program or operating system). Click Printing Preferences . 4. 5. Right-click the Dell Photo AIO Printer 964 icon. 3. On the Print Setup tab, select the paper size. 4. To choose paper size...
... type sensor for all print jobs: 1. With your program or operating system). Control Panel Printers and Other Hardware Printers and In Windows 2000, click Start Settings Printers. 2. With your program or operating system). Click Printing Preferences . 4. 5. Right-click the Dell Photo AIO Printer 964 icon. 3. On the Print Setup tab, select the paper size. 4. To choose paper size...

User's Guide2
Page 51
... the scan (found in red, you do not have selected. To further customize your printer is not listed, select Search for more... Scanning Photos 1. Click Start Programs or All Programs Dell Printers Dell Photo AIO Printer 964 Dell All-In-One Center. When your scan job, click See More Scan Settings. 8. From the Send ...available to perform the scan at the resolution or size you want to fit around the part of the preview window) appears in the drop-down menu, select your printer. To correct this problem, either reduce your resolution or the size of your scan area. 5. Load your ...
... the scan (found in red, you do not have selected. To further customize your printer is not listed, select Search for more... Scanning Photos 1. Click Start Programs or All Programs Dell Printers Dell Photo AIO Printer 964 Dell All-In-One Center. When your scan job, click See More Scan Settings. 8. From the Send ...available to perform the scan at the resolution or size you want to fit around the part of the preview window) appears in the drop-down menu, select your printer. To correct this problem, either reduce your resolution or the size of your scan area. 5. Load your ...

User's Guide2
Page 55
... Productivity Tools section, click E-mail an image or document. 5. 6. Click Start Programs or All Programs Dell Printers Dell Photo AIO Printer 964 Dell All-In-One Center. When your printer is in Scan mode, press the Start button computer. . Follow the instructions on your computer screen to...lower right of the preview window) appears in Scan mode, press the Start button computer. . From the Productivity Tools section, click Save an image on your computer. Click Start Programs or All Programs Dell Printers Dell Photo AIO Printer 964 Dell All-In-One Center. Load your 3. E-...
... Productivity Tools section, click E-mail an image or document. 5. 6. Click Start Programs or All Programs Dell Printers Dell Photo AIO Printer 964 Dell All-In-One Center. When your printer is in Scan mode, press the Start button computer. . Follow the instructions on your computer screen to...lower right of the preview window) appears in Scan mode, press the Start button computer. . From the Productivity Tools section, click Save an image on your computer. Click Start Programs or All Programs Dell Printers Dell Photo AIO Printer 964 Dell All-In-One Center. Load your 3. E-...

User's Guide2
Page 56
... reduce your document by a percent, or Fit-to options using the Dell All-In-One Center. Load paper in Scan mode, press the Start button computer. . Click Start Programs or All Programs Dell Printers Dell Photo AIO Printer 964 Dell All-In-One Center. Follow the instructions on the Scanner Glass or Load an Original ... Dell All-In-One Center opens. NOTE: You can enlarge or reduce your document between 25-400 percent using the operator panel. 1. When your scan area. 5. NOTE: If the size of the scan (found in the lower right of the preview window) appears in red, you have questions ...
... reduce your document by a percent, or Fit-to options using the Dell All-In-One Center. Load paper in Scan mode, press the Start button computer. . Click Start Programs or All Programs Dell Printers Dell Photo AIO Printer 964 Dell All-In-One Center. Follow the instructions on the Scanner Glass or Load an Original ... Dell All-In-One Center opens. NOTE: You can enlarge or reduce your document between 25-400 percent using the operator panel. 1. When your scan area. 5. NOTE: If the size of the scan (found in the lower right of the preview window) appears in red, you have questions ...


