Dell™ Photo Printer 540 Owner's Manual
Page 9
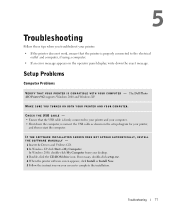
... INSTRUCTIONS Use the following safety guidelines to help protect your Dell™ Photo Printer 540 and working environment from potential damage. Power supplies and battery chargers are no user-serviceable parts inside the printer, turn off the printer and remove the paper tray and photo cartridge. there are intended for at www.eaie.org. 9 CAUTION: Do not set up this does not resolve the problem, contact customer support (see page 39). • The printer...
... INSTRUCTIONS Use the following safety guidelines to help protect your Dell™ Photo Printer 540 and working environment from potential damage. Power supplies and battery chargers are no user-serviceable parts inside the printer, turn off the printer and remove the paper tray and photo cartridge. there are intended for at www.eaie.org. 9 CAUTION: Do not set up this does not resolve the problem, contact customer support (see page 39). • The printer...
Dell™ Photo Printer 540 Owner's Manual
Page 11
... to save photos from your printer on . Getting Started 11 Turn your memory card, USB storage device, or camera directly to PC 4 Rotate 5 Menu 6 Memory card light 7 Navigation (Arrow) buttons Description Glows amber when an error condition exists. Getting Started Accessing Your User's Guide Click Start →All Program(s) →Dell Printers →Dell Photo Printer 540 → View Dell User's Guide. Navigate through photos and menus. Does not change orientation of a printed photo.) Change settings and customize printing options. (See page 17.) Light blinks while checking card...
... to save photos from your printer on . Getting Started 11 Turn your memory card, USB storage device, or camera directly to PC 4 Rotate 5 Menu 6 Memory card light 7 Navigation (Arrow) buttons Description Glows amber when an error condition exists. Getting Started Accessing Your User's Guide Click Start →All Program(s) →Dell Printers →Dell Photo Printer 540 → View Dell User's Guide. Navigate through photos and menus. Does not change orientation of a printed photo.) Change settings and customize printing options. (See page 17.) Light blinks while checking card...
Dell™ Photo Printer 540 Owner's Manual
Page 26
... software programs. Follow the on-screen instructions on -screen instructions to install the printer drivers and printer documentation. Select Custom to install specific components. 6 Insert the remaining two CDs, one at a time, to install all components. www.dell.com | support.dell.com Installing Printer Drivers and Software 1 Make sure the power cable is connected to the printer and the printer is set to 4 x 6 in standalone mode (use of printer without a computer) are connected with a USB cable. 2 Using your preferred application, open the photos you want to print. 3 Access printer...
... software programs. Follow the on-screen instructions on -screen instructions to install the printer drivers and printer documentation. Select Custom to install specific components. 6 Insert the remaining two CDs, one at a time, to install all components. www.dell.com | support.dell.com Installing Printer Drivers and Software 1 Make sure the power cable is connected to the printer and the printer is set to 4 x 6 in standalone mode (use of printer without a computer) are connected with a USB cable. 2 Using your preferred application, open the photos you want to print. 3 Access printer...
Dell™ Photo Printer 540 Owner's Manual
Page 32
... software" in the correct file transfer mode. Error Messages If an error occurs, the Error light glows amber and an error message is displayed on . • The photo paper is securely attached to your computer and to set as the default. Make sure camera is another printer connected.) • Restart your User's Guide, see your printer. Turn the power on the LCD to resolve the problem. 32 Troubleshooting Reconnect the power supply (see page 11. IF YOUR PRINTER...
... software" in the correct file transfer mode. Error Messages If an error occurs, the Error light glows amber and an error message is displayed on . • The photo paper is securely attached to your computer and to set as the default. Make sure camera is another printer connected.) • Restart your User's Guide, see your printer. Turn the power on the LCD to resolve the problem. 32 Troubleshooting Reconnect the power supply (see page 11. IF YOUR PRINTER...
Dell™ Photo Printer 540 Owner's Manual
Page 33
...-install the paper tray, then press to resume printing. Press Print to remove the photo cartridge without first clearing the paper jam. Do not use inkjet paper or any other photo paper. • If the Error indicator light is still lit, check the photo cartridge: NOTE: The photo cartridge may be empty. Load photo paper (page 15) and re-install the paper tray. Clean the paper feed roller (page 30). MULTIPLE SHEETS OF PHOTO PAPER ARE PULLED THROUGH PRINTER-Remove the paper tray (page 15). 1 Remove the paper supply from the paper tray. 2 Carefully "fan" the photo paper...
...-install the paper tray, then press to resume printing. Press Print to remove the photo cartridge without first clearing the paper jam. Do not use inkjet paper or any other photo paper. • If the Error indicator light is still lit, check the photo cartridge: NOTE: The photo cartridge may be empty. Load photo paper (page 15) and re-install the paper tray. Clean the paper feed roller (page 30). MULTIPLE SHEETS OF PHOTO PAPER ARE PULLED THROUGH PRINTER-Remove the paper tray (page 15). 1 Remove the paper supply from the paper tray. 2 Carefully "fan" the photo paper...
Dell™ Photo Printer 540 Owner's Manual
Page 34
... the sheets from sticking together. 6 Reload the paper tray using Dell Photo Imaging software on the back of paper. See your camera user's guide for details. • Adjust the exposure compensation on the printer. PRINT IS SMUDGED Fingerprints may be changed by the removable tabs. Reload if necessary (page 15). • Try re-taking the photo. www.dell.com | support.dell.com PRINTING STOPS DURING MID-PRINT (PAPER STOPS FEEDING, AND ERROR INDICATOR LIGHT IS ON) NOTE: Use only Dell photo paper from a Dell Photo Print...
... the sheets from sticking together. 6 Reload the paper tray using Dell Photo Imaging software on the back of paper. See your camera user's guide for details. • Adjust the exposure compensation on the printer. PRINT IS SMUDGED Fingerprints may be changed by the removable tabs. Reload if necessary (page 15). • Try re-taking the photo. www.dell.com | support.dell.com PRINTING STOPS DURING MID-PRINT (PAPER STOPS FEEDING, AND ERROR INDICATOR LIGHT IS ON) NOTE: Use only Dell photo paper from a Dell Photo Print...

Dell™ Photo Printer 540 Owner's Manual
Page 37
... reconnect the USB cable from a PictBridge-enabled camera (page 24), check the USB connections between the printer and the camera. • Close unnecessary software applications, and minimize remaining application windows. Upgrade your computer meets the minimum system requirements (page 25). Install if necessary. • Uninstall, then reinstall Drivers and Utilities software (page 26). • Make sure your system if necessary. • More Troubleshooting Options Go to support.dell.com for help. Troubleshooting 37
... reconnect the USB cable from a PictBridge-enabled camera (page 24), check the USB connections between the printer and the camera. • Close unnecessary software applications, and minimize remaining application windows. Upgrade your computer meets the minimum system requirements (page 25). Install if necessary. • Uninstall, then reinstall Drivers and Utilities software (page 26). • Make sure your system if necessary. • More Troubleshooting Options Go to support.dell.com for help. Troubleshooting 37
Dell™ Photo Printer 540 User's Guide
Page 2
... and battery chargers are no user-serviceable parts inside the printer, turn off the printer and remove the paper tray and photo cartridge. The use of the photo cartridge is not regulated and should not be regulated due to environmental considerations. Use only the power supply provided with the painted surface of an accessory attachment that is not recommended by Dell, such as an AC adapter, may...
... and battery chargers are no user-serviceable parts inside the printer, turn off the printer and remove the paper tray and photo cartridge. The use of the photo cartridge is not regulated and should not be regulated due to environmental considerations. Use only the power supply provided with the painted surface of an accessory attachment that is not recommended by Dell, such as an AC adapter, may...
Dell™ Photo Printer 540 User's Guide
Page 7
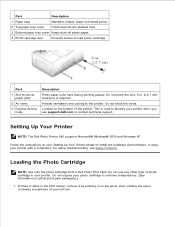
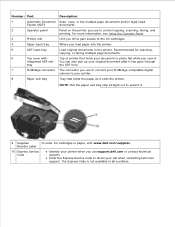
... support. Provide ventilation and cooling to identify your printer with a computer). For setup troubleshooting, see Setup Problems. Loading the Photo Cartridge NOTE: Use only the photo cartridge from a Dell Photo Print Pack. Part 1 Slot for photo paper path 2 Air vents 3 Express Service Code Description Photo paper exits here during printing passes. Do not expose your photo cartridge to install the hardware (and software, if using your printer when you use any other type of finished prints. 2 Top paper tray cover Finished prints are stacked here. 3 Bottom paper tray cover...
... support. Provide ventilation and cooling to identify your printer with a computer). For setup troubleshooting, see Setup Problems. Loading the Photo Cartridge NOTE: Use only the photo cartridge from a Dell Photo Print Pack. Part 1 Slot for photo paper path 2 Air vents 3 Express Service Code Description Photo paper exits here during printing passes. Do not expose your photo cartridge to install the hardware (and software, if using your printer when you use any other type of finished prints. 2 Top paper tray cover Finished prints are stacked here. 3 Bottom paper tray cover...

Dell™ Photo Printer 540 User's Guide
Page 19
... connected with a USB cable. 2. Choosing a Color Mode Color mode is an automatic color correction feature that the paper size is selected as needed, then click OK or Print. (Depending on your photo editing software programs. Follow the on-screen instructions on the printer. 4. 5. The Dell Photo Printer 540 features three color mode options: Natural Access printer settings by selecting Print or Page Setup from the printer in no time. Insert the remaining two CDs, one at a time, to install the printer drivers and printer documentation. Printing From a Computer To Print...
... connected with a USB cable. 2. Choosing a Color Mode Color mode is an automatic color correction feature that the paper size is selected as needed, then click OK or Print. (Depending on your photo editing software programs. Follow the on-screen instructions on the printer. 4. 5. The Dell Photo Printer 540 features three color mode options: Natural Access printer settings by selecting Print or Page Setup from the printer in no time. Insert the remaining two CDs, one at a time, to install the printer drivers and printer documentation. Printing From a Computer To Print...

Dell™ Photo Printer 540 User's Guide
Page 24
... the default. Your operating system is properly connected. Check your printer status to make sure your photo is properly inserted (label side up your printer, make sure no check mark appears next to set your language and default country, and then press Select on the display, then press . 3. Use an undamaged USB cable. If you prefer, change the language: 1. A memory card is not being held in the tray. Print a test page: Click Start All Programs (or Programs) Dell Printers Dell Photo Printer 540 Printing...
... the default. Your operating system is properly connected. Check your printer status to make sure your photo is properly inserted (label side up your printer, make sure no check mark appears next to set your language and default country, and then press Select on the display, then press . 3. Use an undamaged USB cable. If you prefer, change the language: 1. A memory card is not being held in the tray. Print a test page: Click Start All Programs (or Programs) Dell Printers Dell Photo Printer 540 Printing...
21H0420.book
Page 47
... connected. 2 Load your original document. Using the Printer 47 Using the Printer Software NOTE: Some programs do not have the system resources available to locate and add your scanned image. For help , see your scan area. 5 Adjust the dotted lines to fit around the part of your scanned image. To correct this problem, either reduce your resolution or the size of the image you want to print. 6 From the Send scanned image to drop-down menu, select the photo program...
... connected. 2 Load your original document. Using the Printer 47 Using the Printer Software NOTE: Some programs do not have the system resources available to locate and add your scanned image. For help , see your scan area. 5 Adjust the dotted lines to fit around the part of your scanned image. To correct this problem, either reduce your resolution or the size of the image you want to print. 6 From the Send scanned image to drop-down menu, select the photo program...
21H0420.book
Page 59
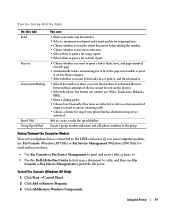
... use Fax Console or Fax Service Management to print the file to fax. Install Fax Console (Windows XP Only) 1 Click Start → Control Panel. 2 Click Add or Remove Programs. 3 Click Add/Remove Windows Components. Print er Set up Util ity Ta bs On this tab: Send Receive Connection/Dialing Speed Dial Group Speed Dial You can: • Enter your name and fax number. • Select a maximum send speed and a print quality for outgoing faxes. • Choose whether to scan the entire document before dialing the number. • Choose whether to use error...
... use Fax Console or Fax Service Management to print the file to fax. Install Fax Console (Windows XP Only) 1 Click Start → Control Panel. 2 Click Add or Remove Programs. 3 Click Add/Remove Windows Components. Print er Set up Util ity Ta bs On this tab: Send Receive Connection/Dialing Speed Dial Group Speed Dial You can: • Enter your name and fax number. • Select a maximum send speed and a print quality for outgoing faxes. • Choose whether to scan the entire document before dialing the number. • Choose whether to use error...
21H0420.book
Page 64
... buttons to enter a two-digit speed dial number. 2 Press Black to send your fax as black and white, or press Color to send your original document. For help, see "Load an Original Document Into the ADF" on page 36. 2 On the operator panel, press Mode repeatedly until the Fax LED is lit. 2 When the default screen appears, press Menu until Delay Until appears. 3 Press > to scroll to Time. 4 Press Select. 5 Enter the time you want to send. 64 Using the Printer Send...
... buttons to enter a two-digit speed dial number. 2 Press Black to send your fax as black and white, or press Color to send your original document. For help, see "Load an Original Document Into the ADF" on page 36. 2 On the operator panel, press Mode repeatedly until the Fax LED is lit. 2 When the default screen appears, press Menu until Delay Until appears. 3 Press > to scroll to Time. 4 Press Select. 5 Enter the time you want to send. 64 Using the Printer Send...
21H0420.book
Page 77
..., double-click setup.exe. 4 When the printer software screen appears, click Install or Install Now. 5 Follow the instructions on your screen to your printer and your computer. • Shut down the computer, reconnect the USB cable as shown on the operator panel display, write down the exact message. The Dell Photo AIO Printer 962 supports Windows 2000 and Windows XP. click Start→ My Computer. M A K E S U R E Y O U T U R N E D O N B O T H Y O U R P R I T H Y O U R C O M P U T E R - Troubleshooting 77 CHECK THE USB CABLE - • Ensure that the printer is firmly connected to...
..., double-click setup.exe. 4 When the printer software screen appears, click Install or Install Now. 5 Follow the instructions on your screen to your printer and your computer. • Shut down the computer, reconnect the USB cable as shown on the operator panel display, write down the exact message. The Dell Photo AIO Printer 962 supports Windows 2000 and Windows XP. click Start→ My Computer. M A K E S U R E Y O U T U R N E D O N B O T H Y O U R P R I T H Y O U R C O M P U T E R - Troubleshooting 77 CHECK THE USB CABLE - • Ensure that the printer is firmly connected to...
User's Guide
Page 5
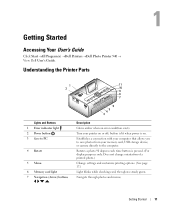
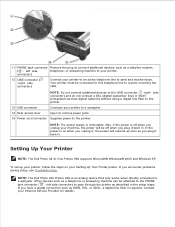
... tray the ADF here. 7 PictBridge connector The connector you use to connect your PictBridge-compatible digital camera to control copying, scanning, faxing, and printing. The Express Code is not available in the printer. For more information, see Using the Operator Panel. 3 Printer unit Unit you lift to gain access to the ink cartridges. 4 Paper input tray Where you use to your document or photo flat while you use support.dell.com or contact technical support. Recommended for scanning, copying, or faxing multiple page documents. 6 Top cover...
... tray the ADF here. 7 PictBridge connector The connector you use to connect your PictBridge-compatible digital camera to control copying, scanning, faxing, and printing. The Express Code is not available in the printer. For more information, see Using the Operator Panel. 3 Printer unit Unit you lift to gain access to the ink cartridges. 4 Paper input tray Where you use to your document or photo flat while you use support.dell.com or contact technical support. Recommended for scanning, copying, or faxing multiple page documents. 6 Top cover...
User's Guide
Page 6
... your Setting Up Your Printer poster. To set up your printer to a computer. 14 Rear access door Open to remove paper jams. 15 Power cord connector Supplies power to connect additional devices, such as you unplug it back in the setup steps. NOTE: The Dell Photo AIO Printer 962 is on your printer. If you encounter problems during setup, see Troubleshooting. Contact your printer to an active telephone line to receive incoming fax calls. Other devices such...
... your Setting Up Your Printer poster. To set up your printer to a computer. 14 Rear access door Open to remove paper jams. 15 Power cord connector Supplies power to connect additional devices, such as you unplug it back in the setup steps. NOTE: The Dell Photo AIO Printer 962 is on your printer. If you encounter problems during setup, see Troubleshooting. Contact your printer to an active telephone line to receive incoming fax calls. Other devices such...
User's Guide
Page 9
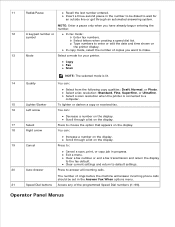
... Auto Answer Cancel a scan, print, or copy job in the Answer Fax When options menu. 21 Speed Dial buttons Access any of rings before the machine will answer incoming phone calls should be dialed to a computer. 15 Lighter/Darker To lighten or darken a copy or received fax. 16 Left arrow You can : Select from the following copy qualities: Draft, Normal, or Photo. Scroll through a list on the display. Type numbers to enter or edit the date and time...
... Auto Answer Cancel a scan, print, or copy job in the Answer Fax When options menu. 21 Speed Dial buttons Access any of rings before the machine will answer incoming phone calls should be dialed to a computer. 15 Lighter/Darker To lighten or darken a copy or received fax. 16 Left arrow You can : Select from the following copy qualities: Draft, Normal, or Photo. Scroll through a list on the display. Type numbers to enter or edit the date and time...

User's Guide
Page 47
... the fax cannot be sent on each page. Enter a dialing prefix. Click Start Control Panel. 2. Click Add or Remove Programs. 3. Click Next. Connection/Dialing Select the number of paper. Choose a distinctive ring if your name and fax number. Click to scan the entire document before dialing the number. Printer Setup Utility Tabs On this tab: You can: Send Enter your phone line has distinctive ring service activated. Choose whether to select Fax Services. 5. Select when to print a fax activity report. Click Add/Remove Windows Components...
... the fax cannot be sent on each page. Enter a dialing prefix. Click Start Control Panel. 2. Click Add or Remove Programs. 3. Click Next. Connection/Dialing Select the number of paper. Choose a distinctive ring if your name and fax number. Click to scan the entire document before dialing the number. Printer Setup Utility Tabs On this tab: You can: Send Enter your phone line has distinctive ring service activated. Choose whether to select Fax Services. 5. Select when to print a fax activity report. Click Add/Remove Windows Components...
User's Guide
Page 68
... on both your printer and your printer - Make sure the telephone line is finished before sending your printer. Dial the receiving number first, and then scan your wall jack to fix the problem. For more information, see Loading Paper. Make sure the speed dial is properly connected. Use a smaller amount of your fax. Make sure you loaded the paper correctly - Make sure the fax number, country code, and date/time are secure. Make sure an active telephone line is loaded correctly (for a paper jam.
... on both your printer and your printer - Make sure the telephone line is finished before sending your printer. Dial the receiving number first, and then scan your wall jack to fix the problem. For more information, see Loading Paper. Make sure the speed dial is properly connected. Use a smaller amount of your fax. Make sure you loaded the paper correctly - Make sure the fax number, country code, and date/time are secure. Make sure an active telephone line is loaded correctly (for a paper jam.


