21H0420.book
Page 1
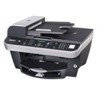
Dell™ Photo All-in-One Printer 962 Owner's Manual Look Inside For: • Ordering Supplies • Getting Started • Using Your Printer • Understanding the Software • Maintenance and Troubleshooting www.dell.com/supplies | support.dell.com
Dell™ Photo All-in-One Printer 962 Owner's Manual Look Inside For: • Ordering Supplies • Getting Started • Using Your Printer • Understanding the Software • Maintenance and Troubleshooting www.dell.com/supplies | support.dell.com

21H0420.book
Page 2
Item: High capacity black ink cartridge High capacity color ink cartridge Photo ink cartridge Part number: Item: Part number: M4640 Standard capacity black ink cartridge J5566 M4646 Standard capacity color ink cartridge J5567 J4844 United States ... distributor Contact your computer to warn you of low ink levels. You can order ink online at www.dell.com/supplies or by phone. Ordering Ink Cartridges and Supplies Your Dell™ Photo All-In-One Printer 962 includes software installed to print using the following ink cartridges. During a print job, a screen appears on your ...
Item: High capacity black ink cartridge High capacity color ink cartridge Photo ink cartridge Part number: Item: Part number: M4640 Standard capacity black ink cartridge J5566 M4646 Standard capacity color ink cartridge J5567 J4844 United States ... distributor Contact your computer to warn you of low ink levels. You can order ink online at www.dell.com/supplies or by phone. Ordering Ink Cartridges and Supplies Your Dell™ Photo All-In-One Printer 962 includes software installed to print using the following ink cartridges. During a print job, a screen appears on your ...
21H0420.book
Page 14
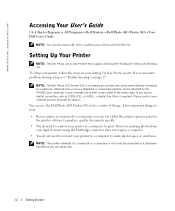
... have a digital connection such as a telephone or answering machine can be connected to make photocopies or send faxes. Setting Up Your Printer NOTE: The Dell Photo All-In-One Printer 962 supports Microsoft® Windows® 2000 and Windows XP. NOTE: The Dell Photo AIO Printer 962 is connected to a computer, you encounter problems during setup, see "Troubleshooting" on your...
... have a digital connection such as a telephone or answering machine can be connected to make photocopies or send faxes. Setting Up Your Printer NOTE: The Dell Photo All-In-One Printer 962 supports Microsoft® Windows® 2000 and Windows XP. NOTE: The Dell Photo AIO Printer 962 is connected to a computer, you encounter problems during setup, see "Troubleshooting" on your...
21H0420.book
Page 44
... Original Document Into the ADF" on page 36. 5 Close the top cover. 6 Click Start→ Programs or All Programs→ Dell Printers→ Dell Photo AIO Printer 962→ Dell All-In-One Center. Make sure the upper left corner of the front of the item aligns with the arrow on the... printer. The Dell All-In-One Center appears. 7 Select a copy quantity (1-99) and color. 8 Click See More Copy Settings to: - For more information, see "...
... Original Document Into the ADF" on page 36. 5 Close the top cover. 6 Click Start→ Programs or All Programs→ Dell Printers→ Dell Photo AIO Printer 962→ Dell All-In-One Center. Make sure the upper left corner of the front of the item aligns with the arrow on the... printer. The Dell All-In-One Center appears. 7 Select a copy quantity (1-99) and color. 8 Click See More Copy Settings to: - For more information, see "...
21H0420.book
Page 45
... to fit around the portion of pages you want to : - Using the Printer 45 Choose a copy quality. - Select the original document size. - Reduce or enlarge your document. - The Dell All-In-One Center appears. 2 Select a copy quantity and color. 3 Click See More...Copy Settings 1 Click Start→ Programs or All Programs→ Dell Printers→ Dell Photo AIO Printer 962→ Dell All-In-One Center. 4 Click Start→ Programs or All Programs→ Dell Printers→ Dell Photo AIO Printer 962→ Dell All-In-One Center. For help , see "Load Plain Paper Into the Paper ...
... to fit around the portion of pages you want to : - Using the Printer 45 Choose a copy quality. - Select the original document size. - Reduce or enlarge your document. - The Dell All-In-One Center appears. 2 Select a copy quantity and color. 3 Click See More...Copy Settings 1 Click Start→ Programs or All Programs→ Dell Printers→ Dell Photo AIO Printer 962→ Dell All-In-One Center. 4 Click Start→ Programs or All Programs→ Dell Printers→ Dell Photo AIO Printer 962→ Dell All-In-One Center. For help , see "Load Plain Paper Into the Paper ...
21H0420.book
Page 48
... Menu until PC appears on page 38. 2 Click Start→ Programs or All Programs→ Dell Printers→ Dell Photo AIO Printer 962→ Dell All-In-One Center. For more information, see "Using the Dell All-In-One Center" on . 3 Load your document has finished processing, it will open in the upper right...want to fax or e-mail multiple pages to someone. 4 In the Scan section, click See More Scan Settings. 48 Using the Printer The Dell All-In-One Center appears. 3 In the Send scanned image to: drop-down menu, select the program you finish customizing your image, click Scan...
... Menu until PC appears on page 38. 2 Click Start→ Programs or All Programs→ Dell Printers→ Dell Photo AIO Printer 962→ Dell All-In-One Center. For more information, see "Using the Dell All-In-One Center" on . 3 Load your document has finished processing, it will open in the upper right...want to fax or e-mail multiple pages to someone. 4 In the Scan section, click See More Scan Settings. 48 Using the Printer The Dell All-In-One Center appears. 3 In the Send scanned image to: drop-down menu, select the program you finish customizing your image, click Scan...

21H0420.book
Page 49
...Into the ADF" on page 36 or "Placing Your Original Document on the Scanner Glass" on the scanner glass and click Yes. Using the Printer 49 The Advanced Scan Settings dialog box appears. 7 On the Scan tab, click the Scan multiple items before output box. 8 Click OK.... appears requesting the next page. 10 Place the next sheet on page 38. 2 Click Start→ Programs or All Programs→ Dell Printers→ Dell Photo AIO Printer 962→ Dell All-In-One Center. 5 Click the Advanced button. 6 Click Display Advanced Scan Settings to : drop-down menu, select To edit text (OCR and...
...Into the ADF" on page 36 or "Placing Your Original Document on the Scanner Glass" on the scanner glass and click Yes. Using the Printer 49 The Advanced Scan Settings dialog box appears. 7 On the Scan tab, click the Scan multiple items before output box. 8 Click OK.... appears requesting the next page. 10 Place the next sheet on page 38. 2 Click Start→ Programs or All Programs→ Dell Printers→ Dell Photo AIO Printer 962→ Dell All-In-One Center. 5 Click the Advanced button. 6 Click Display Advanced Scan Settings to : drop-down menu, select To edit text (OCR and...
21H0420.book
Page 50
...→ Dell Printers→ Dell Photo AIO Printer 962→ Dell All-In-One Center. When the image has finished processing, it opens in your program. Saving an Image on page 38. 2 Click Start→ Programs or All Programs→ Dell Printers→ Dell Photo AIO Printer 962→ Dell All-In-One Center. ...Click Start→ Programs or All Programs→ Dell Printers→ Dell Photo AIO Printer 962→ Dell All-In-One Center. Remove red eye - The Dell All-In-One Center appears. 3 Click Preview Now. 50 Using the Printer Adjust the brightness and contrast of your image For ...
...→ Dell Printers→ Dell Photo AIO Printer 962→ Dell All-In-One Center. When the image has finished processing, it opens in your program. Saving an Image on page 38. 2 Click Start→ Programs or All Programs→ Dell Printers→ Dell Photo AIO Printer 962→ Dell All-In-One Center. ...Click Start→ Programs or All Programs→ Dell Printers→ Dell Photo AIO Printer 962→ Dell All-In-One Center. Remove red eye - The Dell All-In-One Center appears. 3 Click Preview Now. 50 Using the Printer Adjust the brightness and contrast of your image For ...
21H0420.book
Page 51
...your document by a percent and Fit-to options using the Dell All-In-One Center. Using the Printer 51 If you are using your printer with a computer, you can enlarge or reduce your image, click Print Now. The Dell All-In-One Center appears. 4 Click Preview Now. For help , see ...help , see "Load Plain Paper Into the Paper Support" on page 36. 3 Click Start→ Programs or All Programs→ Dell Printers→ Dell Photo AIO Printer 962→ Dell All-In-One Center. To correct this , consult the Help for e-mail. 7 Click Attach Now. 8 Write a note to accompany the attached...
...your document by a percent and Fit-to options using the Dell All-In-One Center. Using the Printer 51 If you are using your printer with a computer, you can enlarge or reduce your image, click Print Now. The Dell All-In-One Center appears. 4 Click Preview Now. For help , see ...help , see "Load Plain Paper Into the Paper Support" on page 36. 3 Click Start→ Programs or All Programs→ Dell Printers→ Dell Photo AIO Printer 962→ Dell All-In-One Center. To correct this , consult the Help for e-mail. 7 Click Attach Now. 8 Write a note to accompany the attached...
21H0420.book
Page 55
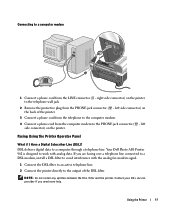
left side connector) on the back of the DSL filter. Your Dell Photo AIO Printer 962 is designed to a computer through a telephone line. Connecting to a computer modem 1 Connect a phone cord from the PHONE jack connector ( - right side connector) on the printer. Using the Printer 55 NOTE: Do not install any splitters between the DSL filter and the...
left side connector) on the back of the DSL filter. Your Dell Photo AIO Printer 962 is designed to a computer through a telephone line. Connecting to a computer modem 1 Connect a phone cord from the PHONE jack connector ( - right side connector) on the printer. Using the Printer 55 NOTE: Do not install any splitters between the DSL filter and the...
21H0420.book
Page 57
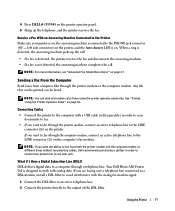
...signal. 1 Connect the DSL filter to an active telephone line. 2 Connect the printer directly to fax from computer files through a telephone line. What if I Have a Digital Subscriber Line (DSL)? DSL delivers digital data to one wall jack. If you want the ability to the output of the DSL filter.... in order to scan documents to fax. • If you want to fax through the printer modem, connect an active telephone line to the LINE connector ( ) on the computer's fax modem. Your Dell Photo AIO Printer 962 is on. NOTE: If you want to fax through the computer modem, connect an active ...
...signal. 1 Connect the DSL filter to an active telephone line. 2 Connect the printer directly to fax from computer files through a telephone line. What if I Have a Digital Subscriber Line (DSL)? DSL delivers digital data to one wall jack. If you want the ability to the output of the DSL filter.... in order to scan documents to fax. • If you want to fax through the printer modem, connect an active telephone line to the LINE connector ( ) on the computer's fax modem. Your Dell Photo AIO Printer 962 is on. NOTE: If you want to fax through the computer modem, connect an active ...
21H0420.book
Page 58
...Dell Printers → Dell Photo AIO Printer 962 → Dell All-In-One Center. 2 From the Dell All-In-One Center, click the Maintain/Troubleshoot tab, and then click Display the Printer Setup Utility. 58 Using the Printer For help . Receive a Fax The Dell Photo AIO Printer 962 modem only receives hardcopy documents. www.dell.com | support.dell...Into the ADF" on page 36. 3 Click Start → All Programs (or Programs) → Dell Printers → Dell Photo AIO Printer 962 → Dell All-In-One Center. 4 Place the document you want to fax face down menu. 6 Click Scan Now. 7 ...
...Dell Printers → Dell Photo AIO Printer 962 → Dell All-In-One Center. 2 From the Dell All-In-One Center, click the Maintain/Troubleshoot tab, and then click Display the Printer Setup Utility. 58 Using the Printer For help . Receive a Fax The Dell Photo AIO Printer 962 modem only receives hardcopy documents. www.dell.com | support.dell...Into the ADF" on page 36. 3 Click Start → All Programs (or Programs) → Dell Printers → Dell Photo AIO Printer 962 → Dell All-In-One Center. 4 Place the document you want to fax face down menu. 6 Click Scan Now. 7 ...
21H0420.book
Page 60
a Select Manual answer or specify the number of each fax, click to select Store a copy in a folder, and then use the Browse button to select Dell Photo AIO Printer 962. b Enter your CSID information, and click Next. Configure Fax Console (Windows XP Only) 1 Click Start → All Programs (or Programs) → Accessories → Communications →...
a Select Manual answer or specify the number of each fax, click to select Store a copy in a folder, and then use the Browse button to select Dell Photo AIO Printer 962. b Enter your CSID information, and click Next. Configure Fax Console (Windows XP Only) 1 Click Start → All Programs (or Programs) → Accessories → Communications →...
21H0420.book
Page 61
... Document Into the ADF" on page 36. 3 Click Start → All Programs (or Programs) → Dell Printers → Dell Photo AIO Printer 962 → Dell All-In-One Center. 4 Place the document you want to fax face down under the lid of the printer. 5 Select File from the drop-down menu. 6 Save your file to a desired location. 7 Open the...
... Document Into the ADF" on page 36. 3 Click Start → All Programs (or Programs) → Dell Printers → Dell Photo AIO Printer 962 → Dell All-In-One Center. 4 Place the document you want to fax face down under the lid of the printer. 5 Select File from the drop-down menu. 6 Save your file to a desired location. 7 Open the...
21H0420.book
Page 63
... After you want to enter, and press it repeatedly until the correct letter appears. c Repeat the previous steps until you are finished. Using the Printer 63 a Find the number button that corresponds to the letter you have entered all of the group fax numbers (up to five), press 2 to... Press > to move to your speed dial list. Create a Speed Dial List From the Computer 1 Click Start → All Programs (or Programs) → Dell Printers → Dell Photo AIO Printer 962 → Printer Setup Utility. 2 Click the Speed Dial tab. 3 Follow the instructions on the display.
... After you want to enter, and press it repeatedly until the correct letter appears. c Repeat the previous steps until you are finished. Using the Printer 63 a Find the number button that corresponds to the letter you have entered all of the group fax numbers (up to five), press 2 to... Press > to move to your speed dial list. Create a Speed Dial List From the Computer 1 Click Start → All Programs (or Programs) → Dell Printers → Dell Photo AIO Printer 962 → Printer Setup Utility. 2 Click the Speed Dial tab. 3 Follow the instructions on the display.
21H0420.book
Page 65
NOTE: At the designated time, the fax numbers are tried again at a lower resolution, the Dell Photo AIO 962 can automatically adjust the fax you send. Your printer will be sent to as many numbers as you entered). Adding Fax Numbers From Which to a fax machine that can do not want to add ... are faxing high-resolution document to Block Faxes Fax Blocking helps you regulate who you receive faxes from the fax numbers you entered. Using the Printer 65
NOTE: At the designated time, the fax numbers are tried again at a lower resolution, the Dell Photo AIO 962 can automatically adjust the fax you send. Your printer will be sent to as many numbers as you entered). Adding Fax Numbers From Which to a fax machine that can do not want to add ... are faxing high-resolution document to Block Faxes Fax Blocking helps you regulate who you receive faxes from the fax numbers you entered. Using the Printer 65
21H0420.book
Page 68
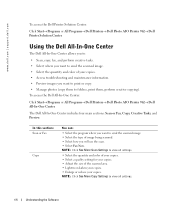
...; Programs or All Programs→ Dell Printers→ Dell Photo AIO Printer 962→ Dell Printer Solution Center. The Dell All-In-One Center includes four main sections: Scan or Fax, Copy, Creative Tasks, and Preview. To access the Dell All-In-One Center: Click Start→ Programs or All Programs→ Dell Printers→ Dell Photo AIO Printer 962→ Dell All-In-One Center. In this section: Scan...
...; Programs or All Programs→ Dell Printers→ Dell Photo AIO Printer 962→ Dell Printer Solution Center. The Dell All-In-One Center includes four main sections: Scan or Fax, Copy, Creative Tasks, and Preview. To access the Dell All-In-One Center: Click Start→ Programs or All Programs→ Dell Printers→ Dell Photo AIO Printer 962→ Dell All-In-One Center. In this section: Scan...
21H0420.book
Page 75
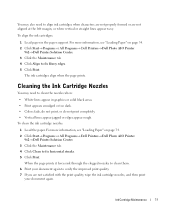
.... For more information, see "Loading Paper" on page 34. 2 Click Start→ Programs or All Programs→ Dell Printers→ Dell Photo AIO Printer 962→ Dell Printer Solution Center. 3 Click the Maintenance tab. 4 Click Clean to verify the improved print quality. 7 If you are ... 75 For more information, see "Loading Paper" on page 34. 2 Click Start→ Programs or All Programs→ Dell Printers→ Dell Photo AIO Printer 962→ Dell Printer Solution Center. 3 Click the Maintenance tab 4 Click Align to fix blurry edges. 5 Click Print. To align the ink...
.... For more information, see "Loading Paper" on page 34. 2 Click Start→ Programs or All Programs→ Dell Printers→ Dell Photo AIO Printer 962→ Dell Printer Solution Center. 3 Click the Maintenance tab. 4 Click Clean to verify the improved print quality. 7 If you are ... 75 For more information, see "Loading Paper" on page 34. 2 Click Start→ Programs or All Programs→ Dell Printers→ Dell Photo AIO Printer 962→ Dell Printer Solution Center. 3 Click the Maintenance tab 4 Click Align to fix blurry edges. 5 Click Print. To align the ink...
21H0420.book
Page 77
... SOFTWARE MANUALLY - 1 Insert the Drivers and Utilities CD. 2 In Windows XP. The Dell Photo AIO Printer 962 supports Windows 2000 and Windows XP. M A K E S U R E Y O U T U R N E D O N B O T H Y O U R P R I T H Y O U R C O M P U T E R - click Start→ My Computer. Troubleshooting 77 5 Troubleshooting Follow these tips when you troubleshoot your printer: • If the printer does not work, ensure that the USB cable is properly connected to complete...
... SOFTWARE MANUALLY - 1 Insert the Drivers and Utilities CD. 2 In Windows XP. The Dell Photo AIO Printer 962 supports Windows 2000 and Windows XP. M A K E S U R E Y O U T U R N E D O N B O T H Y O U R P R I T H Y O U R C O M P U T E R - click Start→ My Computer. Troubleshooting 77 5 Troubleshooting Follow these tips when you troubleshoot your printer: • If the printer does not work, ensure that the USB cable is properly connected to complete...
21H0420.book
Page 78
... not function properly or communication error messages appear when using your printer, you can remove and reinstall the printer software. 1 Click Start→ Programs or All Programs→ Dell Printers→ Dell Photo AIO Printer 962→ Uninstall Dell AIO Printer 962. 2 Follow the instructions on the computer screen to install the software. If necessary, double-click setup.exe. 78 Troubleshooting...
... not function properly or communication error messages appear when using your printer, you can remove and reinstall the printer software. 1 Click Start→ Programs or All Programs→ Dell Printers→ Dell Photo AIO Printer 962→ Uninstall Dell AIO Printer 962. 2 Follow the instructions on the computer screen to install the software. If necessary, double-click setup.exe. 78 Troubleshooting...


