User Manual
Page 23
...Mioga_AIO_UG_FM\Mioga_AIO _UG_FM\Mioga-AIO-UGTOC.fm Removing the Retard Roller in the Standard 250-Sheet Tray 628 Installing a Retard Roller in the Standard 250-Sheet Tray 629 Cleaning Inside the Printer 631 Cleaning the Feed Roller 631 Cleaning the CTD Sensor 637 Cleaning the Scanner 640... Cleaning the ADF Feed Roller 642 Adjusting Color Registration 643 Printing the Color Registration Chart 643 Determining Values 644 Entering Values 646...
...Mioga_AIO_UG_FM\Mioga_AIO _UG_FM\Mioga-AIO-UGTOC.fm Removing the Retard Roller in the Standard 250-Sheet Tray 628 Installing a Retard Roller in the Standard 250-Sheet Tray 629 Cleaning Inside the Printer 631 Cleaning the Feed Roller 631 Cleaning the CTD Sensor 637 Cleaning the Scanner 640... Cleaning the ADF Feed Roller 642 Adjusting Color Registration 643 Printing the Color Registration Chart 643 Determining Values 644 Entering Values 646...
User Manual
Page 633
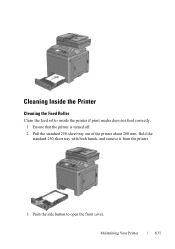
Maintaining Your Printer 631 Cleaning Inside the Printer Cleaning the Feed Roller Clean the feed roller inside the printer if print media does not feed correctly. 1 Ensure that the printer is turned off. 2 Pull the standard 250-sheet tray out of the printer about 200 mm. Hold the standard 250-sheet tray with both hands, and remove it from the printer. 3 Push the side button to open the front cover.
Maintaining Your Printer 631 Cleaning Inside the Printer Cleaning the Feed Roller Clean the feed roller inside the printer if print media does not feed correctly. 1 Ensure that the printer is turned off. 2 Pull the standard 250-sheet tray out of the printer about 200 mm. Hold the standard 250-sheet tray with both hands, and remove it from the printer. 3 Push the side button to open the front cover.
User Manual
Page 636
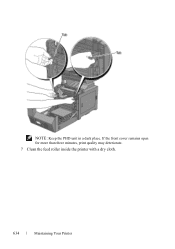
If the front cover remains open for more than three minutes, print quality may deteriorate. 7 Clean the feed roller inside the printer with a dry cloth. 634 Maintaining Your Printer NOTE: Keep the PHD unit in a dark place.
If the front cover remains open for more than three minutes, print quality may deteriorate. 7 Clean the feed roller inside the printer with a dry cloth. 634 Maintaining Your Printer NOTE: Keep the PHD unit in a dark place.

User Manual
Page 644
... the contamination from the ADF may also be soiled. Cleaning the ADF Feed Roller Keeping the ADF feed roller clean helps ensure the best possible copies. It is recommended to clean the ADF feed roller at regular intervals. 1 Open the ADF cover. 2 Wipe the ADF feed roller with a dry soft lint-free cloth or paper towel until it... white sheet until it is clean. In this case, slightly dampen a soft lint-free cloth or paper towel with ink stains, paper from the ADF feed roller until it is clean and dry. 642 Maintaining Your Printer
... the contamination from the ADF may also be soiled. Cleaning the ADF Feed Roller Keeping the ADF feed roller clean helps ensure the best possible copies. It is recommended to clean the ADF feed roller at regular intervals. 1 Open the ADF cover. 2 Wipe the ADF feed roller with a dry soft lint-free cloth or paper towel until it... white sheet until it is clean. In this case, slightly dampen a soft lint-free cloth or paper towel with ink stains, paper from the ADF feed roller until it is clean and dry. 642 Maintaining Your Printer
User Manual
Page 666
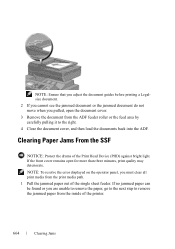
... the operator panel, you are unable to remove the paper, go to the next step to remove the jammed paper from the ADF feeder roller or the feed area by carefully pulling it to the right. 4 Close the document cover, and then load the documents back into the ADF. PRE LIMINARY 9/13...
... the operator panel, you are unable to remove the paper, go to the next step to remove the jammed paper from the ADF feeder roller or the feed area by carefully pulling it to the right. 4 Close the document cover, and then load the documents back into the ADF. PRE LIMINARY 9/13...

User Manual
Page 689
... is loaded correctly. Ensure that the print media is not curled. Turn the print media over or around and try printing again to see if feeding improves. Do not mix print media types. D E L L C ON F I D E N T I N A RY 9 / 1 3 / 1 0 - F O R P R O O F O N LY Troubleshooting Guide 687 Ensure ...Tray and the Optional 250-Sheet Feeder" for more information. See "Supported Paper Types" for more information. The envelope is empty. Wipe the retard rollers in the standard 250-sheet tray or single sheet feeder. P R E L I M I A L - Do not overload the tray. Ensure ...
... is loaded correctly. Ensure that the print media is not curled. Turn the print media over or around and try printing again to see if feeding improves. Do not mix print media types. D E L L C ON F I D E N T I N A RY 9 / 1 3 / 1 0 - F O R P R O O F O N LY Troubleshooting Guide 687 Ensure ...Tray and the Optional 250-Sheet Feeder" for more information. See "Supported Paper Types" for more information. The envelope is empty. Wipe the retard rollers in the standard 250-sheet tray or single sheet feeder. P R E L I M I A L - Do not overload the tray. Ensure ...

User Manual
Page 720
...\section31.fm Action 1 Ensure the fuser is complete. 5 Wipe the retard roller in the tray where the multi- Does this solve your problem? Does this solve your problem? The task is installed correctly. Contact Dell. 1 Ensure the media type you are using other type of print media,...Does this solve your problem? DE LL CONFIDENTIAL - Standard 250-Sheet Tray/Optional 250-Sheet Feeder Multi-feed Jam Action 1 Ensure that the tray is complete. Does this solve your problem? SSF Multi-feed Jam No If using coated paper, go to action 3. Go to action 5. Go to action ...
...\section31.fm Action 1 Ensure the fuser is complete. 5 Wipe the retard roller in the tray where the multi- Does this solve your problem? Does this solve your problem? The task is installed correctly. Contact Dell. 1 Ensure the media type you are using other type of print media,...Does this solve your problem? DE LL CONFIDENTIAL - Standard 250-Sheet Tray/Optional 250-Sheet Feeder Multi-feed Jam Action 1 Ensure that the tray is complete. Does this solve your problem? SSF Multi-feed Jam No If using coated paper, go to action 3. Go to action 5. Go to action ...
User Manual
Page 721
...PHD unit if you have a spare unit. See "Replacing the Toner Cartridges." 4 Replace the toner cartridge (Y). The task is complete. 5 Wipe the retard roller in the tray where the multi- Replace it with water. P R E L I M I A L - The task is complete. Does this solve...a new one .) D E L L C ON F I D E N T I N A RY 9 / 1 3 / 1 0 - The task is feed occurred with a cloth moistened with a new one .) The task is Go to action 5. Contact Dell. complete. Action 1 To specify the cause of the noise, perform the Auto Registration Adjustment. complete. (The toner cartridge...
...PHD unit if you have a spare unit. See "Replacing the Toner Cartridges." 4 Replace the toner cartridge (Y). The task is complete. 5 Wipe the retard roller in the tray where the multi- Replace it with water. P R E L I M I A L - The task is complete. Does this solve...a new one .) D E L L C ON F I D E N T I N A RY 9 / 1 3 / 1 0 - The task is feed occurred with a cloth moistened with a new one .) The task is Go to action 5. Contact Dell. complete. Action 1 To specify the cause of the noise, perform the Auto Registration Adjustment. complete. (The toner cartridge...
User Manual
Page 726
... Document Feeder (ADF). Images are adjusted properly. FILE LOCATION: C:\Users\fxstdpcadmin\Desktop\0630_UG??\Mioga_AIO_UG_FM\Mioga_AIO_UG_FM\section31.fm Document misfeeds or multiple feeds occur in the ADF. Check whether the ADF roller assembly is properly loaded in the ADF or on the output when scanned using the document glass. Ensure that the document...
... Document Feeder (ADF). Images are adjusted properly. FILE LOCATION: C:\Users\fxstdpcadmin\Desktop\0630_UG??\Mioga_AIO_UG_FM\Mioga_AIO_UG_FM\section31.fm Document misfeeds or multiple feeds occur in the ADF. Check whether the ADF roller assembly is properly loaded in the ADF or on the output when scanned using the document glass. Ensure that the document...

