User Manual
Page 214
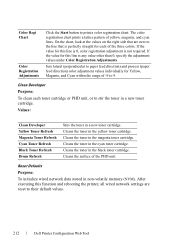
...stir the toner in non-volatile memory (NVM). Values: Clean Developer Yellow Toner Refresh Magenta Toner Refresh Cyan Toner Refresh Black Toner Refresh Drum Refresh Stirs the toner in the yellow toner cartridge. Cleans the toner in a new toner cartridge. Cleans the surface of yellow, ...cartridge. After executing this line is not required. Color Regi Chart Color Registration Adjustments Click the Start button to their default values. 212 Dell Printer Configuration Web Tool Clean Developer Purpose: To clean each of -9 to the line that is perfectly straight for this line is 0,...
...stir the toner in non-volatile memory (NVM). Values: Clean Developer Yellow Toner Refresh Magenta Toner Refresh Cyan Toner Refresh Black Toner Refresh Drum Refresh Stirs the toner in the yellow toner cartridge. Cleans the toner in a new toner cartridge. Cleans the surface of yellow, ...cartridge. After executing this line is not required. Color Regi Chart Color Registration Adjustments Click the Start button to their default values. 212 Dell Printer Configuration Web Tool Clean Developer Purpose: To clean each of -9 to the line that is perfectly straight for this line is 0,...
User Manual
Page 466
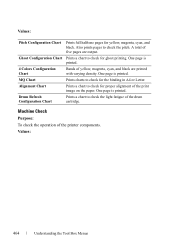
.... One page is printed. 4 Colors Configuration Chart Bands of yellow, magenta, cyan, and black are output. MQ Chart Prints charts to check for ghost printing. Drum Refresh Configuration Chart Prints a chart to check the pitch. A total of five pages are printed with varying density. Machine Check Purpose: To check the operation...
.... One page is printed. 4 Colors Configuration Chart Bands of yellow, magenta, cyan, and black are output. MQ Chart Prints charts to check for ghost printing. Drum Refresh Configuration Chart Prints a chart to check the pitch. A total of five pages are printed with varying density. Machine Check Purpose: To check the operation...

User Manual
Page 469
... Result. When Using the Tool Box NOTE: Understanding the Tool Box Menus 467 Values: Toner Refresh Mode Drum Refresh Mode Yellow Magenta Cyan Black Drum Click Yellow to their default values. Click Drum to stir the toner. Refresh Mode Purpose: To use up a toner cartridge or PHD unit when you...need to replace it before the end of its life, or to clean the magenta cartridge. Values: Clean Developer Click Start to clean the drum. Click Magenta to stir the toner in the toner cartridge. To print the internal environment sensor information of the printer such as temperature and ...
... Result. When Using the Tool Box NOTE: Understanding the Tool Box Menus 467 Values: Toner Refresh Mode Drum Refresh Mode Yellow Magenta Cyan Black Drum Click Yellow to their default values. Click Drum to stir the toner. Refresh Mode Purpose: To use up a toner cartridge or PHD unit when you...need to replace it before the end of its life, or to clean the magenta cartridge. Values: Clean Developer Click Start to clean the drum. Click Magenta to stir the toner in the toner cartridge. To print the internal environment sensor information of the printer such as temperature and ...

User Manual
Page 519
... Cleans the toner in the Address Book. After executing this function and rebooting the printer, all the menu parameters are reset to their default values. Drum Refresh Purpose: To clean the surface of the PHD unit. Values: Yes Cleans the surface of the PHD unit. Values: User Fax Section Yes No...
... Cleans the toner in the Address Book. After executing this function and rebooting the printer, all the menu parameters are reset to their default values. Drum Refresh Purpose: To clean the surface of the PHD unit. Values: Yes Cleans the surface of the PHD unit. Values: User Fax Section Yes No...

User Manual
Page 621
... that the printer is turned off. 2 Pull the standard 250-sheet tray out of the Print Head Device (PHD) against bright light. NOTICE: Protect the drums of the printer about 200 mm. NOTICE: Ensure nothing touches or scratches the surface (black-colored film) of the belt unit. If the front cover...
... that the printer is turned off. 2 Pull the standard 250-sheet tray out of the Print Head Device (PHD) against bright light. NOTICE: Protect the drums of the printer about 200 mm. NOTICE: Ensure nothing touches or scratches the surface (black-colored film) of the belt unit. If the front cover...
User Manual
Page 663
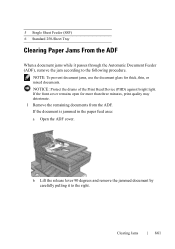
... jammed document by carefully pulling it passes through the Automatic Document Feeder (ADF), remove the jam according to the right. D E L L C ON F I D E N T I N A RY 9 / 1 3 / 1 0 - P R E L I M I A L - NOTICE: Protect the drums of the Print Head Device (PHD) against bright light. If the front cover remains open for thick, thin, or mixed documents. FILE LOCATION: C:\Users\fxstdpcadmin...
... jammed document by carefully pulling it passes through the Automatic Document Feeder (ADF), remove the jam according to the right. D E L L C ON F I D E N T I N A RY 9 / 1 3 / 1 0 - P R E L I M I A L - NOTICE: Protect the drums of the Print Head Device (PHD) against bright light. If the front cover remains open for thick, thin, or mixed documents. FILE LOCATION: C:\Users\fxstdpcadmin...
User Manual
Page 666
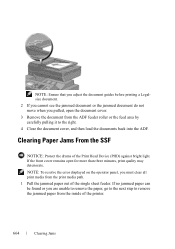
... it to remove the jammed paper from the inside of the printer. PRE LIMINARY 9/13/10 - Clearing Paper Jams From the SSF NOTICE: Protect the drums of the single sheet feeder. FILE LOCATION: C:\Users\fxstdpcadmin\Desktop\0630_UG??\Mioga_AIO_UG_FM\Mioga_AIO_UG_FM\section30.fm NOTE: Ensure that you adjust the document guides before printing...
... it to remove the jammed paper from the inside of the printer. PRE LIMINARY 9/13/10 - Clearing Paper Jams From the SSF NOTICE: Protect the drums of the single sheet feeder. FILE LOCATION: C:\Users\fxstdpcadmin\Desktop\0630_UG??\Mioga_AIO_UG_FM\Mioga_AIO_UG_FM\section30.fm NOTE: Ensure that you adjust the document guides before printing...

User Manual
Page 670
... print media path. 1 Pull the standard 250-sheet tray out of the printer carefully. Clearing Paper Jams From the Standard 250Sheet Tray NOTICE: Protect the drums of the printer. If the front cover remains open for more than three minutes, print quality may deteriorate. PRE LIMINARY 9/13/10 - Doing so could...
... print media path. 1 Pull the standard 250-sheet tray out of the printer carefully. Clearing Paper Jams From the Standard 250Sheet Tray NOTICE: Protect the drums of the printer. If the front cover remains open for more than three minutes, print quality may deteriorate. PRE LIMINARY 9/13/10 - Doing so could...
User Manual
Page 674
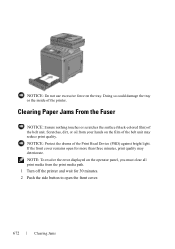
... NOTE: To resolve the error displayed on the operator panel, you must clear all print media from your hands on the tray. NOTICE: Protect the drums of the printer. PRE LIMINARY 9/13/10 - Scratches, dirt, or oil from the print media path. 1 Turn off the printer and wait for 30 minutes...
... NOTE: To resolve the error displayed on the operator panel, you must clear all print media from your hands on the tray. NOTICE: Protect the drums of the printer. PRE LIMINARY 9/13/10 - Scratches, dirt, or oil from the print media path. 1 Turn off the printer and wait for 30 minutes...

User Manual
Page 705
..." and "Installing a PHD Unit." Fog No Go to action 2. Yes The task is complete. b After you start the Drum Refresh Mode, click Chart Print on the Diagnosis tab. Yes The task is complete. Contact Dell. D E L L C ON F I D E N T I N A RY 9 / 1 3 / 1 0 - c Click the 4 Colors Configuration Chart button. Action 1 Execute the PHD Refresh Mode. P R E L I...Does this solve your problem? Does this solve your problem? 3 Replace the PHD unit if you start the Drum Refresh Mode, click Chart Print on the Diagnosis tab. The 4 Colors Configuration Chart is printed. The 4 ...
..." and "Installing a PHD Unit." Fog No Go to action 2. Yes The task is complete. b After you start the Drum Refresh Mode, click Chart Print on the Diagnosis tab. Yes The task is complete. Contact Dell. D E L L C ON F I D E N T I N A RY 9 / 1 3 / 1 0 - c Click the 4 Colors Configuration Chart button. Action 1 Execute the PHD Refresh Mode. P R E L I...Does this solve your problem? Does this solve your problem? 3 Replace the PHD unit if you start the Drum Refresh Mode, click Chart Print on the Diagnosis tab. The 4 Colors Configuration Chart is printed. The 4 ...
User Manual
Page 749
PRELIMINARY 9/13/10 FOR PROOF ONLY Index 747 FILE LOCATION: C:\Users\fxstdpc-admin\Desktop\0630_UG??\Mioga_AIO_UG_FM\Mioga_AIO_UG_FM\Miog a-AIO-UGIX.fm Dell technical support policy, 739 Drum Refresh Configuration Chart, 464 Details, 177 Drum Refresh Mode, 467 Determining Values, 644 DHCP, 487 Dimensions, 605 Duplex Print, 189, 206, 432, 462, 497 Duplexer, 40, 660..., 221, 229 Emulations, 606 Encryption, 237 End Time, 201 Entering Values, 646 Envelope, 191-192, 210-211, 267, 514-515 Envelope #10, 270 Environment, 606 Drum RefreshD,E2L1L2CONFIDENTIAL -
PRELIMINARY 9/13/10 FOR PROOF ONLY Index 747 FILE LOCATION: C:\Users\fxstdpc-admin\Desktop\0630_UG??\Mioga_AIO_UG_FM\Mioga_AIO_UG_FM\Miog a-AIO-UGIX.fm Dell technical support policy, 739 Drum Refresh Configuration Chart, 464 Details, 177 Drum Refresh Mode, 467 Determining Values, 644 DHCP, 487 Dimensions, 605 Duplex Print, 189, 206, 432, 462, 497 Duplexer, 40, 660..., 221, 229 Emulations, 606 Encryption, 237 End Time, 201 Entering Values, 646 Envelope, 191-192, 210-211, 267, 514-515 Envelope #10, 270 Environment, 606 Drum RefreshD,E2L1L2CONFIDENTIAL -


