User Manual
Page 674
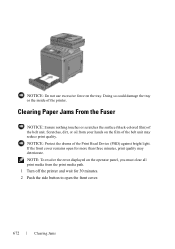
If the front cover remains open the front cover. Clearing Paper Jams From the Fuser NOTICE: Ensure nothing touches or scratches the surface (black-colored film) of the Print Head Device (PHD) against bright light. FOR PROOF ONLY 672 Clearing ... minutes. 2 Push the side button to open for more than three minutes, print quality may reduce print quality. NOTICE: Protect the drums of the belt unit. Doing so could damage the tray or the inside of the printer. FILE LOCATION: C:\Users\fxstdpcadmin\Desktop\0630_UG??\Mioga_AIO_UG_FM\Mioga_AIO_UG_FM\section30.fm NOTICE: Do not...
If the front cover remains open the front cover. Clearing Paper Jams From the Fuser NOTICE: Ensure nothing touches or scratches the surface (black-colored film) of the Print Head Device (PHD) against bright light. FOR PROOF ONLY 672 Clearing ... minutes. 2 Push the side button to open for more than three minutes, print quality may reduce print quality. NOTICE: Protect the drums of the belt unit. Doing so could damage the tray or the inside of the printer. FILE LOCATION: C:\Users\fxstdpcadmin\Desktop\0630_UG??\Mioga_AIO_UG_FM\Mioga_AIO_UG_FM\section30.fm NOTICE: Do not...

User Manual
Page 675
FILE LOCATION: C:\Users\fxstdpcadmin\Desktop\0630_UG??\Mioga_AIO_UG_FM\Mioga_AIO_UG_FM\section30.fm 3 Open the belt unit. 4 Lift the levers at both ends of the fuser, and remove the jammed paper. If you are still unable to remove the paper, go to the next step. F O R P R O O F O N LY Clearing Jams 673 D E L L C ON F I D E N T I N A RY 9 / 1 3 / 1 0 - P R E L I M I A L -
FILE LOCATION: C:\Users\fxstdpcadmin\Desktop\0630_UG??\Mioga_AIO_UG_FM\Mioga_AIO_UG_FM\section30.fm 3 Open the belt unit. 4 Lift the levers at both ends of the fuser, and remove the jammed paper. If you are still unable to remove the paper, go to the next step. F O R P R O O F O N LY Clearing Jams 673 D E L L C ON F I D E N T I N A RY 9 / 1 3 / 1 0 - P R E L I M I A L -
User Manual
Page 701
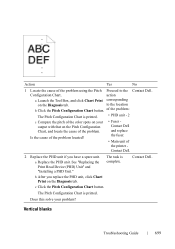
... problem. c Click the Pitch Configuration Chart button. Configuration Chart. The task is printed. F O R P R O O F O N LY Troubleshooting Guide 699 a Replace the PHD unit. Is the cause of the problem located? • Fuser Contact Dell and replace the fuser. • Main unit of the problem using the Pitch Proceed to the location b Click the Pitch Configuration Chart button.
... problem. c Click the Pitch Configuration Chart button. Configuration Chart. The task is printed. F O R P R O O F O N LY Troubleshooting Guide 699 a Replace the PHD unit. Is the cause of the problem located? • Fuser Contact Dell and replace the fuser. • Main unit of the problem using the Pitch Proceed to the location b Click the Pitch Configuration Chart button.
User Manual
Page 708
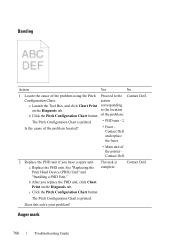
... this solve your problem? of the problem: The Pitch Configuration Chart is printed. • PHD unit - 2 Is the cause of the problem located? • Fuser Contact Dell and replace the fuser. • Main unit of the problem using the Pitch Proceed to the location b Click the Pitch Configuration Chart button. The task is printed. The...
... this solve your problem? of the problem: The Pitch Configuration Chart is printed. • PHD unit - 2 Is the cause of the problem located? • Fuser Contact Dell and replace the fuser. • Main unit of the problem using the Pitch Proceed to the location b Click the Pitch Configuration Chart button. The task is printed. The...


