User Guide
Page 9
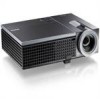
2 Connecting Your Projector 12 3 4 5 6 7 8 9 10 11 12 16 15 14 13 1 USB remote connector 2 HDMI connector 3 VGA-A output (monitor loop-through) 4 VGA-A input (D-sub) connector 5 VGA-B input (D-sub) ... connector 10 Microphone connector 11 RS232 connector 12 RJ45 connector 13 Security cable slot 14 Audio output connector 15 Audio-B left-channel input connector 16 Power cord connector CAUTION: Before you begin any of the procedures in this section, follow the Safety Instructions as described on page 7. Connecting Your...
2 Connecting Your Projector 12 3 4 5 6 7 8 9 10 11 12 16 15 14 13 1 USB remote connector 2 HDMI connector 3 VGA-A output (monitor loop-through) 4 VGA-A input (D-sub) connector 5 VGA-B input (D-sub) ... connector 10 Microphone connector 11 RS232 connector 12 RJ45 connector 13 Security cable slot 14 Audio output connector 15 Audio-B left-channel input connector 16 Power cord connector CAUTION: Before you begin any of the procedures in this section, follow the Safety Instructions as described on page 7. Connecting Your...
User Guide
Page 10
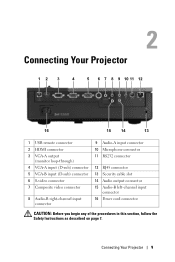
Connecting to a Computer Connecting a Computer Using a VGA Cable 1 2 3 1 Power cord 2 VGA to VGA cable 3 USB-A to use the Page Up and Page Down features on the remote control. 10 Connecting Your Projector NOTE: The USB cable must be connected if you want to USB-B cable NOTE: The USB cable is not provided with your projector.
Connecting to a Computer Connecting a Computer Using a VGA Cable 1 2 3 1 Power cord 2 VGA to VGA cable 3 USB-A to use the Page Up and Page Down features on the remote control. 10 Connecting Your Projector NOTE: The USB cable must be connected if you want to USB-B cable NOTE: The USB cable is not provided with your projector.
User Guide
Page 11
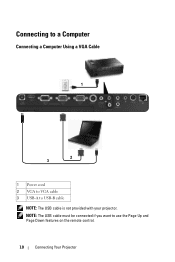
Connecting Your Projector 11 Monitor Loop-Through Connection Using VGA Cables 1 2 2 1 Power cord 2 VGA to VGA cable NOTE: Only one VGA cable is shipped with your projector. An additional VGA cable can be purchased on the Dell website at dell.com.
Connecting Your Projector 11 Monitor Loop-Through Connection Using VGA Cables 1 2 2 1 Power cord 2 VGA to VGA cable NOTE: Only one VGA cable is shipped with your projector. An additional VGA cable can be purchased on the Dell website at dell.com.
User Guide
Page 12
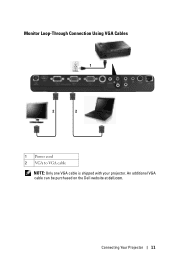
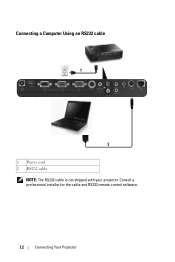
Consult a professional installer for the cable and RS232 remote control software. 12 Connecting Your Projector Connecting a Computer Using an RS232 cable 1 2 1 Power cord 2 RS232 cable NOTE: The RS232 cable is not shipped with your projector.
Consult a professional installer for the cable and RS232 remote control software. 12 Connecting Your Projector Connecting a Computer Using an RS232 cable 1 2 1 Power cord 2 RS232 cable NOTE: The RS232 cable is not shipped with your projector.
User Guide
Page 13
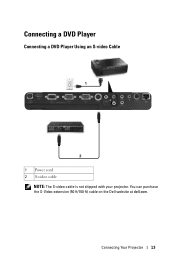
You can purchase the S-Video extension (50 ft/100 ft) cable on the Dell website at dell.com. Connecting Your Projector 13 Connecting a DVD Player Connecting a DVD Player Using an S-video Cable 1 2 1 Power cord 2 S-video cable NOTE: The S-video cable is not shipped with your projector.
You can purchase the S-Video extension (50 ft/100 ft) cable on the Dell website at dell.com. Connecting Your Projector 13 Connecting a DVD Player Connecting a DVD Player Using an S-video Cable 1 2 1 Power cord 2 S-video cable NOTE: The S-video cable is not shipped with your projector.
User Guide
Page 14
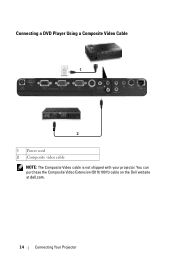
You can purchase the Composite Video Extension (50 ft/100 ft) cable on the Dell website at dell.com. 14 Connecting Your Projector Connecting a DVD Player Using a Composite Video Cable 1 2 1 Power cord 2 Composite video cable NOTE: The Composite Video cable is not shipped with your projector.
You can purchase the Composite Video Extension (50 ft/100 ft) cable on the Dell website at dell.com. 14 Connecting Your Projector Connecting a DVD Player Using a Composite Video Cable 1 2 1 Power cord 2 Composite video cable NOTE: The Composite Video cable is not shipped with your projector.
User Guide
Page 15
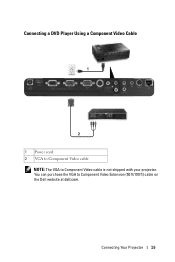
Connecting Your Projector 15 Connecting a DVD Player Using a Component Video Cable 1 2 1 Power cord 2 VGA to Component Video cable NOTE: The VGA to Component Video Extension (50 ft/100 ft) cable on the Dell website at dell.com. You can purchase the VGA to Component Video cable is not shipped with your projector.
Connecting Your Projector 15 Connecting a DVD Player Using a Component Video Cable 1 2 1 Power cord 2 VGA to Component Video cable NOTE: The VGA to Component Video Extension (50 ft/100 ft) cable on the Dell website at dell.com. You can purchase the VGA to Component Video cable is not shipped with your projector.

User Guide
Page 16
Connecting a DVD Player Using an HDMI Cable 1 2 1 Power cord 2 HDMI cable NOTE: The HDMI cable is not shipped with your projector. 16 Connecting Your Projector
Connecting a DVD Player Using an HDMI Cable 1 2 1 Power cord 2 HDMI cable NOTE: The HDMI cable is not shipped with your projector. 16 Connecting Your Projector

User Guide
Page 17
Connecting to Local Area Network To control the projector that is connected to a network through an RJ45 cable. 1 2 Local Area Network (LAN) 1 Power cord 2 RJ45 cable NOTE: The RJ45 cable is not shipped with your projector. Connecting Your Projector 17
Connecting to Local Area Network To control the projector that is connected to a network through an RJ45 cable. 1 2 Local Area Network (LAN) 1 Power cord 2 RJ45 cable NOTE: The RJ45 cable is not shipped with your projector. Connecting Your Projector 17
User Guide
Page 18
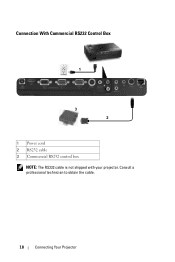
Consult a professional technician to obtain the cable. 18 Connecting Your Projector Connection With Commercial RS232 Control Box 1 3 2 1 Power cord 2 RS232 cable 3 Commercial RS232 control box NOTE: The RS232 cable is not shipped with your projector.
Consult a professional technician to obtain the cable. 18 Connecting Your Projector Connection With Commercial RS232 Control Box 1 3 2 1 Power cord 2 RS232 cable 3 Commercial RS232 control box NOTE: The RS232 cable is not shipped with your projector.
User Guide
Page 19
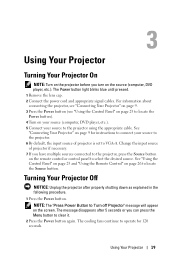
... 5 seconds or you can press the Menu button to clear it. 2 Press the Power button again. 3 Using Your Projector Turning Your Projector On NOTE: Turn on the projector before you turn on the remote control or control panel to select the desired source. See "Using the Control... properly shutting down as explained in the following procedure. 1 Press the Power button. NOTE: The "Press Power Button to Turn off Projector" message will appear on page 26 to VGA-A. The Power button light blinks blue until pressed. 1 Remove the lens cap. 2 Connect the power cord and appropriate signal cables.
... 5 seconds or you can press the Menu button to clear it. 2 Press the Power button again. 3 Using Your Projector Turning Your Projector On NOTE: Turn on the projector before you turn on the remote control or control panel to select the desired source. See "Using the Control... properly shutting down as explained in the following procedure. 1 Press the Power button. NOTE: The "Press Power Button to Turn off Projector" message will appear on page 26 to VGA-A. The Power button light blinks blue until pressed. 1 Remove the lens cap. 2 Connect the power cord and appropriate signal cables.
User Guide
Page 20
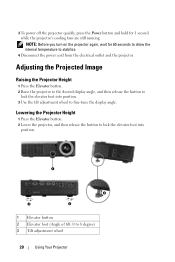
... button 2 Elevator foot (Angle of tilt: 0 to 8 degree) 3 Tilt adjustment wheel 20 Using Your Projector Lowering the Projector Height 1 Press the Elevator button. 2 Lower the projector, and then release the button to lock the elevator foot into position. 3 Use the tilt adjustment wheel to stabilize. 4 Disconnect the power cord from the electrical outlet and the...
... button 2 Elevator foot (Angle of tilt: 0 to 8 degree) 3 Tilt adjustment wheel 20 Using Your Projector Lowering the Projector Height 1 Press the Elevator button. 2 Lower the projector, and then release the button to lock the elevator foot into position. 3 Use the tilt adjustment wheel to stabilize. 4 Disconnect the power cord from the electrical outlet and the...
User Guide
Page 65
... and that the ambient temperature is overheated. The lamp is within operational range. The projector automatically shuts down . Color wheel cannot start. Unplug the power cord after three minutes then turn on . If the problem persists, contact Dell. Unplug the power cord after three minutes and then turn the display on . Air vents might be blocked...
... and that the ambient temperature is overheated. The lamp is within operational range. The projector automatically shuts down . Color wheel cannot start. Unplug the power cord after three minutes then turn on . If the problem persists, contact Dell. Unplug the power cord after three minutes and then turn the display on . Air vents might be blocked...
User Guide
Page 66
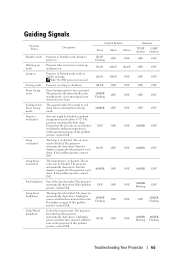
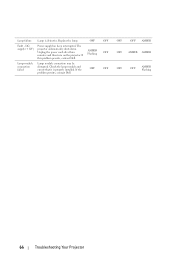
Replace the lamp. Power supply has been interrupted. DC supply (+12V) Lamp module connection failed Lamp is properly installed. OFF AMBER Flashing OFF OFF OFF OFF OFF OFF AMBER OFF AMBER AMBER OFF OFF AMBER Flashing 66 Troubleshooting Your Projector Unplug the power cord after three minutes and then turn on the projector. Check the lamp module and ensure that it is defective. If the problem persists, contact Dell. Lamp failure Fault - The projector automatically shuts down. If this problem persists, contact Dell. Lamp module connection may be disrupted.
Replace the lamp. Power supply has been interrupted. DC supply (+12V) Lamp module connection failed Lamp is properly installed. OFF AMBER Flashing OFF OFF OFF OFF OFF OFF AMBER OFF AMBER AMBER OFF OFF AMBER Flashing 66 Troubleshooting Your Projector Unplug the power cord after three minutes and then turn on the projector. Check the lamp module and ensure that it is defective. If the problem persists, contact Dell. Lamp failure Fault - The projector automatically shuts down. If this problem persists, contact Dell. Lamp module connection may be disrupted.

User Guide
Page 67
... on page 74. CAUTION: If the lamp shatters, remove all broken pieces from the projector and dispose or recycle according to Dell™. For more information, see www.dell.com/hg. 1 Turn off the projector and disconnect the power cord. 2 Let the projector cool for at least 30 minutes. Replace the lamp when the message "Lamp is...
... on page 74. CAUTION: If the lamp shatters, remove all broken pieces from the projector and dispose or recycle according to Dell™. For more information, see www.dell.com/hg. 1 Turn off the projector and disconnect the power cord. 2 Let the projector cool for at least 30 minutes. Replace the lamp when the message "Lamp is...
User Guide
Page 78
... Projector Height 20 lower the projector Elevator button 20 Elevator foot 20 Tilt adjustment wheel 20 Adjusting the Projector ...Projector Composite video cable 14 Connecting a Computer with a RS232 cable 12 Connecting with a Component Cable 15 Connecting with a Composite Cable 14 Connecting with an HDMI Cable 16 Connecting with an S-video Cable 13 HDMI cable 16, 17, 18 Power cord...-channel input connector 9 Audio-B right-channel input connector 9 HDMI connector 9 Microphone connector 9 Power cord connector 9 RS232 connector 9 Security cable slot 9 S-video connector 9 USB remote connector 9 VGA...
... Projector Height 20 lower the projector Elevator button 20 Elevator foot 20 Tilt adjustment wheel 20 Adjusting the Projector ...Projector Composite video cable 14 Connecting a Computer with a RS232 cable 12 Connecting with a Component Cable 15 Connecting with a Composite Cable 14 Connecting with an HDMI Cable 16 Connecting with an S-video Cable 13 HDMI cable 16, 17, 18 Power cord...-channel input connector 9 Audio-B right-channel input connector 9 HDMI connector 9 Microphone connector 9 Power cord connector 9 RS232 connector 9 Security cable slot 9 S-video connector 9 USB remote connector 9 VGA...


