User Guide
Page 4
Adjusting the Projector Zoom and Focus 17 Adjusting Projection Image Size 18 Using the Control Panel 19 Using the Remote Control 21 Using the On-Screen Display 22 Main Menu 23 INPUT SELECT 23 AUTO-ADJUST 24 SET UP 24 PICTURE (in PC Mode 25 PICTURE (in Video Mode 26 DISPLAY (in PC Mode 27 DISPLAY (in Video Mode 28 LAMP 29 LANGUAGE 30 OTHERS 31 4 Troubleshooting Your Projector 34 Changing the Lamp 38 5 Specifications 40 6 Contacting Dell 44 7 Appendix: Glossary 45 4 Contents
Adjusting the Projector Zoom and Focus 17 Adjusting Projection Image Size 18 Using the Control Panel 19 Using the Remote Control 21 Using the On-Screen Display 22 Main Menu 23 INPUT SELECT 23 AUTO-ADJUST 24 SET UP 24 PICTURE (in PC Mode 25 PICTURE (in Video Mode 26 DISPLAY (in PC Mode 27 DISPLAY (in Video Mode 28 LAMP 29 LANGUAGE 30 OTHERS 31 4 Troubleshooting Your Projector 34 Changing the Lamp 38 5 Specifications 40 6 Contacting Dell 44 7 Appendix: Glossary 45 4 Contents
User Guide
Page 5
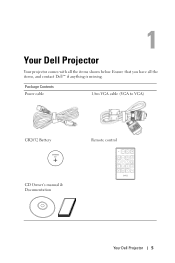
Ensure that you have all the items shown below. Package Contents Power cable 1.8m VGA cable (VGA to VGA) CR2032 Battery CR2032 3V CD Owner's manual & Documentation Remote control Your Dell Projector 5 1 Your Dell Projector Your projector comes with all the items, and contact Dell™ if anything is missing.
Ensure that you have all the items shown below. Package Contents Power cable 1.8m VGA cable (VGA to VGA) CR2032 Battery CR2032 3V CD Owner's manual & Documentation Remote control Your Dell Projector 5 1 Your Dell Projector Your projector comes with all the items, and contact Dell™ if anything is missing.
User Guide
Page 7
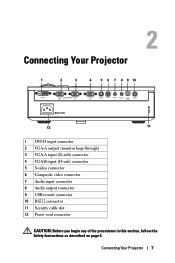
... Audio Out USB Remote RS-232 Dell 1209S 12 11 1 DVI-D input connector 2 VGA-A output (monitor loop-through) 3 VGA-A input (D-sub) connector 4 VGA-B input (D-sub) connector 5 S-video connector 6 Composite video connector 7 Audio input connector 8 Audio output connector 9 USB remote connector 10 RS232 ...connector 11 Security cable slot 12 Power cord connector CAUTION: Before you begin any of the procedures in this section, follow the Safety Instructions as described on page 6. Connecting Your Projector 7 A Out VGA - A ...
... Audio Out USB Remote RS-232 Dell 1209S 12 11 1 DVI-D input connector 2 VGA-A output (monitor loop-through) 3 VGA-A input (D-sub) connector 4 VGA-B input (D-sub) connector 5 S-video connector 6 Composite video connector 7 Audio input connector 8 Audio output connector 9 USB remote connector 10 RS232 ...connector 11 Security cable slot 12 Power cord connector CAUTION: Before you begin any of the procedures in this section, follow the Safety Instructions as described on page 6. Connecting Your Projector 7 A Out VGA - A ...
User Guide
Page 8
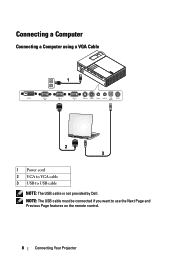
A Out VGA - B In S-Video In Video In Audio In Audio Out USB Remote RS-232 MOLEX 2 3 1 Power cord 2 VGA to VGA cable 3 USB to use the Next Page and Previous Page features on the remote control. 8 Connecting Your Projector A In VGA - NOTE: The USB cable must be connected if you want to USB cable NOTE: The USB cable is not provided by Dell. Connecting a Computer Connecting a Computer using a VGA Cable 1 DVI-D In VGA -
A Out VGA - B In S-Video In Video In Audio In Audio Out USB Remote RS-232 MOLEX 2 3 1 Power cord 2 VGA to VGA cable 3 USB to use the Next Page and Previous Page features on the remote control. 8 Connecting Your Projector A In VGA - NOTE: The USB cable must be connected if you want to USB cable NOTE: The USB cable is not provided by Dell. Connecting a Computer Connecting a Computer using a VGA Cable 1 DVI-D In VGA -
User Guide
Page 9
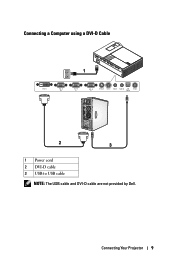
A In VGA - Connecting Your Projector 9 B In S-Video In Video In Audio In Audio Out USB Remote RS-232 TV OUT SDIF-OUT PDIF-OUT MOLEX 2 3 1 Power cord 2 DVI-D cable 3 USB to USB cable NOTE: The USB cable and DVI-D cable are not provided by Dell. A Out VGA - Connecting a Computer using a DVI-D Cable 1 DVI-D In VGA -
A In VGA - Connecting Your Projector 9 B In S-Video In Video In Audio In Audio Out USB Remote RS-232 TV OUT SDIF-OUT PDIF-OUT MOLEX 2 3 1 Power cord 2 DVI-D cable 3 USB to USB cable NOTE: The USB cable and DVI-D cable are not provided by Dell. A Out VGA - Connecting a Computer using a DVI-D Cable 1 DVI-D In VGA -
User Guide
Page 10
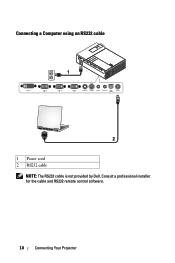
B In S-Video In Video In Audio In Audio Out USB Remote RS-232 2 1 Power cord 2 RS232 cable NOTE: The RS232 cable is not provided by Dell. A Out VGA - Consult a professional installer for the cable and RS232 remote control software. 10 Connecting Your Projector Connecting a Computer using an RS232 cable 1 DVI-D In VGA - A In VGA -
B In S-Video In Video In Audio In Audio Out USB Remote RS-232 2 1 Power cord 2 RS232 cable NOTE: The RS232 cable is not provided by Dell. A Out VGA - Consult a professional installer for the cable and RS232 remote control software. 10 Connecting Your Projector Connecting a Computer using an RS232 cable 1 DVI-D In VGA - A In VGA -
User Guide
Page 11
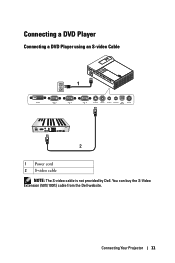
Connecting Your Projector 11 Connecting a DVD Player Connecting a DVD Player using an S-video Cable 1 DVI-D In VGA - A In VGA - B In S-Video In Video In Audio In Audio Out USB Remote RS-232 2 1 Power cord 2 S-video cable NOTE: The S-video cable is not provided by Dell. You can buy the S-Video Extension (50ft/100ft) cable from the Dell website. A Out VGA -
Connecting Your Projector 11 Connecting a DVD Player Connecting a DVD Player using an S-video Cable 1 DVI-D In VGA - A In VGA - B In S-Video In Video In Audio In Audio Out USB Remote RS-232 2 1 Power cord 2 S-video cable NOTE: The S-video cable is not provided by Dell. You can buy the S-Video Extension (50ft/100ft) cable from the Dell website. A Out VGA -
User Guide
Page 12
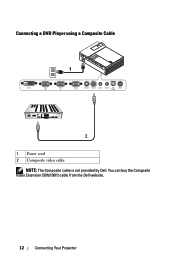
A In VGA - B In S-Video In Video In Audio In Audio Out USB Remote RS-232 2 1 Power cord 2 Composite video cable NOTE: The Composite cable is not provided by Dell. You can buy the Composite Video Extension (50ft/100ft) cable from the Dell website. 12 Connecting Your Projector A Out VGA - Connecting a DVD Player using a Composite Cable 1 DVI-D In VGA -
A In VGA - B In S-Video In Video In Audio In Audio Out USB Remote RS-232 2 1 Power cord 2 Composite video cable NOTE: The Composite cable is not provided by Dell. You can buy the Composite Video Extension (50ft/100ft) cable from the Dell website. 12 Connecting Your Projector A Out VGA - Connecting a DVD Player using a Composite Cable 1 DVI-D In VGA -
User Guide
Page 13
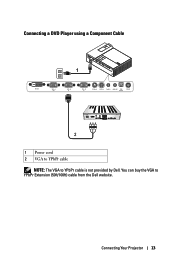
You can buy the VGA to YPbPr cable is not provided by Dell. B In S-Video In Video In Audio In Audio Out USB Remote RS-232 2 1 Power cord 2 VGA to YPbPr cable NOTE: The VGA to YPbPr Extension (50ft/100ft) cable from the Dell website. Connecting a DVD Player using a Component Cable 1 DVI-D In VGA - Connecting Your Projector 13 A In VGA - A Out VGA -
You can buy the VGA to YPbPr cable is not provided by Dell. B In S-Video In Video In Audio In Audio Out USB Remote RS-232 2 1 Power cord 2 VGA to YPbPr cable NOTE: The VGA to YPbPr Extension (50ft/100ft) cable from the Dell website. Connecting a DVD Player using a Component Cable 1 DVI-D In VGA - Connecting Your Projector 13 A In VGA - A Out VGA -
User Guide
Page 14
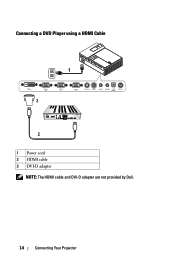
Connecting a DVD Player using a HDMI Cable 1 DVI-D In VGA - A In VGA - B In S-Video In Video In Audio In Audio Out USB Remote RS-232 2 1 Power cord 2 HDMI cable 3 DVI-D adapter NOTE: The HDMI cable and DVI-D adapter are not provided by Dell. 14 Connecting Your Projector A Out 3 VGA -
Connecting a DVD Player using a HDMI Cable 1 DVI-D In VGA - A In VGA - B In S-Video In Video In Audio In Audio Out USB Remote RS-232 2 1 Power cord 2 HDMI cable 3 DVI-D adapter NOTE: The HDMI cable and DVI-D adapter are not provided by Dell. 14 Connecting Your Projector A Out 3 VGA -
User Guide
Page 15
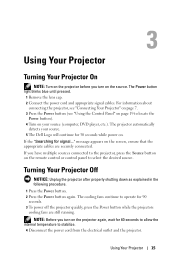
...desired source. 3 Using Your Projector Turning Your Projector On NOTE: Turn on the projector before you turn on the projector again, wait for 60 seconds to allow the internal temperature to locate the Power button). 4 Turn on your source. 5 The Dell Logo will continue for 30 ...Power button again. NOTE: Before you have multiple sources connected to the projector, press the Source button on the remote control or control panel to operate for signal..." For information about connecting the projector, see "Connecting Your Projector" on page 7. 3 Press the Power button (see "Using the ...
...desired source. 3 Using Your Projector Turning Your Projector On NOTE: Turn on the projector before you turn on the projector again, wait for 60 seconds to allow the internal temperature to locate the Power button). 4 Turn on your source. 5 The Dell Logo will continue for 30 ...Power button again. NOTE: Before you have multiple sources connected to the projector, press the Source button on the remote control or control panel to operate for signal..." For information about connecting the projector, see "Connecting Your Projector" on page 7. 3 Press the Power button (see "Using the ...
User Guide
Page 16
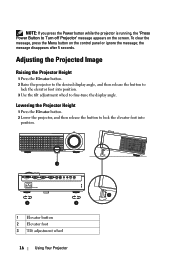
... on the control panel or ignore the message; A Out VGA - A I S-Video In Video In Audio In Audio Out USB Remote RS-232 Dell 1209S 3 3 2 1 Elevator button 2 Elevator foot 3 Tilt adjustment wheel 16 Using Your Projector the message disappears after 5 seconds. To clear the message, press the Menu button on the screen. NOTE: If you...
... on the control panel or ignore the message; A Out VGA - A I S-Video In Video In Audio In Audio Out USB Remote RS-232 Dell 1209S 3 3 2 1 Elevator button 2 Elevator foot 3 Tilt adjustment wheel 16 Using Your Projector the message disappears after 5 seconds. To clear the message, press the Menu button on the screen. NOTE: If you...
User Guide
Page 20
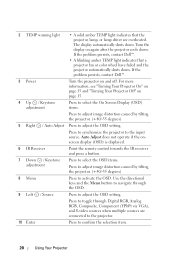
...onscreen display (OSD) is displayed. 6 IR Receiver Point the remote control towards the IR receiver and press a button. 7 Down / Keystone adjustment Press to select the OSD items. Press to adjust image distortion caused by tilting the projector. (+40/-35 degrees) 5 Right / Auto Adjust Press ...adjust the OSD setting. For more information, see "Turning Your Projector On" on page 15 and "Turning Your Projector Off" on again after the projector cools down. If the problem persists, contact Dell™. 3 Power Turn the projector on and off. Use the directional keys and the Menu ...
...onscreen display (OSD) is displayed. 6 IR Receiver Point the remote control towards the IR receiver and press a button. 7 Down / Keystone adjustment Press to select the OSD items. Press to adjust image distortion caused by tilting the projector. (+40/-35 degrees) 5 Right / Auto Adjust Press ...adjust the OSD setting. For more information, see "Turning Your Projector On" on page 15 and "Turning Your Projector Off" on again after the projector cools down. If the problem persists, contact Dell™. 3 Power Turn the projector on and off. Use the directional keys and the Menu ...
User Guide
Page 21
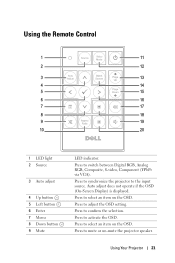
Press to confirm the selection. Press to adjust the OSD setting. Using Your Projector 21 Using the Remote Control 1 11 2 12 3 13 4 14 5 15 6 16 7 17 8 18 9 19 10 20 1 LED light 2 Source 3 Auto adjust 4 Up button 5 Left button 6 Enter 7 Menu 8 Down button 9 ... to select an item on the OSD. Press to select an item on the OSD. Press to the input source. Press to synchronize the projector to mute or un-mute the projector speaker. Press to activate the OSD. Press to switch between Digital RGB, Analog RGB, Composite, S-video, Component (YPbPr via VGA).
Press to confirm the selection. Press to adjust the OSD setting. Using Your Projector 21 Using the Remote Control 1 11 2 12 3 13 4 14 5 15 6 16 7 17 8 18 9 19 10 20 1 LED light 2 Source 3 Auto adjust 4 Up button 5 Left button 6 Enter 7 Menu 8 Down button 9 ... to select an item on the OSD. Press to select an item on the OSD. Press to the input source. Press to synchronize the projector to mute or un-mute the projector speaker. Press to activate the OSD. Press to switch between Digital RGB, Analog RGB, Composite, S-video, Component (YPbPr via VGA).

User Guide
Page 22
... information, see "Turning Your Projector On" on page 15 and "Turning Your Projector Off" on page 15. 12 Video mode The Dell 1209S Micro-projector has preset configurations that can be displayed with or without an input source present. To select an option, press the or on your projectors control panel or remote control. 10 Aspect ratio...
... information, see "Turning Your Projector On" on page 15 and "Turning Your Projector Off" on page 15. 12 Video mode The Dell 1209S Micro-projector has preset configurations that can be displayed with or without an input source present. To select an option, press the or on your projectors control panel or remote control. 10 Aspect ratio...
User Guide
Page 23
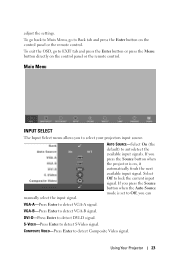
... tab and press the Enter button or press the Menu button directly on the control panel or the remote control. DVI-D-Press Enter to detect Composite Video signal. Using Your Projector 23 COMPOSITE VIDEO-Press Enter to detect DVI-D signal. Main Menu INPUT SELECT The Input Select menu ...allows you can VGA-A-Press Enter to select your projectors input source. If you press the Source button when the projector is set to Off, you to detect VGA-A signal. adjust the settings. AUTO SOURCE-Select On (the default...
... tab and press the Enter button or press the Menu button directly on the control panel or the remote control. DVI-D-Press Enter to detect Composite Video signal. Using Your Projector 23 COMPOSITE VIDEO-Press Enter to detect DVI-D signal. Main Menu INPUT SELECT The Input Select menu ...allows you can VGA-A-Press Enter to select your projectors input source. If you press the Source button when the projector is set to Off, you to detect VGA-A signal. adjust the settings. AUTO SOURCE-Select On (the default...
User Guide
Page 35
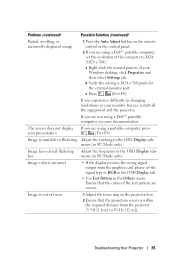
...on the remote control or the control panel. 2 If you experience difficulty in PC Mode only). If you are correct. Image is out of your presentation If you are using a Dell™ portable computer, see your monitor freezes, restart all the equipment and the projector. If ...continued) Possible Solution (continued) Partial, scrolling, or incorrectly displayed image 1 Press the Auto Adjust button on the projector lens. 2 Ensure that the colors of the test pattern are using a Dell™ portable computer, set the signal type to RGB in the OSD Display tab. • Use Test ...
...on the remote control or the control panel. 2 If you experience difficulty in PC Mode only). If you are correct. Image is out of your presentation If you are using a Dell™ portable computer, see your monitor freezes, restart all the equipment and the projector. If ...continued) Possible Solution (continued) Partial, scrolling, or incorrectly displayed image 1 Press the Auto Adjust button on the projector lens. 2 Ensure that the colors of the test pattern are using a Dell™ portable computer, set the signal type to RGB in the OSD Display tab. • Use Test ...

User Guide
Page 37
If so, replace with a new CR2032 battery. Troubleshooting Your Projector 37 Problem (continued) The remote control is too dim. Check if the LED indicator from the remote is not operating smoothly or works only within a limited range Possible Solution (continued) The battery may be low.
If so, replace with a new CR2032 battery. Troubleshooting Your Projector 37 Problem (continued) The remote control is too dim. Check if the LED indicator from the remote is not operating smoothly or works only within a limited range Possible Solution (continued) The battery may be low.

User Guide
Page 41
... and usage patterns. Specifications 41 The lamp life specified for Dell's projectors refers to the typical time under high temperatures and abrupt powering-off may result in eco mode) NOTE: The actual operating life span of a projector lamp will cease light output. Environmental Regulatory I/O Connectors Lamp ... phone jack (diameter 3.5 mm) Audio output: one phone jack (diameter 3.5 mm) USB port: One USB slave for remote support One mini-DIN RS232 for wired remote control from PC DVI-D input: one DVI-D connector for more than 50% of a sampling population to reduce to approximately...
... and usage patterns. Specifications 41 The lamp life specified for Dell's projectors refers to the typical time under high temperatures and abrupt powering-off may result in eco mode) NOTE: The actual operating life span of a projector lamp will cease light output. Environmental Regulatory I/O Connectors Lamp ... phone jack (diameter 3.5 mm) Audio output: one phone jack (diameter 3.5 mm) USB port: One USB slave for remote support One mini-DIN RS232 for wired remote control from PC DVI-D input: one DVI-D connector for more than 50% of a sampling population to reduce to approximately...
User Guide
Page 48
... and Focus 17 Focus ring 17 Zoom tab 17 C Changing the Lamp 38 Connecting the Projector Composite video cable 12 Connecting a Computer with a RS232 cable 10 Connecting with a Component Cable 13 Connecting with a Composite Cable 12 Connecting with an HDMI Cable ... Connection Ports Audio input connector 7 Audio output connector 7 Composite video connector 7 DVI-D input connector 7 Power cord connector 7 RS232 connector 7 Security cable slot 7 S-video connector 7 USB remote connector 7 VGA-A input (D-sub) connector 7 VGA-A output (monitor loop-through) 7 VGA-B input (D-sub) connector 7 Contact...
... and Focus 17 Focus ring 17 Zoom tab 17 C Changing the Lamp 38 Connecting the Projector Composite video cable 12 Connecting a Computer with a RS232 cable 10 Connecting with a Component Cable 13 Connecting with a Composite Cable 12 Connecting with an HDMI Cable ... Connection Ports Audio input connector 7 Audio output connector 7 Composite video connector 7 DVI-D input connector 7 Power cord connector 7 RS232 connector 7 Security cable slot 7 S-video connector 7 USB remote connector 7 VGA-A input (D-sub) connector 7 VGA-A output (monitor loop-through) 7 VGA-B input (D-sub) connector 7 Contact...


