User Guide
Page 4
Adjusting the Projector Zoom and Focus 17 Adjusting Projection Image Size 18 Using the Control Panel 19 Using the Remote Control 21 Using the On-Screen Display 22 Main Menu 23 INPUT SELECT 23 AUTO-ADJUST 24 SET UP 24 PICTURE (in PC Mode 25 PICTURE (in Video Mode 26 DISPLAY (in PC Mode 27 DISPLAY (in Video Mode 28 LAMP 29 LANGUAGE 30 OTHERS 31 4 Troubleshooting Your Projector 34 Changing the Lamp 38 5 Specifications 40 6 Contacting Dell 44 7 Appendix: Glossary 45 4 Contents
Adjusting the Projector Zoom and Focus 17 Adjusting Projection Image Size 18 Using the Control Panel 19 Using the Remote Control 21 Using the On-Screen Display 22 Main Menu 23 INPUT SELECT 23 AUTO-ADJUST 24 SET UP 24 PICTURE (in PC Mode 25 PICTURE (in Video Mode 26 DISPLAY (in PC Mode 27 DISPLAY (in Video Mode 28 LAMP 29 LANGUAGE 30 OTHERS 31 4 Troubleshooting Your Projector 34 Changing the Lamp 38 5 Specifications 40 6 Contacting Dell 44 7 Appendix: Glossary 45 4 Contents
User Guide
Page 15
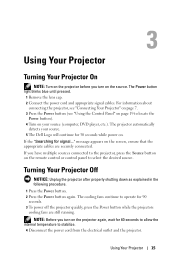
... projectors cooling fans are securely connected. The cooling fans continue to stabilize. 4 Disconnect the power cord from the electrical outlet and the projector. NOTE: Before you turn on the remote control or control panel to the projector, press the Source button on the source. If the "Searching for signal..." The Power button light blinks blue until pressed. 1 Remove the lens cap. 2 Connect the power cord and appropriate signal cables. Using Your Projector 15 The projector automatically detects your source (computer, DVD player, etc.). message...
... projectors cooling fans are securely connected. The cooling fans continue to stabilize. 4 Disconnect the power cord from the electrical outlet and the projector. NOTE: Before you turn on the remote control or control panel to the projector, press the Source button on the source. If the "Searching for signal..." The Power button light blinks blue until pressed. 1 Remove the lens cap. 2 Connect the power cord and appropriate signal cables. Using Your Projector 15 The projector automatically detects your source (computer, DVD player, etc.). message...
User Guide
Page 16
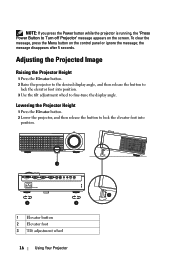
... Video In Audio In Audio Out USB Remote RS-232 Dell 1209S 3 3 2 1 Elevator button 2 Elevator foot 3 Tilt adjustment wheel 16 Using Your Projector Lowering the Projector Height 1 Press the Elevator button. 2 Lower the projector, and then release the button to Turn off Projector" message appears on the control panel or ignore the message; B I VGA - NOTE: If you press the Power button while the projector is running, the "Press Power Button to lock the elevator foot into position. 3 Use the tilt adjustment wheel...
... Video In Audio In Audio Out USB Remote RS-232 Dell 1209S 3 3 2 1 Elevator button 2 Elevator foot 3 Tilt adjustment wheel 16 Using Your Projector Lowering the Projector Height 1 Press the Elevator button. 2 Lower the projector, and then release the button to Turn off Projector" message appears on the control panel or ignore the message; B I VGA - NOTE: If you press the Power button while the projector is running, the "Press Power Button to lock the elevator foot into position. 3 Use the tilt adjustment wheel...
User Guide
Page 19
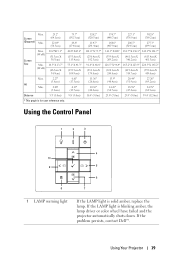
If the problem persists, contact Dell™. If the LAMP light is solid amber, replace the lamp. Using Your Projector 19 Screen (Diagonal) Max. Min. 25.2" (64.1cm) 22.89" (58.3cm) 75.7" (192.3cm) 68.8" (174.8cm) Screen Size Max. (WxH) 20.2"X15.1" (51.3cm X 38.5cm) Min. (WxH) 18.3" X 13.7" (46.5cm....58" (47.2cm) 24.78" (62.9cm) 16.4' (5.0m) 23.0' (7.0m) 29.5' (9.0m) 39.4' (12.0m) Using the Control Panel 1 2 3 10 9 8 4 5 6 7 1 LAMP warning light If the LAMP light is blinking amber, the lamp driver or color wheel have failed and the projector automatically shuts down.
If the problem persists, contact Dell™. If the LAMP light is solid amber, replace the lamp. Using Your Projector 19 Screen (Diagonal) Max. Min. 25.2" (64.1cm) 22.89" (58.3cm) 75.7" (192.3cm) 68.8" (174.8cm) Screen Size Max. (WxH) 20.2"X15.1" (51.3cm X 38.5cm) Min. (WxH) 18.3" X 13.7" (46.5cm....58" (47.2cm) 24.78" (62.9cm) 16.4' (5.0m) 23.0' (7.0m) 29.5' (9.0m) 39.4' (12.0m) Using the Control Panel 1 2 3 10 9 8 4 5 6 7 1 LAMP warning light If the LAMP light is blinking amber, the lamp driver or color wheel have failed and the projector automatically shuts down.
User Guide
Page 20
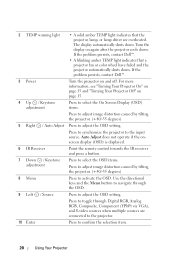
... "Turning Your Projector Off" on page 15. 4 Up / Keystone adjustment Press to select the On Screen Display (OSD) items. Press to adjust image distortion caused by tilting the projector. (+40/-35 degrees) 8 Menu Press to the input source. The display automatically shuts down. If the problem persists, contact Dell™. • A blinking amber TEMP light indicates that the projector, lamp, or lamp driver are connected to the projector. 10 Enter Press to adjust the OSD setting. Turn the display on...
... "Turning Your Projector Off" on page 15. 4 Up / Keystone adjustment Press to select the On Screen Display (OSD) items. Press to adjust image distortion caused by tilting the projector. (+40/-35 degrees) 8 Menu Press to the input source. The display automatically shuts down. If the problem persists, contact Dell™. • A blinking amber TEMP light indicates that the projector, lamp, or lamp driver are connected to the projector. 10 Enter Press to adjust the OSD setting. Turn the display on...

User Guide
Page 22
... ratio Press to change the aspect ratio of a displayed image. 11 Power Turns the projector on the control panel or remote control to 22 Using Your Projector Use or on and off. When an item is selected, the color changes to dark blue. To select a submenu, press the Enter button on page 15. 12 Video mode The Dell 1209S Micro-projector has preset configurations that can be displayed with or without an input source present.
... ratio Press to change the aspect ratio of a displayed image. 11 Power Turns the projector on the control panel or remote control to 22 Using Your Projector Use or on and off. When an item is selected, the color changes to dark blue. To select a submenu, press the Enter button on page 15. 12 Video mode The Dell 1209S Micro-projector has preset configurations that can be displayed with or without an input source present.
User Guide
Page 23
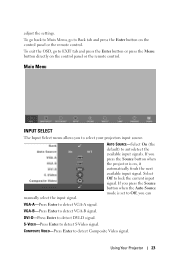
adjust the settings. Select Off to detect Composite Video signal. COMPOSITE VIDEO-Press Enter to lock the current input signal. Main Menu INPUT SELECT The Input Select menu allows you can VGA-A-Press Enter to select your projectors input source. AUTO SOURCE-Select On (the default) to detect VGA-B signal. If you press the Source button when the Auto Source mode is on, it automatically finds the next available input signal. manually select the input signal. Using Your Projector 23 If you press the...
adjust the settings. Select Off to detect Composite Video signal. COMPOSITE VIDEO-Press Enter to lock the current input signal. Main Menu INPUT SELECT The Input Select menu allows you can VGA-A-Press Enter to select your projectors input source. AUTO SOURCE-Select On (the default) to detect VGA-B signal. If you press the Source button when the Auto Source mode is on, it automatically finds the next available input signal. manually select the input signal. Using Your Projector 23 If you press the...
User Guide
Page 24
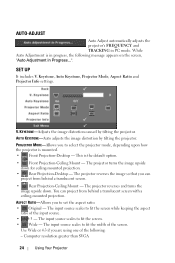
... V. AUTO KEYSTONE-Auto adjusts the image distortion by tilting the projector. The projector reverses and turns the image upside down for ceiling-mounted projection. • Rear Projection-Desktop - The input source scales to fit the width of the input source. • 4:3 - Keystone, Auto Keystone, Projector Mode, Aspect Ratio and Projector Info settings. PROJECTOR MODE-Allows you can project from behind a translucent screen with a ceiling-mounted projection. You can project from behind a translucent screen. • Rear Projection-Ceiling Mount - Computer resolution...
... V. AUTO KEYSTONE-Auto adjusts the image distortion by tilting the projector. The projector reverses and turns the image upside down for ceiling-mounted projection. • Rear Projection-Desktop - The input source scales to fit the width of the input source. • 4:3 - Keystone, Auto Keystone, Projector Mode, Aspect Ratio and Projector Info settings. PROJECTOR MODE-Allows you can project from behind a translucent screen with a ceiling-mounted projection. You can project from behind a translucent screen. • Rear Projection-Ceiling Mount - Computer resolution...
User Guide
Page 25
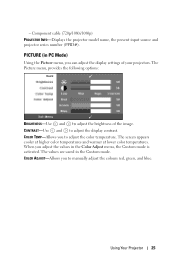
- Component cable (720p/1080i/1080p) PROJECTOR INFO-Displays the projector model name, the present input source and projector series number (PPID#). Using Your Projector 25 CONTRAST-Use and to manually adjust the colours red, green, and blue. The Picture menu, provides the following options: BRIGHTNESS-Use and to adjust the color temperature. The screen appears cooler at higher color temperatures and warmer at lower color temperatures. COLOR ADJUST-Allows you adjust the values in the Custom mode. When you to adjust the display contrast. PICTURE (in...
- Component cable (720p/1080i/1080p) PROJECTOR INFO-Displays the projector model name, the present input source and projector series number (PPID#). Using Your Projector 25 CONTRAST-Use and to manually adjust the colours red, green, and blue. The Picture menu, provides the following options: BRIGHTNESS-Use and to adjust the color temperature. The screen appears cooler at higher color temperatures and warmer at lower color temperatures. COLOR ADJUST-Allows you adjust the values in the Custom mode. When you to adjust the display contrast. PICTURE (in...
User Guide
Page 26
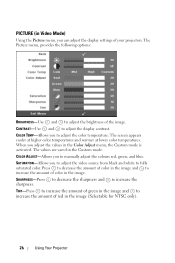
... the amount of color in the image. The Picture menu, provides the following options: BRIGHTNESS-Use and to adjust the brightness of your projectors. COLOR ADJUST-Allows you can adjust the display settings of the image. PICTURE (in Video Mode) Using the Picture menu, you to manually adjust the colours red, green, and blue. CONTRAST-Use and to increase the sharpness. The screen appears cooler at higher color temperatures and warmer at lower color temperatures. When you adjust the values in...
... the amount of color in the image. The Picture menu, provides the following options: BRIGHTNESS-Use and to adjust the brightness of your projectors. COLOR ADJUST-Allows you can adjust the display settings of the image. PICTURE (in Video Mode) Using the Picture menu, you to manually adjust the colours red, green, and blue. CONTRAST-Use and to increase the sharpness. The screen appears cooler at higher color temperatures and warmer at lower color temperatures. When you adjust the values in...
User Guide
Page 27
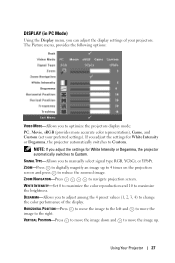
... 4 times on the projection screen and press to Custom. The Picture menu, provides the following options: VIDEO MODE-Allows you adjust the settings for White Intensity or Degamma, the projector automatically switches to reduce the zoomed image. SIGNAL TYPE-Allows you to adjust among the 4 preset values (1, 2, 3, 4) to optimize the projectors display mode: PC, Movie, sRGB (provides more accurate color representation), Game, and Custom (set your projectors. If you to change the color performance...
... 4 times on the projection screen and press to Custom. The Picture menu, provides the following options: VIDEO MODE-Allows you adjust the settings for White Intensity or Degamma, the projector automatically switches to reduce the zoomed image. SIGNAL TYPE-Allows you to adjust among the 4 preset values (1, 2, 3, 4) to optimize the projectors display mode: PC, Movie, sRGB (provides more accurate color representation), Game, and Custom (set your projectors. If you to change the color performance...
User Guide
Page 28
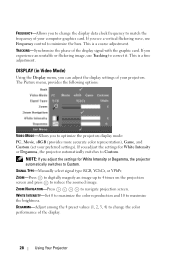
... navigate projection screen. FREQUENCY-Allows you to change the color performance of the display signal with the graphic card. This is a fine adjustment. ZOOM NAVIGATION-Press to reduce the zoomed image. This is a coarse adjustment. The Picture menu, provides the following options: VIDEO MODE-Allows you adjust the settings for White Intensity or Degamma, the projector automatically switches to maximize the brightness. NOTE: If you experience an unstable or flickering image, use Frequency control...
... navigate projection screen. FREQUENCY-Allows you to change the color performance of the display signal with the graphic card. This is a fine adjustment. ZOOM NAVIGATION-Press to reduce the zoomed image. This is a coarse adjustment. The Picture menu, provides the following options: VIDEO MODE-Allows you adjust the settings for White Intensity or Degamma, the projector automatically switches to maximize the brightness. NOTE: If you experience an unstable or flickering image, use Frequency control...
User Guide
Page 29
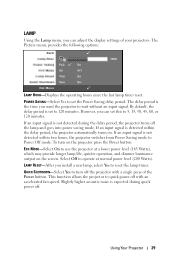
... power level (200 Watts). LAMP RESET-After you can adjust the display settings of the Power button. By default, the delay period is detected within two hours, the projector switches from Power Saving mode to turn on . Using Your Projector 29 However, you install a new lamp, select Yes to 120 minutes. If an input signal is expected during the delay period, the projector turns off . The Picture menu, provides the following options: LAMP HOUR-Displays the operating hours since the last lamp timer reset...
... power level (200 Watts). LAMP RESET-After you can adjust the display settings of the Power button. By default, the delay period is detected within two hours, the projector switches from Power Saving mode to turn on . Using Your Projector 29 However, you install a new lamp, select Yes to 120 minutes. If an input signal is expected during the delay period, the projector turns off . The Picture menu, provides the following options: LAMP HOUR-Displays the operating hours since the last lamp timer reset...
User Guide
Page 31
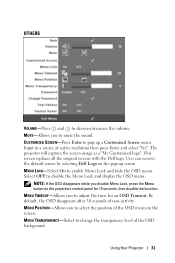
... menu. Input in a source at native resolution then press Enter and select "Yes". MENU TIMEOUT-Allows you to mute the sound. User can recover the default screen by selecting Dell Logo on the projectors control panel for an OSD Timeout. MENU POSITION-Allows you to change the transparency level of non-activity. This screen replaces all the original screens with the Dell logo. Using Your Projector 31 MUTE-Allows you disable Menu Lock...
... menu. Input in a source at native resolution then press Enter and select "Yes". MENU TIMEOUT-Allows you to mute the sound. User can recover the default screen by selecting Dell Logo on the projectors control panel for an OSD Timeout. MENU POSITION-Allows you to change the transparency level of non-activity. This screen replaces all the original screens with the Dell logo. Using Your Projector 31 MUTE-Allows you disable Menu Lock...
User Guide
Page 35
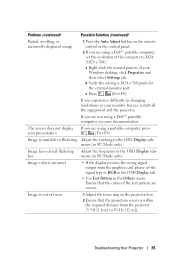
... using a Dell™ portable computer, set the signal type to 39.4 ft [12 m]). Troubleshooting Your Projector 35 If you experience difficulty in the Others menu. Image has vertical flickering Adjust the frequency in PC Mode only). bar menu (in the OSD Display sub- Image color is 1024 x 768 pixels for the external monitor port. Problem (continued) Possible Solution (continued) Partial, scrolling, or incorrectly displayed image 1 Press the Auto Adjust button on the projector lens...
... using a Dell™ portable computer, set the signal type to 39.4 ft [12 m]). Troubleshooting Your Projector 35 If you experience difficulty in the Others menu. Image has vertical flickering Adjust the frequency in PC Mode only). bar menu (in the OSD Display sub- Image color is 1024 x 768 pixels for the external monitor port. Problem (continued) Possible Solution (continued) Partial, scrolling, or incorrectly displayed image 1 Press the Auto Adjust button on the projector lens...
User Guide
Page 36
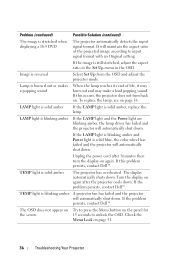
... display automatically shuts down . It will automatically shut down . TEMP light is reversed Select Set Up from the OSD and adjust the projector mode. If the problem persists, contact Dell™. To replace the lamp, see on the panel for the screen 15 seconds to input signal format with an Original setting. Lamp is blinking amber If the LAMP light and the Power light are blinking amber, the lamp driver has failed and the projector will automatically shut down...
... display automatically shuts down . It will automatically shut down . TEMP light is reversed Select Set Up from the OSD and adjust the projector mode. If the problem persists, contact Dell™. To replace the lamp, see on the panel for the screen 15 seconds to input signal format with an Original setting. Lamp is blinking amber If the LAMP light and the Power light are blinking amber, the lamp driver has failed and the projector will automatically shut down...
User Guide
Page 38
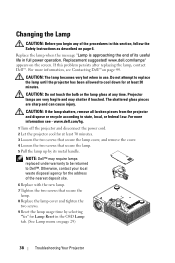
... bulb or the lamp glass at least 30 minutes. www.dell.com/hg. 1 Turn off the projector and disconnect the power cord. 2 Let the projector cool for at least 30 minutes. 3 Loosen the two screws that secure the lamp cover, and remove the cover. 4 Loosen the two screws that secure the lamp. 8 Replace the lamp cover and tighten the two screws. 9 Reset the lamp usage time by its useful life in this problem persists after replacing...
... bulb or the lamp glass at least 30 minutes. www.dell.com/hg. 1 Turn off the projector and disconnect the power cord. 2 Let the projector cool for at least 30 minutes. 3 Loosen the two screws that secure the lamp cover, and remove the cover. 4 Loosen the two screws that secure the lamp. 8 Replace the lamp cover and tighten the two screws. 9 Reset the lamp usage time by its useful life in this problem persists after replacing...

User Guide
Page 41
...) USB port: One USB slave for remote support One mini-DIN RS232 for wired remote control from PC DVI-D input: one DVI-D connector for DVI-D signal (HDCP compliant). 165~200-watt user-replaceable 3000-hour lamp (up to 4000 hours in eco mode) NOTE: The actual operating life span of a projector in stressful conditions which may result in a lamp's shortened operating life span or possibly lamp failure. Usage of a projector lamp will cease light output. Specifications 41...
...) USB port: One USB slave for remote support One mini-DIN RS232 for wired remote control from PC DVI-D input: one DVI-D connector for DVI-D signal (HDCP compliant). 165~200-watt user-replaceable 3000-hour lamp (up to 4000 hours in eco mode) NOTE: The actual operating life span of a projector in stressful conditions which may result in a lamp's shortened operating life span or possibly lamp failure. Usage of a projector lamp will cease light output. Specifications 41...

User Guide
Page 46
... is used to ten times the common logarithm of the ratio of frequency. National Television Standards Committee. Red, Green, Blue- dB- Each DMD consists of thousands of a lens to the opposite corner. The distance from one corner to its focal point. Maximum Distance- Maximum Image Size- The largest image a projector can focus an image onto a screen. NTSC- North American standard for video and broadcasting, with a video format of a projected image...
... is used to ten times the common logarithm of the ratio of frequency. National Television Standards Committee. Red, Green, Blue- dB- Each DMD consists of thousands of a lens to the opposite corner. The distance from one corner to its focal point. Maximum Distance- Maximum Image Size- The largest image a projector can focus an image onto a screen. NTSC- North American standard for video and broadcasting, with a video format of a projected image...
User Guide
Page 49
M Main Unit 6 Control panel 6 Elevator button 6 Focus ring 6 IR receiver 6 Lens 6 Zoom tab 6 O On-Screen Display 22 Auto-Adjust 24 Display (in PC Mode) 27 Display (in Video Mode) 28 Input Select 23 Lamp 29 Language 30 Main Menu 23 Others 31 Picture (in PC Mode) 25 Picture (in Video Mode) 26 Set Up 24 P phone numbers 44 Powering On/Off the Projector Powering Off the Projector 15 Powering On the Projector 15 R Remote Control 21 IR receiver 20 S Specifications Audio 40 Brightness 40 Color Wheel Speed 40...
M Main Unit 6 Control panel 6 Elevator button 6 Focus ring 6 IR receiver 6 Lens 6 Zoom tab 6 O On-Screen Display 22 Auto-Adjust 24 Display (in PC Mode) 27 Display (in Video Mode) 28 Input Select 23 Lamp 29 Language 30 Main Menu 23 Others 31 Picture (in PC Mode) 25 Picture (in Video Mode) 26 Set Up 24 P phone numbers 44 Powering On/Off the Projector Powering Off the Projector 15 Powering On the Projector 15 R Remote Control 21 IR receiver 20 S Specifications Audio 40 Brightness 40 Color Wheel Speed 40...


