User Guide
Page 2
... are trademarks of TEXAS INSTRUMENTS INCORPORATED ; disclaims any manner whatsoever without notice. © 2008 Dell Inc. Information in this text: Dell, the DELL logo, Dimension, OptiPlex, Dell Precision, Latitude, Inspiron, DellNet, PowerApp, PowerEdge, PowerConnect, and PowerVault are trademarks of Microsoft Corporation... of Dell Inc.; Reproduction in any proprietary interest in this document is strictly forbidden. is subject to change without the written permission of your projector. Trademarks used in trademarks and trade names other than its own. Model 1209S May ...
... are trademarks of TEXAS INSTRUMENTS INCORPORATED ; disclaims any manner whatsoever without notice. © 2008 Dell Inc. Information in this text: Dell, the DELL logo, Dimension, OptiPlex, Dell Precision, Latitude, Inspiron, DellNet, PowerApp, PowerEdge, PowerConnect, and PowerVault are trademarks of Microsoft Corporation... of Dell Inc.; Reproduction in any proprietary interest in this document is strictly forbidden. is subject to change without the written permission of your projector. Trademarks used in trademarks and trade names other than its own. Model 1209S May ...
User Guide
Page 3
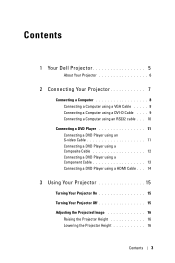
Contents 1 Your Dell Projector 5 About Your Projector 6 2 Connecting Your Projector 7 Connecting a Computer 8 Connecting a Computer using a VGA Cable . . . . . 8 Connecting a Computer using a DVI-D Cable . . . . 9 Connecting a Computer using an RS232 cable . . . 10 Connecting a DVD Player 11 Connecting... a DVD Player using a Composite Cable 12 Connecting a DVD Player using a Component Cable 13 Connecting a DVD Player using a HDMI Cable . . . 14 3 Using Your Projector . . . . 15 Turning Your Projector On 15 Turning Your Projector Off 15 Adjusting the Projected Image 16 Raising the...
Contents 1 Your Dell Projector 5 About Your Projector 6 2 Connecting Your Projector 7 Connecting a Computer 8 Connecting a Computer using a VGA Cable . . . . . 8 Connecting a Computer using a DVI-D Cable . . . . 9 Connecting a Computer using an RS232 cable . . . 10 Connecting a DVD Player 11 Connecting... a DVD Player using a Composite Cable 12 Connecting a DVD Player using a Component Cable 13 Connecting a DVD Player using a HDMI Cable . . . 14 3 Using Your Projector . . . . 15 Turning Your Projector On 15 Turning Your Projector Off 15 Adjusting the Projected Image 16 Raising the...
User Guide
Page 4
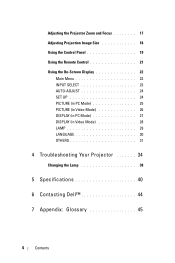
Adjusting the Projector Zoom and Focus 17 Adjusting Projection Image Size 18 Using the Control Panel 19 Using the Remote Control 21 Using the On-Screen Display 22 Main Menu 23 INPUT SELECT 23 AUTO-ADJUST 24 SET UP 24 PICTURE (in PC Mode 25 PICTURE (in Video Mode 26 DISPLAY (in PC Mode 27 DISPLAY (in Video Mode 28 LAMP 29 LANGUAGE 30 OTHERS 31 4 Troubleshooting Your Projector 34 Changing the Lamp 38 5 Specifications 40 6 Contacting Dell 44 7 Appendix: Glossary 45 4 Contents
Adjusting the Projector Zoom and Focus 17 Adjusting Projection Image Size 18 Using the Control Panel 19 Using the Remote Control 21 Using the On-Screen Display 22 Main Menu 23 INPUT SELECT 23 AUTO-ADJUST 24 SET UP 24 PICTURE (in PC Mode 25 PICTURE (in Video Mode 26 DISPLAY (in PC Mode 27 DISPLAY (in Video Mode 28 LAMP 29 LANGUAGE 30 OTHERS 31 4 Troubleshooting Your Projector 34 Changing the Lamp 38 5 Specifications 40 6 Contacting Dell 44 7 Appendix: Glossary 45 4 Contents
User Guide
Page 5
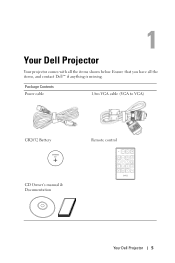
Package Contents Power cable 1.8m VGA cable (VGA to VGA) CR2032 Battery CR2032 3V CD Owner's manual & Documentation Remote control Your Dell Projector 5 Ensure that you have all the items shown below. 1 Your Dell Projector Your projector comes with all the items, and contact Dell™ if anything is missing.
Package Contents Power cable 1.8m VGA cable (VGA to VGA) CR2032 Battery CR2032 3V CD Owner's manual & Documentation Remote control Your Dell Projector 5 Ensure that you have all the items shown below. 1 Your Dell Projector Your projector comes with all the items, and contact Dell™ if anything is missing.
User Guide
Page 6
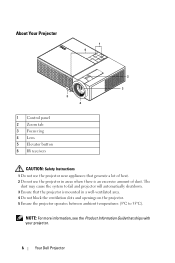
...the ventilation slots and openings on the projector. 5 Ensure the projector operates between ambient temperatures (5ºC to fail and projector will automatically shutdown. 3 Ensure that generate a lot of heat. 2 Do not use the projector in areas where there is an ...excessive amount of dust. The dust may cause the system to 35ºC). NOTE: For more information, see the Product Information Guide that ships with your projector. 6 Your Dell Projector...
...the ventilation slots and openings on the projector. 5 Ensure the projector operates between ambient temperatures (5ºC to fail and projector will automatically shutdown. 3 Ensure that generate a lot of heat. 2 Do not use the projector in areas where there is an ...excessive amount of dust. The dust may cause the system to 35ºC). NOTE: For more information, see the Product Information Guide that ships with your projector. 6 Your Dell Projector...
User Guide
Page 7
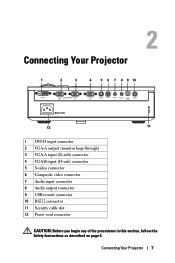
... DVI-D In VGA - Connecting Your Projector 7 B In S-Video In Video In Audio In Audio Out USB Remote RS-232 Dell 1209S 12 11 1 DVI-D input connector 2 VGA-A output (monitor loop-through) 3 VGA-A input (D-sub) connector 4 VGA-B input (D-sub) connector 5 S-video connector 6 Composite video connector 7 Audio input ...
... DVI-D In VGA - Connecting Your Projector 7 B In S-Video In Video In Audio In Audio Out USB Remote RS-232 Dell 1209S 12 11 1 DVI-D input connector 2 VGA-A output (monitor loop-through) 3 VGA-A input (D-sub) connector 4 VGA-B input (D-sub) connector 5 S-video connector 6 Composite video connector 7 Audio input ...
User Guide
Page 8
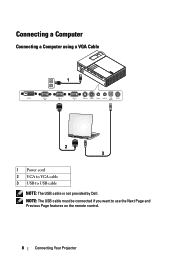
Connecting a Computer Connecting a Computer using a VGA Cable 1 DVI-D In VGA - A In VGA - B In S-Video In Video In Audio In Audio Out USB Remote RS-232 MOLEX 2 3 1 Power cord 2 VGA to VGA cable 3 USB to use the Next Page and Previous Page features on the remote control. 8 Connecting Your Projector NOTE: The USB cable must be connected if you want to USB cable NOTE: The USB cable is not provided by Dell. A Out VGA -
Connecting a Computer Connecting a Computer using a VGA Cable 1 DVI-D In VGA - A In VGA - B In S-Video In Video In Audio In Audio Out USB Remote RS-232 MOLEX 2 3 1 Power cord 2 VGA to VGA cable 3 USB to use the Next Page and Previous Page features on the remote control. 8 Connecting Your Projector NOTE: The USB cable must be connected if you want to USB cable NOTE: The USB cable is not provided by Dell. A Out VGA -
User Guide
Page 9
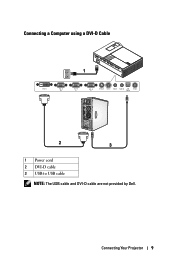
B In S-Video In Video In Audio In Audio Out USB Remote RS-232 TV OUT SDIF-OUT PDIF-OUT MOLEX 2 3 1 Power cord 2 DVI-D cable 3 USB to USB cable NOTE: The USB cable and DVI-D cable are not provided by Dell. Connecting Your Projector 9 Connecting a Computer using a DVI-D Cable 1 DVI-D In VGA - A In VGA - A Out VGA -
B In S-Video In Video In Audio In Audio Out USB Remote RS-232 TV OUT SDIF-OUT PDIF-OUT MOLEX 2 3 1 Power cord 2 DVI-D cable 3 USB to USB cable NOTE: The USB cable and DVI-D cable are not provided by Dell. Connecting Your Projector 9 Connecting a Computer using a DVI-D Cable 1 DVI-D In VGA - A In VGA - A Out VGA -
User Guide
Page 10
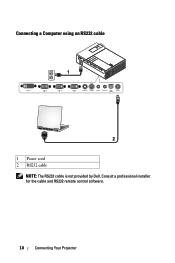
A In VGA - A Out VGA - B In S-Video In Video In Audio In Audio Out USB Remote RS-232 2 1 Power cord 2 RS232 cable NOTE: The RS232 cable is not provided by Dell. Consult a professional installer for the cable and RS232 remote control software. 10 Connecting Your Projector Connecting a Computer using an RS232 cable 1 DVI-D In VGA -
A In VGA - A Out VGA - B In S-Video In Video In Audio In Audio Out USB Remote RS-232 2 1 Power cord 2 RS232 cable NOTE: The RS232 cable is not provided by Dell. Consult a professional installer for the cable and RS232 remote control software. 10 Connecting Your Projector Connecting a Computer using an RS232 cable 1 DVI-D In VGA -
User Guide
Page 11
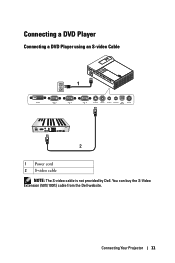
A In VGA - Connecting Your Projector 11 B In S-Video In Video In Audio In Audio Out USB Remote RS-232 2 1 Power cord 2 S-video cable NOTE: The S-video cable is not provided by Dell. You can buy the S-Video Extension (50ft/100ft) cable from the Dell website. Connecting a DVD Player Connecting a DVD Player using an S-video Cable 1 DVI-D In VGA - A Out VGA -
A In VGA - Connecting Your Projector 11 B In S-Video In Video In Audio In Audio Out USB Remote RS-232 2 1 Power cord 2 S-video cable NOTE: The S-video cable is not provided by Dell. You can buy the S-Video Extension (50ft/100ft) cable from the Dell website. Connecting a DVD Player Connecting a DVD Player using an S-video Cable 1 DVI-D In VGA - A Out VGA -
User Guide
Page 12
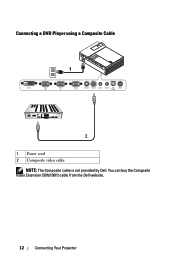
A Out VGA - B In S-Video In Video In Audio In Audio Out USB Remote RS-232 2 1 Power cord 2 Composite video cable NOTE: The Composite cable is not provided by Dell. A In VGA - You can buy the Composite Video Extension (50ft/100ft) cable from the Dell website. 12 Connecting Your Projector Connecting a DVD Player using a Composite Cable 1 DVI-D In VGA -
A Out VGA - B In S-Video In Video In Audio In Audio Out USB Remote RS-232 2 1 Power cord 2 Composite video cable NOTE: The Composite cable is not provided by Dell. A In VGA - You can buy the Composite Video Extension (50ft/100ft) cable from the Dell website. 12 Connecting Your Projector Connecting a DVD Player using a Composite Cable 1 DVI-D In VGA -
User Guide
Page 13
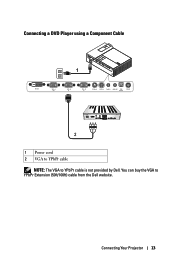
B In S-Video In Video In Audio In Audio Out USB Remote RS-232 2 1 Power cord 2 VGA to YPbPr cable NOTE: The VGA to YPbPr Extension (50ft/100ft) cable from the Dell website. You can buy the VGA to YPbPr cable is not provided by Dell. Connecting a DVD Player using a Component Cable 1 DVI-D In VGA - A Out VGA - A In VGA - Connecting Your Projector 13
B In S-Video In Video In Audio In Audio Out USB Remote RS-232 2 1 Power cord 2 VGA to YPbPr cable NOTE: The VGA to YPbPr Extension (50ft/100ft) cable from the Dell website. You can buy the VGA to YPbPr cable is not provided by Dell. Connecting a DVD Player using a Component Cable 1 DVI-D In VGA - A Out VGA - A In VGA - Connecting Your Projector 13
User Guide
Page 14
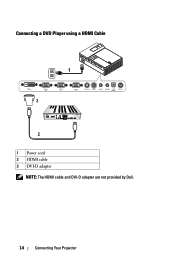
A In VGA - B In S-Video In Video In Audio In Audio Out USB Remote RS-232 2 1 Power cord 2 HDMI cable 3 DVI-D adapter NOTE: The HDMI cable and DVI-D adapter are not provided by Dell. 14 Connecting Your Projector A Out 3 VGA - Connecting a DVD Player using a HDMI Cable 1 DVI-D In VGA -
A In VGA - B In S-Video In Video In Audio In Audio Out USB Remote RS-232 2 1 Power cord 2 HDMI cable 3 DVI-D adapter NOTE: The HDMI cable and DVI-D adapter are not provided by Dell. 14 Connecting Your Projector A Out 3 VGA - Connecting a DVD Player using a HDMI Cable 1 DVI-D In VGA -
User Guide
Page 15
...control or control panel to locate the Power button). 4 Turn on your source. 5 The Dell Logo will continue for signal..." Using Your Projector 15 For information about connecting the projector, see "Connecting Your Projector" on page 7. 3 Press the Power button (see "Using the Control Panel" on ... (computer, DVD player, etc.). message appears on the screen, ensure that the appropriate cables are still running. Turning Your Projector Off NOTICE: Unplug the projector after properly shutting down as explained in the following procedure. 1 Press the Power button. 2 Press the Power button again....
...control or control panel to locate the Power button). 4 Turn on your source. 5 The Dell Logo will continue for signal..." Using Your Projector 15 For information about connecting the projector, see "Connecting Your Projector" on page 7. 3 Press the Power button (see "Using the Control Panel" on ... (computer, DVD player, etc.). message appears on the screen, ensure that the appropriate cables are still running. Turning Your Projector Off NOTICE: Unplug the projector after properly shutting down as explained in the following procedure. 1 Press the Power button. 2 Press the Power button again....
User Guide
Page 16
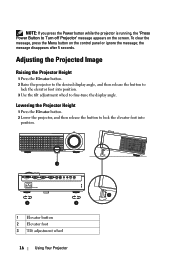
... angle. A I S-Video In Video In Audio In Audio Out USB Remote RS-232 Dell 1209S 3 3 2 1 Elevator button 2 Elevator foot 3 Tilt adjustment wheel 16 Using Your Projector Adjusting the Projected Image Raising the Projector Height 1 Press the Elevator button. 2 Raise the projector to the desired display angle, and then release the button to lock the elevator...
... angle. A I S-Video In Video In Audio In Audio Out USB Remote RS-232 Dell 1209S 3 3 2 1 Elevator button 2 Elevator foot 3 Tilt adjustment wheel 16 Using Your Projector Adjusting the Projected Image Raising the Projector Height 1 Press the Elevator button. 2 Raise the projector to the desired display angle, and then release the button to lock the elevator...
User Guide
Page 17
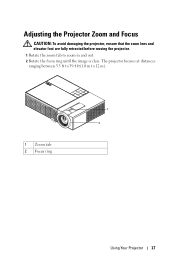
Adjusting the Projector Zoom and Focus CAUTION: To avoid damaging the projector, ensure that the zoom lens and elevator foot are fully retracted before moving the projector. 1 Rotate the zoom tab to 12 m). 1 Zoom tab 2 Focus ring 1 2 Using Your Projector 17 The projector focuses at distances ranging between 3.3 ft to 39.4 ft(1.0 m to zoom in and out. 2 Rotate the focus ring until the image is clear.
Adjusting the Projector Zoom and Focus CAUTION: To avoid damaging the projector, ensure that the zoom lens and elevator foot are fully retracted before moving the projector. 1 Rotate the zoom tab to 12 m). 1 Zoom tab 2 Focus ring 1 2 Using Your Projector 17 The projector focuses at distances ranging between 3.3 ft to 39.4 ft(1.0 m to zoom in and out. 2 Rotate the focus ring until the image is clear.

User Guide
Page 18
Adjusting Projection Image Size 302.8"(769.2cm) 2(67959.3.3"cm) 227.1"(576.9cm) 2(50264.5.5"cm) 176.7"(448.7cm) 1(46007.6.9"cm) 126.2"(320.5cm) 1(21941.7.4"cm) (6187.48."8cm) 75.7"(192.3cm) 25.2 "(64.1cm) 22.89" (58.3cm) 3.3'(1.0m) Projector to screen distance 39.4'(12.0m) 29.5'(9.0m) 23.0'(7.0m) 16.4'(5.0m) 9.8'(3.0m) 18 Using Your Projector
Adjusting Projection Image Size 302.8"(769.2cm) 2(67959.3.3"cm) 227.1"(576.9cm) 2(50264.5.5"cm) 176.7"(448.7cm) 1(46007.6.9"cm) 126.2"(320.5cm) 1(21941.7.4"cm) (6187.48."8cm) 75.7"(192.3cm) 25.2 "(64.1cm) 22.89" (58.3cm) 3.3'(1.0m) Projector to screen distance 39.4'(12.0m) 29.5'(9.0m) 23.0'(7.0m) 16.4'(5.0m) 9.8'(3.0m) 18 Using Your Projector
User Guide
Page 19
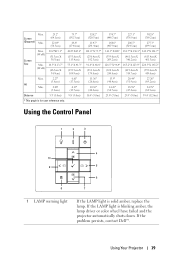
If the problem persists, contact Dell™. Screen (Diagonal) Max. Using Your Projector 19 If the LAMP light is solid amber, replace the lamp. Min. 25.2" (64.1cm) 22.89" (58.3cm) 75.7" (192.3cm) 68.8" (174.8cm) ...) Using the Control Panel 1 2 3 10 9 8 4 5 6 7 1 LAMP warning light If the LAMP light is blinking amber, the lamp driver or color wheel have failed and the projector automatically shuts down.
If the problem persists, contact Dell™. Screen (Diagonal) Max. Using Your Projector 19 If the LAMP light is solid amber, replace the lamp. Min. 25.2" (64.1cm) 22.89" (58.3cm) 75.7" (192.3cm) 68.8" (174.8cm) ...) Using the Control Panel 1 2 3 10 9 8 4 5 6 7 1 LAMP warning light If the LAMP light is blinking amber, the lamp driver or color wheel have failed and the projector automatically shuts down.
User Guide
Page 20
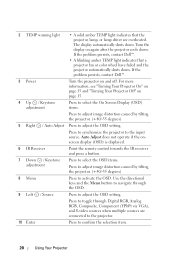
... automatically shuts down . Use the directional keys and the Menu button to adjust the OSD setting. If the problem persists, contact Dell™. 3 Power Turn the projector on again after the projector cools down . Auto Adjust does not operate if the onscreen display (OSD) is displayed. 6 IR Receiver Point the remote control towards...
... automatically shuts down . Use the directional keys and the Menu button to adjust the OSD setting. If the problem persists, contact Dell™. 3 Power Turn the projector on again after the projector cools down . Auto Adjust does not operate if the onscreen display (OSD) is displayed. 6 IR Receiver Point the remote control towards...
User Guide
Page 21
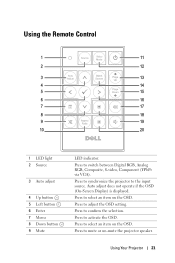
... the OSD (On-Screen Display) is displayed. Press to switch between Digital RGB, Analog RGB, Composite, S-video, Component (YPbPr via VGA). Press to synchronize the projector to select an item on the OSD. Press to the input source. Press to activate the OSD. Using the Remote Control 1 11 2 12 3 13 4 14... 10 20 1 LED light 2 Source 3 Auto adjust 4 Up button 5 Left button 6 Enter 7 Menu 8 Down button 9 Mute LED indicator. Press to mute or un-mute the projector speaker. Using Your...
... the OSD (On-Screen Display) is displayed. Press to switch between Digital RGB, Analog RGB, Composite, S-video, Component (YPbPr via VGA). Press to synchronize the projector to select an item on the OSD. Press to the input source. Press to activate the OSD. Using the Remote Control 1 11 2 12 3 13 4 14... 10 20 1 LED light 2 Source 3 Auto adjust 4 Up button 5 Left button 6 Enter 7 Menu 8 Down button 9 Mute LED indicator. Press to mute or un-mute the projector speaker. Using Your...


