Owners Manual
Page 1
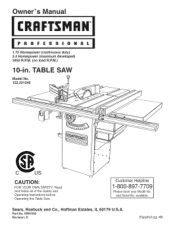
Customer Helpline 1-800-897-7709 Please have your Model No. OR91552 Revision: D Espa5ol pg. 48 Read and follow all of the Safety and Operating Instructions before Operating this Table Saw. Part No. TABLE SAW Model No. 152.221240 CAUTION: FOR YOUR OWN SAFETY; and Serial No. Sears, Roebuck and Co., Hoffman Estates, IL 60179 U.S.A. available. Owner's uai CRRFrSMRH 1.75 Horsepower (continuous duty) 2.4 Horsepower (maximum developed) 3450 R.P.M. (no load R.P.M.) 10-in.
Customer Helpline 1-800-897-7709 Please have your Model No. OR91552 Revision: D Espa5ol pg. 48 Read and follow all of the Safety and Operating Instructions before Operating this Table Saw. Part No. TABLE SAW Model No. 152.221240 CAUTION: FOR YOUR OWN SAFETY; and Serial No. Sears, Roebuck and Co., Hoffman Estates, IL 60179 U.S.A. available. Owner's uai CRRFrSMRH 1.75 Horsepower (continuous duty) 2.4 Horsepower (maximum developed) 3450 R.P.M. (no load R.P.M.) 10-in.
Owners Manual
Page 2
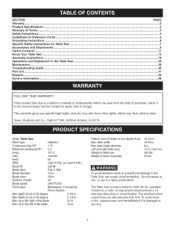
...to the Table Saw ...Maintenance ...Troubleshooting Guide ...Part List ...Espanol ...Service Information ... Max depth-of-cut Max dado width Max dado blade diameter Left and right table wing Weight of table saw Weight of teeth Poly-V Belt 10-in. 5/8-in . Table Saw Motor type...of Terms ...Safety Instructions ...Guidelines for Extension Cords ...Grounding Instructions ...Specific Safety Instructions for Table Saw ...Accessories and Attachments ...Carton Contents ...Know Your Table Saw ...Assembly Instructions ...Operations and Adjustment to the nearest Sears Service Center for 120V, 60 Hz...
...to the Table Saw ...Maintenance ...Troubleshooting Guide ...Part List ...Espanol ...Service Information ... Max depth-of-cut Max dado width Max dado blade diameter Left and right table wing Weight of table saw Weight of teeth Poly-V Belt 10-in. 5/8-in . Table Saw Motor type...of Terms ...Safety Instructions ...Guidelines for Extension Cords ...Grounding Instructions ...Specific Safety Instructions for Table Saw ...Accessories and Attachments ...Carton Contents ...Know Your Table Saw ...Assembly Instructions ...Operations and Adjustment to the nearest Sears Service Center for 120V, 60 Hz...
Owners Manual
Page 4
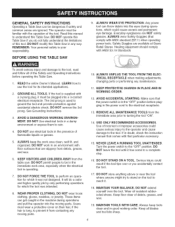
... Users must be plugged into the moving parts. 10. AVOID ACCIDENTAL STARTING. REMOVE ALL MAINTENANCE TOOLS from contacting any maintenance. 11. Use of the Safety and Operating Instructions before plugging in the power cord to understand this Table Saw in any way. If in doubt, check...BALANCE. The operator must wear a protective cover on the tool to be dangerous if safety and common sense are slippery from the table saw. Everyday eyeglasses are available at Sears Retail Stores. READ the entire Owner's Manual. USE ONLY RECOMMENDED ACCESSORIES. Wear oil resistant ...
... Users must be plugged into the moving parts. 10. AVOID ACCIDENTAL STARTING. REMOVE ALL MAINTENANCE TOOLS from contacting any maintenance. 11. Use of the Safety and Operating Instructions before plugging in the power cord to understand this Table Saw in any way. If in doubt, check...BALANCE. The operator must wear a protective cover on the tool to be dangerous if safety and common sense are slippery from the table saw. Everyday eyeglasses are available at Sears Retail Stores. READ the entire Owner's Manual. USE ONLY RECOMMENDED ACCESSORIES. Wear oil resistant ...

Owners Manual
Page 5
...be sure it is acceptable for correct sizing of this tool can generate and disburse dust or other part that is marked with dust. An undersized cord will draw. CHILDPROOF THE WORKSHOP AREA by a ...ALCOHOL, OR MEDICATION. Always use clamps or jigs to see "MiNiMUM RECOMMENDED GAUGE FOR EXTENSION CORDS (AWG)" table for outdoor use the next heavier gauge. 27. If in good electrical condition. USE ONLY A 3=WIRE EXTENSION...14 AWG 14 AWG Not recommended 240 VOLT OPERATION ONLY 0 to 6 Amps 6 to 10 Amps 10 to 12 Amps 12 to the dust may result in doubt of the proper size of ...
...be sure it is acceptable for correct sizing of this tool can generate and disburse dust or other part that is marked with dust. An undersized cord will draw. CHILDPROOF THE WORKSHOP AREA by a ...ALCOHOL, OR MEDICATION. Always use clamps or jigs to see "MiNiMUM RECOMMENDED GAUGE FOR EXTENSION CORDS (AWG)" table for outdoor use the next heavier gauge. 27. If in good electrical condition. USE ONLY A 3=WIRE EXTENSION...14 AWG 14 AWG Not recommended 240 VOLT OPERATION ONLY 0 to 6 Amps 6 to 10 Amps 10 to 12 Amps 12 to the dust may result in doubt of the proper size of ...

Owners Manual
Page 8
... over the blade. 26. PROPERLY SUPPORT long or wide workpiece. 30. Clean off the table/work area before table saw . USEa pushstick(s)for Woodworking Machinery and the U.S. NEVERperformlayouta, ssemblyorset-upworkon thetable/worakreawhenthemachineis running....twistedor warpedo, r doesnothavea straightedgetoguide alongthefence. • Usingfeatherboardwshenthebladeguardand splitterassemblycannotbeused. REMOVEcut-offpiecesanddebrisfromthetable beforestartingthesaw. NEVER have any part of your body in front of this tool is to be connected to instruct other users. AVOID ...
... over the blade. 26. PROPERLY SUPPORT long or wide workpiece. 30. Clean off the table/work area before table saw . USEa pushstick(s)for Woodworking Machinery and the U.S. NEVERperformlayouta, ssemblyorset-upworkon thetable/worakreawhenthemachineis running....twistedor warpedo, r doesnothavea straightedgetoguide alongthefence. • Usingfeatherboardwshenthebladeguardand splitterassemblycannotbeused. REMOVEcut-offpiecesanddebrisfromthetable beforestartingthesaw. NEVER have any part of your body in front of this tool is to be connected to instruct other users. AVOID ...

Owners Manual
Page 11
... with a soft cloth. Splitter mounting rod 6. Switch 14. This table saw parts. 1. The saw carton also contains a box of saw will require some amount of the parts and the table saw. The protective coatings can only be connected to the power source. Extension wing (2) 3. Splitter bracket assembly 7. Fence hook (2) 10. This may need redone several times before assembly. 8, Compare...
... with a soft cloth. Splitter mounting rod 6. Switch 14. This table saw parts. 1. The saw carton also contains a box of saw will require some amount of the parts and the table saw. The protective coatings can only be connected to the power source. Extension wing (2) 3. Splitter bracket assembly 7. Fence hook (2) 10. This may need redone several times before assembly. 8, Compare...

Owners Manual
Page 13
Upper support assembly 54. See hardware diagram to help in finding the correct part. Clamp knob 53. See figure 3-5. , Hardware Pack for Biesemeyer Fence Rails (#0R91669) includes: (Hardware finish is Zinc) Flat Washer M8 (2) Flat Washer 5/16" (9) Lock... head Screw 10-32 x 3/8" (4) Knob (Black) (not shown) Cursor (not shown) (2) Hardware Pack for Extension Wings (#0R92013) includes: (Hardware finish is Black Oxide) Flat Washer M8 (8) Lock Washer M8 (8) Hex Head Screw M8x1.25 x 30mm (8) Hardware Pack for Outfeed Table (#0R92015) includes: (Hardware finish is Black Oxide) Clamp Knob Flat ...
Upper support assembly 54. See hardware diagram to help in finding the correct part. Clamp knob 53. See figure 3-5. , Hardware Pack for Biesemeyer Fence Rails (#0R91669) includes: (Hardware finish is Zinc) Flat Washer M8 (2) Flat Washer 5/16" (9) Lock... head Screw 10-32 x 3/8" (4) Knob (Black) (not shown) Cursor (not shown) (2) Hardware Pack for Extension Wings (#0R92013) includes: (Hardware finish is Black Oxide) Flat Washer M8 (8) Lock Washer M8 (8) Hex Head Screw M8x1.25 x 30mm (8) Hardware Pack for Outfeed Table (#0R92015) includes: (Hardware finish is Black Oxide) Clamp Knob Flat ...

Owners Manual
Page 24
...screw is flush with hex socket head screw and flat washer (F) into the top T-slot (L) of the cross cut fence so that no part of the fence is disconnected from the power source. Repeat this through the slot in the clamp assembly and thread one knob into miter ...tighten the hex socket head screw. Allow the cross cut fence (H). See figure 13-3. 9. MITER GAUGE ASSEMBLY Figure 13=2 H MAKE CERTAIN the table saw is in the path of the saw table and securely tighten both hex socket head screws. Figure 13-1 E B Thread elevating rod (A) into the grooves (I) of the miter gauge body...
...screw is flush with hex socket head screw and flat washer (F) into the top T-slot (L) of the cross cut fence so that no part of the fence is disconnected from the power source. Repeat this through the slot in the clamp assembly and thread one knob into miter ...tighten the hex socket head screw. Allow the cross cut fence (H). See figure 13-3. 9. MITER GAUGE ASSEMBLY Figure 13=2 H MAKE CERTAIN the table saw is in the path of the saw table and securely tighten both hex socket head screws. Figure 13-1 E B Thread elevating rod (A) into the grooves (I) of the miter gauge body...
Owners Manual
Page 26
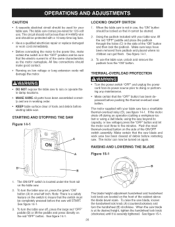
... under the front rail on the side of the cabinet above the blade bevel scale. See figure 14-1. 3. The motor supplied with your table saw , unlock and remove the padlock from padlock and placed where no children can now be started. 2. To turn the handwhee[ (B) clockwise....ON" button (A) in damp locations. • MAKE SURE all parts have been removed from the "ON" button. See figure 14-1. 3, To turn the table saw blade, loosen the handwheel lock knob (A) (counterclockwise) and turn the table saw . To raise the saw off during an operation (cutting a workpiece too fast or using ...
... under the front rail on the side of the cabinet above the blade bevel scale. See figure 14-1. 3. The motor supplied with your table saw , unlock and remove the padlock from padlock and placed where no children can now be started. 2. To turn the handwhee[ (B) clockwise....ON" button (A) in damp locations. • MAKE SURE all parts have been removed from the "ON" button. See figure 14-1. 3, To turn the table saw blade, loosen the handwheel lock knob (A) (counterclockwise) and turn the table saw . To raise the saw off during an operation (cutting a workpiece too fast or using ...

Owners Manual
Page 34
Figure 24=2 The use of non-Craftsman attachments and accesE sories may be used in either one of the miter gauge grooves. Place the workpiece against the miter gauge and the table. Figure 24=3 F / H K / To avoid serious injury, NEVER hang onto or touch the part of the workpiece that is going to be cut... gauge body. Start the cut slowly and hold the workpiece firmly against the miter gauge and advance both the miter gauge and workpiece toward the saw , one can be positioned in risk of the miter gauge (A) to the front of the miter gauge by using the block as a cut -off gauge...
Figure 24=2 The use of non-Craftsman attachments and accesE sories may be used in either one of the miter gauge grooves. Place the workpiece against the miter gauge and the table. Figure 24=3 F / H K / To avoid serious injury, NEVER hang onto or touch the part of the workpiece that is going to be cut... gauge body. Start the cut slowly and hold the workpiece firmly against the miter gauge and advance both the miter gauge and workpiece toward the saw , one can be positioned in risk of the miter gauge (A) to the front of the miter gauge by using the block as a cut -off gauge...
Owners Manual
Page 35
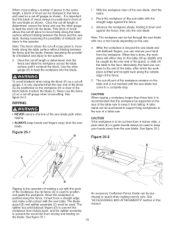
... (G)bepositionedso theworkpiece(H)is not touched until the saw blade has come to a complete stop. Toavoidkickbackwhenusingtheblock(F)asa cut-off part of the workpiece remains on the size. ...saw blade, start the motor. 2. CAUTION If the workpiece is to feedtheworkpieceintotheblade. Oncethecut-offlengthis determinedlo, ckthe fenceandslidetheworkpieceacrossthetable surfaceuntilit contactstheblock.Usethe miter gauge(K)to be cut with the saw blade with the straight edge against the fence, then into the saw blade. An accessory Craftsman Fence Guide can be fed through the saw table...
... (G)bepositionedso theworkpiece(H)is not touched until the saw blade has come to a complete stop. Toavoidkickbackwhenusingtheblock(F)asa cut-off part of the workpiece remains on the size. ...saw blade, start the motor. 2. CAUTION If the workpiece is to feedtheworkpieceintotheblade. Oncethecut-offlengthis determinedlo, ckthe fenceandslidetheworkpieceacrossthetable surfaceuntilit contactstheblock.Usethe miter gauge(K)to be cut with the saw blade with the straight edge against the fence, then into the saw blade. An accessory Craftsman Fence Guide can be fed through the saw table...
Owners Manual
Page 39
...in safe order. CLEANING With the table saw . The operator should not be used as high-pressured air may damage insulation. Air pressure above 50 R S. Only trained personnel should perform repairs to the table saw unplugged, blow off motor with non-factory parts could cause serious injury to the ...operator and damage to clean tame saw . 39 Do not allow chips and dust to remove dust or dirt. Keep ...
...in safe order. CLEANING With the table saw . The operator should not be used as high-pressured air may damage insulation. Air pressure above 50 R S. Only trained personnel should perform repairs to the table saw unplugged, blow off motor with non-factory parts could cause serious injury to the ...operator and damage to clean tame saw . 39 Do not allow chips and dust to remove dust or dirt. Keep ...

Owners Manual
Page 41
...111 STD861004 112 OR91774 113 OR91076 114 OR91076 115 OR91077 116 OR91074 117 OR91118 118 OR91078 Description OWNER'S MANUAL - #22124 10" TaNe Saw BLADE GUARD ASSEMBLY, (NOT SHOWN) CONSISTS OF REF #: 1,2, 3, 3a, 3b 4, 6, 6, 7, 16, 24 & ... service technician does repairs. Any attempt to repair or replace electrical parts on this table saw may create a HAZARD or cause product damage. PART No. 119 120 121 122 123 124 125 126 127 127A 128... M5 CROSS CUT FENCE Qty. 1 N/A N/A Key No. 10-IN.TABLESAW MODEL NO.152.221240 When servicing, use only CRAFTSMAN replacement parts.
...111 STD861004 112 OR91774 113 OR91076 114 OR91076 115 OR91077 116 OR91074 117 OR91118 118 OR91078 Description OWNER'S MANUAL - #22124 10" TaNe Saw BLADE GUARD ASSEMBLY, (NOT SHOWN) CONSISTS OF REF #: 1,2, 3, 3a, 3b 4, 6, 6, 7, 16, 24 & ... service technician does repairs. Any attempt to repair or replace electrical parts on this table saw may create a HAZARD or cause product damage. PART No. 119 120 121 122 123 124 125 126 127 127A 128... M5 CROSS CUT FENCE Qty. 1 N/A N/A Key No. 10-IN.TABLESAW MODEL NO.152.221240 When servicing, use only CRAFTSMAN replacement parts.

Owners Manual
Page 42
...BE CUT TO PROPER LENGTH 42 PART No. 254 OR90059 255 OR91826... TAP SCREW 1/4-28 x 3/8" CABINET ASSEMBLY SPEC TAG (C SAW) BEVEL SCALE BLADE ELEVATION AND TILT LABEL HINGE ASSEMBLY HEX NUT...WASHER 4 444 STD622505 1/4-20 x 1/2" HEX HEAD SCREW 4 445 OR91616 FRONT RAIL 1 446 OR91617 TABLE ASSEMBLY 12" X 27" 1 N/A OR92011 TEMPLATE (not shown) Service Notes: A KIT INCLUDES; Description...1 N/A 403 OR91602 LABEL LARGE BIESEMEYER COMM/HS FNC 1 404 STD511103 10-32 x 3/8" ROUND HEAD SCREW 2 405 STD551010 #10 FLAT WASHER 2 406 OR91603 CURSOR 1 407 OR91604 LABEL, FLAG & ...
...BE CUT TO PROPER LENGTH 42 PART No. 254 OR90059 255 OR91826... TAP SCREW 1/4-28 x 3/8" CABINET ASSEMBLY SPEC TAG (C SAW) BEVEL SCALE BLADE ELEVATION AND TILT LABEL HINGE ASSEMBLY HEX NUT...WASHER 4 444 STD622505 1/4-20 x 1/2" HEX HEAD SCREW 4 445 OR91616 FRONT RAIL 1 446 OR91617 TABLE ASSEMBLY 12" X 27" 1 N/A OR92011 TEMPLATE (not shown) Service Notes: A KIT INCLUDES; Description...1 N/A 403 OR91602 LABEL LARGE BIESEMEYER COMM/HS FNC 1 404 STD511103 10-32 x 3/8" ROUND HEAD SCREW 2 405 STD551010 #10 FLAT WASHER 2 406 OR91603 CURSOR 1 407 OR91604 LABEL, FLAG & ...

Owners Manual
Page 88
... door openers and water heaters. 1-800-4-MY-HOIVlE ® (1-800-469-4663) www.sears.com Anytime, day or night (U.S.A. in your home - For Sears professional installation of Sears, Roebuck and Co. ® Marca Registrada / TMMarca de F_brica / sMMarca de Servicio de Sears, Roebuck and Co. only) www.sears.com ...TO purchase a protection agreement (U.S.A.) or maintenance agreement (Canada)on -line for the location of all major brand appliances l.a..w...n... For the replacement parts, accessories and owner's manuals that you need to do-it ! Your Home For repair -
... door openers and water heaters. 1-800-4-MY-HOIVlE ® (1-800-469-4663) www.sears.com Anytime, day or night (U.S.A. in your home - For Sears professional installation of Sears, Roebuck and Co. ® Marca Registrada / TMMarca de F_brica / sMMarca de Servicio de Sears, Roebuck and Co. only) www.sears.com ...TO purchase a protection agreement (U.S.A.) or maintenance agreement (Canada)on -line for the location of all major brand appliances l.a..w...n... For the replacement parts, accessories and owner's manuals that you need to do-it ! Your Home For repair -


