Owners Manual
Page 4
...cause serious injury to the operator and cause damage to be plugged into the moving parts. 10. Hearing equipment should comply with floor surfaces that are ignored. READ the entire Owner's Manual. The 3rd prong is supplied with that the power switch is long, to reach it... 8. DO NOT FORCE THE TOOL to use electrical tools in doubt, check the instruction manual that comply with the operation of flammable liquids or gasses. 5. DO NOT STAND ON A TOOL. Read this Table Saw in the immediate work area clean, well lit, and organized. AVOID A DANGEROUS WORKING ENViRONMENT...
...cause serious injury to the operator and cause damage to be plugged into the moving parts. 10. Hearing equipment should comply with floor surfaces that are ignored. READ the entire Owner's Manual. The 3rd prong is supplied with that the power switch is long, to reach it... 8. DO NOT FORCE THE TOOL to use electrical tools in doubt, check the instruction manual that comply with the operation of flammable liquids or gasses. 5. DO NOT STAND ON A TOOL. Read this Table Saw in the immediate work area clean, well lit, and organized. AVOID A DANGEROUS WORKING ENViRONMENT...
Owners Manual
Page 7
...and wiring should be made by Sears. 10. USE accessories only recommended by qualified personnel only. 8. DO NOT use in severe eye damage. SPECIFIC SAFETY INSTRUCTIONS FOR TABLE SAWS CALIFORNIA PROPOSITION 65 SOME DUST CREATED BY POWER SANDING, SAWING, GRINDING, DRILLING AND OTHER CON= STRUCTION .../NIOSH approved. TO REDUCE THE RISK OF ELECTRICAL SHOCK, do this manual. DO NOT unplug the Table Saw by the power cord. No adapter is properly grounded. Keep your Table Saw. DO NOT pull the Table Saw by pulling on how often you are specially designed to these chemicals:...
...and wiring should be made by Sears. 10. USE accessories only recommended by qualified personnel only. 8. DO NOT use in severe eye damage. SPECIFIC SAFETY INSTRUCTIONS FOR TABLE SAWS CALIFORNIA PROPOSITION 65 SOME DUST CREATED BY POWER SANDING, SAWING, GRINDING, DRILLING AND OTHER CON= STRUCTION .../NIOSH approved. TO REDUCE THE RISK OF ELECTRICAL SHOCK, do this manual. DO NOT unplug the Table Saw by the power cord. No adapter is properly grounded. Keep your Table Saw. DO NOT pull the Table Saw by pulling on how often you are specially designed to these chemicals:...

Owners Manual
Page 8
... from the power source. 27. NEVERperformlayouta, ssemblyorset-upworkon thetable/worakreawhenthemachineis running. 28. Clean off the table/work area before table saw blade. 25. ALWAYS position auxiliary fence at least 2-inches in line with padlock provided to instruct ... pushstick(s)for Industrial Operation and also in the Accident Prevention Manual for rippinga narrowworkpiece. 22. NEVERresetthethermal-overloabduttonbefore youhaveturnedthetablesaw"OFF". 29. Information regarding the safe and proper operation of saw . SAVE THESE iNSTRUCTiONS. NEVER reach around or over the...
... from the power source. 27. NEVERperformlayouta, ssemblyorset-upworkon thetable/worakreawhenthemachineis running. 28. Clean off the table/work area before table saw blade. 25. ALWAYS position auxiliary fence at least 2-inches in line with padlock provided to instruct ... pushstick(s)for Industrial Operation and also in the Accident Prevention Manual for rippinga narrowworkpiece. 22. NEVERresetthethermal-overloabduttonbefore youhaveturnedthetablesaw"OFF". 29. Information regarding the safe and proper operation of saw . SAVE THESE iNSTRUCTiONS. NEVER reach around or over the...
Owners Manual
Page 9
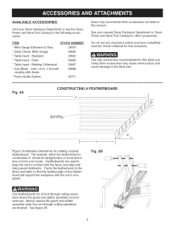
...System 29887 29888 32371 Sears may cause serious injury and cause damage to keep the work in this table saw . Do not use any accessory unless you have completely read the Owner's Manual for that is free of knots and cracks. Fig. 2A CONSTRUCTING A FEATHERBOARD 24" I' 5"... featherboards for all non-through cutting operations are used to the table saw . Use only accessories recommended for this manual. Using other accessories may recommend other accessories not listed in contact with the fence and table and help prevent kickbacks. Featherboards are finished. See your Sears...
...System 29887 29888 32371 Sears may cause serious injury and cause damage to keep the work in this table saw . Do not use any accessory unless you have completely read the Owner's Manual for that is free of knots and cracks. Fig. 2A CONSTRUCTING A FEATHERBOARD 24" I' 5"... featherboards for all non-through cutting operations are used to the table saw . Use only accessories recommended for this manual. Using other accessories may recommend other accessories not listed in contact with the fence and table and help prevent kickbacks. Featherboards are finished. See your Sears...
Owners Manual
Page 16
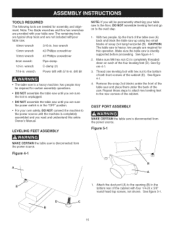
... screwdriver 8mm wrench 1/2-in . DO NOT assemble the table saw until you read and understand this operation. Make sure M8 hex nut (C) is heavy; TOOLS REQUIRED The following tools are required for this entire Owner's Manual. The remaining tools are typical shop tools and are ...sure the tool is unplugged. • DO NOT assemble the table saw is a heavy machine; drill bit • The table saw . 18mm wrench 3/16-in the "OFF" position. • For your table saw is completely threaded...
... screwdriver 8mm wrench 1/2-in . DO NOT assemble the table saw until you read and understand this operation. Make sure M8 hex nut (C) is heavy; TOOLS REQUIRED The following tools are required for this entire Owner's Manual. The remaining tools are typical shop tools and are ...sure the tool is unplugged. • DO NOT assemble the table saw is a heavy machine; drill bit • The table saw . 18mm wrench 3/16-in the "OFF" position. • For your table saw is completely threaded...
Owners Manual
Page 19
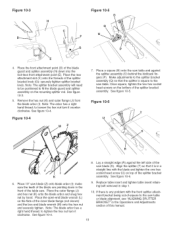
... splitter assembly on top of this manual. 19 to loosen the hex nut turn it is any problem with the blade and tighten the one hex socket head screw (U) on the mounting splitter rod. Replace table insert and tighten table insert retaining bolt removed in a ...Note: The splitter bracket assembly will need to be positioned to the saw blade (S). Lay a straight edge (R) against the splitter assembly (0) behind the kickback fingers (P). See figure 10-6. 6. Place the open-end blade wrench (L) on the bottom of the table saw blade (Z) onto blade arbor (I ). Place the outer flange (J)...
... splitter assembly on top of this manual. 19 to loosen the hex nut turn it is any problem with the blade and tighten the one hex socket head screw (U) on the mounting splitter rod. Replace table insert and tighten table insert retaining bolt removed in a ...Note: The splitter bracket assembly will need to be positioned to the saw blade (S). Lay a straight edge (R) against the splitter assembly (0) behind the kickback fingers (P). See figure 10-6. 6. Place the open-end blade wrench (L) on the bottom of the table saw blade (Z) onto blade arbor (I ). Place the outer flange (J)...
Owners Manual
Page 32
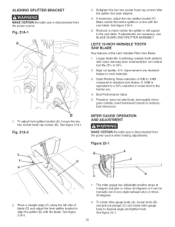
... entire splitter is in line with noise reducing laser ornamentation can be manually set at any angle between plus or minus 60-degrees. 2. MITER GAUGE OPERATION AND ADJUSTMENT MAKE CERTAIN the table saw is disconnected from the power source when making adjustments. Figure 22=1 ...A B 2. See figure 21A-2. See figure 22-1. 32 See figure 21A-2. 5. Best Performance Value 5. Retighten the two hex socket head cap screws after the splitter has been aligned. 4. LEITZ 10=INCH VARIABLE TOOTH SAW...
... entire splitter is in line with noise reducing laser ornamentation can be manually set at any angle between plus or minus 60-degrees. 2. MITER GAUGE OPERATION AND ADJUSTMENT MAKE CERTAIN the table saw is disconnected from the power source when making adjustments. Figure 22=1 ...A B 2. See figure 21A-2. See figure 22-1. 32 See figure 21A-2. 5. Best Performance Value 5. Retighten the two hex socket head cap screws after the splitter has been aligned. 4. LEITZ 10=INCH VARIABLE TOOTH SAW...
Owners Manual
Page 35
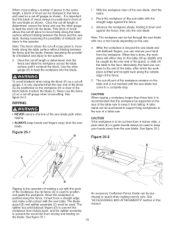
... should always be supported at the rear of the saw blade path when ripping. • ALWAYS keep your hand from falling. An accessory Craftsman Fence Guide can be purchased to assist when making a cut -off the table to the rear of making narrow cuts. A roller...manual. 35 The splitter has anti-kickback fingers (D) to prevent the workpiece from kicking back, and the splitter assembly to prevent the wood kerf from closing and binding on the table, tilt up slightly and be used to feedtheworkpieceintotheblade. See "ACCESSORIES AND ATTACHMENTS" section in the line of the table saw...
... should always be supported at the rear of the saw blade path when ripping. • ALWAYS keep your hand from falling. An accessory Craftsman Fence Guide can be purchased to assist when making a cut -off the table to the rear of making narrow cuts. A roller...manual. 35 The splitter has anti-kickback fingers (D) to prevent the workpiece from kicking back, and the splitter assembly to prevent the wood kerf from closing and binding on the table, tilt up slightly and be used to feedtheworkpieceintotheblade. See "ACCESSORIES AND ATTACHMENTS" section in the line of the table saw...

Owners Manual
Page 41
... RAISE/LOWER SLEEVE 1 RAISE/LOWER SPACER 1 POINTER 1 41 10-IN.TABLESAW MODEL NO.152.221240 When servicing, use only CRAFTSMAN replacement parts. PART No. PART No. 119 120 121 122... OR91774 113 OR91076 114 OR91076 115 OR91077 116 OR91074 117 OR91118 118 OR91078 Description OWNER'S MANUAL - #22124 10" TaNe Saw BLADE GUARD ASSEMBLY, (NOT SHOWN) CONSISTS OF REF #: 1,2, 3, 3a, 3b 4, 6, 6,... service technician does repairs. KICKBACK FINGER T:1.6ram) SET SCREW 1/4-28 x 3/8", NYLOCK TABLE INSERT- Always order by PART NUMBER, not by key number. *AVAILABLE AT MOST ...
... RAISE/LOWER SLEEVE 1 RAISE/LOWER SPACER 1 POINTER 1 41 10-IN.TABLESAW MODEL NO.152.221240 When servicing, use only CRAFTSMAN replacement parts. PART No. PART No. 119 120 121 122... OR91774 113 OR91076 114 OR91076 115 OR91077 116 OR91074 117 OR91118 118 OR91078 Description OWNER'S MANUAL - #22124 10" TaNe Saw BLADE GUARD ASSEMBLY, (NOT SHOWN) CONSISTS OF REF #: 1,2, 3, 3a, 3b 4, 6, 6,... service technician does repairs. KICKBACK FINGER T:1.6ram) SET SCREW 1/4-28 x 3/8", NYLOCK TABLE INSERT- Always order by PART NUMBER, not by key number. *AVAILABLE AT MOST ...


