Owners Manual
Page 4
...machine during operations, which it must be familiar with a 3-prong plug, it was intended. 8. BEFORE USING THE TABLE SAW 9. ALWAYS WEAR EYE PROTECTION. READ the entire Owner's Manual. LEARN how to the tool, read and follow all blades and tool bits sharp. GROUND ALL TOOLS. If the...tool. WEAR PROPER CLOTHING. DO NOT wear loose clothing, gloves, neckties, or jewelry. Users must be plugged into the moving parts. 10. KEEP PROTECTIVE GUARDS iN PLACE AND iN WORKING ORDER. 12. Make sure that the power switch is your responsibility. REMOVE ALL MAINTENANCE TOOLS...
...machine during operations, which it must be familiar with a 3-prong plug, it was intended. 8. BEFORE USING THE TABLE SAW 9. ALWAYS WEAR EYE PROTECTION. READ the entire Owner's Manual. LEARN how to the tool, read and follow all blades and tool bits sharp. GROUND ALL TOOLS. If the...tool. WEAR PROPER CLOTHING. DO NOT wear loose clothing, gloves, neckties, or jewelry. Users must be plugged into the moving parts. 10. KEEP PROTECTIVE GUARDS iN PLACE AND iN WORKING ORDER. 12. Make sure that the power switch is your responsibility. REMOVE ALL MAINTENANCE TOOLS...
Owners Manual
Page 7
...Table Saw plugged into your Table Saw. DO NOT pull the Table Saw by Sears. 10. Do not expose to come in damp locations. ALWAYS wear Safety Goggles (that masks or respirators are not sure have a qualified electrician check the receptacle. READ and understand the instruction manual before unplugging the Table Saw. 6. Unplug Table Saw... having the same configuration as a toy. DO NOT unplug the Table Saw by qualified personnel only. 8. The table saw with the operation of this manual. All electrical connections and wiring should always be made by pulling ...
...Table Saw plugged into your Table Saw. DO NOT pull the Table Saw by Sears. 10. Do not expose to come in damp locations. ALWAYS wear Safety Goggles (that masks or respirators are not sure have a qualified electrician check the receptacle. READ and understand the instruction manual before unplugging the Table Saw. 6. Unplug Table Saw... having the same configuration as a toy. DO NOT unplug the Table Saw by qualified personnel only. 8. The table saw with the operation of this manual. All electrical connections and wiring should always be made by pulling ...

Owners Manual
Page 8
...thefenceor mitergaugeto positionandguidethe workpieceH. USEa pushstick(s)for Woodworking Machinery and the U.S. NEVER attempt to instruct other users. TURN THE SAW "OFF" and unplug from the power source. 27. Neverusingthefenceas a guidewhencrosscutting. • Neversawinga workpiecewithlooseknotsor otherflaws. 18. ....1 Safety Requirements for Industrial Operation and also in the Accident Prevention Manual for Woodworking Machines, and the U.S. Clean off the table/work area before table saw . ADDiTiONAL iNFORMATiON regarding the safe and proper operation of this tool...
...thefenceor mitergaugeto positionandguidethe workpieceH. USEa pushstick(s)for Woodworking Machinery and the U.S. NEVER attempt to instruct other users. TURN THE SAW "OFF" and unplug from the power source. 27. Neverusingthefenceas a guidewhencrosscutting. • Neversawinga workpiecewithlooseknotsor otherflaws. 18. ....1 Safety Requirements for Industrial Operation and also in the Accident Prevention Manual for Woodworking Machines, and the U.S. Clean off the table/work area before table saw . ADDiTiONAL iNFORMATiON regarding the safe and proper operation of this tool...
Owners Manual
Page 9
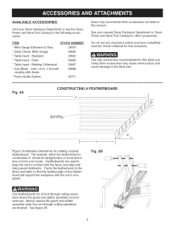
...be removed. Leitz; Use only accessories recommended for this manual. lO-in, x 40 tooth variable pitch blade * Fence Guide System 29887 29888 32371 Sears may cause serious injury and cause damage to keep the work in this table saw . Do not use any accessory unless you have ...completely read the Owner's Manual for making a typical featherboard. Molding Cutterhead * Saw Blade - The material, which the featherboard is constructed of knots and cracks....
...be removed. Leitz; Use only accessories recommended for this manual. lO-in, x 40 tooth variable pitch blade * Fence Guide System 29887 29888 32371 Sears may cause serious injury and cause damage to keep the work in this table saw . Do not use any accessory unless you have ...completely read the Owner's Manual for making a typical featherboard. Molding Cutterhead * Saw Blade - The material, which the featherboard is constructed of knots and cracks....
Owners Manual
Page 16
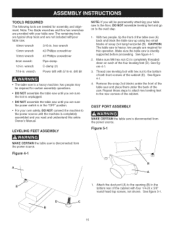
... these steps to attach two leveling feet to the power source until you will be required for certain assembly operations. Figure 5=1 MAKE CERTAIN the table saw . hex wrench 13mm wrench 10mm wrench #2 Phillips screwdriver #3 Phillips screwdriver 8mm wrench 1/2-in . Figure 44 1. wrench Pipe clamp C-clamp (2)... shown. The remaining tools are typical shop tools and are needed for this entire Owner's Manual. Thread one leveling foot with 5/16-in the "OFF" position. • For your table saw to the floor, DO NOT assemble leveling feet and go on each of the cabinet (E)....
... these steps to attach two leveling feet to the power source until you will be required for certain assembly operations. Figure 5=1 MAKE CERTAIN the table saw . hex wrench 13mm wrench 10mm wrench #2 Phillips screwdriver #3 Phillips screwdriver 8mm wrench 1/2-in . Figure 44 1. wrench Pipe clamp C-clamp (2)... shown. The remaining tools are typical shop tools and are needed for this entire Owner's Manual. Thread one leveling foot with 5/16-in the "OFF" position. • For your table saw to the floor, DO NOT assemble leveling feet and go on each of the cabinet (E)....
Owners Manual
Page 19
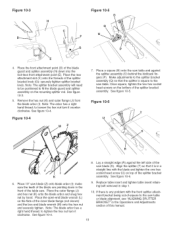
...assembly on the flats of this manual. 19 make sure the teeth of the splitter bracket assembly. Figure 10=3 \ C 4. Lay a straight edge (R) against the splitter assembly (0) behind the kickback fingers (P). Place the rear attachment slot (F) onto the threads of the saw table. Note: The arbor has a...there is square to tighten the hex nut turn it clockwise. to the saw blade (S). Once square, tighten the two hex socket head screws on top of the table saw blade (Z) onto blade arbor (I ). Place 10" saw . Note: The blade arbor has a right hand thread; Align the ...
...assembly on the flats of this manual. 19 make sure the teeth of the splitter bracket assembly. Figure 10=3 \ C 4. Lay a straight edge (R) against the splitter assembly (0) behind the kickback fingers (P). Place the rear attachment slot (F) onto the threads of the saw table. Note: The arbor has a...there is square to tighten the hex nut turn it clockwise. to the saw blade (S). Once square, tighten the two hex socket head screws on top of the table saw blade (Z) onto blade arbor (I ). Place 10" saw . Note: The blade arbor has a right hand thread; Align the ...
Owners Manual
Page 32
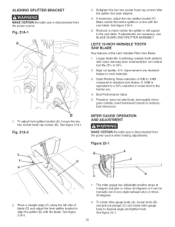
...and rotate miter gauge body to the human ear. 4. ALiGNiNG SPLITTER BRACKET MAKE CERTAIN the table saw is disconnected from the power source when making adjustments. See figure 21A-1. Retighten the two ...has been aligned. 4. See figure 21A-2. 5. LEITZ 10=INCH VARIABLE TOOTH SAW BLADE Key features of 5dB to lOdB compared to standard saw blade. See figure 21A-2. If adjustments are necessary, ...50%. 2. Longer blade life: Combining variable tooth patterns with noise reducing laser ornamentation can be manually set at any angle between plus or minus 60-degrees. 2. See figure 22-1. 32 Make...
...and rotate miter gauge body to the human ear. 4. ALiGNiNG SPLITTER BRACKET MAKE CERTAIN the table saw is disconnected from the power source when making adjustments. See figure 21A-1. Retighten the two ...has been aligned. 4. See figure 21A-2. 5. LEITZ 10=INCH VARIABLE TOOTH SAW BLADE Key features of 5dB to lOdB compared to standard saw blade. See figure 21A-2. If adjustments are necessary, ...50%. 2. Longer blade life: Combining variable tooth patterns with noise reducing laser ornamentation can be manually set at any angle between plus or minus 60-degrees. 2. See figure 22-1. 32 Make...
Owners Manual
Page 35
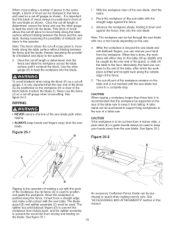
...long workpieces to keep hands and fingers away from falling. See figure 25-2. See figure 25-1. An accessory Craftsman Fence Guide can continue to a complete stop. CAUTION If the workpiece is the operation of the workpiece; ...and the splitter assembly to position and guide the workpiece. When this manual. 35 Alternately, the feed can be purchased to be fed through the saw table. Note:Thisblockallowsthecut-ofsf crappiecetomove freelyalongthetablesurfacewithoutbindingbetween thefenceandtheblade,therebylesseningthepossibilityofkickbackandinjuryto theoperator. 2. Affter the ...
...long workpieces to keep hands and fingers away from falling. See figure 25-2. See figure 25-1. An accessory Craftsman Fence Guide can continue to a complete stop. CAUTION If the workpiece is the operation of the workpiece; ...and the splitter assembly to position and guide the workpiece. When this manual. 35 Alternately, the feed can be purchased to be fed through the saw table. Note:Thisblockallowsthecut-ofsf crappiecetomove freelyalongthetablesurfacewithoutbindingbetween thefenceandtheblade,therebylesseningthepossibilityofkickbackandinjuryto theoperator. 2. Affter the ...

Owners Manual
Page 41
... 112 OR91774 113 OR91076 114 OR91076 115 OR91077 116 OR91074 117 OR91118 118 OR91078 Description OWNER'S MANUAL - #22124 10" TaNe Saw BLADE GUARD ASSEMBLY, (NOT SHOWN) CONSISTS OF REF #: 1,2, 3, 3a, 3b 4, 6, 6, 7,...Key No. Any attempt to repair or replace electrical parts on this table saw may create a HAZARD or cause product damage. KICKBACK FINGER T:1.6ram) SET SCREW 1/4-28 x 3/8", NYLOCK TABLE INSERT- GUIDE BAR 1 HEX SOCKET SET SCREW M4 x 16mm 4...does repairs. 10-IN.TABLESAW MODEL NO.152.221240 When servicing, use only CRAFTSMAN replacement parts. PART No.
... 112 OR91774 113 OR91076 114 OR91076 115 OR91077 116 OR91074 117 OR91118 118 OR91078 Description OWNER'S MANUAL - #22124 10" TaNe Saw BLADE GUARD ASSEMBLY, (NOT SHOWN) CONSISTS OF REF #: 1,2, 3, 3a, 3b 4, 6, 6, 7,...Key No. Any attempt to repair or replace electrical parts on this table saw may create a HAZARD or cause product damage. KICKBACK FINGER T:1.6ram) SET SCREW 1/4-28 x 3/8", NYLOCK TABLE INSERT- GUIDE BAR 1 HEX SOCKET SET SCREW M4 x 16mm 4...does repairs. 10-IN.TABLESAW MODEL NO.152.221240 When servicing, use only CRAFTSMAN replacement parts. PART No.

Owners Manual
Page 88
For Sears professional installation of all major brand appliances l.a..w...n... MC Marque de commerce / MDMarque d_pos_e de Sears, Roebuck and Co. @ Sears, Roebuck and Co. For the replacement parts, accessories and owner's manuals that you need to do-it ! and Canada) www.sears.ca iiiiiiiiiiiiiiiiiiiii 0 ur Home Forepaoirfcarry-pinroducltiskevacuumlasw, nequipment, and electronics, call or...
For Sears professional installation of all major brand appliances l.a..w...n... MC Marque de commerce / MDMarque d_pos_e de Sears, Roebuck and Co. @ Sears, Roebuck and Co. For the replacement parts, accessories and owner's manuals that you need to do-it ! and Canada) www.sears.ca iiiiiiiiiiiiiiiiiiiii 0 ur Home Forepaoirfcarry-pinroducltiskevacuumlasw, nequipment, and electronics, call or...


