Owners Manual
Page 2
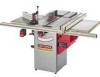
... nearest Sears Service Center for repair, free of charge. SECTION Warranty ...Product Specifications ...Glossary of Terms ...Safety Instructions ...Guidelines for Extension Cords ...Grounding Instructions ...Specific Safety Instructions for Table Saw ...Accessories and Attachments ...Carton Contents ...Know Your Table Saw ...Assembly Instructions ...Operations and Adjustment to the Table Saw, use proper circuit protection. Fence type Biesemeyer, Commercial Fence System Max depth-of-cut at max depth-of-cut at 45-degree Max rip to the right of the blade Max rip to rain, or use a 15 amp...
... nearest Sears Service Center for repair, free of charge. SECTION Warranty ...Product Specifications ...Glossary of Terms ...Safety Instructions ...Guidelines for Extension Cords ...Grounding Instructions ...Specific Safety Instructions for Table Saw ...Accessories and Attachments ...Carton Contents ...Know Your Table Saw ...Assembly Instructions ...Operations and Adjustment to the Table Saw, use proper circuit protection. Fence type Biesemeyer, Commercial Fence System Max depth-of-cut at max depth-of-cut at 45-degree Max rip to the right of the blade Max rip to rain, or use a 15 amp...
Owners Manual
Page 4
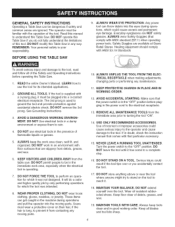
.... 4. LEARN how to the tool, read and follow all blades and tool bits sharp. DO NOT work in doubt, check the instruction manual that particular accessory. 15. WEAR PROPER CLOTHING. REMOVE ALL MAINTENANCE TOOLS from the table saw. If in an environment with ANSi $3.19 Standards To avoid serious injury and damage to use electrical tools in the presence of the Safety and Operating Instructions before plugging in the...
.... 4. LEARN how to the tool, read and follow all blades and tool bits sharp. DO NOT work in doubt, check the instruction manual that particular accessory. 15. WEAR PROPER CLOTHING. REMOVE ALL MAINTENANCE TOOLS from the table saw. If in an environment with ANSi $3.19 Standards To avoid serious injury and damage to use electrical tools in the presence of the Safety and Operating Instructions before plugging in the...

Owners Manual
Page 5
... that it repaired by removing switch keys, unplugging tools from the electrical receptacles, and using it is properly sized, and in doubt, use a shorter and thicker cord. If in Canada) to use . Protect your extension cord is possible, use properly fitting NIOSH/OSHA approved respiratory protection appropriate for correct sizing of an extension cord, use the next heavier gauge. 27. Allowing dust to secure the workpiece. Feed work into...
... that it repaired by removing switch keys, unplugging tools from the electrical receptacles, and using it is properly sized, and in doubt, use a shorter and thicker cord. If in Canada) to use . Protect your extension cord is possible, use properly fitting NIOSH/OSHA approved respiratory protection appropriate for correct sizing of an extension cord, use the next heavier gauge. 27. Allowing dust to secure the workpiece. Feed work into...
Owners Manual
Page 6
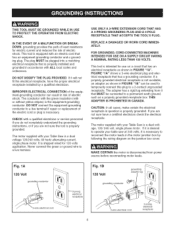
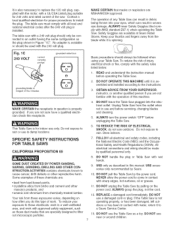
.... USE ONLY A 3=WIRE EXTENSION CORD THAT HAS A 3=PRONG GROUNDING PLUG AND A 3-POLE RECEPTACLE THAT ACCEPTS THE TOOL'S PLUG. This tool is equipped with ALL local codes and ordinances. REPLACE A DAMAGED OR WORN CORD IMMEDI= ATELY. The adapter has a dgid lug extending from power source before reconnecting motor leads. If you are not sure have the proper electrical receptacle installed by following the wiring diagram on...
.... USE ONLY A 3=WIRE EXTENSION CORD THAT HAS A 3=PRONG GROUNDING PLUG AND A 3-POLE RECEPTACLE THAT ACCEPTS THE TOOL'S PLUG. This tool is equipped with ALL local codes and ordinances. REPLACE A DAMAGED OR WORN CORD IMMEDI= ATELY. The adapter has a dgid lug extending from power source before reconnecting motor leads. If you are not sure have the proper electrical receptacle installed by following the wiring diagram on...
Owners Manual
Page 7
... the power cord to a Sears Service Center. 13. Basic precautions should be followed when using your thumbs and fingers away from the outlet when not in contact with a UL/CSA Listed plug suitable for indoor use and before servicing, changing blades and cleaning. 5. DO NOT handle the plug or Table Saw with the safety rules listed below: 1. USE only as a toy. TO REDUCE THE RISK OF ELECTRICAL...
... the power cord to a Sears Service Center. 13. Basic precautions should be followed when using your thumbs and fingers away from the outlet when not in contact with a UL/CSA Listed plug suitable for indoor use and before servicing, changing blades and cleaning. 5. DO NOT handle the plug or Table Saw with the safety rules listed below: 1. USE only as a toy. TO REDUCE THE RISK OF ELECTRICAL...

Owners Manual
Page 8
... the power source. 27. LOCK the START/STOP switch with the path of saw blade. 25. ALWAYS position auxiliary fence at least 2-inches in line with padlock provided to free a stalled blade without first turning the machine "OFF" and unplugging it from power source. Department of this product is available from the National Safety Council, 1121 Spring Lake Drive, Itasca, IL 60143-3201 in the Safety Data Sheets...
... the power source. 27. LOCK the START/STOP switch with the path of saw blade. 25. ALWAYS position auxiliary fence at least 2-inches in line with padlock provided to free a stalled blade without first turning the machine "OFF" and unplugging it from power source. Department of this product is available from the National Safety Council, 1121 Spring Lake Drive, Itasca, IL 60143-3201 in the Safety Data Sheets...
Owners Manual
Page 9
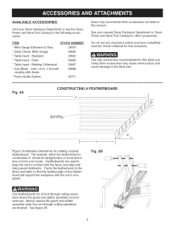
... work in this table saw . Do not use any accessory unless you have completely read the Owner's Manual for the following accessories. AVAILABLE ACCESSORIES Visit your nearest Sears Hardware Department or Sears Power and Hand Tool Catalog for all non-through cutting operations are used to the table saw . Dado 29885 * Table Insert - See figure 2B. Molding Cutterhead * Saw Blade - Always replace the guard and splitter assembly when the non-through cutting operations where the guard and splitter assembly must be straight piece...
... work in this table saw . Do not use any accessory unless you have completely read the Owner's Manual for the following accessories. AVAILABLE ACCESSORIES Visit your nearest Sears Hardware Department or Sears Power and Hand Tool Catalog for all non-through cutting operations are used to the table saw . Dado 29885 * Table Insert - See figure 2B. Molding Cutterhead * Saw Blade - Always replace the guard and splitter assembly when the non-through cutting operations where the guard and splitter assembly must be straight piece...
Owners Manual
Page 16
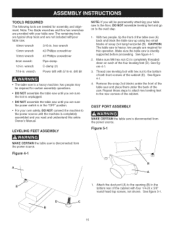
... this operation. See figure 4-1. 3. wrench Power drill with four 1/4-20 x 3/8" round head tap screws, not shown. LEVELING FEET ASSEMBLY NOTE: If you are required for this entire Owner's Manual. Repeat these steps to attach two leveling feet to the next step. 1. Attach the dust port (A) to the bottom of both front corners of the four leveling feet (D). DO NOT assemble the table saw...
... this operation. See figure 4-1. 3. wrench Power drill with four 1/4-20 x 3/8" round head tap screws, not shown. LEVELING FEET ASSEMBLY NOTE: If you are required for this entire Owner's Manual. Repeat these steps to attach two leveling feet to the next step. 1. Attach the dust port (A) to the bottom of both front corners of the four leveling feet (D). DO NOT assemble the table saw...
Owners Manual
Page 19
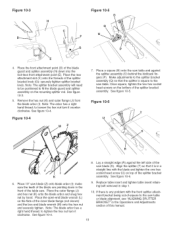
... of the blade guard and splitter assembly (H) down in a straight line with the front splitter attachment bracket being out-of-square to tighten the hex nut turn it clockwise. Note: The arbor has a right hand thread; Figure 10=3 \ C 4. make sure the teeth of the blade are pointing down into the tool-less front attachment point (E). Replace table insert and tighten table insert retaining bolt removed in the Operations and Adjustments section...
... of the blade guard and splitter assembly (H) down in a straight line with the front splitter attachment bracket being out-of-square to tighten the hex nut turn it clockwise. Note: The arbor has a right hand thread; Figure 10=3 \ C 4. make sure the teeth of the blade are pointing down into the tool-less front attachment point (E). Replace table insert and tighten table insert retaining bolt removed in the Operations and Adjustments section...
Owners Manual
Page 26
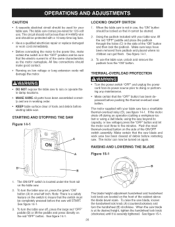
... an operation (cutting a workpiece too fast or using a dull blade, using the saw to rain or operate the in the side of tools and debris before pushing the thermal-overload reset button. See figure 15-1. 26 LOCKING ON/OFF SWITCH 1. See figure 14-1. 3. To turn the table saw blade is securely tightened. CAUTION • A separate electrical circuit should be used for 120-volt use. STARTING AND STOPPING THE SAW Figure 14=1 • Turn the power switch "OFF...
... an operation (cutting a workpiece too fast or using a dull blade, using the saw to rain or operate the in the side of tools and debris before pushing the thermal-overload reset button. See figure 15-1. 26 LOCKING ON/OFF SWITCH 1. See figure 14-1. 3. To turn the table saw blade is securely tightened. CAUTION • A separate electrical circuit should be used for 120-volt use. STARTING AND STOPPING THE SAW Figure 14=1 • Turn the power switch "OFF...

Owners Manual
Page 31
... saw table and assemble the blade flange and arbor nut. 4. CHANGING THE SAW BLADE • Turn the power switch "OFF" and unplug the power cord from turning. Figure 21=1 Figure 20=1 B / C 1. Two wrenches are supplied with the 240 volt plug. 5. Using both blade wrenches as the plug. Replace table insert and tighten the table insert retaining bolt. 7. make all electrical connections. CHANGING MOTOR VOLTAGE • MAKE CERTAIN the table saw blade. • USE ONLY 10-in the opposite direction from power source. 2. All local and state codes...
... saw table and assemble the blade flange and arbor nut. 4. CHANGING THE SAW BLADE • Turn the power switch "OFF" and unplug the power cord from turning. Figure 21=1 Figure 20=1 B / C 1. Two wrenches are supplied with the 240 volt plug. 5. Using both blade wrenches as the plug. Replace table insert and tighten the table insert retaining bolt. 7. make all electrical connections. CHANGING MOTOR VOLTAGE • MAKE CERTAIN the table saw blade. • USE ONLY 10-in the opposite direction from power source. 2. All local and state codes...
Owners Manual
Page 32
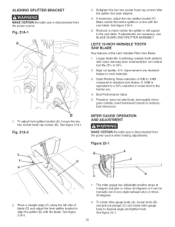
... laser ornamentation can be manually set at any angle between plus or minus 45-degrees or it can extend tool life 25% to align the splitter (E) with the blade. If adjustments are necessary, see BLADE GUARD AND SPLITTER ASSEMBLY. ALiGNiNG SPLITTER BRACKET MAKE CERTAIN the table saw is still square to industrybest tolerances. High cut steel body, best quality micrograin carbide, hand hammered (tuned) to the saw blade...
... laser ornamentation can be manually set at any angle between plus or minus 45-degrees or it can extend tool life 25% to align the splitter (E) with the blade. If adjustments are necessary, see BLADE GUARD AND SPLITTER ASSEMBLY. ALiGNiNG SPLITTER BRACKET MAKE CERTAIN the table saw is still square to industrybest tolerances. High cut steel body, best quality micrograin carbide, hand hammered (tuned) to the saw blade...
Owners Manual
Page 33
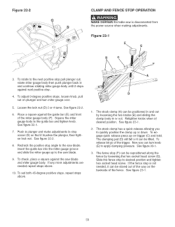
... a square against the saw blade and miter gauge body. Recheck the positive stop . 4. Loosen the lock nut (D) 3 or 4 turns. See figure 22-1. 7. D 1, The stock clamp (A) can be positioned in plunger and make adjustments to stop to quickly position the clamp up to the guide bar and tighten knob. Figure 22=2 G D CLAMP AND FENCE STOP OPERATION MAKE CERTAIN the table saw is not needed repeat steps above . To adjust O-degree positive stops, loosen knob, pull out on trigger...
... a square against the saw blade and miter gauge body. Recheck the positive stop . 4. Loosen the lock nut (D) 3 or 4 turns. See figure 22-1. 7. D 1, The stock clamp (A) can be positioned in plunger and make adjustments to stop to quickly position the clamp up to the guide bar and tighten knob. Figure 22=2 G D CLAMP AND FENCE STOP OPERATION MAKE CERTAIN the table saw is not needed repeat steps above . To adjust O-degree positive stops, loosen knob, pull out on trigger...

Owners Manual
Page 34
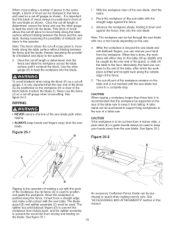
... table saw. Start the cut off scrap pieces from the saw is not provided with one of wood to the fence (J) to the same length, clamp a block (F) of the miter gauge grooves. When cross-cutting a number of pieces to use the fence as a cut -off gauge. Slide the miter gauge and workpiece back to move it enters the blade. This auxiliary fence can be used in two. 4. CUT=OFF GAUGE 1. See figure 24-1. Never use as a cut...
... table saw. Start the cut off scrap pieces from the saw is not provided with one of wood to the fence (J) to the same length, clamp a block (F) of the miter gauge grooves. When cross-cutting a number of pieces to use the fence as a cut -off gauge. Slide the miter gauge and workpiece back to move it enters the blade. This auxiliary fence can be used in two. 4. CUT=OFF GAUGE 1. See figure 24-1. Never use as a cut...
Owners Manual
Page 35
... surfaceuntilit contactstheblock.Usethe miter gauge(K)to position and guide the workpiece. The cut with one or two hands depending on the blade. See figure 25-2. An accessory Craftsman Fence Guide can be purchased to the end of a table saw table. See figure 25-1. The blade guard (B) and splitter assembly (C) must have a straight edge and make solid contact with the straight edge against the fence, then into the saw blade and anti...
... surfaceuntilit contactstheblock.Usethe miter gauge(K)to position and guide the workpiece. The cut with one or two hands depending on the blade. See figure 25-2. An accessory Craftsman Fence Guide can be purchased to the end of a table saw table. See figure 25-1. The blade guard (B) and splitter assembly (C) must have a straight edge and make solid contact with the straight edge against the fence, then into the saw blade and anti...
Owners Manual
Page 36
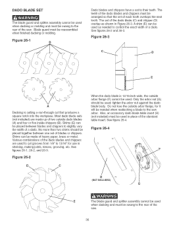
... a dado. Also, an accessory dado blade table insert (H) (not included) must be arranged so that produces a square notch into the workpiece. No more than two shims should be used in shelving, making joints, tenons, grooving, etc. DADO BLADE SET The blade guard and splitter assembly cannot be used . Blade guard must be reassembled when finished dadoing or molding. See figures 26-1,26-2, and 26-3. Figure 26=2 C When the dado blade is cutting...
... a dado. Also, an accessory dado blade table insert (H) (not included) must be arranged so that produces a square notch into the workpiece. No more than two shims should be used in shelving, making joints, tenons, grooving, etc. DADO BLADE SET The blade guard and splitter assembly cannot be used . Blade guard must be reassembled when finished dadoing or molding. See figures 26-1,26-2, and 26-3. Figure 26=2 C When the dado blade is cutting...

Owners Manual
Page 37
... install blade guard and splitter assembly after dado operation is completed. Also, an accessory molding cutterhead table insert (F) (not included) must be kept free of corner moulds, picture frames, table edges, etc. Figure 27=3 G A C The molding head consists of a cutterhead (A) in the cutterhead and securely clamped with the molding cutterhead, tighten the arbor nut (E) against the cutterhead body. Each of the workpiece. Cutting moldings with fasteners. It is attached to the fence with a molding...
... install blade guard and splitter assembly after dado operation is completed. Also, an accessory molding cutterhead table insert (F) (not included) must be kept free of corner moulds, picture frames, table edges, etc. Figure 27=3 G A C The molding head consists of a cutterhead (A) in the cutterhead and securely clamped with the molding cutterhead, tighten the arbor nut (E) against the cutterhead body. Each of the workpiece. Cutting moldings with fasteners. It is attached to the fence with a molding...

Owners Manual
Page 40
... saw. 4. Restricted air circulation due to the "OFF" position and unplug the power cord from the electrical receptacle before making any adjustments. Dust accumulation on motor. 1. See "Fence Alignment" in the "OFF" position. 2. Rails are not set -screws in Operation and Adjustment Section. 2. Work surface is not mounted securely. 40 1. Saw is uneven. 4. Replace drive belt. 3. Adjust leveling feet, if supplied with a multi-meter. TOPREVENTINJURYTOYOURSELF or damage to the table saw, turn the power switch...
... saw. 4. Restricted air circulation due to the "OFF" position and unplug the power cord from the electrical receptacle before making any adjustments. Dust accumulation on motor. 1. See "Fence Alignment" in the "OFF" position. 2. Rails are not set -screws in Operation and Adjustment Section. 2. Work surface is not mounted securely. 40 1. Saw is uneven. 4. Replace drive belt. 3. Adjust leveling feet, if supplied with a multi-meter. TOPREVENTINJURYTOYOURSELF or damage to the table saw, turn the power switch...

Owners Manual
Page 41
... KNOB SPRING PIN 4ram x 26ram QUICK RELEASE SPRING QUICK RELEASE BRACKET SPRING PIN 6ram x 26ram LOWER BUSHING ELEVATING ROD CLAMP FOOT FLAT WASHER M4 PAN HEAD SCREW M4 x 10ram CLAMP PAD MITER GAGE BODY SPECIAL WASHER, T-SLOT SPECIAL SCREW SQUARE NUT M5 CROSS CUT FENCE Qty. 1 N/A N/A Key No. Any attempt to repair or replace electrical parts on this table saw may create a HAZARD or cause product damage. Repair service is available at your nearest Sears Service Center. KICKBACK FINGER T:1.6ram) SET SCREW 1/4-28 x 3/8", NYLOCK TABLE INSERT...
... KNOB SPRING PIN 4ram x 26ram QUICK RELEASE SPRING QUICK RELEASE BRACKET SPRING PIN 6ram x 26ram LOWER BUSHING ELEVATING ROD CLAMP FOOT FLAT WASHER M4 PAN HEAD SCREW M4 x 10ram CLAMP PAD MITER GAGE BODY SPECIAL WASHER, T-SLOT SPECIAL SCREW SQUARE NUT M5 CROSS CUT FENCE Qty. 1 N/A N/A Key No. Any attempt to repair or replace electrical parts on this table saw may create a HAZARD or cause product damage. Repair service is available at your nearest Sears Service Center. KICKBACK FINGER T:1.6ram) SET SCREW 1/4-28 x 3/8", NYLOCK TABLE INSERT...

Owners Manual
Page 42
... WRENCH 6ram ALLEN WRENCH 1/6" ALLEN WRENCH CABLE CLAMP ROUND HEAD TAP SCREW 1/4-28 x 3/8" CABINET ASSEMBLY SPEC TAG (C SAW) BEVEL SCALE BLADE ELEVATION AND TILT LABEL HINGE ASSEMBLY HEX NUT M5 FLAT WASHER M5 SHEET METAL SCREW 1/4-20 x 3/8" MOTOR COVER WARNING LABEL PAN HEAD SCREW M5 X 15ram LATCH BLACK SWELL ASSEMBLY CABINET SIDE PANEL SHEET METAL SCREW 1/4-20 x 3/8" SHEET METAL SCREW 1/4-20 x 3/8" MITER GAUGE FENCE HOOK DUST CHUTE RIGHT DUST DEFLECTOR SHEET METAL SCREW 1/4-20 x 3/8" LEFT DUST DEFLECTOR SHEET METAL SCREW 1/4-20 x 3/8" SHEET METAL SCREW 1/4-20 x 3/8" CABLE CLAMP SHEET...
... WRENCH 6ram ALLEN WRENCH 1/6" ALLEN WRENCH CABLE CLAMP ROUND HEAD TAP SCREW 1/4-28 x 3/8" CABINET ASSEMBLY SPEC TAG (C SAW) BEVEL SCALE BLADE ELEVATION AND TILT LABEL HINGE ASSEMBLY HEX NUT M5 FLAT WASHER M5 SHEET METAL SCREW 1/4-20 x 3/8" MOTOR COVER WARNING LABEL PAN HEAD SCREW M5 X 15ram LATCH BLACK SWELL ASSEMBLY CABINET SIDE PANEL SHEET METAL SCREW 1/4-20 x 3/8" SHEET METAL SCREW 1/4-20 x 3/8" MITER GAUGE FENCE HOOK DUST CHUTE RIGHT DUST DEFLECTOR SHEET METAL SCREW 1/4-20 x 3/8" LEFT DUST DEFLECTOR SHEET METAL SCREW 1/4-20 x 3/8" SHEET METAL SCREW 1/4-20 x 3/8" CABLE CLAMP SHEET...


