Craftsman #10402 - Professional Laser 10 in. Radial Arm Saw 22010 Support and Manuals
Get Help and Manuals for this Craftsman item
View All Support Options Below
Free Craftsman #10402 manuals!
Problems with Craftsman #10402?
Ask a Question
Free Craftsman #10402 manuals!
Problems with Craftsman #10402?
Ask a Question
Popular Craftsman #10402 Manual Pages
Operation Manual - Page 1

... • Operation • Maintenance • Parts List
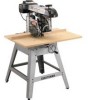
Sears, Roebuck and Co., 3333 Beverly Rd., Hoffman Estates, IL 60179 USA Visit the Craftsman web page: www.sears.com/craftsman
983000-041 5-02 Operator's Manual
CRAFTSMAN +
PRO
I 0 HAL
10 in.
CAUTION: Read and follow all
Safety Rules and Operating Instructions before first use of this manual for future reference.
Operation Manual - Page 2

... what it is intended, you will repair it, free of charge, Contact a Sears Service Center for repair.
If you may also have been ... many features for Safe Operation ...• Electrical ...• Product Specifications and Glossary ...• Unpacking and Accessories ...• Loose Parts List ...• Tools Needed ...• Labels ...• Features ...• Assembly ...Assembling...
Operation Manual - Page 3

...
44-54 44 44 45 45
45 46 47 48 49 50 51 51-52 52 53 53 54
55-56
• Maintenance ...
57
• Troubleshooting ...• Exploded View and Repair Parts List ...• Parts Ordering / Service ...
58-62 64-85 back page
3
rRI:IFI"$1_tI_:INRADIAL SAW315.220100
Operation Manual - Page 4

...RIGHT TOOL FOR THE JOB. Keep proper footing and balance at all instructions, safety rules, etc. contained in this manual,...instructions vital to the operation or maintenance of wood on the saw 's applications and limitations as well as the specific.... Do not use original factory replacement parts when servicing. Do not let visitors contact the tool or extension cord while operating,
...
Operation Manual - Page 5
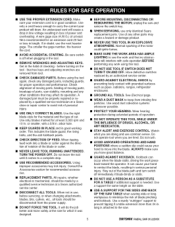
... TOOLS. It will interfere with safe operation BEFORE performing any other conditions that may affect its operation, A damaged part must be disconnected from inhaling fine particles. Use a sturdy "outrigger" support to a complete stop,
• USE RECOMMENDED ACCESSORIES. All repairs, whether electrical or mechanical, should be properly repaired or replaced by a qualified service...
Operation Manual - Page 8

... a qualified electrician or service personnel if the grounding instructions are not completely understood, or if in doubt as the motor's horsepower rating, A line intended only for lights cannot properly carry a power tool motor, Wire that is properly installed and grounded in a loss of electric shock, This tool is
equipped with all local codes and ordinances,
Do...
Operation Manual - Page 16
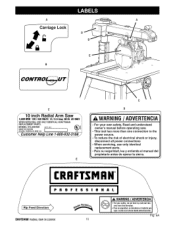
I MODEL 315.220100
I
N SERVICING,USE ONLYIDENTICALCRAFTSMAN
|
LACEMENT PARTS.
!
NO.
/
_...manual before operating saw. • This tool has more than one connection to the power source. • To reduce the risk of electrical shock or injury, disconnect all power connections • When servicing, use only identical replacement parts. • Para su seguridad, lea y entienda el manual...
Operation Manual - Page 17

...Turnpoweroffandwaitfor bladeto stopbeforemovingworkpieceor
I 'Unplug sawbeforechangingthebladeor servicing.
_.
j" • Whenrippingu, ...support • Position cutting tool behind the
fence. • With power off and switch key
removed, turn cutting tool by hand to make sure it does not strike guard, fence or any other saw parts. • Para su seguridad, lea y entienda el manual...
Operation Manual - Page 19

... each item in place unless specifically instructed to reduce risk of this saw . Toothed pawls that can be repositioned or even replaced with a riving knife, anti-kickback pawls, an upper blade guard, a lower outer blade guard, and a lower inner blade guard. See Figure 9A. Located behind the handle. Sets and locks blade angle, it...
Operation Manual - Page 25

...14 25
TABLE SUPPORT Set these items before making setups involving the blade arbor and work stand. The table supports are approximately ...supports and the following hardware:
4 square head bolts (5t16-18 x 3/4 in.) 4 Iockwashers (5/16 in.) 4 hex nuts (5/16-18) 4 fiat washers (5/16 in Leveling The Table Supports section. Locate these items aside until all the tables have been installed...
Operation Manual - Page 52

...right side of pawls.)
• Remove the workpiece from the table, Set the push block, featherboard, or pushstick nearby,
• Set up , insert the yellow
key, and turn the saw off and ...the end of cut without following all the setup
steps in place, (For a bevel rip cut, place the workpiece under the lower set up table extension(s) and supports.
• Keep your hand.
Release the...
Operation Manual - Page 59

... center,
3. Contact your nearest Sears Service Center.
1. See the removal procedure in the Assembly section.
7. See Setting the Arm Lock HZhee/in Assembly section.
4. PROBLEM
CAUSE
SOLUTION
Saw vibrates excessiveUy. BUade is uneven, 1. Reposifion on a fiat surface, Adjust the bveHng feet on carriage. 8. Clean track. Replace the board.
1. See Adjusting the Column...
Operation Manual - Page 61

...are not true. Table is not correct.
2. See Leveling Table Supports and Levering the Front Table in Assembly section.
3. PROBLEM
CAUSE
SOLUTION
Miter or cross cuts are not straight.
1. Yoke...Blade is out of cut .
1. See Setting the Arm Lock HZheel in the Adjustments section.
61
CRRFTSMANRADIAL SAW315.220100 Check with square; sand or replace.
1. See Aligning the Riving Knife to ...
Operation Manual - Page 62

... in Adjustments section,
2, CoUumn tube is Uoose or misaHgned,
3, See Setting the Arm Lock L,_Zheeinl the Assembly section,
4, Fence/taMes are bent or dull,
5, Sharpen or repUace the Made, See the removaU procedure in Assembly section,
3, Arm is Uoose in coUumn support,
2, See Adjusting the Column Tube in Assembly section,
[RRSTSMRN' RADIAL...
Operation Manual - Page 67
...Assembly (Includes Key Nos. 26, 27, 28 1
Leg Stand Assembly 1 Operator's Manual (Not Shown)
* Standard Hardware Item -- May Be Purchased Locally ** Available From... 25 26 27 28 29
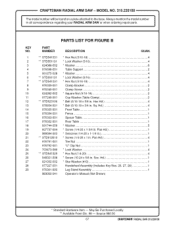
PARTS LIST FOR FIGURE B
PART NUMBER
** STD541031 ** STD551131
...18 4
* Lock Washer (5/16 4
* Washer
8
Table Support
2
* Washer
4
* Lock Washer (5/16 4
* Hex ...18 x 5/8 in. MODEL NO. 315.220100
...
Craftsman #10402 Reviews
We have not received any reviews for Craftsman yet.