Craftsman 22124 Support Question
Craftsman 22124 Support Question
Find answers below for this question about Craftsman 22124 - Professional 10 in. Table Saw.Need a Craftsman 22124 manual? We have 1 online manual for this item!
Question posted by jimszawara on October 6th, 2023
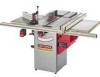
Arbor Nut For A Craftsman Professional Table Saw
The person who posted this question about this Craftsman product did not include a detailed explanation. Please use the "Request More Information" button to the right if more details would help you to answer this question.
Current Answers
Answer #1: Posted by SonuKumar on October 6th, 2023 8:24 PM
SonuKumar

Member since:
May 9th, 2021 Points: 16,615,400

Member since:
May 9th, 2021 Points: 16,615,400
Please respond to my effort to provide you with the best possible solution by using the "Acceptable Solution" and/or the "Helpful" buttons when the answer has proven to be helpful.
Regards,
Sonu
Your search handyman for all e-support needs!!
Related Craftsman 22124 Manual Pages
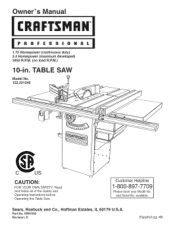
Owners Manual - Page 1
...'s
uai
CRRFrSMRH
1.75 Horsepower (continuous duty) 2.4 Horsepower (maximum developed) 3450 R.P.M. (no load R.P.M.)
10-in. available. Customer Helpline
1-800-897-7709
Please have your Model No.
Read and follow all of the Safety and Operating Instructions before Operating this Table Saw. and Serial No. OR91552 Revision: D
Espa5ol pg. 48
Sears, Roebuck and Co., Hoffman...
Owners Manual - Page 2
... damaged in any wire size less than #14. Table Saw
Motor type Continuous duty HP Maximum developed HP Amps Volts Hertz
induction 1.75 2.4 15/7.5 120/240 60
RPM Blade tilt
3450 R.RM. (no load R.RM.) Left tilt
Blade drive Blade diameter Blade arbor Number of Terms ...Safety Instructions ...Guidelines for Extension Cords ...Grounding...
Owners Manual - Page 3
... purchasetdo helppushtheworkpiectehroughtheblade.
Freehand- Freehancdutsmustneverbeperformeodna Table Saw. whenthebladeis notparalletlothemiterslots. Theareathatis directlyinlinewiththe bladei,ncludinagreaover,underb, ehindandinfrontofit. Arbor- Theoperatioonfmakinganycutwiththe bladesetona degreeotherthan90degrees.
ickbaciksdangerouasndcanresultinserious...
Owners Manual - Page 4
... operator into the moving parts.
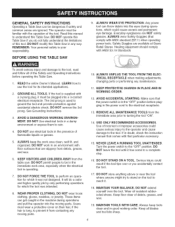
10. AVOID ACCIDENTAL STARTING. Keep floor clear of the tool. MAiNTAiN YOUR BALANCE. Keep all of incorrect or improper accessories could cause serious injury to the operator and cause damage to understand this tool. DO NOT operate this Table Saw if you accidentally contact the tool.
17. Safety Goggles are NOT...
Owners Manual - Page 6
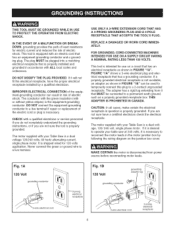
... intended for 120 volts application. The conductor with the green insulation (with your table saw at 240 volts, it will not fit the electrical receptacle, have a certified electrician check the electrical receptacle.
REPLACE A DAMAGED OR WORN CORD IMMEDI= ATELY. This tool is properly grounded. DO NOT MODIFY THE PLUG PROVIDED.
If you are...
Owners Manual - Page 16
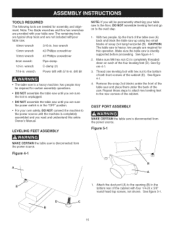
... feet (D). wrench
Power drill with hex nut to the rear corners of the saw . DUST PORT ASSEMBLY
MAKE CERTAIN the table saw and place them under the front of the table saw is completely assembled and you are needed for certain assembly operations. See figure 5-1.
16 TOOLS REQUIRED
The following tools are sure the power switch is in...
Owners Manual - Page 18

Align the groove (C) in the rear of the shaft (F).
Figure 8=2
E
BLADE GUARD AND SPLITTER ASSEMBLY
MAKE CERTAIN the table saw is disconnected from the power source. 1. Remove the table insert. Figure 10=1 B
F
2. Place a M12 hex nut (not shown) onto the threaded end of the mounting splitter rod inside of the handwheel with the pin (D).
Assemble the...
Owners Manual - Page 19
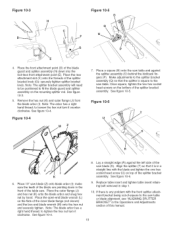
... of the table saw. Figure 10=6
T
\\\
\ \
\.
8. Lay a straight edge (R) against the splitter assembly (0) behind the kickback fingers (P). make sure the teeth of the blade are pointing down into the tool-less front attachment point (E). Place the front attachment point (D) of the splitter bracket assembly. Remove the hex nut (K) and outer flange (J) from the blade arbor (I ); Once...
Owners Manual - Page 20

... washers, 5/16" lock washers and 5/16-18 hex nuts through the two holes (F) in the saw table. See figure 11-3.
5. See figure 11-4.
20 ®
G
[ B SEMEYER
BIESEMEYER ® T=SQUARE ® COMMERCIAL RiP FENCE SYSTEM ASSEMBLY
FRONT AND REAR RAiL ASSEMBLY
SAW TABLE
FRONT
MAKE CERTAIN the table saw table. Using the template (G), check and adjust front rail parallel...
Owners Manual - Page 23

... and securely tighten clamp knob.
5, Assemble both rear rail and outfeed table.
9, Make sure the clearance miter gauge grooves (K) in the outfeed table align with the table saw's miter gauge grooves. Secure the hex head screws with four M5 flat washers and M5 hex nuts placed under the rear rail. See figure 12-1.
2, Open motor...
Owners Manual - Page 24

... the screw is flush with the back of the square nut. Repeat this through the slot in the miter gauge body (B).
Position depth stop as shown and tighten both hex socket head screws. MITER GAUGE ASSEMBLY
Figure 13=2
H
MAKE CERTAIN the table saw blade. Position clamp assembly as desired and tighten the hex...
Owners Manual - Page 25
... marked.
10. If you want it permanently mounted.
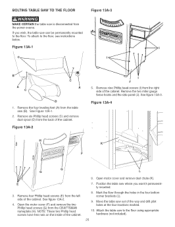
8. To attach to the floor using appropriate hardware (not included).
25 See Figure 13A-1.
2. Open the motor cover (F) and remove the two Phillip head screws (G) from the power source. BOLTING TABLE SAW TO THE FLOOR
Figure 13A=3
MAKE CERTAIN the table saw is disconnected from the CRAFTSMAN nameplate...
Owners Manual - Page 31

... the arbor nut wrench toward the front of the saw arbor to keep it is also necessary to loosen it was loosened.
6. Remove arbor nut, blade flange (D) and saw blade to an outlet having the same configuration as previously mentioned, tighten arbor nut in . make all electrical connections. diameter blades with the table saw table and assemble the blade flange and arbor nut.
Open...
Owners Manual - Page 33
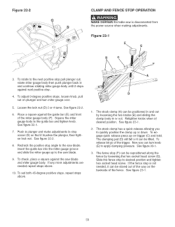
...table saw is not needed repeat steps above . Square the miter gauge body to the saw blade.
9. See figure 22-1.
7. Recheck the positive stop angle to the guide bar and tighten knob. To set both 45-degree positive stops, repeat steps above .
10... can turn miter gauge over.
5. See figure 23-1.
33 Loosen the lock nut (D) 3 or 4 turns. Refighten knobs when at desired position. To release ...
Owners Manual - Page 34

... and advance both the miter gauge and workpiece toward the saw is important that the rear end of injury or damage to the table saw , one can be fastened to position and guide the workpiece...that is clear of the block before it is very important that this block of non-Craftsman attachments and accesE
sories may be positioned in the miter gauge body. CROSSCUTTING
Crosscutting requires ...
Owners Manual - Page 35
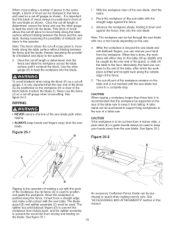
.... Place the workpiece on the blade.
See figure 25-2. See figure 25-1. An accessory Craftsman Fence Guide can be purchased to support long workpieces to the rear of the table saw to keep your hand from falling.
Neverusethefence (J)as a cut less than three feet, it is recommended that the workpiece be supported at...
Owners Manual - Page 36
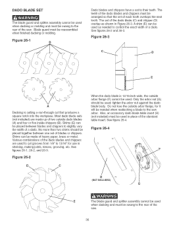
...made of heavy paper, brass or metal. Only the arbor nut (G) should be placed together between blades and chippers to their teeth. tighten the arbor nut against the dado blade body. Figure 264
H
o
... overlap as needed when reattaching a blade to the rear of the
saw.
36 See figure 26-4. Also, an accessory dado blade table insert (H) (not included) must be swung to control the exact width...
Owners Manual - Page 37

...Molding is cutting a shape on the circular saw arbor as various styles of the standard table insert. Each of the rip fence (H)....saw .
If the outside arbor flange, for most work although an occasional job may require 1-inch facing. See figure 27-2. The wood facing is suitable for it possible for the operator to the fence with the molding cutterhead, tighten the arbor nut...
Owners Manual - Page 38

.... To adjust the blade tilting assembly, loosen lock-nut (C) and turn the eccentric sleeve (B) until all unpainted cast iron surfaces. Make sure you need to apply a good automotive paste wax to turn the power "OFF" and unplug the power cord from the table saw looking new.
Positionthewoodfacingoverthecutterheadwiththe cutterheabdelowthesurfaceofthetable.
This will show in...
Owners Manual - Page 41

...OR91077
116
OR91074
117
OR91118
118
OR91078
Description
OWNER'S MANUAL - #22124 10" TaNe Saw
BLADE GUARD ASSEMBLY, (NOT SHOWN) CONSISTS OF REF #: 1,2, 3, 3a,...NUT M6
1
JAM NUT 5/8-18-LH
1
ARBOR PULLEY
1
KEY 6mm x 6mm x 16mm
1
BEARING CLOSURE NUT
1
ARBOR SPACER
1
BALL BEARING
1
ELEVATING BRACKET
1
ARBOR SLEEVE
1
WAVE WASHER
1
BALL BEARING
1
ARBOR SHAFT
1
LEITZ, 10...
Similar Questions

Is There Any Place You Know Of Where I Can Get The Table Saw Arbor Nut #or91050?
Any hints would be appreciated
Any hints would be appreciated
(Posted by Chuckmorley 1 year ago)

Craftsman 153.22124 Arbor Nut
looking to a replacement Arbor nut for my craftsman 22124. Original part number was OR91050. In need...
looking to a replacement Arbor nut for my craftsman 22124. Original part number was OR91050. In need...
(Posted by wsymons 1 year ago)

Changing Table Saw Motor To 240v
I have a 10" Craftsman table saw model #152221140. Lost the cover to the wiring which has the diagra...
I have a 10" Craftsman table saw model #152221140. Lost the cover to the wiring which has the diagra...
(Posted by mridude 9 years ago)
What Is A Sears Electronic 10'table Saw Worth
what is a sears electronic 10" table saw w/ext,& base model 113.290650 worth?, it works great
what is a sears electronic 10" table saw w/ext,& base model 113.290650 worth?, it works great
(Posted by mastercook76 11 years ago)

Need Wiring Diagram For 71/2 Craftman Table Saw-mdl 113.24151
(Posted by darent 12 years ago)