Craftsman 22124 Support Question
Craftsman 22124 Support Question
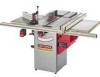
Find answers below for this question about Craftsman 22124 - Professional 10 in. Table Saw.Need a Craftsman 22124 manual? We have 1 online manual for this item!
Question posted by wsymons on October 23rd, 2022
Craftsman 153.22124 Arbor Nut
looking to a replacement Arbor nut for my craftsman 22124. Original part number was OR91050. In need is a resource.Thanks
Current Answers
Answer #1: Posted by SonuKumar on October 23rd, 2022 10:08 PM
SonuKumar

Member since:
May 9th, 2021 Points: 16,619,310

Member since:
May 9th, 2021 Points: 16,619,310
https://zeroclearanceinserts.com/products/craftsman-2-pack-fits-22104-22114-22124-tablesaws
https://www.searspartsdirect.com/model/2fpgb9zy76-000247/craftsman-152221240-table-saw-parts
https://www.ereplacementparts.com/craftsman-152221240-table-saw-parts-c-158286_168548_172621.html
Please respond to my effort to provide you with the best possible solution by using the "Acceptable Solution" and/or the "Helpful" buttons when the answer has proven to be helpful.
Regards,
Sonu
Your search handyman for all e-support needs!!
Related Craftsman 22124 Manual Pages
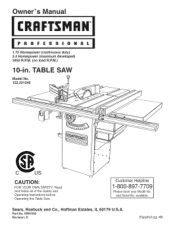
Owners Manual - Page 1
Customer Helpline
1-800-897-7709
Please have your Model No.
available. Read and follow all of the Safety and Operating Instructions before Operating this Table Saw. TABLE SAW
Model No. 152.221240
CAUTION:
FOR YOUR OWN SAFETY; and Serial No. OR91552 Revision: D
Espa5ol pg. 48 Sears, Roebuck and Co., Hoffman Estates, IL 60179 U.S.A. ...
Owners Manual - Page 2
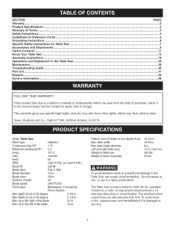
Table Saw
Motor type Continuous duty HP Maximum developed HP Amps Volts Hertz
induction 1.75 2.4 15/7.5 120/240 60
RPM Blade tilt
3450 R.RM. (no load R.RM.) Left tilt
Blade drive Blade diameter Blade arbor Number of teeth
Poly-V Belt 10...RM.
The Table Saw is damaged in a damp environment. To avoid shock or fire, replace power cord immediately if it to the Table Saw ...Maintenance ......
Owners Manual - Page 3
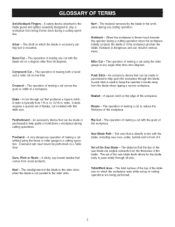
Arbor- BevelCut-
MiterCut- Apushstickis usedtokeeptheoperator'hsandsaway fromthebladewhenrippinga narrowworkpiece. Featherboar-dAnaccessordyevicethatcanbemadeor purchasetdohelpguideor holddowna workpiecdeuring cuttingoperations.
Gum...withouut singthefenceormitergaugeina cuttingoperation. Freehancdutsmustneverbeperformeodna Table Saw. Theoperatioonf makinga cutwiththegrainof theworkpiece....
Owners Manual - Page 4
... during operations and pull the operator into the moving parts.
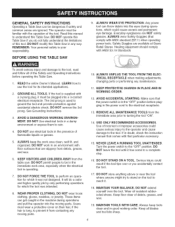
10. It will do not fully understand the limitations of this Table Saw in good working order. Make sure that are ignored. GENERAL SAFETY iNSTRUCTiONS
Operating a Table Saw can be familiar with the operation of the tool. MAiNTAiN YOUR BALANCE. Keep all of debris, grease, and...
Owners Manual - Page 7
...pull the Table Saw by qualified personnel only.
8. REPLACE a ...Table Saw plugged into your Table Saw. Unplug Table Saw from bricks and cement and other reproductive harm. ALWAYS turn the power switch "OFF" before operating the Table Saw.
2. Do not expose to install the plug. DO NOT handle the plug or Table Saw with the 240 volt plug. DO NOT unplug the Table Saw by Sears.
10...
Owners Manual - Page 11

...table saw can be removed by spraying WD-40 on a clean work surface.
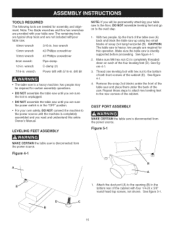
2. Table saw will require some amount of assembly. Handwheel lock knob (2) 5. Leveling foot (4) 9. Fence hook (2)
10. Polly-V belt 11. This table saw...and installed correctly. This may need redone several times before table
saw is a heavy machine, two people are required to lift the table saw off with a soft cloth....
Owners Manual - Page 16
... the power source.
CAUTION: The table saw . Remove the scrap 2x4 blocks under the front of the table saw and place them under the back of the saw is heavy; With two people, tip the front of the table saw (A) back and block the table saw . TOOLS REQUIRED
The following tools are provided with hex nut to the bottom of both front...
Owners Manual - Page 18

... of the cabinet. Note: Place an 18mm wrench on 12mm hex nut and a 13mm wrench on the front of the handwheel with the pin (D). f
J
A
3. See figure 10-2 and 10-3.
1. Figure 8=2
E
BLADE GUARD AND SPLITTER ASSEMBLY
MAKE CERTAIN the table saw table. Note: Remove the table
insert retaining bolt used to secure the tame insert to the left...
Owners Manual - Page 19
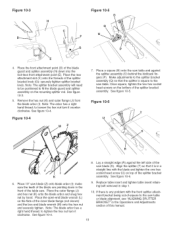
...on top of the table saw blade (S). Replace table insert and tighten table insert retaining bolt removed in a
straight line with the front splitter attachment bracket being out-of the splitter bracket assembly. securely tighten splitter bracket knob.
Place a square (N) onto the saw blade (Z) onto blade arbor (I ). See figure 10-4.
9. Remove the hex nut (K) and outer flange...
Owners Manual - Page 20

...; T=SQUARE ® COMMERCIAL RiP FENCE SYSTEM ASSEMBLY
FRONT AND REAR RAiL ASSEMBLY
SAW TABLE
FRONT
MAKE CERTAIN the table saw table and fasten the rail to the table using 5/16-18 x 1-1/2" hex head screw, 5/16" flat washer, 5/16" lock washer and 5/16-18 hex nut. See figure 11-4.
7. Align the two holes on the rear rail (J) with...
Owners Manual - Page 23

... (J) with the table saw table and securely tighten hardware attaching support retainer to tab (L) under the rear rail. Place a straight edge on the outfeed table to
/
move freely. Make a loop (E) from the power source. See figure 12-1.
2, Open motor cover, plug switch cord (C) into motor cord (D). Do not
completely tighten hex nut. See figure 12...
Owners Manual - Page 24

... no part of the fence is flush with the back of the square nut. See figure 13-2.
6, Position the cross cut fence (H).
MITER GAUGE ASSEMBLY
Figure 13=2
H
MAKE CERTAIN the table saw is flush with the back of the square nut. Repeat this through the slot in the clamp assembly and thread one knob...
Owners Manual - Page 25
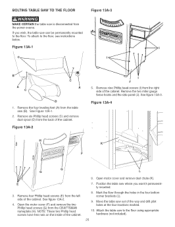
...nuts on the inside of the cabinet. Position the table saw where you wish, the table saw can be permanently mounted to the floor.
See figure 13A-2.
4. Open motor cover and remove dust chute (K).
7. BOLTING TABLE SAW TO THE FLOOR
Figure 13A=3
MAKE CERTAIN the table saw is disconnected from the table saw... (E) from the CRAFTSMAN nameplate (H). Attach the table saw out of the cabinet...
Owners Manual - Page 31

... plug with a UL/CSA Listed plug (not included) suitable for 240 volts and the rated current of saw blade.
• USE ONLY 10-in . Turn the arbor nut wrench toward the front of the motor. Replace table insert and tighten the table insert retaining bolt.
7. To change to loosen it from its power source when changing the...
Owners Manual - Page 32
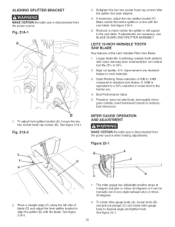
... still square to standard saw blades.
Figure 22=1
A B
2.
LEITZ 10=INCH VARIABLE TOOTH SAW BLADE
Key features of 5dB to lOdB compared to the saw blade.
Place a straight...tool life 25% to
align the splitter (E) with the saw table. Retighten the two hex socket head cap screws after the splitter has been aligned.
4. MITER GAUGE OPERATION AND ADJUSTMENT
MAKE CERTAIN the table saw...
Owners Manual - Page 33
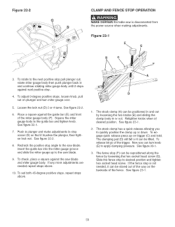
...pull out on plunger and turn knob (E) to the saw blade. To set both 45-degree positive stops, repeat steps above .
10.
Now you to the guide bar and tighten knob. ...D
CLAMP AND FENCE STOP OPERATION
MAKE CERTAIN the table saw is not needed repeat steps above . If any more adjustments are needed , it touches the plunger, then tighten lock nut. See figure 23-1.
2, The stock clamp has...
Owners Manual - Page 34

...can be purchased as a cut -off scrap pieces from the miter gauge and your saw is going to the table saw. Start the cut off gauge when crosscutting.
34 NEVER pick up any short cut slowly...the saw , one of injury or damage to be used in the miter gauge body. When bevel cutting (blade tilted), use the right hand miter gauge groove so that is running. Never use of non-Craftsman ...
Owners Manual - Page 35
... has come to prevent the wood kerf from closing and binding on the size.
4. An accessory Craftsman Fence Guide can be supported at the rear of the table saw to the rear of the workpiece; Oncethecut-offlengthis determinedlo, ckthe
fenceandslidetheworkpieceacrossthetable surfaceuntilit contactstheblock.Usethe miter gauge(K)to assist when making a cut with one or...
Owners Manual - Page 38

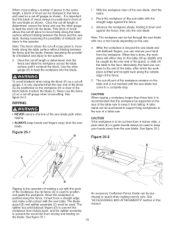
...iron surface. Positionthewoodfacingoverthecutterheadwiththe cutterheabdelowthesurfaceofthetable. NOTE: In the illustration below, the table saw from rusting from the table saw looking new.
A side-to -rear" direction only. See figure 28-1....when making the cuts in the assembly, then tighten the lock-nut.
Make sure you need to apply a good automotive paste wax to buff the unpainted cast...
Owners Manual - Page 41

KICKBACK FINGER
T:1.6ram)
SET SCREW 1/4-28 x 3/8", NYLOCK TABLE INSERT- 10-IN.TABLESAW
MODEL NO.152.221240
When servicing, use only CRAFTSMAN replacement parts.
PART No. Any attempt to repair or replace electrical parts on this table saw may create a HAZARD or cause product damage.
STANDARD TABLE INSERT RETAINING BOLT TABLE HEX SOCKET SET SCREW M8 x 20ram ALIGN-A-CUT INSERT FLAT...
Similar Questions

Arbor Nut For A Craftsman Professional Table Saw
(Posted by jimszawara 6 months ago)

Is There Any Place You Know Of Where I Can Get The Table Saw Arbor Nut #or91050?
Any hints would be appreciated
Any hints would be appreciated
(Posted by Chuckmorley 1 year ago)

Changing Table Saw Motor To 240v
I have a 10" Craftsman table saw model #152221140. Lost the cover to the wiring which has the diagra...
I have a 10" Craftsman table saw model #152221140. Lost the cover to the wiring which has the diagra...
(Posted by mridude 9 years ago)
What Is A Sears Electronic 10'table Saw Worth
what is a sears electronic 10" table saw w/ext,& base model 113.290650 worth?, it works great
what is a sears electronic 10" table saw w/ext,& base model 113.290650 worth?, it works great
(Posted by mastercook76 11 years ago)

Need Wiring Diagram For 71/2 Craftman Table Saw-mdl 113.24151
(Posted by darent 12 years ago)