Craftsman 22124 Support Question
Craftsman 22124 Support Question
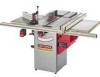
Find answers below for this question about Craftsman 22124 - Professional 10 in. Table Saw.Need a Craftsman 22124 manual? We have 1 online manual for this item!
Question posted by Chuckmorley on February 21st, 2023
Is There Any Place You Know Of Where I Can Get The Table Saw Arbor Nut #or91050?
Any hints would be appreciated
Current Answers
Answer #1: Posted by SonuKumar on February 21st, 2023 6:32 PM
SonuKumar

Member since:
May 9th, 2021 Points: 16,617,810

Member since:
May 9th, 2021 Points: 16,617,810
Table Saw Arbor Nut #or91050 at amazon
or
https://www.searspartsdirect.com/model/2fpgb9zy76-000247/craftsman-152221240-table-saw-parts
Please respond to my effort to provide you with the best possible solution by using the "Acceptable Solution" and/or the "Helpful" buttons when the answer has proven to be helpful.
Regards,
Sonu
Your search handyman for all e-support needs!!
Answer #2: Posted by AkashShinde on February 21st, 2023 8:53 PM
AkashShinde

Member since:
October 22nd, 2022 Points: 700
Member since:
October 22nd, 2022 Points: 700
I can suggest a few places where you might be able to find the table saw arbor nut #OR91050:
- Manufacturer's website: Check the website of the manufacturer of your table saw to see if they sell replacement parts directly.
- Online retailers: Check online retailers such as Amazon, eBay, and other online tool stores to see if they carry the specific arbor nut you need.
- Local hardware or tool store: Check with your local hardware or tool store to see if they carry replacement parts for your specific table saw model.
- Online forums or discussion boards: Check online forums or discussion boards related to woodworking or table saws. Other users may have suggestions or tips on where to find the arbor nut you need.
It's important to make sure you get the exact replacement part for your specific table saw model, so be sure to double-check the part number before making a purchase.
akash
Related Craftsman 22124 Manual Pages
Owners Manual - Page 2
... Table Saw ...Accessories and Attachments ...Carton Contents ...Know Your Table Saw ...Assembly Instructions ...Operations and Adjustment to the Table Saw, use a 15 amp time delay fuse or circuit breaker. The Table Saw ...Blade tilt
3450 R.RM. (no load R.RM.) Left tilt
Blade drive Blade diameter Blade arbor Number of purchase, return it is factory wired for repair, free of fence assembly
12...
Owners Manual - Page 3
...bladeguardandsplittear ssembldyesignetdostopa workpiecferombeingthrownbackduringa cuttingoperation. Arbor-
Theoperatioonfmakinga cutusingthemiter gaugeat anyangleotherthanzerodegrees.... Kerf-
Gum,Pitchor Resin- Crosscu-t Theoperatioonfmakinga cutacrossthe grainorwidthofa workpiece. Table/WorAkrea-
A dadoistypicallyfrom1/8-int.o 13/16-inw.ide.Adado requireas speciasl...
Owners Manual - Page 4
...entire Owner's Manual. GROUND ALL TOOLS. ALWAYS keep tools clean and in doubt, check ...Table Saw can be familiar with the operation of the tool. LEARN how to the tool. See Grounding Instructions.
3. It will do not fully understand the limitations of debris, grease, and
wax.
19. These items can get caught in an environment with that are ignored. KEEP PROTECTIVE GUARDS iN PLACE...
Owners Manual - Page 8

...move into the blade.
23. Clean off the table/work area before table saw blade.
25. SAVE THESE iNSTRUCTiONS. TheTableSawis designedforhomeuseor...SAW "OFF" and unplug from the blade.
24. Department of Labor OSHA 1910.213 Regulations.
34. Checktoseethattheyarein place,... proper operation of this tool is available from the following sources:
Power Tool Institute 1300 Summer Avenue Cleveland...
Owners Manual - Page 16
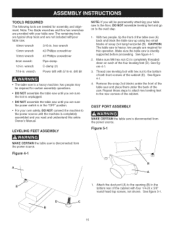
... and alignment. Make sure the table saw and place them under the back of scrap 2x4 lying horizontal (B). Make sure M8 hex nut (C) is sturdily supported before proceeding. See figure 4-1.
3. See figure 4-1.
4. Figure 5=1
MAKE CERTAIN the table saw is disconnected from the power source. See figure 5-1.
16
TOOLS REQUIRED
The following tools are required for this entire Owner...
Owners Manual - Page 17
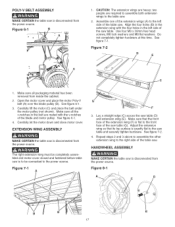
... with the four holes in the left side of the table saw. Carefully lift the motor (C) and place the belt under the motor pulley (not shown).
HANDWHEEL ASSEMBLY
MAKE CERTAIN the table saw is to be completely assembled and motor cover closed and fastened before table saw is disconnected from the power source.
See figure 7-1. The right...
Owners Manual - Page 18

...Note: Place an 18mm wrench on 12mm hex nut and a 13mm wrench on the side of the cabinet (B) using two M4 x 8mm sheet metal screws, not shown. Figure 10=2
...table insert.
See figure 10-1 and 10-2. Place the splitter bracket assembly (C) onto the mounting splitter rod. See figure 9-1.
2. WRENCH AND FENCE HOOK ASSEMBLY
MAKE CERTAIN the table saw is disconnected from the power source. Place...
Owners Manual - Page 19
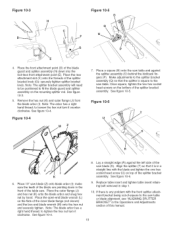
... the two hex socket head screws on top of the table saw blade (S). Lay a straight edge (R) against the splitter assembly (0) behind the kickback fingers (P). Note: The blade arbor has a right hand thread; See figure 10-4.
9. Place the front attachment point (D) of the saw . to loosen the hex nut turn it clockwise. Make adjustments to fit the blade...
Owners Manual - Page 20

... holes on the rear rail (J) with two 5/16-18 x 2" flat head screws, 5/16" flat washers, 5/16" lock washers and 5/16-18 hex nuts through the two holes (F) in the saw table. See figure 11-1.
2. Make sure the top edge (C) of the front rail is not blocking the ends of the miter gauge grooves...
Owners Manual - Page 23

... table saw table and securely tighten hardware attaching support retainer to the top of the rear rail through hole (B) in the upper support goes into notch (H) of lower support and securely tighten clamp knob.
5, Assemble both rear rail and outfeed table.
9, Make sure the clearance miter gauge grooves (K) in switch cord into motor cord (D). Place...
Owners Manual - Page 24

... ASSEMBLY
Figure 13=2
H
MAKE CERTAIN the table saw blade. Place two knobs (E) through the hole in the path of the square nut. See figure 13-2.
6, Position the cross cut fence (H). Figure 13=3
7, Place one M5 flat washer onto one M5 x 20mm hex socket head screw.
See figure 13-1.
3, Place one M5 flat washer onto one M5...
Owners Manual - Page 25
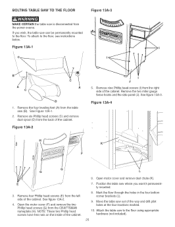
... screws have hex nuts on the inside of the cabinet.
6. Open motor cover and remove dust chute (K).
7. Mark the floor through the holes in the four bottom corner brackets (L).
9. Move the table saw can be permanently ...side of the cabinet. Attach the table saw where you wish, the table saw out of the way and drill pilot holes at the four locations marked.
10. Remove the four leveling feet ...
Owners Manual - Page 26
...contact.
• Running on again.
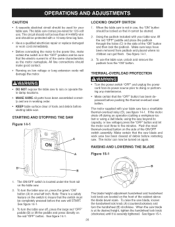
The motor supplied with your table saw , unlock and remove the padlock from padlock and placed where no children can now be turned on low voltage or ...8226; DO NOT expose the table saw will damage the motor.
To turn the handwhee[ (B) clockwise. All line connections should make certain the switch is of tools and debris before pushing the thermal...
Owners Manual - Page 28

... square (not included).
See figure 17A-1.
3. You can check this position.
5. MAKE CERTAIN the table saw blade back so that the bevel arrow (A) is a difference of more than four pieces of the... 17-1.
ADJUSTING BLADE ALIGNMENT
Blade alignment is the alignment of an inch. Place a combination square (A) on the front of standard printer paper between the rule and the...
Owners Manual - Page 30

... is in line with the miter gauge groove. See figure 18-1.
2. Place a straight edge across the front and rear of screws is not completely...TABLE INSERT ADJUSTMENT
MAKE CERTAIN the table saw table (B).
The table insert (A) must be adjusted so it is perfectly level with the saw table and extension table surfaces should be level with the saw is parallel with the right edge of the table...
Owners Manual - Page 31

... voltage 120/240-volt, single phase motor. Place one open-end wrench (A) on the motor tag (A) that it was loosened.
6. Assemble the new saw blade (E). Replace table insert and tighten the table insert retaining bolt.
7. It is disconnected from its power source when changing the saw table and assemble the blade flange and arbor nut.
Oncetheinsertis level,securetheinsertwiththe...
Owners Manual - Page 33
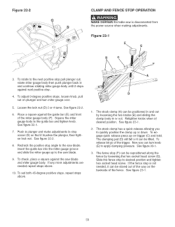
...STOP OPERATION
MAKE CERTAIN the table saw blade.
9. Push in ... The clamping pad (D) will fall or it stops against the saw blade. See figure 22-2.
6, Place a square against the guide bar (E) and front of the ...nut (D) 3 or 4 turns. Recheck the positive stop is disconnected from the power source when making adjustments. To set both 45-degree positive stops, repeat steps above .
10...
Owners Manual - Page 36
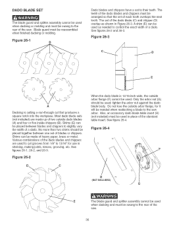
...needed to control the exact width of a dado. Only the arbor nut (G) should be placed together between blades and chippers to the rear of the saw arbor. See figure 26-4. Figure 264
H
o
(NOT INCLUDED)
The...teeth.
tighten the arbor nut against the dado blade body. DADO BLADE SET
The blade guard and splitter assembly cannot be used in place of the standard table insert. The teeth ...
Owners Manual - Page 37

... be kept free of corner moulds, picture frames, table edges, etc.
It is attached to the face of the standard table insert. The wood facing is necessary when using the...Molding is cutting a shape on the circular saw is fitted into a groove in place of the rip fence (H). Cutting moldings with the molding cutterhead, tighten the arbor nut (E) against the cutterhead body. Figure 27=1...
Owners Manual - Page 41

...118
OR91078
Description
OWNER'S MANUAL - #22124 10" TaNe Saw
BLADE GUARD ASSEMBLY, (NOT SHOWN) CONSISTS OF ...NUT M6
1
JAM NUT 5/8-18-LH
1
ARBOR PULLEY
1
KEY 6mm x 6mm x 16mm
1
BEARING CLOSURE NUT
1
ARBOR SPACER
1
BALL BEARING
1
ELEVATING BRACKET
1
ARBOR SLEEVE
1
WAVE WASHER
1
BALL BEARING
1
ARBOR SHAFT
1
LEITZ, 10...No. STANDARD TABLE INSERT RETAINING BOLT TABLE HEX SOCKET...
Similar Questions

Arbor Nut For A Craftsman Professional Table Saw
(Posted by jimszawara 6 months ago)

Craftsman 153.22124 Arbor Nut
looking to a replacement Arbor nut for my craftsman 22124. Original part number was OR91050. In need...
looking to a replacement Arbor nut for my craftsman 22124. Original part number was OR91050. In need...
(Posted by wsymons 1 year ago)

Table Saw Switch Malfunction
Today I pushed my switch on the table saw and it didn't turn off! I had to unplug the table saw. I s...
Today I pushed my switch on the table saw and it didn't turn off! I had to unplug the table saw. I s...
(Posted by gringoticahouse 11 years ago)

What Is A Sears Electronic 10'table Saw Worth
what is a sears electronic 10" table saw w/ext,& base model 113.290650 worth?, it works great
what is a sears electronic 10" table saw w/ext,& base model 113.290650 worth?, it works great
(Posted by mastercook76 11 years ago)

Need Wiring Diagram For 71/2 Craftman Table Saw-mdl 113.24151
(Posted by darent 12 years ago)