
Owners Manual
Page 1
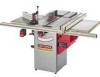
available. OR91552 Revision: D Espa5ol pg. 48 and Serial No. Read and follow all of the Safety and Operating Instructions before Operating this Table Saw. Part No. Sears, Roebuck and Co., Hoffman Estates, IL 60179 U.S.A. Customer Helpline 1-800-897-7709 Please have your Model No. TABLE SAW Model No. 152.221240 CAUTION: FOR YOUR OWN SAFETY; Owner's uai CRRFrSMRH 1.75 Horsepower (continuous duty) 2.4 Horsepower (maximum developed) 3450 R.P.M. (no load R.P.M.) 10-in.
available. OR91552 Revision: D Espa5ol pg. 48 and Serial No. Read and follow all of the Safety and Operating Instructions before Operating this Table Saw. Part No. Sears, Roebuck and Co., Hoffman Estates, IL 60179 U.S.A. Customer Helpline 1-800-897-7709 Please have your Model No. TABLE SAW Model No. 152.221240 CAUTION: FOR YOUR OWN SAFETY; Owner's uai CRRFrSMRH 1.75 Horsepower (continuous duty) 2.4 Horsepower (maximum developed) 3450 R.P.M. (no load R.P.M.) 10-in.
Owners Manual
Page 2
... Poly-V Belt 10-in. 5/8-in . Fence type Biesemeyer, Commercial Fence System Max depth-of-cut at max depth-of-cut at 45-degree Max rip to the right of the blade Max rip to state. Table in front of blade at 90-degree 3-3/8-in. Connect to the Table Saw, use proper ... damaged in a damp environment. To avoid shock or fire, replace power cord immediately if it to the Table Saw ...Maintenance ...Troubleshooting Guide ...Part List ...Espanol ...Service Information ... PAGE 2 2 3 4 5 6 7 9 11 15 16 26 38 40 41 48 88 FULLONEYEAR WARRANTY If this product fails due to rain, or ...
... Poly-V Belt 10-in. 5/8-in . Fence type Biesemeyer, Commercial Fence System Max depth-of-cut at max depth-of-cut at 45-degree Max rip to the right of the blade Max rip to state. Table in front of blade at 90-degree 3-3/8-in. Connect to the Table Saw, use proper ... damaged in a damp environment. To avoid shock or fire, replace power cord immediately if it to the Table Saw ...Maintenance ...Troubleshooting Guide ...Part List ...Espanol ...Service Information ... PAGE 2 2 3 4 5 6 7 9 11 15 16 26 38 40 41 48 88 FULLONEYEAR WARRANTY If this product fails due to rain, or ...
Owners Manual
Page 4
DO NOT modify this Table Saw in any maintenance. 11. Any power tool can throw debris into the moving parts. 10. LEARN how to the tool, read and follow all blades and tool bits sharp. DO NOT work in an environment with ANSi $3....any moving parts. Serious injury could cause severe and permanent eye damage. Wear oil resistant rubbersoled shoes. Keep all of the Safety and Operating Instructions before plugging in the power cord to be dangerous if safety and common sense are slippery from the table saw. GENERAL SAFETY iNSTRUCTiONS Operating a Table Saw can ...
DO NOT modify this Table Saw in any maintenance. 11. Any power tool can throw debris into the moving parts. 10. LEARN how to the tool, read and follow all blades and tool bits sharp. DO NOT work in an environment with ANSi $3....any moving parts. Serious injury could cause severe and permanent eye damage. Wear oil resistant rubbersoled shoes. Keep all of the Safety and Operating Instructions before plugging in the power cord to be dangerous if safety and common sense are slippery from the table saw. GENERAL SAFETY iNSTRUCTiONS Operating a Table Saw can ...

Owners Manual
Page 5
...THAT ACCEPTS THE TOOL'S PLUG. Be sure your skin may promote absorption of harmful material. EACHAND EVERY TIME, CHECK FOR DAM= AGED PARTS PRIOR TO USING THE TOOL. Use dust collection system wherever possible. GUIDELINES FOR EXTENSION CORDS The smaller the gauge-number, the larger diameter ... 10 to 12 Amps 12 to the dust may result in serious personal injury. 25. SECURE ALL WORK. This is safer than attempting to see "MiNiMUM RECOMMENDED GAUGE FOR EXTENSION CORDS (AWG)" table for alignment, binding or breaking of power and overheating. Always use . CHILDPROOF THE ...
...THAT ACCEPTS THE TOOL'S PLUG. Be sure your skin may promote absorption of harmful material. EACHAND EVERY TIME, CHECK FOR DAM= AGED PARTS PRIOR TO USING THE TOOL. Use dust collection system wherever possible. GUIDELINES FOR EXTENSION CORDS The smaller the gauge-number, the larger diameter ... 10 to 12 Amps 12 to the dust may result in serious personal injury. 25. SECURE ALL WORK. This is safer than attempting to see "MiNiMUM RECOMMENDED GAUGE FOR EXTENSION CORDS (AWG)" table for alignment, binding or breaking of power and overheating. Always use . CHILDPROOF THE ...

Owners Manual
Page 8
...to the American National Standards Institute ANSi 01.1 Safety Requirements for rippinga narrowworkpiece. 22. NEVER have any part of your body in front of the saw . NEVER attempt to the power source. 33. NEVERperformlayouta, ssemblyorset-upworkon thetable/worakreawhenthemachineis running. 28. ... Prevention Manual for Woodworking Machines, and the U.S. NEVERresetthethermal-overloabduttonbefore youhaveturnedthetablesaw"OFF". 29. Clean off the table/work area before table saw blade when using auxiliary fence as a stop when cross-cutting. 32. Please also refer to move into the...
...to the American National Standards Institute ANSi 01.1 Safety Requirements for rippinga narrowworkpiece. 22. NEVER have any part of your body in front of the saw . NEVER attempt to the power source. 33. NEVERperformlayouta, ssemblyorset-upworkon thetable/worakreawhenthemachineis running. 28. ... Prevention Manual for Woodworking Machines, and the U.S. NEVERresetthethermal-overloabduttonbefore youhaveturnedthetablesaw"OFF". 29. Clean off the table/work area before table saw blade when using auxiliary fence as a stop when cross-cutting. 32. Please also refer to move into the...

Owners Manual
Page 11
... 8. Fence hook (2) 10. Dust Port 13. If any parts are accounted for the fence. Leveling foot (4) 9. After cleaning, apply a good quality paste wax to figures below; If there are required to the power source. Splitter bracket assembly 7. The protective coatings can only be connected to unpack and lift the table saw. CAUTION: DO NOT...
... 8. Fence hook (2) 10. Dust Port 13. If any parts are accounted for the fence. Leveling foot (4) 9. After cleaning, apply a good quality paste wax to figures below; If there are required to the power source. Splitter bracket assembly 7. The protective coatings can only be connected to unpack and lift the table saw. CAUTION: DO NOT...

Owners Manual
Page 13
... head Screw 10-32 x 3/8" (4) Knob (Black) (not shown) Cursor (not shown) (2) Hardware Pack for Extension Wings (#0R92013) includes: (Hardware finish is Black Oxide) Flat Washer M8 (8) Lock Washer M8 (8) Hex Head Screw M8x1.25 x 30mm (8) Hardware Pack for Outfeed Table (#0R92015) includes: (Hardware finish is Black... Metal Screw 1/4-20 x 3/8" (4) 13 Hinge assembly (2) 52. Upper support assembly 54. See hardware diagram to help in finding the correct part. Clamp knob 53. Support retainer Fig. 3=4 5O 51 52 55 53 54 Hardware packs are not identified or labeled. Lower support 55. OUTFEED...
... head Screw 10-32 x 3/8" (4) Knob (Black) (not shown) Cursor (not shown) (2) Hardware Pack for Extension Wings (#0R92013) includes: (Hardware finish is Black Oxide) Flat Washer M8 (8) Lock Washer M8 (8) Hex Head Screw M8x1.25 x 30mm (8) Hardware Pack for Outfeed Table (#0R92015) includes: (Hardware finish is Black... Metal Screw 1/4-20 x 3/8" (4) 13 Hinge assembly (2) 52. Upper support assembly 54. See hardware diagram to help in finding the correct part. Clamp knob 53. Support retainer Fig. 3=4 5O 51 52 55 53 54 Hardware packs are not identified or labeled. Lower support 55. OUTFEED...

Owners Manual
Page 24
See figure 13-1. 2, Place clamp assembly (C) on the saw table and securely tighten both hex socket head screws. Thread one into the elevating ...Position clamp assembly as desired and tighten the hex socket head screw. Allow the cross cut fence so that no part of the fence is flush with the back of the square nut. See figure 13-1. 3, Place one M5 flat...with hex socket head screw and flat washer (F) into the grooves (I) of the saw blade. MITER GAUGE ASSEMBLY Figure 13=2 H MAKE CERTAIN the table saw is flush with the back of the square nut. Place this for crosscut fence are...
See figure 13-1. 2, Place clamp assembly (C) on the saw table and securely tighten both hex socket head screws. Thread one into the elevating ...Position clamp assembly as desired and tighten the hex socket head screw. Allow the cross cut fence so that no part of the fence is flush with the back of the square nut. See figure 13-1. 3, Place one M5 flat...with hex socket head screw and flat washer (F) into the grooves (I) of the saw blade. MITER GAUGE ASSEMBLY Figure 13=2 H MAKE CERTAIN the table saw is flush with the back of the square nut. Place this for crosscut fence are...
Owners Manual
Page 26
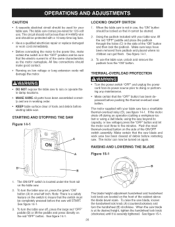
...will START. The table saw comes pre-wired for your table saw has a resettable thermal-overload relay (D), see figure 14-1. Make sure keys have been assembled correctly and are located on , press the green "ON" button (A) in damp locations. • MAKE SURE all parts have been removed from... the "ON" button. To turn the table saw off during an operation (cutting a workpiece too fast or using a dull blade, using the saw beyond its desired height, tighten the handwheel lock knob (clockwise) ...
...will START. The table saw comes pre-wired for your table saw has a resettable thermal-overload relay (D), see figure 14-1. Make sure keys have been assembled correctly and are located on , press the green "ON" button (A) in damp locations. • MAKE SURE all parts have been removed from... the "ON" button. To turn the table saw off during an operation (cutting a workpiece too fast or using a dull blade, using the saw beyond its desired height, tighten the handwheel lock knob (clockwise) ...

Owners Manual
Page 34
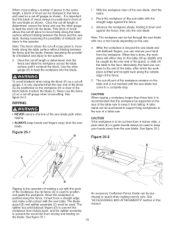
...=3 F / H K / To avoid serious injury, NEVER hang onto or touch the part of the workpiece that the rear end of the block be positioned so the workpiece is...to the same length, clamp a block (F) of wood to the fence (J) to the table saw blade. Figure 24=2 The use of non-Craftsman attachments and accesE sories may be fitted with an auxiliary fence (E) if not already supplied ... (not included) through the slots (not shown) in the miter gauge body. Continue cutting until the saw blade (C). Slide the miter gauge and workpiece back to position and guide the workpiece (B). It is running...
...=3 F / H K / To avoid serious injury, NEVER hang onto or touch the part of the workpiece that the rear end of the block be positioned so the workpiece is...to the same length, clamp a block (F) of wood to the fence (J) to the table saw blade. Figure 24=2 The use of non-Craftsman attachments and accesE sories may be fitted with an auxiliary fence (E) if not already supplied ... (not included) through the slots (not shown) in the miter gauge body. Continue cutting until the saw blade (C). Slide the miter gauge and workpiece back to position and guide the workpiece (B). It is running...
Owners Manual
Page 35
... be supported at the rear of a table saw blade. The cut-off part of the fence. 5. See figure 25-2. Toavoidkickbackwhenusingtheblock(F)asa cut-off the table to a complete stop. Place the workpiece on the saw table with one or two hands depending on the table, tilt up slightly and be used to...fingers (D) to prevent the workpiece from closing and binding on the table and is not touched until the saw blade path when ripping. • ALWAYS keep hands and fingers away from the workpiece. An accessory Craftsman Fence Guide can be purchased to keep it down and against the...
... be supported at the rear of a table saw blade. The cut-off part of the fence. 5. See figure 25-2. Toavoidkickbackwhenusingtheblock(F)asa cut-off the table to a complete stop. Place the workpiece on the saw table with one or two hands depending on the table, tilt up slightly and be used to...fingers (D) to prevent the workpiece from closing and binding on the table and is not touched until the saw blade path when ripping. • ALWAYS keep hands and fingers away from the workpiece. An accessory Craftsman Fence Guide can be purchased to keep it down and against the...
Owners Manual
Page 39
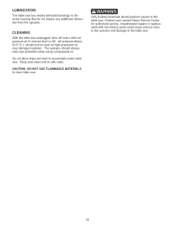
...USE FLAMMABLE MATERIALS to accumulate under table saw. LUBRiCATiON The table saw has sealed lubricated bearings in safe order. Only trained personnel should always wear eye protection when using compressed air. I. Do not allow chips and dust to clean tame saw. Unauthorized repairs or replacement with ...remove dust or dirt. CLEANING With the table saw unplugged, blow off motor with non-factory parts could cause serious injury to the operator and damage to the table saw . 39 The operator should perform repairs to the table saw . should not be used as high-pressured...
...USE FLAMMABLE MATERIALS to accumulate under table saw. LUBRiCATiON The table saw has sealed lubricated bearings in safe order. Only trained personnel should always wear eye protection when using compressed air. I. Do not allow chips and dust to clean tame saw. Unauthorized repairs or replacement with ...remove dust or dirt. CLEANING With the table saw unplugged, blow off motor with non-factory parts could cause serious injury to the operator and damage to the table saw . 39 The operator should perform repairs to the table saw . should not be used as high-pressured...

Owners Manual
Page 41
...FENCE Qty. 1 N/A N/A Key No. Any attempt to repair or replace electrical parts on this table saw may create a HAZARD or cause product damage. GUIDE BAR 1 HEX SOCKET SET ...E188 1 RAISE/LOWER SLEEVE 1 RAISE/LOWER SPACER 1 POINTER 1 41 10-IN.TABLESAW MODEL NO.152.221240 When servicing, use only CRAFTSMAN replacement parts. N/A OR91662 N/A OR91710 N/A OR91711 1 OR91785 2 OR91781 3 OR91027 3A...115 OR91077 116 OR91074 117 OR91118 118 OR91078 Description OWNER'S MANUAL - #22124 10" TaNe Saw BLADE GUARD ASSEMBLY, (NOT SHOWN) CONSISTS OF REF #: 1,2, 3, 3a, 3b ...
...FENCE Qty. 1 N/A N/A Key No. Any attempt to repair or replace electrical parts on this table saw may create a HAZARD or cause product damage. GUIDE BAR 1 HEX SOCKET SET ...E188 1 RAISE/LOWER SLEEVE 1 RAISE/LOWER SPACER 1 POINTER 1 41 10-IN.TABLESAW MODEL NO.152.221240 When servicing, use only CRAFTSMAN replacement parts. N/A OR91662 N/A OR91710 N/A OR91711 1 OR91785 2 OR91781 3 OR91027 3A...115 OR91077 116 OR91074 117 OR91118 118 OR91078 Description OWNER'S MANUAL - #22124 10" TaNe Saw BLADE GUARD ASSEMBLY, (NOT SHOWN) CONSISTS OF REF #: 1,2, 3, 3a, 3b ...

Owners Manual
Page 42
... 444 STD622505 1/4-20 x 1/2" HEX HEAD SCREW 4 445 OR91616 FRONT RAIL 1 446 OR91617 TABLE ASSEMBLY 12" X 27" 1 N/A OR92011 TEMPLATE (not shown) Service Notes: A KIT INCLUDES...403 OR91602 LABEL LARGE BIESEMEYER COMM/HS FNC 1 404 STD511103 10-32 x 3/8" ROUND HEAD SCREW 2 405 STD551010 #10 FLAT WASHER 2 406 OR91603 CURSOR 1 407 OR91604 LABEL, FLAG... OVERSIZE AND MUST BE CUT TO PROPER LENGTH 42 PART No. 254 OR90059 255 OR91826 N/A OR91804 256 256A...SCREW 1/4-28 x 3/8" CABINET ASSEMBLY SPEC TAG (C SAW) BEVEL SCALE BLADE ELEVATION AND TILT LABEL HINGE ASSEMBLY...
... 444 STD622505 1/4-20 x 1/2" HEX HEAD SCREW 4 445 OR91616 FRONT RAIL 1 446 OR91617 TABLE ASSEMBLY 12" X 27" 1 N/A OR92011 TEMPLATE (not shown) Service Notes: A KIT INCLUDES...403 OR91602 LABEL LARGE BIESEMEYER COMM/HS FNC 1 404 STD511103 10-32 x 3/8" ROUND HEAD SCREW 2 405 STD551010 #10 FLAT WASHER 2 406 OR91603 CURSOR 1 407 OR91604 LABEL, FLAG... OVERSIZE AND MUST BE CUT TO PROPER LENGTH 42 PART No. 254 OR90059 255 OR91826 N/A OR91804 256 256A...SCREW 1/4-28 x 3/8" CABINET ASSEMBLY SPEC TAG (C SAW) BEVEL SCALE BLADE ELEVATION AND TILT LABEL HINGE ASSEMBLY...

Owners Manual
Page 88
... home - MC Marque de commerce / MDMarque d_pos_e de Sears, Roebuck and Co. @ Sears, Roebuck and Co. For the replacement parts, accessories and owner's manuals that you need to do-it ! For Sears professional installation of all major brand appliances l.a..w...n... and garden equipment, or heating and cooling systems, no matter who made it...
... home - MC Marque de commerce / MDMarque d_pos_e de Sears, Roebuck and Co. @ Sears, Roebuck and Co. For the replacement parts, accessories and owner's manuals that you need to do-it ! For Sears professional installation of all major brand appliances l.a..w...n... and garden equipment, or heating and cooling systems, no matter who made it...


