
Owners Manual
Page 2
...this manual are for illustrative purposes only, and may not be exactly the same as the screens actually produced by the product. 2 • DLP is forbidden. You are registered trademarks or trademarks of Microsoft Corporation in the United States and other countries. • Other company and product ...liable for any loss or lost profits or claims from third parties arising out of the use of CASIO COMPUTER CO., LTD. • CASIO COMPUTER CO., LTD. shall not be held liable for your own personal use is forbidden without notice. • Copying of this manual, either in part or its...
...this manual are for illustrative purposes only, and may not be exactly the same as the screens actually produced by the product. 2 • DLP is forbidden. You are registered trademarks or trademarks of Microsoft Corporation in the United States and other countries. • Other company and product ...liable for any loss or lost profits or claims from third parties arising out of the use of CASIO COMPUTER CO., LTD. • CASIO COMPUTER CO., LTD. shall not be held liable for your own personal use is forbidden without notice. • Copying of this manual, either in part or its...
Owners Manual
Page 3
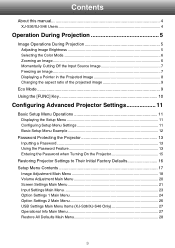
...XJ-S36/XJ-S46 Users 4 Operation During Projection 5 Image Operations During Projection 5 Adjusting Image Brightness 5 Selecting the Color Mode 6 Zooming an Image ...6 Momentarily Cutting Off the Input Source Image 7 Freezing an Image ...7 Displaying a Pointer in the Projected Image 8 Changing the aspect ratio of the projected image 9 Eco Mode ...9 Using... the [FUNC] Key 10 Configuring Advanced Projector Settings 11 Basic Setup Menu Operations 11 Displaying the Setup Menu 11 Configuring Setup ...
...XJ-S36/XJ-S46 Users 4 Operation During Projection 5 Image Operations During Projection 5 Adjusting Image Brightness 5 Selecting the Color Mode 6 Zooming an Image ...6 Momentarily Cutting Off the Input Source Image 7 Freezing an Image ...7 Displaying a Pointer in the Projected Image 8 Changing the aspect ratio of the projected image 9 Eco Mode ...9 Using... the [FUNC] Key 10 Configuring Advanced Projector Settings 11 Basic Setup Menu Operations 11 Displaying the Setup Menu 11 Configuring Setup ...
Owners Manual
Page 4
...of the operations in combination with the [S] and [T] buttons XJ-S36/XJ-S46 Users This manual does not include information about connecting USB devices to the XJ-S36/XJ-S46 projector and procedures you are explained using the XJ-S36/XJ-S46 model projector while a USB device is connected to project images from a... USB device, see "USB Function Guide" on the projector instead of an RGB Image 31 ...
...of the operations in combination with the [S] and [T] buttons XJ-S36/XJ-S46 Users This manual does not include information about connecting USB devices to the XJ-S36/XJ-S46 projector and procedures you are explained using the XJ-S36/XJ-S46 model projector while a USB device is connected to project images from a... USB device, see "USB Function Guide" on the projector instead of an RGB Image 31 ...
Owners Manual
Page 5
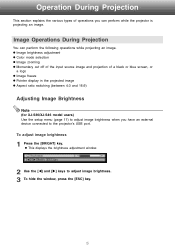
... to adjust image brightness. 3 To hide the window, press the [ESC] key. 5 Image Operations During Projection You can perform while the projector is projecting an image. Operation During Projection This section explains the various types of a black or blue screen, or a logo z Image freeze... z Pointer display in the projected image z Aspect ratio switching (between 4:3 and 16:9) Adjusting Image Brightness Note (for XJ-S36/XJ-S46 model users) Use the setup menu (page 11) to adjust image brightness when you can perform the following operations while projecting an image. z This ...
... to adjust image brightness. 3 To hide the window, press the [ESC] key. 5 Image Operations During Projection You can perform while the projector is projecting an image. Operation During Projection This section explains the various types of a black or blue screen, or a logo z Image freeze... z Pointer display in the projected image z Aspect ratio switching (between 4:3 and 16:9) Adjusting Image Brightness Note (for XJ-S36/XJ-S46 model users) Use the setup menu (page 11) to adjust image brightness when you can perform the following operations while projecting an image. z This ...
Owners Manual
Page 6
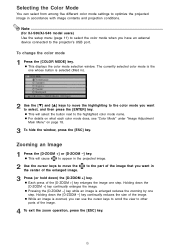
Note (for XJ-S36/XJ-S46 model users) Use the setup menu (page 11) to select the color mode when you want in ). 2 Use the [T] and [S] keys to move the the center of...optimize the projected image in the projected image. 2 Use the cursor keys to move the highlighting to the color mode you have an external device connected to the projector's USB port. z For details on what each color...one step. Holding down the [D-ZOOM +] key continually enlarges the image. Selecting the Color Mode You can use the cursor keys to scroll the view to other parts of the [D-ZOOM +] key enlarges the image ...
Note (for XJ-S36/XJ-S46 model users) Use the setup menu (page 11) to select the color mode when you want in ). 2 Use the [T] and [S] keys to move the the center of...optimize the projected image in the projected image. 2 Use the cursor keys to move the highlighting to the color mode you have an external device connected to the projector's USB port. z For details on what each color...one step. Holding down the [D-ZOOM +] key continually enlarges the image. Selecting the Color Mode You can use the cursor keys to scroll the view to other parts of the [D-ZOOM +] key enlarges the image ...
Owners Manual
Page 8
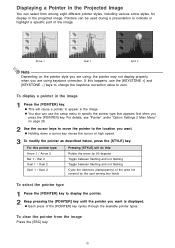
... display in the image 1 Press the [POINTER] key. For details, see "Pointer" under "Option Settings 2 Main Menu" on the pointer style you are using, the pointer may not display properly when you want . To display a pointer in the projected image. z Each press of the image. z You also can... in the image. For this pointer type: Pressing [STYLE] will cause a pointer to zero. Arrow 1 Oval 1 Spot 2 Note Depending on page 26. 2 Use the cursor keys to move the pointer to specify the pointer type that appears first when you want is displayed. To clear the pointer from...
... display in the image 1 Press the [POINTER] key. For details, see "Pointer" under "Option Settings 2 Main Menu" on the pointer style you are using, the pointer may not display properly when you want . To display a pointer in the projected image. z Each press of the image. z You also can... in the image. For this pointer type: Pressing [STYLE] will cause a pointer to zero. Arrow 1 Oval 1 Spot 2 Note Depending on page 26. 2 Use the cursor keys to move the pointer to specify the pointer type that appears first when you want is displayed. To clear the pointer from...
Owners Manual
Page 9
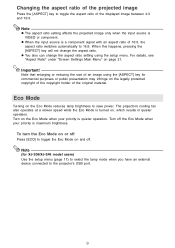
...Mode Turning on page 21. Note (for commercial purposes or public presentation may infringe on the Eco Mode when your priority is maximum brightness. The projector's cooling fan also operates at a slower speed while the Eco Mode is quieter operation. z You also can change the aspect ratio. Important!... the [ASPECT] key will not change the aspect ratio setting using the [ASPECT] key for XJ-S36/XJ-S46 model users) Use the setup menu (page 11) to select the lamp mode when you have an external device connected to the projector's USB port. 9 Turn off the Eco Mode when your priority...
...Mode Turning on page 21. Note (for commercial purposes or public presentation may infringe on the Eco Mode when your priority is maximum brightness. The projector's cooling fan also operates at a slower speed while the Eco Mode is quieter operation. z You also can change the aspect ratio. Important!... the [ASPECT] key will not change the aspect ratio setting using the [ASPECT] key for XJ-S36/XJ-S46 model users) Use the setup menu (page 11) to select the lamp mode when you have an external device connected to the projector's USB port. 9 Turn off the Eco Mode when your priority...
Owners Manual
Page 10
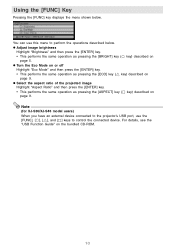
... [FUNC], [ ], [U], and […] keys to perform the operations described below . Note (for XJ-S36/XJ-S46 model users) When you have an external device connected to the projector's USB port, use this menu to control the connected device. z Select the aspect ratio of the projected image Highlight "Aspect Ratio" and then press the [ENTER...
... [FUNC], [ ], [U], and […] keys to perform the operations described below . Note (for XJ-S36/XJ-S46 model users) When you have an external device connected to the projector's USB port, use this menu to control the connected device. z Select the aspect ratio of the projected image Highlight "Aspect Ratio" and then press the [ENTER...
Owners Manual
Page 11
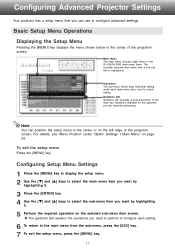
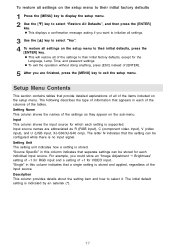
... Setup Menu Settings 1 Press the [MENU] key to display the setup menu. 2 Use the [T] and [S] keys to select the main menu item you want by highlighting it. 5 Perform the required operation on the XJ-S36/XJ-S46) main menu items. The currently selected main menu item is the one that you... displays the menu shown below in the center or on page 24. To exit the setup menu Press the [MENU] key. Configuring Advanced Projector Settings Your projector has a setup menu that is highlighted. Main menu The main menu includes eight (nine on the selected sub-menu item screen. For details...
... Setup Menu Settings 1 Press the [MENU] key to display the setup menu. 2 Use the [T] and [S] keys to select the main menu item you want by highlighting it. 5 Perform the required operation on the XJ-S36/XJ-S46) main menu items. The currently selected main menu item is the one that you... displays the menu shown below in the center or on page 24. To exit the setup menu Press the [MENU] key. Configuring Advanced Projector Settings Your projector has a setup menu that is highlighted. Main menu The main menu includes eight (nine on the selected sub-menu item screen. For details...
Owners Manual
Page 12
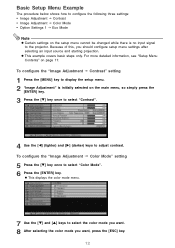
...the "Image Adjustment J Contrast" setting 1 Press the [MENU] key to display the setup menu. 2 "Image Adjustment" is no input signal to the projector. To configure the "Image Adjustment J Color Mode" setting 5 Press the [T] key once to select the color mode you want. 8 After selecting the ...setup menu settings after selecting an input source and starting projection. z This example covers basic steps only. z This displays the color mode menu. 7 Use the [T] and [S] keys to select "Color Mode". 6 Press the [ENTER] key. Basic Setup Menu Example The procedure below shows how to configure...
...the "Image Adjustment J Contrast" setting 1 Press the [MENU] key to display the setup menu. 2 "Image Adjustment" is no input signal to the projector. To configure the "Image Adjustment J Color Mode" setting 5 Press the [T] key once to select the color mode you want. 8 After selecting the ...setup menu settings after selecting an input source and starting projection. z This example covers basic steps only. z This displays the color mode menu. 7 Use the [T] and [S] keys to select "Color Mode". 6 Press the [ENTER] key. Basic Setup Menu Example The procedure below shows how to configure...
Owners Manual
Page 13
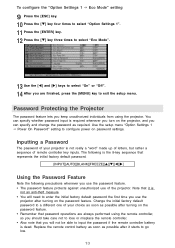
... measure. • You will need to enter the initial factory default password the first time you use of your choice as soon as possible after turning on the projector, and you can specify whether password input is required whenever you turn on the password feature. •...; Remember that it starts to go low. 13 The following precautions whenever you use the password feature. • The password feature protects against unauthorized use the projector after turning on password settings. Replace the remote control battery as soon as possible after it is ...
... measure. • You will need to enter the initial factory default password the first time you use of your choice as soon as possible after turning on the projector, and you can specify whether password input is required whenever you turn on the password feature. •...; Remember that it starts to go low. 13 The following precautions whenever you use the password feature. • The password feature protects against unauthorized use the projector after turning on password settings. Replace the remote control battery as soon as possible after it is ...
Owners Manual
Page 14
...the settings of your password... Keep a written record of your CASIO distributor to enter it up when necessary. If you forget your password! Having your password cleared using the procedure described above . z If the projector is still protected by the factory default password, perform the key... below to have the password cleared. 1. You will not be able to use the projector if you bring the following two items to your projector, except for some reason. Projector unit Note that your CASIO distributor will not be able to their initial factory defaults. Note that you ...
...the settings of your password... Keep a written record of your CASIO distributor to enter it up when necessary. If you forget your password! Having your password cleared using the procedure described above . z If the projector is still protected by the factory default password, perform the key... below to have the password cleared. 1. You will not be able to use the projector if you bring the following two items to your projector, except for some reason. Projector unit Note that your CASIO distributor will not be able to their initial factory defaults. Note that you ...

Owners Manual
Page 15
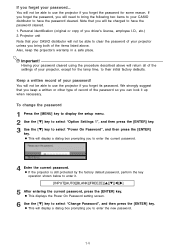
...you entered in step 7, the message "The password you are finished, press the [MENU] key to appear. Entering the Password when Turning On the Projector When you to appear on page 14. z You can perform the projection size adjustment operation ([ZOOM +] / [ZOOM -] keys), focus operation ([... [S], [T], [W], [X], [FUNC] 8 After entering the new password, press the [ENTER] key. z This will be accessible to exit the setup menu. Note You can use any of the following keys as part of the procedure under "To change the password" on the projection screen. indicates that you want to turn...
...you entered in step 7, the message "The password you are finished, press the [MENU] key to appear. Entering the Password when Turning On the Projector When you to appear on page 14. z You can perform the projection size adjustment operation ([ZOOM +] / [ZOOM -] keys), focus operation ([... [S], [T], [W], [X], [FUNC] 8 After entering the new password, press the [ENTER] key. z This will be accessible to exit the setup menu. Note You can use any of the following keys as part of the procedure under "To change the password" on the projection screen. indicates that you want to turn...
Owners Manual
Page 16
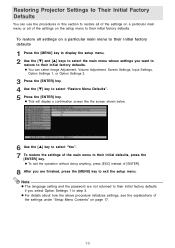
... defaults 1 Press the [MENU] key to display the setup menu. 2 Use the [T] and [S] keys to select the main menu whose settings you select Option Settings 1 in step 3. Restoring Projector Settings to Their Initial Factory Defaults You can select Image Adjustment, Volume Adjustment..., Screen Settings, Input Settings, Option Settings 1, or Option Settings 2. 3 Press the [ENTER] key. 4 Use the [T] key to select "Restore Menu Defaults". 5...
... defaults 1 Press the [MENU] key to display the setup menu. 2 Use the [T] and [S] keys to select the main menu whose settings you select Option Settings 1 in step 3. Restoring Projector Settings to Their Initial Factory Defaults You can select Image Adjustment, Volume Adjustment..., Screen Settings, Input Settings, Option Settings 1, or Option Settings 2. 3 Press the [ENTER] key. 4 Use the [T] key to select "Restore Menu Defaults". 5...
Owners Manual
Page 17
... select "Yes". 4 To restore all of the settings as R (RGB input), C (component video input), V (video input), and U (USB input, XJ-S36/XJ-S46 only). Input This column shows the input source for each of the columns of +1 for RGB input and a setting of the tables. Input source...key to select "Restore All Defaults", and then press the [ENTER] key. z This displays a confirmation message asking if you want to initialize all settings. 3 Use the [S] key to select it. z To exit the operation without doing anything, press [ESC] instead of [ENTER]. 5 After you could store an "Image ...
... select "Yes". 4 To restore all of the settings as R (RGB input), C (component video input), V (video input), and U (USB input, XJ-S36/XJ-S46 only). Input This column shows the input source for each of the columns of +1 for RGB input and a setting of the tables. Input source...key to select "Restore All Defaults", and then press the [ENTER] key. z This displays a confirmation message asking if you want to initialize all settings. 3 Use the [S] key to select it. z To exit the operation without doing anything, press [ESC] instead of [ENTER]. 5 After you could store an "Image ...
Owners Manual
Page 18
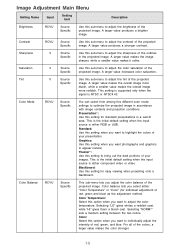
...the color temperature. Color: Select this option when you want to highlight the colors of the projected image. Contrast RCVU Source Specific Use this sub-menu to adjust the contrast of the projected image. Color balance lets you want photographs and graphics to appear natural. ...sets a medium setting between the two colors. A larger value increases color saturation. For all of the projected Specific image. Tint RCV Source Use this sub-menu to adjust the tint of the colors, a larger value makes the color stronger. 18 This setting is supported only when...
...the color temperature. Color: Select this option when you want to highlight the colors of the projected image. Contrast RCVU Source Specific Use this sub-menu to adjust the contrast of the projected image. Color balance lets you want photographs and graphics to appear natural. ...sets a medium setting between the two colors. A larger value increases color saturation. For all of the projected Specific image. Tint RCV Source Use this sub-menu to adjust the tint of the colors, a larger value makes the color stronger. 18 This setting is supported only when...
Owners Manual
Page 19
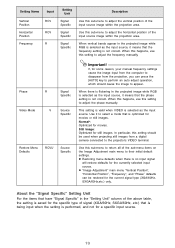
Use this sub-menu to the projector's VIDEO terminal. When vertical bands appear in the "Setting Unit"...[AUTO] key to perform an auto adjust operation, which should be used when projecting still images from the projection, you can be restored for the current signal type (XGA/60Hz, SXGA/60Hz,etc.) only. Normal*: Optimized for the currently ...Name Input Vertical Position Horizontal Position Frequency RCV RCV R Setting Unit Signal Specific Signal Specific Signal Specific Description Use this sub-menu to select a mode that is optimized for movies or still images. Phase R Signal ...
Use this sub-menu to the projector's VIDEO terminal. When vertical bands appear in the "Setting Unit"...[AUTO] key to perform an auto adjust operation, which should be used when projecting still images from the projection, you can be restored for the current signal type (XGA/60Hz, SXGA/60Hz,etc.) only. Normal*: Optimized for the currently ...Name Input Vertical Position Horizontal Position Frequency RCV RCV R Setting Unit Signal Specific Signal Specific Signal Specific Description Use this sub-menu to select a mode that is optimized for movies or still images. Phase R Signal ...

Owners Manual
Page 20
z Changing this setting when there is no input signal changes the volume setting of the projector's speaker. Restore Menu Defaults RCVUN Source Specific Use this sub-menu to return Volume to adjust the volume level of the currently selected signal source. z Restoring menu defaults when there is no input signal will restore defaults for the currently selected input source. 20 Volume Adjustment Main Menu Setting Name Input Setting Unit Description Volume RCVUN Source Specific Use this sub-menu to its initial default setting.
z Changing this setting when there is no input signal changes the volume setting of the projector's speaker. Restore Menu Defaults RCVUN Source Specific Use this sub-menu to return Volume to adjust the volume level of the currently selected signal source. z Restoring menu defaults when there is no input signal will restore defaults for the currently selected input source. 20 Volume Adjustment Main Menu Setting Name Input Setting Unit Description Volume RCVUN Source Specific Use this sub-menu to its initial default setting.
Owners Manual
Page 21
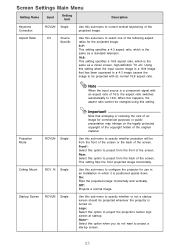
...aspect ratio of 16:9, the aspect ratio switches automatically to 16:9. This setting flips the front projected image horizontally. Use this sub-menu to configure the projector for use in an installation in logo screen at startup. Note When the input source is a 16:9 image that enlarging or...the legally protected copyright of the copyright holder of the original material. When this happens, the aspect ratio cannot be changed using this option to project the projector's built-in which is positioned upside down. Logo: Select this setting. None*: Select this option to project from the...
...aspect ratio of 16:9, the aspect ratio switches automatically to 16:9. This setting flips the front projected image horizontally. Use this sub-menu to configure the projector for use in an installation in logo screen at startup. Note When the input source is a 16:9 image that enlarging or...the legally protected copyright of the copyright holder of the original material. When this happens, the aspect ratio cannot be changed using this option to project the projector's built-in which is positioned upside down. Logo: Select this setting. None*: Select this option to project from the...

Owners Manual
Page 22
Use this sub-menu to return all of the currently selected input source. 22 Logo: Select this option to their initial defaults, regardless of the sub-menu items on the Screen Settings main menu to project the projector's built-in logo screen. Black*: Select this option to project a..." settings are always returned to project a blue screen. Blue*: Select this option to project the projector's built-in logo screen. Logo: Select this option to project a blue screen. Use this sub-menu to specify what should be projected when there is no input signal will restore defaults...
Use this sub-menu to return all of the currently selected input source. 22 Logo: Select this option to their initial defaults, regardless of the sub-menu items on the Screen Settings main menu to project the projector's built-in logo screen. Black*: Select this option to project a..." settings are always returned to project a blue screen. Blue*: Select this option to project the projector's built-in logo screen. Logo: Select this option to project a blue screen. Use this sub-menu to specify what should be projected when there is no input signal will restore defaults...
