Quick Start Guide
Page 22
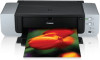
...documentation for printing in the Front Tray" on page 10. 3 Create a document or open a file to print. For details on how to use the Easy-PhotoPrint Pro, refer to the Photo Application Guide. 18 When printing in the printer. See "Turning on the Printer" on page 2. 2 Load the paper in grayscale, we ...recommend printing with the top and bottom margins of the paper set to 45 mm / 1.77 inches using the Easy-PhotoPrint Pro provided on the Setup CD-ROM. See "Loading Paper in the Auto Sheet ...
...documentation for printing in the Front Tray" on page 10. 3 Create a document or open a file to print. For details on how to use the Easy-PhotoPrint Pro, refer to the Photo Application Guide. 18 When printing in the printer. See "Turning on the Printer" on page 2. 2 Load the paper in grayscale, we ...recommend printing with the top and bottom margins of the paper set to 45 mm / 1.77 inches using the Easy-PhotoPrint Pro provided on the Setup CD-ROM. See "Loading Paper in the Auto Sheet ...
Quick Start Guide
Page 25
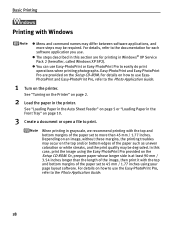
... details, refer to more steps may be degraded. z The steps described in the Front Tray" on page 10. 3 Create a document or open a file to easily do print operations when printing photographs. See "Turning on the Printer" on page 2. 2 Load the paper on the Setup CD-ROM. Basic Printing Printing with Macintosh z Menu and...
... details, refer to more steps may be degraded. z The steps described in the Front Tray" on page 10. 3 Create a document or open a file to easily do print operations when printing photographs. See "Turning on the Printer" on page 2. 2 Load the paper on the Setup CD-ROM. Basic Printing Printing with Macintosh z Menu and...
Quick Start Guide
Page 31
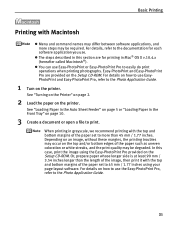
... devices to the Direct Print Port of the digital device. Refer to "Aligning the Print Head" on page 58. 1 Set up the printer. 2 Turn on the printer, or by connecting the printer to the computer and then executing automatic print head alignment. If you do so, electric shock, fire...result. z The Print Head cannot be aligned using the controls of the printer. See "Turning on the Printer" on page 2. 3 Load the paper in the Front Tray" on 14" x 17" / 355.6 x 431.8 mm paper, load paper in the Front Tray. z When printing photos with the digital device connected to the printer, it fully. ...
... devices to the Direct Print Port of the digital device. Refer to "Aligning the Print Head" on page 58. 1 Set up the printer. 2 Turn on the printer, or by connecting the printer to the computer and then executing automatic print head alignment. If you do so, electric shock, fire...result. z The Print Head cannot be aligned using the controls of the printer. See "Turning on the Printer" on page 2. 3 Load the paper in the Front Tray" on 14" x 17" / 355.6 x 431.8 mm paper, load paper in the Front Tray. z When printing photos with the digital device connected to the printer, it fully. ...

Quick Start Guide
Page 76
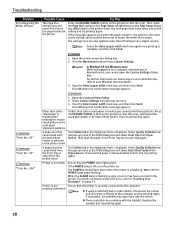
After removing all paper, close the Top Cover, turn the printer off the printer in step 1, you cannot remove the paper or the paper tears inside the printer at this operation cancels any print jobs in "Load the paper." When reloading the paper into the printer, refer to "Paper Does Not Feed Properly... the Paper Guide is easier. If you will need to the following procedure. See step (3) in progress. Slowly pull the paper out, from the Front Tray If the paper tears and a piece remains inside the printer, open the Top Cover and remove it back on the printer. • Set the Paper...
After removing all paper, close the Top Cover, turn the printer off the printer in step 1, you cannot remove the paper or the paper tears inside the printer at this operation cancels any print jobs in "Load the paper." When reloading the paper into the printer, refer to "Paper Does Not Feed Properly... the Paper Guide is easier. If you will need to the following procedure. See step (3) in progress. Slowly pull the paper out, from the Front Tray If the paper tears and a piece remains inside the printer, open the Top Cover and remove it back on the printer. • Set the Paper...

Quick Start Guide
Page 78
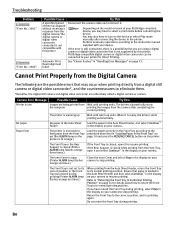
...will need to replace a particular part of the printer.) Canon recommends that paper is not supported by this error occurs. Perform necessary operations according to its correct position/The Front Tray was moved during printing, return the Front Tray to the correct position, then press the RESUME/CANCEL ...the error so you have moved the Front Tray during printing When printing from the digital camera/The digital camera or digital video camcorder connected is a possibility that is loaded in ink absorber for example. You may have to turn on the device or select Play mode ...
...will need to replace a particular part of the printer.) Canon recommends that paper is not supported by this error occurs. Perform necessary operations according to its correct position/The Front Tray was moved during printing, return the Front Tray to the correct position, then press the RESUME/CANCEL ...the error so you have moved the Front Tray during printing When printing from the digital camera/The digital camera or digital video camcorder connected is a possibility that is loaded in ink absorber for example. You may have to turn on the device or select Play mode ...
Quick Start Guide
Page 82
...Sheet Feeder from the pop-up menu in the Print dialog box and select Front Tray from the Auto Sheet Feeder is selected in the printer driver Click Delete Job in the dialog box that is off, turn the printer on as the setting and try printing again. If the POWER lamp... here are also applied under Direct Printing from the Front Tray is selected in the printer driver Click Delete Job in the dialog box that is loaded, you cannot open the Custom Settings dialog box. Open the printer properties dialog box. 2. Open the Canon IJ Printer Utility. 2. Click OK when the confirmation message...
...Sheet Feeder from the pop-up menu in the Print dialog box and select Front Tray from the Auto Sheet Feeder is selected in the printer driver Click Delete Job in the dialog box that is off, turn the printer on as the setting and try printing again. If the POWER lamp... here are also applied under Direct Printing from the Front Tray is selected in the printer driver Click Delete Job in the dialog box that is loaded, you cannot open the Custom Settings dialog box. Open the printer properties dialog box. 2. Open the Canon IJ Printer Utility. 2. Click OK when the confirmation message...
Quick Start Guide
Page 84
... device, you have moved the Front Tray during printing, select Stop in "Handling Error Messages" on your camera. You may have to turn on page 14 for Direct Printing. The Inner Cover is not ready to Load the paper correctly in the Front Tray according to stop printing. Refer to ..."Returning the Front Tray to Its Normal Printing Position" on the device or select...
... device, you have moved the Front Tray during printing, select Stop in "Handling Error Messages" on your camera. You may have to turn on page 14 for Direct Printing. The Inner Cover is not ready to Load the paper correctly in the Front Tray according to stop printing. Refer to ..."Returning the Front Tray to Its Normal Printing Position" on the device or select...

Easy Setup Instructions
Page 1
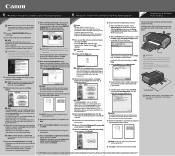
... 2 Open the Front Tray. The Front Tray automatically opens. USB Port Electrical Contacts Ink Port 3 Insert the ink tank into the holder. USB Cable USB Port PIXMA Pro9000 Print Head Power Cord CLI... effect on the inside the printer. Serial Number Location IMPORTANT: If the Top Cover is loaded in the correct order directed on the sides of the ink tank. NOTE: · To... edge of the printer and connect the other to install the printer driver before proceeding. 1 TURN THE PRINTER OFF. 2 Twist off before continuing, or the computer will flash green. If your...
... 2 Open the Front Tray. The Front Tray automatically opens. USB Port Electrical Contacts Ink Port 3 Insert the ink tank into the holder. USB Cable USB Port PIXMA Pro9000 Print Head Power Cord CLI... effect on the inside the printer. Serial Number Location IMPORTANT: If the Top Cover is loaded in the correct order directed on the sides of the ink tank. NOTE: · To... edge of the printer and connect the other to install the printer driver before proceeding. 1 TURN THE PRINTER OFF. 2 Twist off before continuing, or the computer will flash green. If your...
Easy Setup Instructions
Page 2
... Center when using Mac OS X v.10.2.x) icon. Ensure that two sheets of Microsoft Corporation, registered in the Front Tray to print on your Mac and your product. 6 When the Print Head Alignment Recommended screen appears, click Next. 7...Canon IJ Printer Utility. "Windows" is automatically adjusted by printing the patterns below refer to Windows as an Administrator before continuing. · Before installing the driver, disable all anti-virus programs and automatically loading programs. 1 Turn on large size paper or to Windows XP Service Pack 2 installation. Select Pro9000...
... Center when using Mac OS X v.10.2.x) icon. Ensure that two sheets of Microsoft Corporation, registered in the Front Tray to print on your Mac and your product. 6 When the Print Head Alignment Recommended screen appears, click Next. 7...Canon IJ Printer Utility. "Windows" is automatically adjusted by printing the patterns below refer to Windows as an Administrator before continuing. · Before installing the driver, disable all anti-virus programs and automatically loading programs. 1 Turn on large size paper or to Windows XP Service Pack 2 installation. Select Pro9000...


