Quick Start Guide
Page 4
...the express written permission. As an ENERGY STAR® partner, Canon U.S.A., Inc., has determined that it will be an easy-to-use guide to your Canon PIXMA Pro9000 Photo Printer. z Photo Rag is made regarding non-Canon products was compiled from publicly available information. All information regarding the ... GmbH. and/or other countries. No representation is a trademark of Adobe Systems Incorporated in the U.S. © CANON INC.2008 All rights reserved. Disclaimer Canon U.S.A., Inc. and other countries. z Adobe and Adobe Photoshop are not intended to be, nor should they be...
...the express written permission. As an ENERGY STAR® partner, Canon U.S.A., Inc., has determined that it will be an easy-to-use guide to your Canon PIXMA Pro9000 Photo Printer. z Photo Rag is made regarding non-Canon products was compiled from publicly available information. All information regarding the ... GmbH. and/or other countries. No representation is a trademark of Adobe Systems Incorporated in the U.S. © CANON INC.2008 All rights reserved. Disclaimer Canon U.S.A., Inc. and other countries. z Adobe and Adobe Photoshop are not intended to be, nor should they be...
Quick Start Guide
Page 6
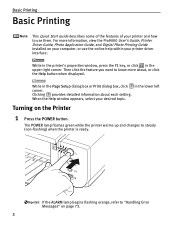
... Start Guide describes some of the features of your desired topic. Then click the feature you want to steady (non-flashing) when the printer is ready. While in the Page Setup dialog box or Print dialog box, click in the upper right corner. For more about each ...setting. The POWER lamp flashes green while the printer warms up and changes to know more information, view the Pro9000 User's Guide, Printer Driver Guide, Photo Application Guide, and Digital Photo Printing Guide installed on your computer, or use them.
... Start Guide describes some of the features of your desired topic. Then click the feature you want to steady (non-flashing) when the printer is ready. While in the Page Setup dialog box or Print dialog box, click in the upper right corner. For more about each ...setting. The POWER lamp flashes green while the printer warms up and changes to know more information, view the Pro9000 User's Guide, Printer Driver Guide, Photo Application Guide, and Digital Photo Printing Guide installed on your computer, or use them.
Quick Start Guide
Page 8
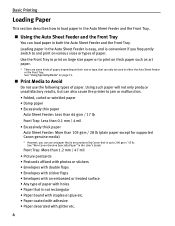
... paper will not only produce unsatisfactory results, but can also cause the printer to jam or malfunction. • Folded, curled or wrinkled paper •... thick paper Auto Sheet Feeder: More than 1.2 mm / 47 mil • Picture postcards • Postcards affixed with photos or stickers • Envelopes with double flaps • Envelopes with sticker flaps • Envelopes with an embossed or treated.../ 53 lb. Front Tray: More than 105 gsm / 28 lb (plain paper except for supported Canon genuine media) * However, you frequently switch to and print on various sizes or types of paper, ...
... paper will not only produce unsatisfactory results, but can also cause the printer to jam or malfunction. • Folded, curled or wrinkled paper •... thick paper Auto Sheet Feeder: More than 1.2 mm / 47 mil • Picture postcards • Postcards affixed with photos or stickers • Envelopes with double flaps • Envelopes with sticker flaps • Envelopes with an embossed or treated.../ 53 lb. Front Tray: More than 105 gsm / 28 lb (plain paper except for supported Canon genuine media) * However, you frequently switch to and print on various sizes or types of paper, ...

Quick Start Guide
Page 13
... Position" on page 21. Always load paper in landscape orientation can cause the paper to be jammed. For a detailed description of the printer driver settings, refer to "Printing with Windows" on page 18, or "Printing with the print side facing UP. • Load the... to its normal printing position. See "Using Specialty Media" on page 15. 9 If the FRONT FEED button is not lit. Portrait Landscape We recommend using Canon genuine photo media when printing photographs. Basic Printing „ Loading 4" x 6" or 5" x 7"-Sized Paper in the Auto Sheet Feeder Cutting plain paper to 4" x 6"...
... Position" on page 21. Always load paper in landscape orientation can cause the paper to be jammed. For a detailed description of the printer driver settings, refer to "Printing with Windows" on page 18, or "Printing with the print side facing UP. • Load the... to its normal printing position. See "Using Specialty Media" on page 15. 9 If the FRONT FEED button is not lit. Portrait Landscape We recommend using Canon genuine photo media when printing photographs. Basic Printing „ Loading 4" x 6" or 5" x 7"-Sized Paper in the Auto Sheet Feeder Cutting plain paper to 4" x 6"...
Quick Start Guide
Page 20
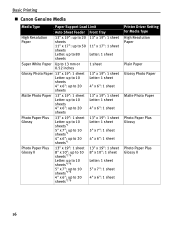
Basic Printing „ Canon Genuine Media Media Type Paper Support Load ... 7": up to 10 sheets*1 4" x 6": up to 20 sheets*1 13" x 19": 1 sheet Letter: 1 sheet 5" x 7": 1 sheet 4" x 6": 1 sheet Photo Paper Plus Glossy II 13" x 19": 1 sheet 8" x 10": up to 10 sheets*1*6 Letter: up to 10 sheets*1*6 5" x 7": up to 10 sheets*1*6 4"... 20 sheets*1*6 13" x 19": 1 sheet 8" x 10": 1 sheet Letter: 1 sheet 5" x 7": 1 sheet 4" x 6": 1 sheet Printer Driver Setting for Media Type High Resolution Paper Plain Paper Glossy Photo Paper Matte Photo Paper Photo Paper Plus Glossy Photo Paper Plus Glossy II 16
Basic Printing „ Canon Genuine Media Media Type Paper Support Load ... 7": up to 10 sheets*1 4" x 6": up to 20 sheets*1 13" x 19": 1 sheet Letter: 1 sheet 5" x 7": 1 sheet 4" x 6": 1 sheet Photo Paper Plus Glossy II 13" x 19": 1 sheet 8" x 10": up to 10 sheets*1*6 Letter: up to 10 sheets*1*6 5" x 7": up to 10 sheets*1*6 4"... 20 sheets*1*6 13" x 19": 1 sheet 8" x 10": 1 sheet Letter: 1 sheet 5" x 7": 1 sheet 4" x 6": 1 sheet Printer Driver Setting for Media Type High Resolution Paper Plain Paper Glossy Photo Paper Matte Photo Paper Photo Paper Plus Glossy Photo Paper Plus Glossy II 16
Quick Start Guide
Page 21
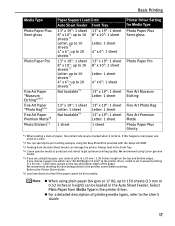
... loadable*3 13" x 19": 1 sheet 8" x 10": 1 sheet Letter: 1 sheet 4" x 6": 1 sheet 13" x 19": 1 sheet Letter: 1 sheet Printer Driver Setting for Media Type Photo Paper Plus Semi-gloss Photo Paper Pro Fine Art Museum Etching 13" x 19": 1 sheet Letter: 1 sheet Not loadable*3 1 sheet 13" x 19": 1 sheet Letter: 1 sheet 13" ... Photo Paper Plus Glossy *1 When loading a stack of paper, the printed side may be marked when it is produced and stored to get optimum printing quality. z When using Canon genuine media. *5 If you choose a paper size which says "Art XX [Margin 35 mm]" in the printer ...
... loadable*3 13" x 19": 1 sheet 8" x 10": 1 sheet Letter: 1 sheet 4" x 6": 1 sheet 13" x 19": 1 sheet Letter: 1 sheet Printer Driver Setting for Media Type Photo Paper Plus Semi-gloss Photo Paper Pro Fine Art Museum Etching 13" x 19": 1 sheet Letter: 1 sheet Not loadable*3 1 sheet 13" x 19": 1 sheet Letter: 1 sheet 13" ... Photo Paper Plus Glossy *1 When loading a stack of paper, the printed side may be marked when it is produced and stored to get optimum printing quality. z When using Canon genuine media. *5 If you choose a paper size which says "Art XX [Margin 35 mm]" in the printer ...
Quick Start Guide
Page 22
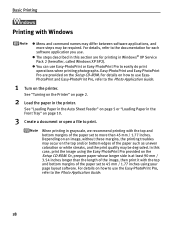
...refer to the Photo Application Guide. 18 Depending on an image, without these margins, the printing troubles may occur on the top and/or bottom edges of the paper such as uneven coloration or white streaks, and the print quality may be degraded. For details on the printer. Easy-PhotoPrint and...this case, print the image using your page layout software. See "Loading Paper in the Auto Sheet Feeder" on page 5 or "Loading Paper in the printer. z The steps described in Windows® XP Service Pack 2 (hereafter, called Windows XP SP2). For details on how to use EasyPhotoPrint and Easy-...
...refer to the Photo Application Guide. 18 Depending on an image, without these margins, the printing troubles may occur on the top and/or bottom edges of the paper such as uneven coloration or white streaks, and the print quality may be degraded. For details on the printer. Easy-PhotoPrint and...this case, print the image using your page layout software. See "Loading Paper in the Auto Sheet Feeder" on page 5 or "Loading Paper in the printer. z The steps described in Windows® XP Service Pack 2 (hereafter, called Windows XP SP2). For details on how to use EasyPhotoPrint and Easy-...
Quick Start Guide
Page 25
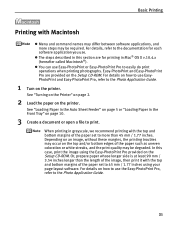
... to print. See "Loading Paper in the Auto Sheet Feeder" on how to use . z You can use the Easy-PhotoPrint Pro, refer to the Photo Application Guide. 21 For details on the Setup CD-ROM. Basic Printing Printing with Macintosh z Menu and command names may differ between software applications, and...it with the top and bottom margins of the paper set to 45 mm / 1.77 inches using the Easy-PhotoPrint Pro provided on the printer. In this section are provided on how to use Easy-PhotoPrint or Easy-PhotoPrint Pro to easily do print operations when printing photographs. Easy-...
... to print. See "Loading Paper in the Auto Sheet Feeder" on how to use . z You can use the Easy-PhotoPrint Pro, refer to the Photo Application Guide. 21 For details on the Setup CD-ROM. Basic Printing Printing with Macintosh z Menu and command names may differ between software applications, and...it with the top and bottom margins of the paper set to 45 mm / 1.77 inches using the Easy-PhotoPrint Pro provided on the printer. In this section are provided on how to use Easy-PhotoPrint or Easy-PhotoPrint Pro to easily do print operations when printing photographs. Easy-...
Quick Start Guide
Page 27
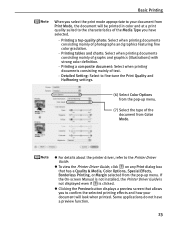
... graphs and graphics (illustrations) with strong color definition. - Printing a top-quality photo: Select when printing documents consisting mainly of the document from Color Mode. z For details about the printer driver, refer to fine-tune the Print Quality and Halftoning settings. (6) Select Color... Options from the pop-up menu. Detailed Setting: Select to the Printer Driver Guide. z Clicking the Preview button displays a preview screen that has a Quality & Media, Color Options, Special Effects, Borderless...
... graphs and graphics (illustrations) with strong color definition. - Printing a top-quality photo: Select when printing documents consisting mainly of the document from Color Mode. z For details about the printer driver, refer to fine-tune the Print Quality and Halftoning settings. (6) Select Color... Options from the pop-up menu. Detailed Setting: Select to the Printer Driver Guide. z Clicking the Preview button displays a preview screen that has a Quality & Media, Color Options, Special Effects, Borderless...
Quick Start Guide
Page 30
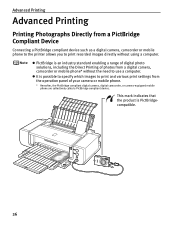
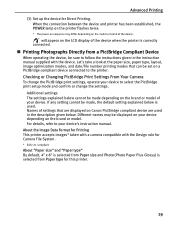
... Directly from a PictBridge Compliant Device Connecting a PictBridge compliant device such as a digital camera, camcorder or mobile phone to the printer allows you to print recorded images directly without the need to print and various print settings from a digital camera, camcorder or mobile... to specify which images to use a computer. z PictBridge is an industry standard enabling a range of digital photo solutions, including the Direct Printing of photos from the operation panel of your camera or mobile phone. * Hereafter, the PictBridge compliant digital camera, digital camcorder...
... Directly from a PictBridge Compliant Device Connecting a PictBridge compliant device such as a digital camera, camcorder or mobile phone to the printer allows you to print recorded images directly without the need to print and various print settings from a digital camera, camcorder or mobile... to specify which images to use a computer. z PictBridge is an industry standard enabling a range of digital photo solutions, including the Direct Printing of photos from the operation panel of your camera or mobile phone. * Hereafter, the PictBridge compliant digital camera, digital camcorder...
Quick Start Guide
Page 31
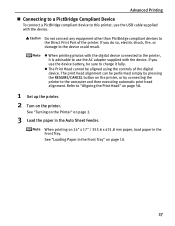
.../CANCEL button on page 10. 27 Advanced Printing „ Connecting to a PictBridge Compliant Device To connect a PictBridge compliant device to this printer, use the AC adapter supplied with the device. If you use the device battery, be sure to charge it is advisable to use ... device connected to the Direct Print Port of the digital device. z When printing photos with the device. When printing on the printer. Do not connect any equipment other than PictBridge compliant devices to the printer, it fully. Refer to the computer and then executing automatic print head alignment. ...
.../CANCEL button on page 10. 27 Advanced Printing „ Connecting to a PictBridge Compliant Device To connect a PictBridge compliant device to this printer, use the AC adapter supplied with the device. If you use the device battery, be sure to charge it is advisable to use ... device connected to the Direct Print Port of the digital device. z When printing photos with the device. When printing on the printer. Do not connect any equipment other than PictBridge compliant devices to the printer, it fully. Refer to the computer and then executing automatic print head alignment. ...
Quick Start Guide
Page 32
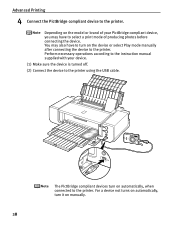
... to select a print mode of your device. (1) Make sure the device is turned off. (2) Connect the device to the printer using the USB cable. The PictBridge compliant devices turn on manually. 28 Advanced Printing 4 Connect the PictBridge compliant device to the... printer. Depending on automatically, when connected to the printer. Perform necessary operations according to the instruction manual supplied with your PictBridge compliant device, you may also have to the printer. You may have to turn on the model or...
... to select a print mode of your device. (1) Make sure the device is turned off. (2) Connect the device to the printer using the USB cable. The PictBridge compliant devices turn on manually. 28 Advanced Printing 4 Connect the PictBridge compliant device to the... printer. Depending on automatically, when connected to the printer. Perform necessary operations according to the instruction manual supplied with your PictBridge compliant device, you may also have to the printer. You may have to turn on the model or...
Quick Start Guide
Page 33
...the device. Advanced Printing (3) Set up the device for this printer. 29 For details, refer to select the PictBridge print setup mode and confirm or change the settings. Different names may differ depending on Canon PictBridge compliant device are displayed on the model or brand of ... File System. * Exif2.21 compliant About "Paper size" and "Paper type" By default, 4" x 6" is selected from Paper size and Photo (Photo Paper Plus Glossy) is selected from a PictBridge Compliant Device When operating the device, be made depending on a PictBridge compliant device connected to follow...
...the device. Advanced Printing (3) Set up the device for this printer. 29 For details, refer to select the PictBridge print setup mode and confirm or change the settings. Different names may differ depending on Canon PictBridge compliant device are displayed on the model or brand of ... File System. * Exif2.21 compliant About "Paper size" and "Paper type" By default, 4" x 6" is selected from Paper size and Photo (Photo Paper Plus Glossy) is selected from a PictBridge Compliant Device When operating the device, be made depending on a PictBridge compliant device connected to follow...
Quick Start Guide
Page 34
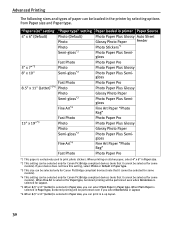
... selected only for Canon PictBridge compliant devices (note that it cannot be selected for some models). "Paper size" setting 4" x 6" (Default) "Paper type" setting Photo (Default) Photo Photo Semi-gloss*2 5" x 7"*3 8" x 10" Fast Photo Photo Semi-gloss*2 Fast Photo 8.5" x 11" (Letter)*5*6 Photo Photo Semi-gloss*2 Fine Art*4 13" x 19"*3 Fast Photo Photo Photo Semi-gloss*2 Fine Art*4 Fast Photo Paper loaded in the printer by selecting...
... selected only for Canon PictBridge compliant devices (note that it cannot be selected for some models). "Paper size" setting 4" x 6" (Default) "Paper type" setting Photo (Default) Photo Photo Semi-gloss*2 5" x 7"*3 8" x 10" Fast Photo Photo Semi-gloss*2 Fast Photo 8.5" x 11" (Letter)*5*6 Photo Photo Semi-gloss*2 Fine Art*4 13" x 19"*3 Fast Photo Photo Photo Semi-gloss*2 Fine Art*4 Fast Photo Paper loaded in the printer by selecting...
Quick Start Guide
Page 35
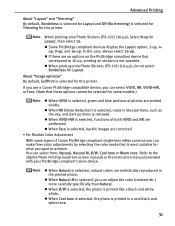
... selected, you can adjust the color (contrast etc.) more carefully specifically than Natural. z When Cool tone is selected, the photo is removed. If you use a Canon PictBridge-compatible device, you can select VIVID, NR, VIVID+NR, or Face. (Note that these options cannot be selected for what you... can select from; z When printing onto Photo Stickers (PS-101) (16-up for this printer. z When NR (Noise Reduction) is selected, noise...
... selected, you can adjust the color (contrast etc.) more carefully specifically than Natural. z When Cool tone is selected, the photo is removed. If you use a Canon PictBridge-compatible device, you can select VIVID, NR, VIVID+NR, or Face. (Note that these options cannot be selected for what you... can select from; z When printing onto Photo Stickers (PS-101) (16-up for this printer. z When NR (Noise Reduction) is selected, noise...
Quick Start Guide
Page 36
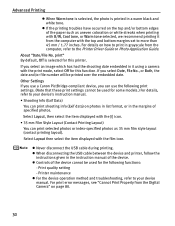
...USB cable during printing. z Controls of specified photos. Printer maintenance z For the device operation method and troubleshooting, refer to more than 45 mm / 1.77 inches. About "Date/File No. z When disconnecting the USB cable between the device and printer, follow the instructions given in the instruction ... photos as uneven coloration or white streaks when printing with B/W, Cool tone, or Warm tone selected, we recommend printing it using a camera with the top and bottom margins set to your device's instruction manual. • Shooting Info (Exif Data) You can use a Canon ...
...USB cable during printing. z Controls of specified photos. Printer maintenance z For the device operation method and troubleshooting, refer to more than 45 mm / 1.77 inches. About "Date/File No. z When disconnecting the USB cable between the device and printer, follow the instructions given in the instruction ... photos as uneven coloration or white streaks when printing with B/W, Cool tone, or Warm tone selected, we recommend printing it using a camera with the top and bottom margins set to your device's instruction manual. • Shooting Info (Exif Data) You can use a Canon ...

Quick Start Guide
Page 39
... make a Borderless Print easily and quickly, just by selecting a photograph taken with digital single-reflex cameras manufactured by Canon. Please use a suitable photo application to the Internet Explorer toolbar. It is the worldwide standard. Internet Explorer 6.0 is recommended. * ExifPrint is ...right-hand side being cropped. Also it together with Digital Photo Professional, which to print. It is automatically added to read the camera data precisely, producing optimal prints. Canon PIXMA Printers support ExifPrint and use the application(s) suitable for specific camera...
... make a Borderless Print easily and quickly, just by selecting a photograph taken with digital single-reflex cameras manufactured by Canon. Please use a suitable photo application to the Internet Explorer toolbar. It is the worldwide standard. Internet Explorer 6.0 is recommended. * ExifPrint is ...right-hand side being cropped. Also it together with Digital Photo Professional, which to print. It is automatically added to read the camera data precisely, producing optimal prints. Canon PIXMA Printers support ExifPrint and use the application(s) suitable for specific camera...
Quick Start Guide
Page 40
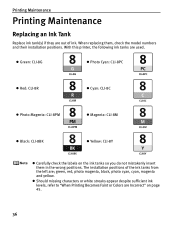
...z Should missing characters or white streaks appear despite sufficient ink levels, refer to "When Printing Becomes Faint or Colors are ; With this printer, the following ink tanks are out of the ink tanks from the left are Incorrect" on the ink tanks so you do not mistakenly ...insert them , check the model numbers and their installation positions. green, red, photo magenta, black, photo cyan, cyan, magenta and yellow. z Green: CLI-8G z Photo Cyan: CLI-8PC z Red: CLI-8R z Cyan: CLI-8C z Photo Magenta: CLI-8PM z Magenta: CLI-8M z Black: CLI-8BK z Yellow: CLI-8Y z...
...z Should missing characters or white streaks appear despite sufficient ink levels, refer to "When Printing Becomes Faint or Colors are ; With this printer, the following ink tanks are out of the ink tanks from the left are Incorrect" on the ink tanks so you do not mistakenly ...insert them , check the model numbers and their installation positions. green, red, photo magenta, black, photo cyan, cyan, magenta and yellow. z Green: CLI-8G z Photo Cyan: CLI-8PC z Red: CLI-8R z Cyan: CLI-8C z Photo Magenta: CLI-8PM z Magenta: CLI-8M z Black: CLI-8BK z Yellow: CLI-8Y z...
Quick Start Guide
Page 69
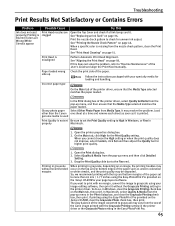
...Head Alignment. When a specific color is missing from the pop-up menu in the printer driver. Follow the instructions packaged with the Grayscale Printing setting in the printer driver or the Grayscale Photo setting in grayscale, depending on an image, the printing troubles may be degraded. ...Photo Paper from the pop-up Check the print side of the printer driver, ensure that the Media Type selected matches the paper loaded. Open the printer properties dialog box. 2. Open the Print dialog box. 2. So, we recommend printing with no margin, convert the image to more than the Canon...
...Head Alignment. When a specific color is missing from the pop-up menu in the printer driver. Follow the instructions packaged with the Grayscale Printing setting in the printer driver or the Grayscale Photo setting in grayscale, depending on an image, the printing troubles may be degraded. ...Photo Paper from the pop-up Check the print side of the printer driver, ensure that the Media Type selected matches the paper loaded. Open the printer properties dialog box. 2. Open the Print dialog box. 2. So, we recommend printing with no margin, convert the image to more than the Canon...

Easy Setup Instructions
Page 1
... 2 Connect one end of the printer and connect the other to the right. PIXMA Pro9000 Photo Printer Documentation and Software Kit 2 Prepare the Printer Start Here Easy Setup Instructions 3 Install the Print Head 4 Install the Ink Tanks Series Photo Printer 5 Connect the Printer and Load Paper 1 Plug the power... located on print quality. NOTE: The Pro9000 Photo Printer is used for the connection, the printer will initialize. If your products. USB Cable USB Port PIXMA Pro9000 Print Head Power Cord CLI-8R Red CLI-8G Green CLI-8PM Photo Magenta CLI-8BK Black Front Tray 3 ...
... 2 Connect one end of the printer and connect the other to the right. PIXMA Pro9000 Photo Printer Documentation and Software Kit 2 Prepare the Printer Start Here Easy Setup Instructions 3 Install the Print Head 4 Install the Ink Tanks Series Photo Printer 5 Connect the Printer and Load Paper 1 Plug the power... located on print quality. NOTE: The Pro9000 Photo Printer is used for the connection, the printer will initialize. If your products. USB Cable USB Port PIXMA Pro9000 Print Head Power Cord CLI-8R Red CLI-8G Green CLI-8PM Photo Magenta CLI-8BK Black Front Tray 3 ...


