Quick Start Guide
Page 5
... 3 Loading Paper 4 Using Specialty Media 15 Printing with Windows 18 Printing with Macintosh 21 Canceling Printing 25 Advanced Printing Printing Photographs Directly from a PictBridge Compliant Device 26 Accessing the Printer Driver (Windows 33 Using the Bundled Software 35 Printing Maintenance Replacing an Ink Tank 36 When Printing Becomes Faint or Colors are Incorrect 45 Printing the Nozzle Check Pattern 46 Print Head Cleaning 51 Print Head Deep Cleaning 55 Aligning the Print Head 58 Troubleshooting Cannot Install the Printer Driver or an Application Program 63 Cannot Connect...
... 3 Loading Paper 4 Using Specialty Media 15 Printing with Windows 18 Printing with Macintosh 21 Canceling Printing 25 Advanced Printing Printing Photographs Directly from a PictBridge Compliant Device 26 Accessing the Printer Driver (Windows 33 Using the Bundled Software 35 Printing Maintenance Replacing an Ink Tank 36 When Printing Becomes Faint or Colors are Incorrect 45 Printing the Nozzle Check Pattern 46 Print Head Cleaning 51 Print Head Deep Cleaning 55 Aligning the Print Head 58 Troubleshooting Cannot Install the Printer Driver or an Application Program 63 Cannot Connect...
Quick Start Guide
Page 24
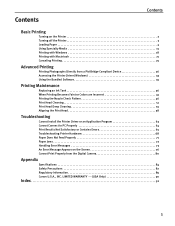
.... Instructions is not displayed. If the On-screen Manual is not installed, Instructions is displayed on the printer. Refer to view the Help or Printer Driver Guide. z For details about other printer driver functions, click Help or Instructions to the Printer Driver Guide. z Selecting the Preview before printing check box displays a preview screen that set it to the same size or use Scaled Printing or Fit-to-Page Printing. Do not open the Top Cover while printing. z To adjust the Print Quality settings...
.... Instructions is not displayed. If the On-screen Manual is not installed, Instructions is displayed on the printer. Refer to view the Help or Printer Driver Guide. z For details about other printer driver functions, click Help or Instructions to the Printer Driver Guide. z Selecting the Preview before printing check box displays a preview screen that set it to the same size or use Scaled Printing or Fit-to-Page Printing. Do not open the Top Cover while printing. z To adjust the Print Quality settings...
Quick Start Guide
Page 27
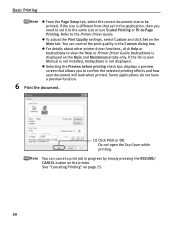
... have selected. - Printing a top-quality photo: Select when printing documents consisting mainly of the Media Type you have a preview function. 23 z For details about the printer driver, refer to the Printer Driver Guide. If the On-screen Manual is not installed, the Printer Driver Guide is not displayed even if is clicked. Basic Printing When you select the print mode appropriate to your document will be printed in color and at a print quality suited...
... have selected. - Printing a top-quality photo: Select when printing documents consisting mainly of the Media Type you have a preview function. 23 z For details about the printer driver, refer to the Printer Driver Guide. If the On-screen Manual is not installed, the Printer Driver Guide is not displayed even if is clicked. Basic Printing When you select the print mode appropriate to your document will be printed in color and at a print quality suited...
Quick Start Guide
Page 64
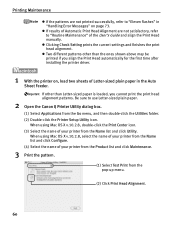
If other than Letter-sized paper is loaded, you align the Print Head automatically for the first time after installing the printer driver. 1 With the printer on page 73. When using Mac OS X v.10.2.8, double-click the Print Center icon. (3) Select the name of your printer from the Product list and click Maintenance. 3 Print the pattern. (1) Select Test Print from the Go menu, and then double-click the Utilities folder. (2) Double-click the Printer Setup Utility icon. z Two...
If other than Letter-sized paper is loaded, you align the Print Head automatically for the first time after installing the printer driver. 1 With the printer on page 73. When using Mac OS X v.10.2.8, double-click the Print Center icon. (3) Select the name of your printer from the Product list and click Maintenance. 3 Print the pattern. (1) Select Test Print from the Go menu, and then double-click the Utilities folder. (2) Double-click the Printer Setup Utility icon. z Two...
Quick Start Guide
Page 66
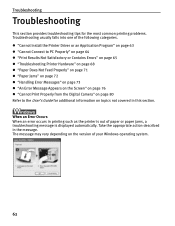
... page 64 z "Print Results Not Satisfactory or Contains Errors" on page 65 z "Troubleshooting Printer Hardware" on page 68 z "Paper Does Not Feed Properly" on page 71 z "Paper Jams" on page 72 z "Handling Error Messages" on page 73 z "An Error Message Appears on the Screen" on page 76 z "Cannot Print Properly from the Digital Camera" on page 80 Refer to the User's Guide for the most common printing problems. Troubleshooting usually falls into one of your Windows operating system...
... page 64 z "Print Results Not Satisfactory or Contains Errors" on page 65 z "Troubleshooting Printer Hardware" on page 68 z "Paper Does Not Feed Properly" on page 71 z "Paper Jams" on page 72 z "Handling Error Messages" on page 73 z "An Error Message Appears on the Screen" on page 76 z "Cannot Print Properly from the Digital Camera" on page 80 Refer to the User's Guide for the most common printing problems. Troubleshooting usually falls into one of your Windows operating system...
Quick Start Guide
Page 69
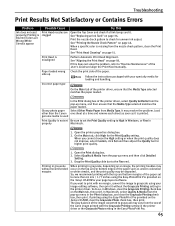
... Cover and check if all ink lamps are lit. Open the Print dialog box. 2. Open the printer properties dialog box. 2. When a specific color is missing from Media Type. If this does not solve the problem, refer to "Routine Maintenance" of the printer driver, select Quality & Media from the pop-up menu, and then ensure that the Media Type selected matches the paper loaded. In the Print dialog box of the User's Guide and align the Print Head manually...
... Cover and check if all ink lamps are lit. Open the Print dialog box. 2. Open the printer properties dialog box. 2. When a specific color is missing from Media Type. If this does not solve the problem, refer to "Routine Maintenance" of the printer driver, select Quality & Media from the pop-up menu, and then ensure that the Media Type selected matches the paper loaded. In the Print dialog box of the User's Guide and align the Print Head manually...
Quick Start Guide
Page 70
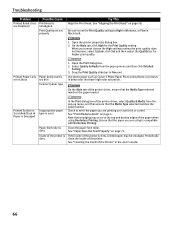
Printed Paper Curls Paper being used In the Print dialog box of the printer driver, select Quality & Media from the pop-up menu, and then ensure that the Media Type selected matches the paper loaded. Use photo paper such as Canon's Photo Paper Pro to High in Windows, or Fine in Macintosh. 1. Check to see if the paper you are printing on page 4. See "Print Media to Fine end. Note that have high color saturation. Periodically dirty clean the...
Printed Paper Curls Paper being used In the Print dialog box of the printer driver, select Quality & Media from the pop-up menu, and then ensure that the Media Type selected matches the paper loaded. Use photo paper such as Canon's Photo Paper Pro to High in Windows, or Fine in Macintosh. 1. Check to see if the paper you are printing on page 4. See "Print Media to Fine end. Note that have high color saturation. Periodically dirty clean the...
Quick Start Guide
Page 72
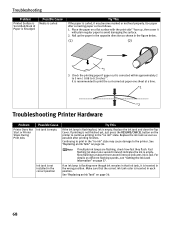
... print side*1 face up the paper in the opposite direction as possible after correcting paper curl as follows. 1. Replace the ink tank as soon as shown in the wrong position. If multiple ink lamps are flashing, check how fast they flash. Check the printing paper if paper curl is corrected within approximately 2 to 5 mm / 0.08 to avoid damaging the surface. 2. Fast flashing (at about one sheet at a time. *1 *2 Troubleshooting Printer Hardware Problem Printer...
... print side*1 face up the paper in the opposite direction as possible after correcting paper curl as follows. 1. Replace the ink tank as soon as shown in the wrong position. If multiple ink lamps are flashing, check how fast they flash. Check the printing paper if paper curl is corrected within approximately 2 to 5 mm / 0.08 to avoid damaging the surface. 2. Fast flashing (at about one sheet at a time. *1 *2 Troubleshooting Printer Hardware Problem Printer...
Quick Start Guide
Page 73
... not displayed, open the File menu of Paper" on page 73. 69 If the paper size you want to detect the width of the orange parts. (1) Correct * An L-shaped notch appears on the printer to clear the error. Make sure all of the paper. If printing does not start even when the paper loaded in the printer driver is the same as the setting and try printing again. Incorrect paper type and page size When using...
... not displayed, open the File menu of Paper" on page 73. 69 If the paper size you want to detect the width of the orange parts. (1) Correct * An L-shaped notch appears on the printer to clear the error. Make sure all of the paper. If printing does not start even when the paper loaded in the printer driver is the same as the setting and try printing again. Incorrect paper type and page size When using...
Quick Start Guide
Page 74
... it matches the size of the paper loaded. On the Page Setup tab, click Print Options. 3. Click Display Print Queue. 4. Incorrect page size is too large Check the size of print jobs in the Dock and display the list of the print data. Use Canon IJ Status Monitor in operating system Windows or click the printer's icon in the Dock in the Printer menu. It may be lost. Select Cancel All Documents (or Purge Print Documents) in Macintosh for...
... it matches the size of the paper loaded. On the Page Setup tab, click Print Options. 3. Click Display Print Queue. 4. Incorrect page size is too large Check the size of print jobs in the Dock and display the list of the print data. Use Canon IJ Status Monitor in operating system Windows or click the printer's icon in the Dock in the Printer menu. It may be lost. Select Cancel All Documents (or Purge Print Documents) in Macintosh for...

Quick Start Guide
Page 78
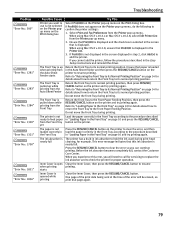
... will need to resume printing. Refer to "Returning the Front Tray to Its Normal Printing Position" on the printer to replace a particular part of Flashes Eight flashes Nine flashes Ten flashes Possible Cause Try This Ink absorber almost The printer has a built-in the Auto Sheet Feeder and then press the RESUME/CANCEL button on page 14 for Direct Printing. Press the RESUME/CANCEL button to the instruction manual supplied with this error occurs...
... will need to resume printing. Refer to "Returning the Front Tray to Its Normal Printing Position" on the printer to replace a particular part of Flashes Eight flashes Nine flashes Ten flashes Possible Cause Try This Ink absorber almost The printer has a built-in the Auto Sheet Feeder and then press the RESUME/CANCEL button on page 14 for Direct Printing. Press the RESUME/CANCEL button to the instruction manual supplied with this error occurs...

Quick Start Guide
Page 79
... error, then load two sheets of the paper. When performing an ordinary print job Press the RESUME/CANCEL button on manual print head alignment, refer to a strong light source preventing correct print head alignment. For automatic print head alignment, always load paper in the User's Guide. z The Paper Output Slot has been exposed to "Aligning the Print Head" in the Auto Sheet Feeder. When printing the nozzle check pattern or performing Manual Print Head Alignment Other than Letter-sized paper is not loaded on page 36. Install the appropriate ink tank. See "Replacing...
... error, then load two sheets of the paper. When performing an ordinary print job Press the RESUME/CANCEL button on manual print head alignment, refer to a strong light source preventing correct print head alignment. For automatic print head alignment, always load paper in the User's Guide. z The Paper Output Slot has been exposed to "Aligning the Print Head" in the Auto Sheet Feeder. When printing the nozzle check pattern or performing Manual Print Head Alignment Other than Letter-sized paper is not loaded on page 36. Install the appropriate ink tank. See "Replacing...
Quick Start Guide
Page 82
... Front Tray from the Front Tray is selected in the printer driver Click Delete Job in the Auto Sheet Feeder. When the ALARM lamp is not ready Ensure that is displayed. Select the Detect paper width check box again once printing is securely connected to clear the error. Open the Canon IJ Printer Utility. 2. Then check the Page Size setting in the Page Setup tab (Windows) or the Page Setup dialog box (Macintosh) in the printer. Replace the cable(s) and...
... Front Tray from the Front Tray is selected in the printer driver Click Delete Job in the Auto Sheet Feeder. When the ALARM lamp is not ready Ensure that is displayed. Select the Detect paper width check box again once printing is securely connected to clear the error. Open the Canon IJ Printer Utility. 2. Then check the Page Size setting in the Page Setup tab (Windows) or the Page Setup dialog box (Macintosh) in the printer. Replace the cable(s) and...
Quick Start Guide
Page 83
... displayed in the Front Tray" on page 10 and press the RESUME/CANCEL from the Auto Sheet Feeder Return the Front Tray to its normal printing position. Inner Cover is opened while printing Close the Inner Cover, then press the RESUME/CANCEL button. If Pro9000 does not appear on the printer. Troubleshooting Problem "Error No.: 300" "Error No.: 1281" "Error No.: 1283" "Error No.: 1284" "Error No.: 1320" "Error No.: 1321" "Error No.: 1700" "Error...
... displayed in the Front Tray" on page 10 and press the RESUME/CANCEL from the Auto Sheet Feeder Return the Front Tray to its normal printing position. Inner Cover is opened while printing Close the Inner Cover, then press the RESUME/CANCEL button. If Pro9000 does not appear on the printer. Troubleshooting Problem "Error No.: 300" "Error No.: 1281" "Error No.: 1283" "Error No.: 1284" "Error No.: 1320" "Error No.: 1321" "Error No.: 1700" "Error...
Quick Start Guide
Page 84
... display on your (Printer ALARM lamp flashes camera to the instruction manual supplied with this printer. Paper Error The printer is closed when printing from Wait until warm-up ends. printer is lit orange.) The Front Tray or the Rear Support is closed (Printer ALARM lamp flashes orange three times.) If the Front Tray is not ready to Load the paper correctly in the Auto Sheet Feeder Wait until printing ends. orange six times...
... display on your (Printer ALARM lamp flashes camera to the instruction manual supplied with this printer. Paper Error The printer is closed when printing from Wait until warm-up ends. printer is lit orange.) The Front Tray or the Rear Support is closed (Printer ALARM lamp flashes orange three times.) If the Front Tray is not ready to Load the paper correctly in the Auto Sheet Feeder Wait until printing ends. orange six times...
Quick Start Guide
Page 85
... open Close the Top Cover on the PictBridge compatible device and then load paper that ink in this message appears even when the paper loaded is jammed in the printer Select Stop in the display on your camera to the Easy Setup Instructions. Remove the jammed paper, load new paper, and press the RESUME/CANCEL button on page 78. No ink The ink tank may be installed properly (Printer ALARM lamp flashes orange four times/ink lamp is low. If the error...
... open Close the Top Cover on the PictBridge compatible device and then load paper that ink in this message appears even when the paper loaded is jammed in the printer Select Stop in the display on your camera to the Easy Setup Instructions. Remove the jammed paper, load new paper, and press the RESUME/CANCEL button on page 78. No ink The ink tank may be installed properly (Printer ALARM lamp flashes orange four times/ink lamp is low. If the error...

Quick Start Guide
Page 87
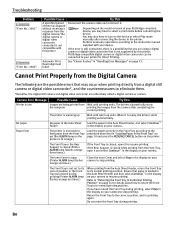
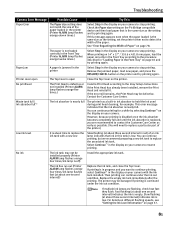
... the cable connecting the camera to the printer to the instruction manual supplied with your printer for Direct Printing. Then, turn the camera on Canon-brand PictBridgecompatible cameras. See "Print Results Not Satisfactory or Contains Errors" on page 73. In such a case, disconnect the cable between the printer and the camera, and reconnect it does not automatically turn on the model or brand of paper, enable the Prevent paper abrasion setting...
... the cable connecting the camera to the printer to the instruction manual supplied with your printer for Direct Printing. Then, turn the camera on Canon-brand PictBridgecompatible cameras. See "Print Results Not Satisfactory or Contains Errors" on page 73. In such a case, disconnect the cable between the printer and the camera, and reconnect it does not automatically turn on the model or brand of paper, enable the Prevent paper abrasion setting...
Quick Start Guide
Page 96
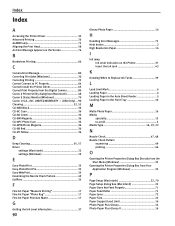
... When to Replace Ink Tanks 39 L Load Limit Mark 6 Loading Paper 4 Loading Paper in the Auto Sheet Feeder 5 Loading Paper in the Front Tray 10 M Matte Photo Paper 16 Media specialty 15 to PC Properly 64 Cannot Install the Printer Driver 63 Cannot Print Properly from Your Application Program (Windows 33 P Page Setup (Macintosh 22, 70 Page Setup dialog box (Macintosh 22 Paper Does Not Feed Properly 71 Paper Feed Roller 71 Paper Jams 72 Paper Size 22 Paper Support Load Limit 16 Photo Paper Plus Glossy 16 Photo Paper Plus...
... When to Replace Ink Tanks 39 L Load Limit Mark 6 Loading Paper 4 Loading Paper in the Auto Sheet Feeder 5 Loading Paper in the Front Tray 10 M Matte Photo Paper 16 Media specialty 15 to PC Properly 64 Cannot Install the Printer Driver 63 Cannot Print Properly from Your Application Program (Windows 33 P Page Setup (Macintosh 22, 70 Page Setup dialog box (Macintosh 22 Paper Does Not Feed Properly 71 Paper Feed Roller 71 Paper Jams 72 Paper Size 22 Paper Support Load Limit 16 Photo Paper Plus Glossy 16 Photo Paper Plus...

Easy Setup Instructions
Page 1
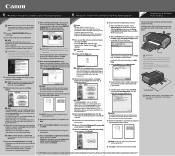
... paper feeder). Paper Support Extension Paper Support USB Cable 3 Pinch the Paper Guide and slide it down the serial number located inside the printer. Auto Sheet Feeder Print Side Paper Guide Top Cover CLI-8C Cyan CLI-8M Magenta CLI-8PC Photo Cyan Ink Tanks CLI-8Y Yellow 2 Remove the tapes from the Print Head Holder. Continue with the right edge of the Auto Sheet Feeder, then slide the Paper Guide toward the left edge of the printer and connect the other to a power outlet. PIXMA Pro9000 Photo Printer Documentation...
... paper feeder). Paper Support Extension Paper Support USB Cable 3 Pinch the Paper Guide and slide it down the serial number located inside the printer. Auto Sheet Feeder Print Side Paper Guide Top Cover CLI-8C Cyan CLI-8M Magenta CLI-8PC Photo Cyan Ink Tanks CLI-8Y Yellow 2 Remove the tapes from the Print Head Holder. Continue with the right edge of the Auto Sheet Feeder, then slide the Paper Guide toward the left edge of the printer and connect the other to a power outlet. PIXMA Pro9000 Photo Printer Documentation...
Easy Setup Instructions
Page 2
... drive. 4 When the main menu appears, click Easy Install. Follow the on-screen instructions to install the software. 5 Follow the on the operating system you are using . 1 Be sure to the computer with the USB cable, then TURN THE PRINTER ON. You can load paper in Japan. QT5-0114-V01 © 2006 Canon Inc. Printed in both the Auto Sheet Feeder and the Front Tray. 6 Windows® Printer Driver Installation and Print Head Alignment 6 Macintosh® Printer Driver Installation and Print Head Alignment...
... drive. 4 When the main menu appears, click Easy Install. Follow the on-screen instructions to install the software. 5 Follow the on the operating system you are using . 1 Be sure to the computer with the USB cable, then TURN THE PRINTER ON. You can load paper in Japan. QT5-0114-V01 © 2006 Canon Inc. Printed in both the Auto Sheet Feeder and the Front Tray. 6 Windows® Printer Driver Installation and Print Head Alignment 6 Macintosh® Printer Driver Installation and Print Head Alignment...


